If you get tired of Chrome OS Flex, you can uninstall it. However, Google hasn’t specified any official method to remove Chrome OS Flex. Here, MiniTool tells you how to delete Chrome OS Flex and reinstall Windows step by step.
Reasons for Uninstalling Chrome OS Flex
Chrome OS Flex, a lightweight operating system, can transform your current Windows or Mac computer into a functional productivity, entertainment, and web-browsing machine. Furthermore, it adds multiple features and apps like Google Assistant, Smart Lock, Instant Tethering, etc.
All existing data that is currently on the device will be erased after you install Chrome OS Flex. What’s worse, it can’t be recovered forever. To try Chrome OS Flex while keeping the existing data and OS, directly run Chrome OS Flex from the USB installer without actually installing it on your hard drive.
However, you may want to remove Chrome OS Flex due to some reasons. If you install Chrome OS or Chrome OS Flex on a non-certified computer, you may run into some bugs and issues. For instance, you might experience Wi-Fi incompatibility, trackpad issues, Bluetooth disconnection, audio issues, and other annoying issues on Chrome OS Flex.
Besides, Chrome OS Flex devices don’t support dual-boot. Hence, you have to remove Chrome OS Flex and install Windows if you want to try other systems. How to delete Chrome OS Flex and reinstall Windows? There are 2 ways to do that.
Bluetooth Disappeared/Missing Windows 10? [6 Selected Fixes]
#1. Delete Chrome OS Flex and Reinstall Windows via Bootable Drive
Google doesn’t offer steps to uninstall Chrome OS Flex. The good news is that Chrome OS Flex will be removed after you install a different operating system on the device. Here’s the full guide to uninstall Chrome OS Flex and reinstall Windows.
Stage 1: Download the ISO File of the Desired Windows System
First and foremost, you should download the ISO file of the target Windows system from Microsoft’s official website. Alternatively, you can also get the ISO file from Windows ISO Downloader. According to your needs, click on the given links to download the Windows ISO file.
- Windows 7 ISO Download (32 & 64 Bit)
- Windows 7 All in One Activated ISO Download
- Windows 10 Home ISO Download (32 & 64 Bit)
- Windows 10 All In One Preactivated ISO (32 & 64 Bit)
- Windows XP ISO Download (32 & 64 Bit)
Stage 2: Create a Bootable Drive
You can create bootable drives by using USB bootable software like Rufus, Windows USB/DVD Download Tool, WinToUSB, Universal USB Installer, Windows Bootable Image Creator, Chromebook Recovery Utility, etc.
Step 1: Move to the official website of Chromebook Recovery Utility and then click the Add to Chrome button.
The button can be found at the upper right corner or the bottom section of the web page.

Step 2: Click Add app in the pop-up window and then click on the icon of Chromebook Recovery Utility on the screen.
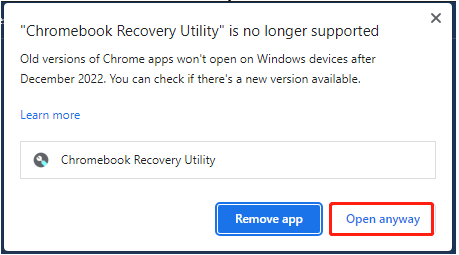
You may be prompted with the window below after clicking on the icon of the utility. As the notice states, Chromebook Recovery Utility is no longer supported. Since old versions of Chrome apps won’t open on Windows devices after December 2022, you need to check if there’s a new version available. If you receive this window, click Open anyway to continue.
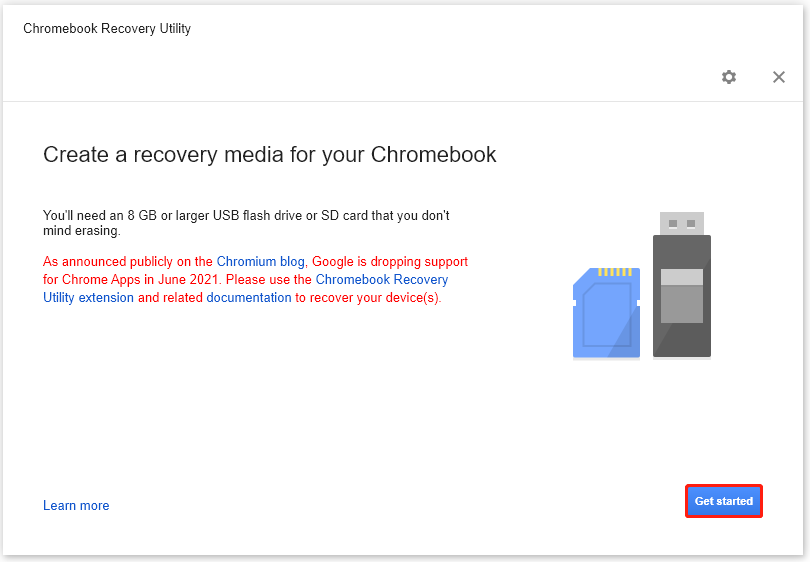
Step 3: In the Chromebook Recovery Utility window, click Get started to move on.
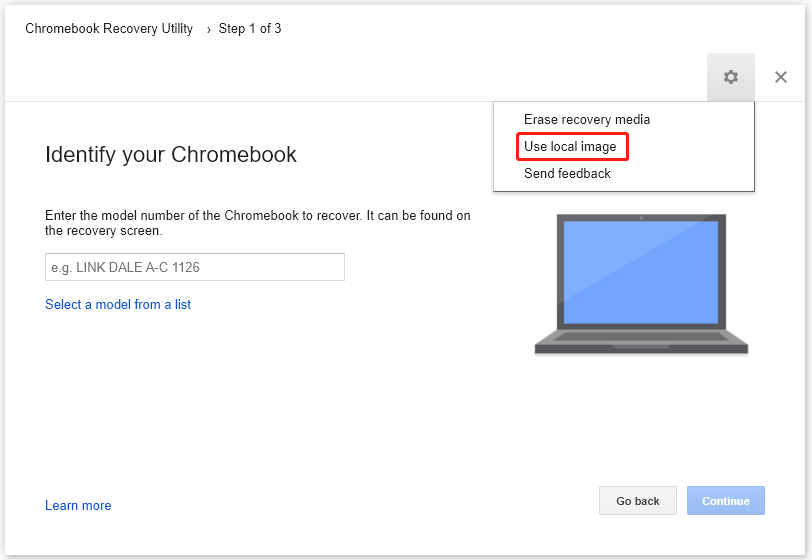
Step 4: Click on the gear icon at the upper right corner of the window and then tap Use local image on the prompted menu. Connect a USB flash drive or SD card to your computer.
Step 5: In the prompted window, set the file type to All Files and then find & click on the downloaded ISO file on your computer. After that, click Open.
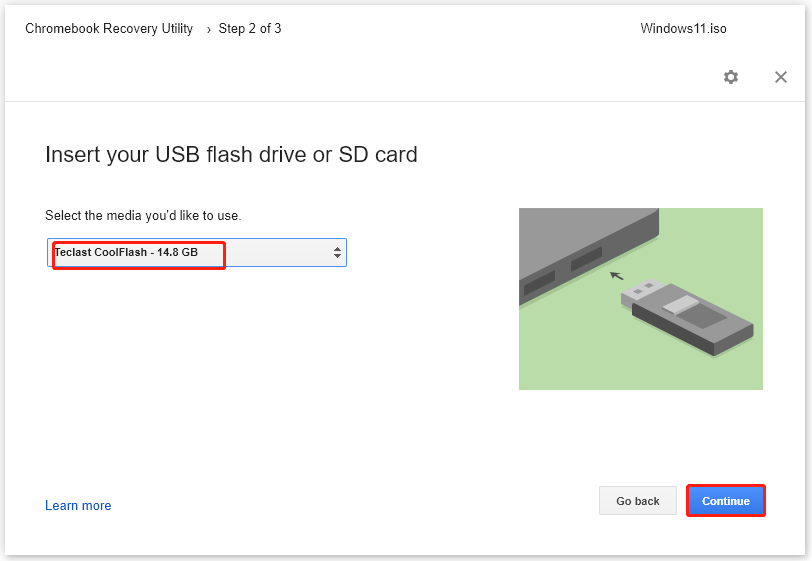
Step 6: After choosing your USB drive or SD card from the drop-down menu, click on the Continue button.
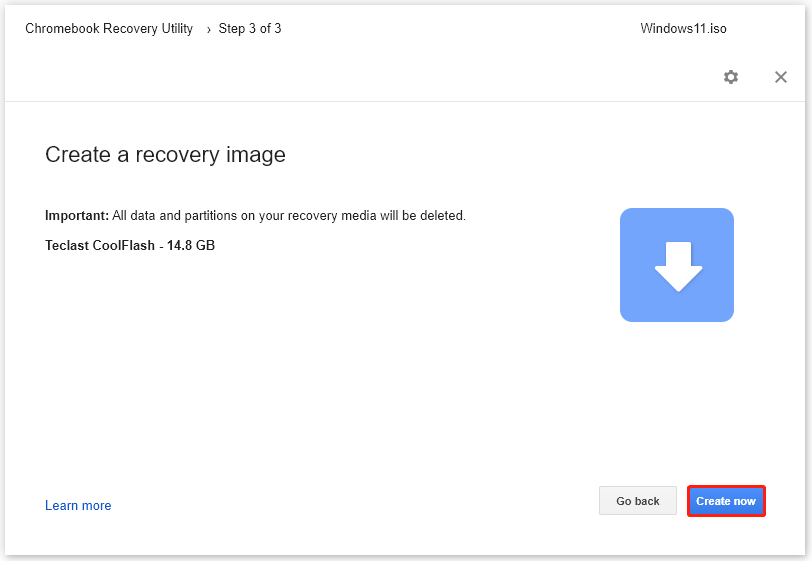
Step 7: Click Create now and then the Chromebook Recovery Utility will automatically create a recovery image for you.
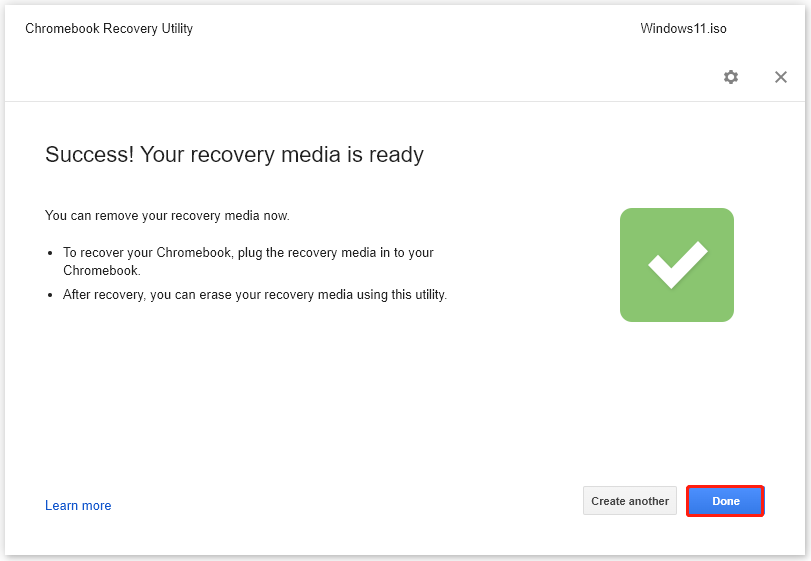
Step 8: After the recovery media is made successfully, click Done to finish the process.
If you are stuck on Chromebook Recovery Utility issues, read this post in which some FAQs related to this app are listed: [Fixed]: Common Chromebook Recovery Utility Not Working Issues
Stage 3: Back up Data
As mentioned before, Chrome OS Flex will be deleted after you install another system on the device. Therefore, you need to back up your important data before installing the new system. You can do that by using a professional data backup tool or directly transferring the data to an external hard drive.
Stage 4: Install Windows via the Bootable USB Drive
Step 1: Plug the bootable USB drive into the Chrome OS Flex machine and then shut down the device.
Step 2: To enter the boot menu of your PC, keep pressing the boot key (F2, F9, F12, or other keys) after you press the Power button.
Step 3: Choose the USB drive on the boot menu and hit Enter to confirm the operation.
Step 4: Then you will see the Windows Installer on the screen. You just need to click Install now.
Step 5: Tap I don’t have a product key on the next window.
Step 6: Click Custom: Install Windows only (advanced).
Step 7: In the next window, you need to choose a partition to install the new system. If there are multiple sections, click on them and tap Delete. When there is only one partition left, click on it and click Create to create the partitions needed to run Windows.
Step 8: After you click Next, your Windows system will get installed on your computer.
Step 9: When the installation process ends, your PC will restart and boot into the setup screen. Then follow the on-screen instructions to sign in to your Microsoft account.
Now, the process to uninstall Chrome OS Flex and install Windows ends. You can enjoy the newly installed Windows system freely.
#2. Delete Chrome OS Flex and Reinstall Windows via System Migration Tool
Though you can remove Chrome OS Flex and install Windows with the steps above, the process is complicated and time-consuming. To simplify the process, you can apply MiniTool Partition Wizard – a system migration tool. Its Migrate OS to SSD/HDD feature enables you to migrate a proper running system to an SSD/HDD.
By using this feature, you don’t have to download ISO, make a bootable USB drive, and set up installation settings step by step. On the contrary, you can directly get a configured Windows system without installing it. Besides, you will uninstall Chrome OS Flex during the migration process. So, you should back up data like what you do in the first method before starting the migration operation.
Here’s the tutorial on how to uninstall Chrome OS Flex and install Windows via MiniTool Partition Wizard.
Step 1: Connect the hard drive with Chrome OS Flex installed to a running Windows PC.
As MiniTool Partition Wizard only works on Windows PCs, you need to perform the migration process on a Windows device.
Step 2: Download and install this system migration tool on your Windows device by clicking the button below and following the on-screen instructions.
MiniTool Partition Wizard DemoClick to Download100%Clean & Safe
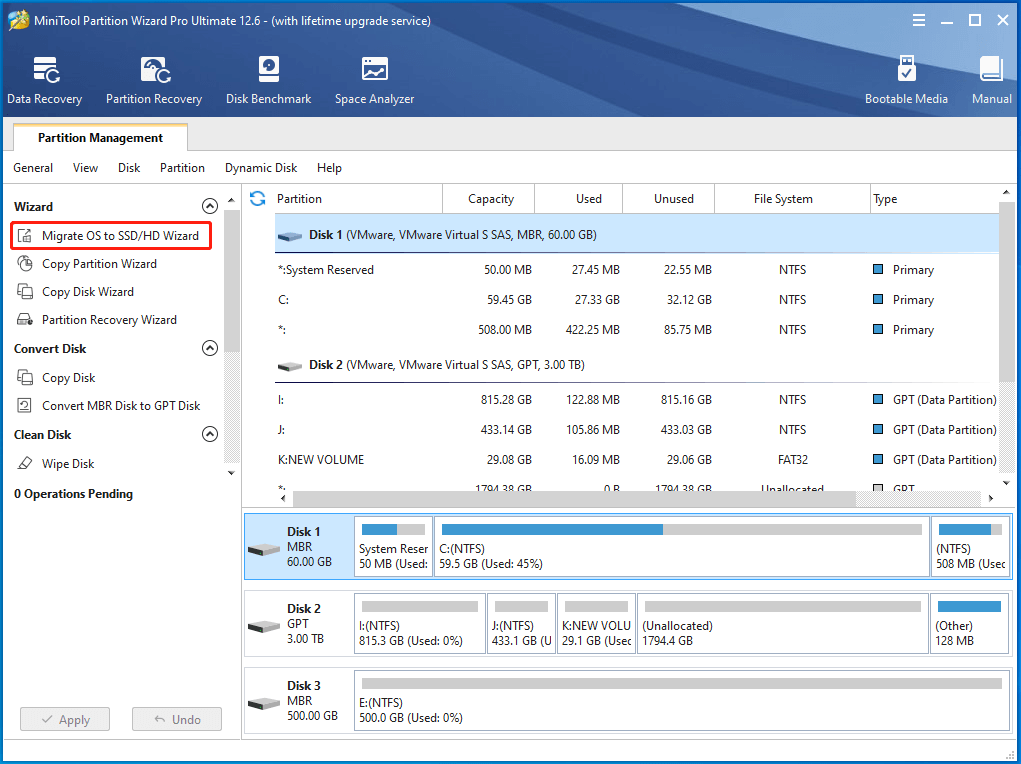
Step 3: After entering the main interface of the MiniTool Partition Wizard, tap Migrate OS to SSD/HD Wizard in the left panel.
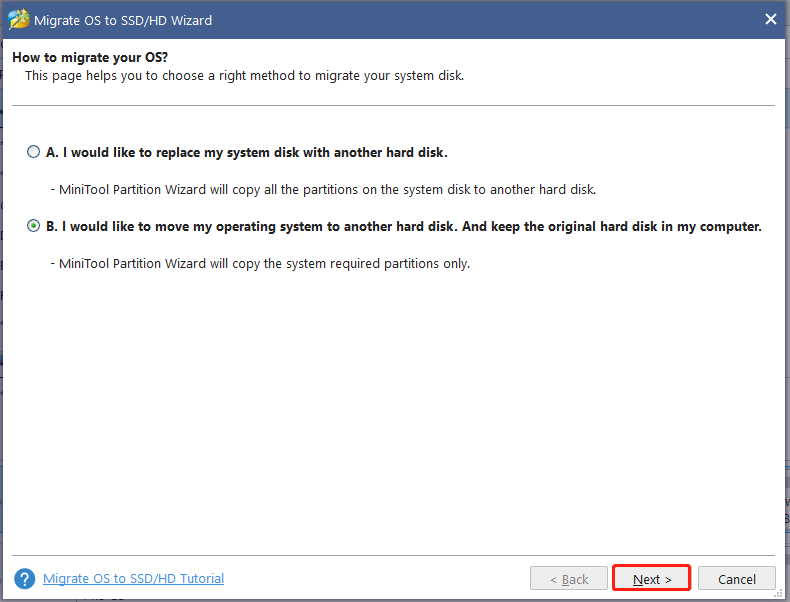
Step 4: Choose a migration method from the given options and then click Next. As you only need to move the system to the connected drive, you should select the second option.
To replace the system disk with another hard disk, pick the first option which works the same as Copy Disk feature.
Step 5: Select the destination disk in the next window and click on the Next button to continue. Here, you should click the newly connected hard disk.
All the data including the Chrome OS Flex on the destination disk would be deleted during the migration process. If you have backed up the data, click Yes to confirm the operation.
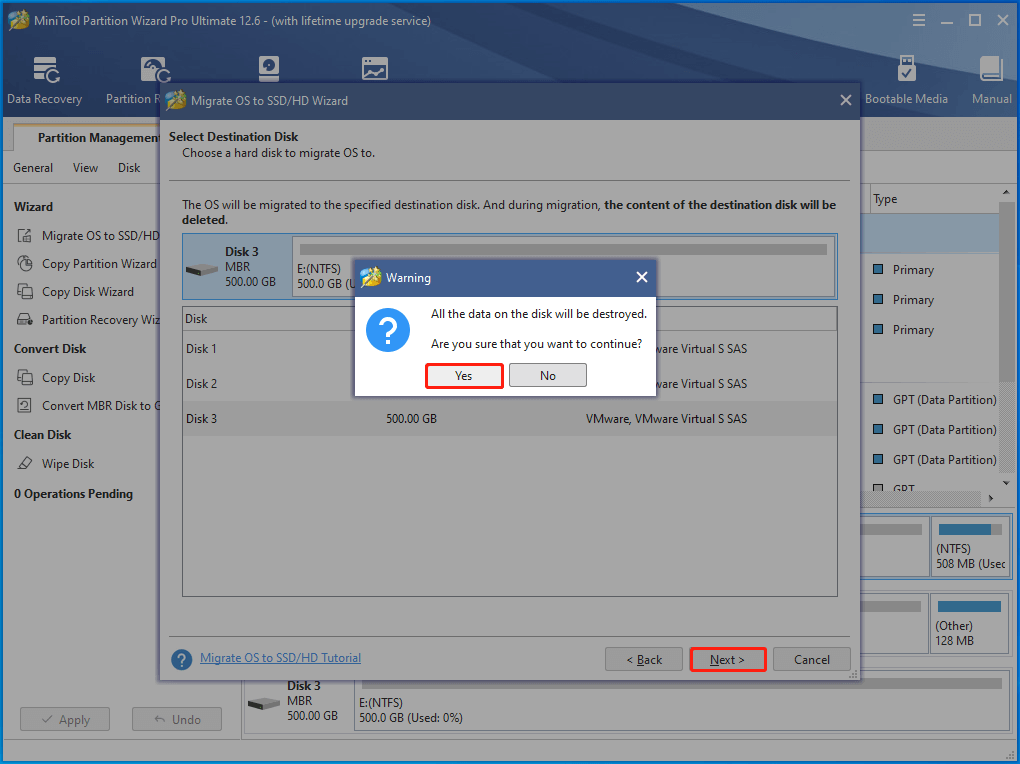
Step 6: Configure copy options based on your needs and click Next.
- Fit partitions to entire disk: All the migrated partitions will occupy the entire target disk.
- Copy partitions without resizing: The size of the migrated partitions will stay the same on the destination disk without changes.
- Align partitions to 1MB: If the destination disk is SSD, it is recommended to pick this option.
- Use GUID Partition Table for the target disk: Check this option if the connected disk is a GPT style.
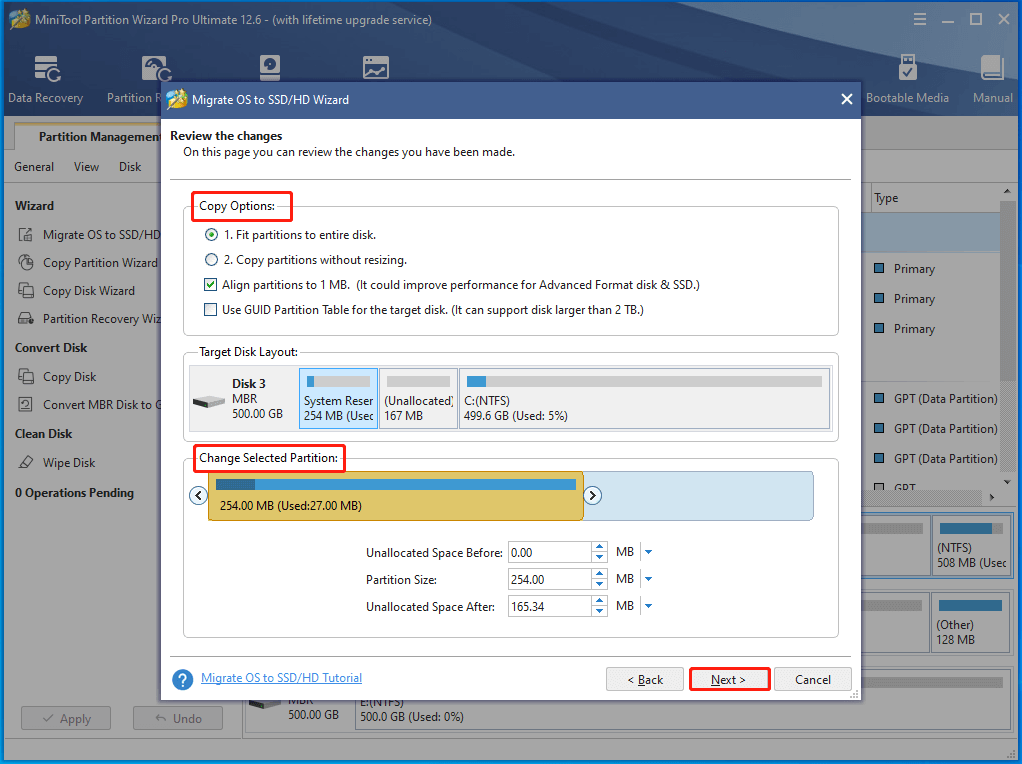
Step 7: After reading the boot note, click Finish to save changes.
Step 8: Click Apply to execute the operation. Put the hard drive to your original device after the migration process ends. Then boot up your computer to experience the Windows system.
Bottom Line
Here are two ways to uninstall Chrome OS Flex and install Windows in this post. You can either manually install the system with the bootable USB drive or migrate a Windows system from another computer. Based on your preference, pick a method.
If you have other methods to delete Chrome OS Flex and reinstall Windows, you are able to share them with us in the following comment area. For any issues with MiniTool Partition Wizard, contact us by sending an email via [email protected]. We will make a reply as soon as possible.
![Partition Not Showing up in Windows 11/10 [Focus on 3 Cases]](https://images.minitool.com/minitool.com/images/uploads/2022/12/partition-not-showing-up-in-win11-thumbnail.jpg)
User Comments :