Disk Cleanup Won’t Open Windows 10
Disk Cleanup is one of the Windows built-in cleanup tools that is included with Windows 10/8/7 to help users remove unnecessary files on computers to free up disk space. To maintain or improve the computer performance, it is recommended to run the tool at least once a month. However, some users complain that Windows tools cannot be used or even opened on their computers.
Disk Cleanup Won’t Open: Disk Cleanup opened once and after clicking ‘Clean System Files’ it closed. When I try to run it by clicking on it in the start menu nothing happens. — answers.microsoft.com
Why won’t Disk Cleanup open or work? Many factors should be to blame for Disk Cleanup not opening or working. No matter what causes the issue in your case, you can try the following solutions one by one until Disk Cleanup works properly again.
Four Solutions to Disk Cleanup Not Opening/Working
- Delete the temporary files
- Run Windows Update troubleshooter
- Run System File Checker
- Use DISM tool
Now follow the guides below to apply the four solutions one by one until the issue “Disk Cleanup won’t open Windows 10” gets solved.
Fix 1: Delete the Temporary Files
If there’re some corrupt temporary files, Disk Cleanup won’t open on Windows 10. So, remove the temporary files on your computer. Here are the steps to fix “Disk Cleanup not working Windows 10”:
Step 1: Type %temp% in the Windows search bar and then hit the Enter key.
Step 2: Select all the temporary files, then right-click them, and choose the Delete option.
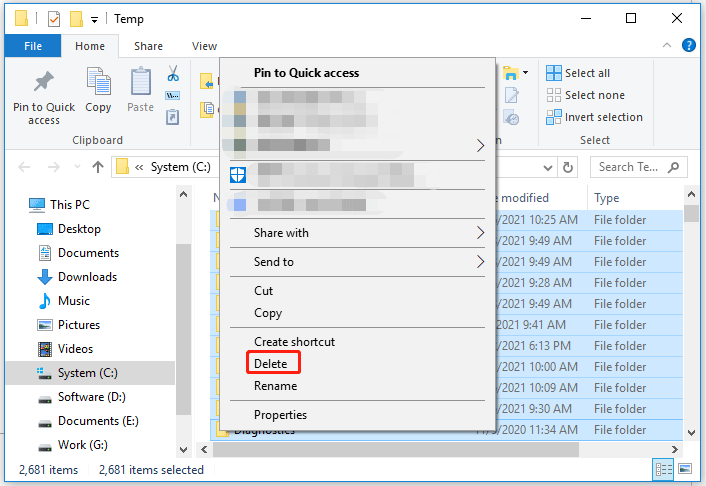
Step 3: Restart your computer and then try launching Disk Cleanup.
Does the issue disappear? If not, move to the next fixes.
Fix 2: Run Windows Update Troubleshooter
If Disk Cleanup is still refused to open or work, now try run Windows Update troubleshooter. Here are the steps:
Step 1: Press Windows + I to launch Windows Settings.
Step 2: Once inside the Windows Settings window, choose the Update & security option.
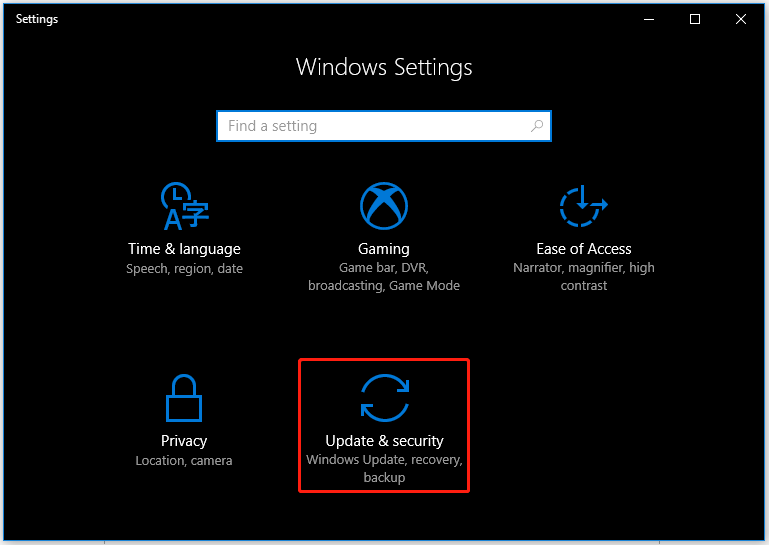
Step 3: Click the Troubleshoot on the left pane, then click the Windows Update on the right pane, and finally click the Run the troubleshooter button.
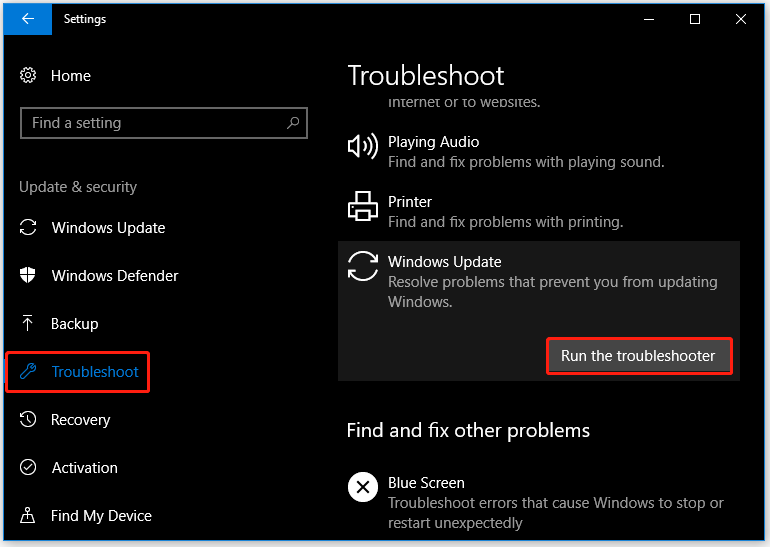
Step 4: The troubleshooter will start detecting problems. Once the detecting process ends, follow the on-screen prompts to complete the troubleshooting. Then, restart tour compute and check if the issue “Disk Cleanup not opening” is solved.
Fix 3: Run System File Checker
The third solution is running System File Checker. As we know, System File Checker is a Microsoft Windows tool that allows users to scan for and restore corruptions in Windows system files. If corrupted system files cause the issue “Disk Cleanup not opening or working Windows 10, running the tool should be helpful.
To run System File Checker, you should perform the following steps:
Step 1: Run Command Prompt as administrator.
- Type Command Prompt in the Windows search bar.
- Right-click the search result and choose Run as administrator.
Step 2: Type the sfc /scannow command on the Command Prompt window and hit the Enter key.
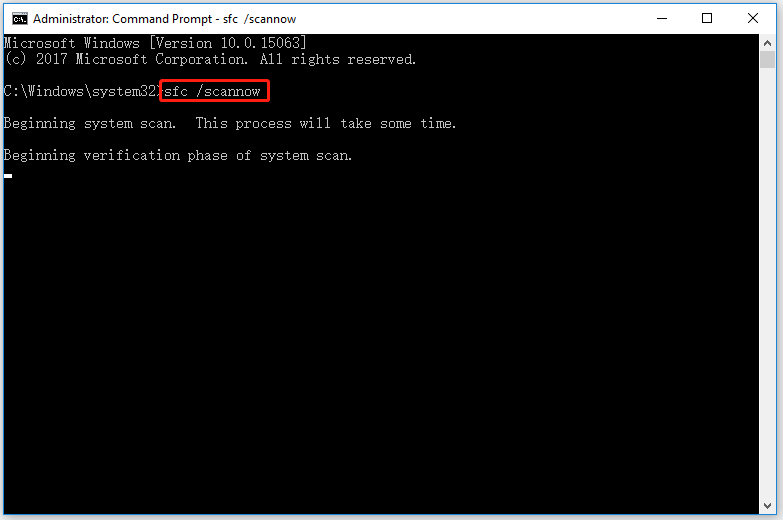
Step 3: When System File Checker finishes the task, reboot your computer to see if the issue “Disk Cleanup not opening/working” is resolved.
If the issue “Disk Cleanup not opening/working” still runs on your computer, then try the next solution.
Fix 4: Run DISM
Now, it is recommended that you try the DISM tool. DISM (Deployment Image Servicing and Management) is a command-line tool, so you need to use it through Command Prompt.
Here is how to run DISM to fix “Disk Cleanup not opening or working”:
Step 1: Run Command Prompt as administrator.
- Type Command Prompt in the Windows search bar.
- Right-click the search result and choose Run as administrator.
Step 2: Type the following command on the Command Prompt window and hit the Enter key.
DISM /Online /Cleanup-Image /RestoreHealth
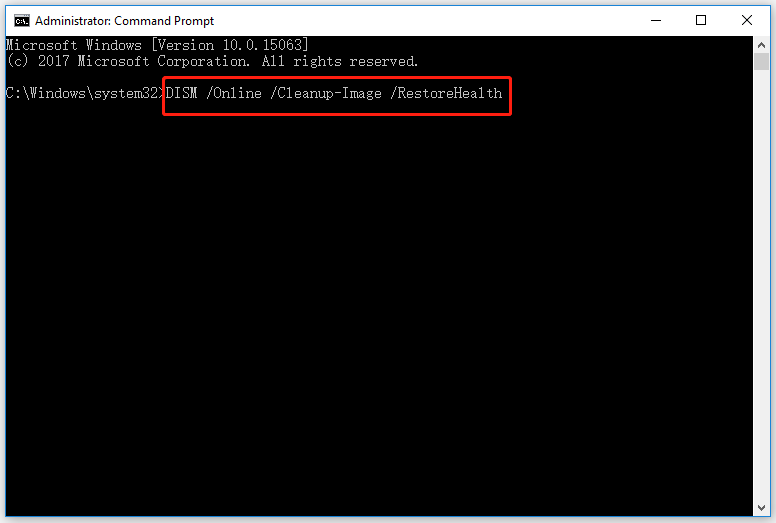
Step 3: Wait for the result of the DISM tool. After that, reboot your computer and try running Disk Cleanup again.
If Disk Cleanup works properly again, you can clean up your disk using it.
Here’s the Stopgap: Using the Disk Cleanup Alternative
If Disk Cleanup still refuses to open or work, then try the Disk Cleanup alternative. Here MiniTool Partition Wizard is recommended for file cleaning. As a professional partition manager, MiniTool Partition Wizard can analyze your disk usage and give a detailed report on disk usage, and based on that report, there should be a low risk of mis-deletion.
Here is how to safely remove files via MiniTool Partition Wizard.
Step 1: Get MiniTool Partition Wizard and launch it to access its main interface.
MiniTool Partition Wizard FreeClick to Download100%Clean & Safe
Step 2: Click the Space Analyzer feature on the toolbar.
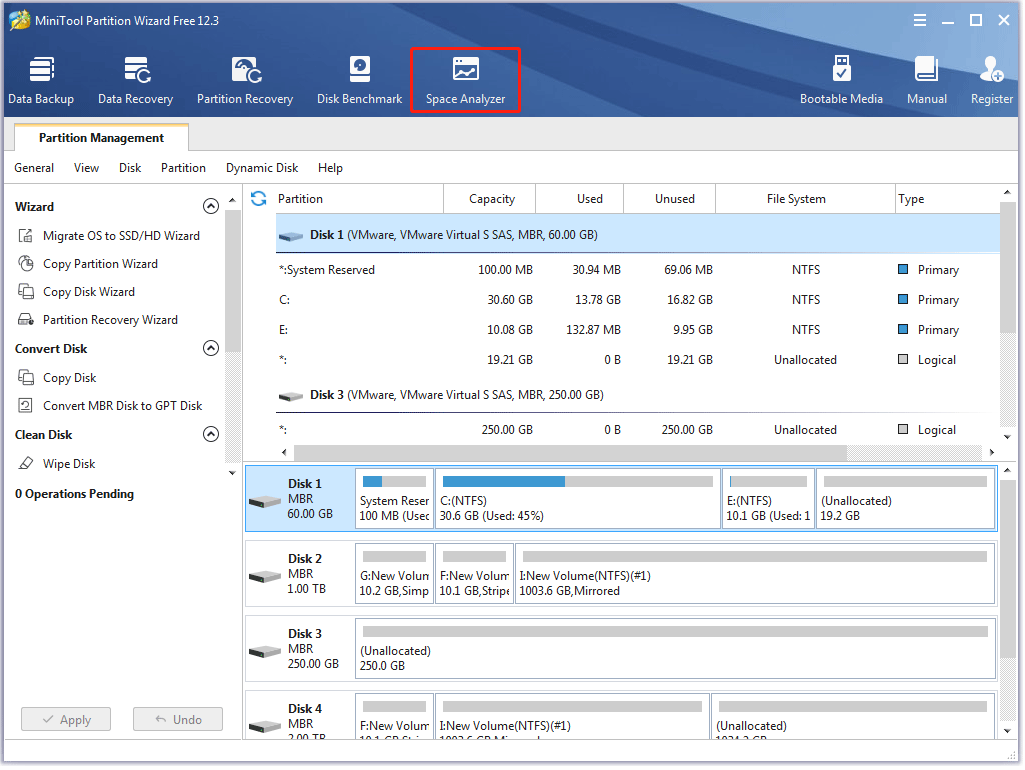
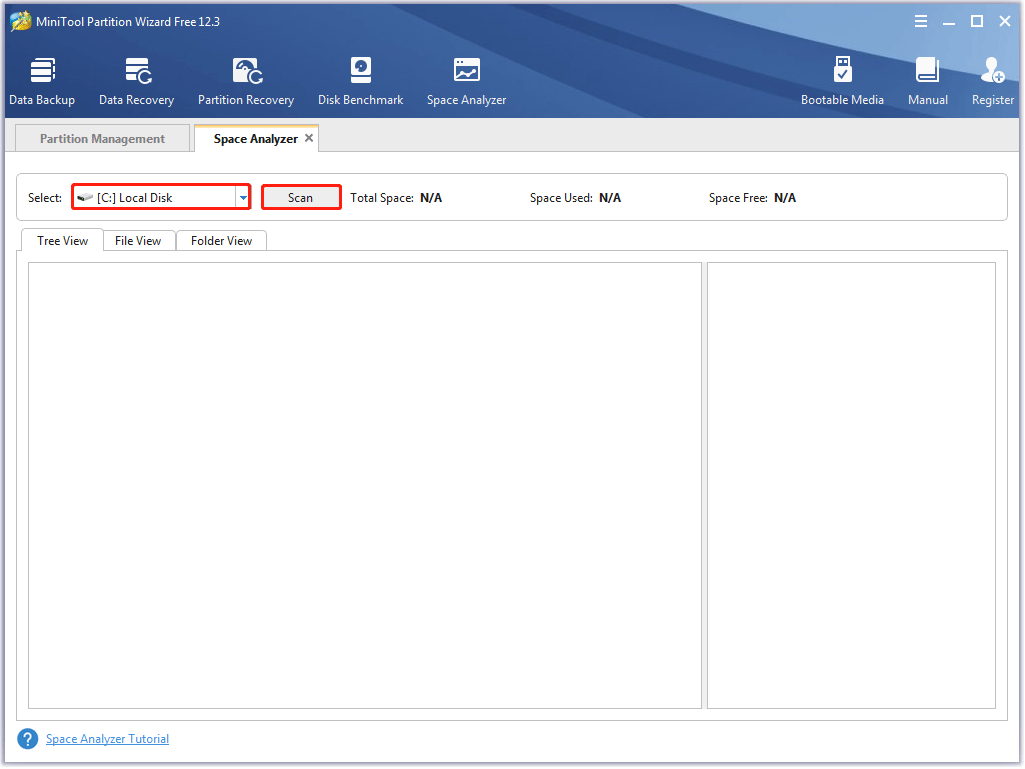
Step 3: Choose the partition to be analyzed and the software will automatically scan the partition.
Step 4: View the result and right-click the file to choose the Delete (to Recycle Bin) option or the Delete (Permanently) option.
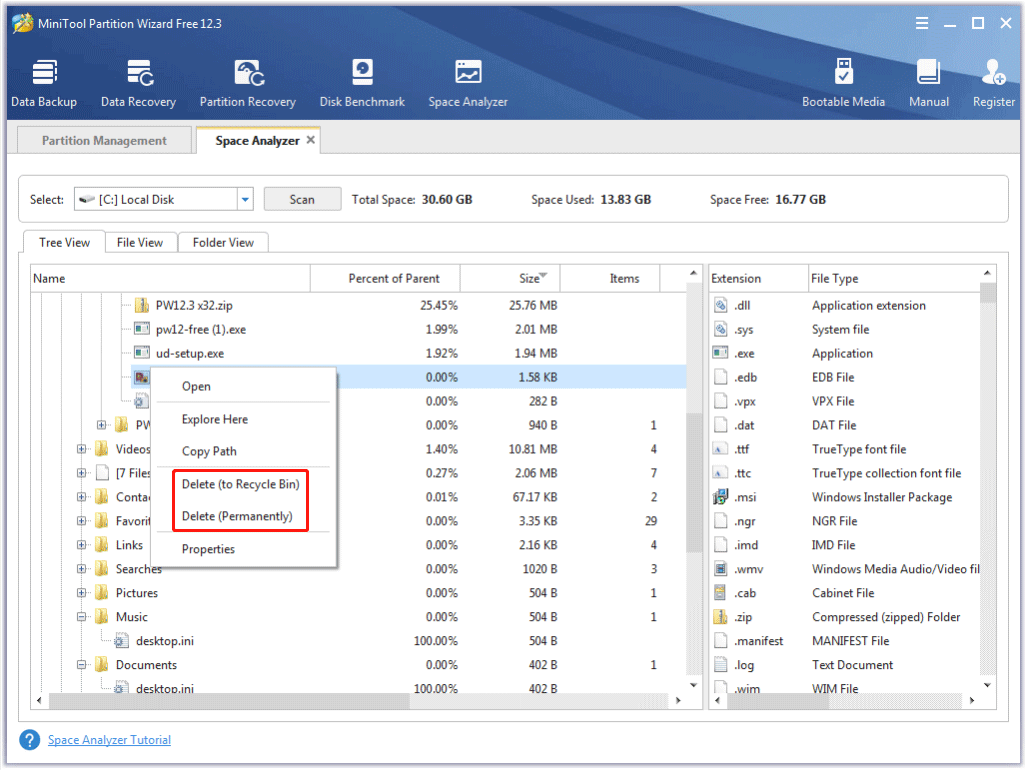
This is how to clean a partition through MiniTool Partition Wizard. When Disk Cleanup does not open or work, you can try the program to delete the unimportant files manually.
Bonus: Why Not Expand Your Drive
When a drive nearly gets full, we always choose to free up the disk using Disk Cleanup and the Windows utility provides lots of help. However, freeing up disk space might no longer be the first choice if you run into the issue “disk space full” frequently, and in this case, the best choice is to expand the full drive.
To expand the drive, you can still try MiniTool Partition Wizard — its Extend Partition feature can help you expand your partition as long as there is free space on the disk where the partition is.
Here is how to expand a partition using MiniTool Partition Wizard.
Step 1: Get MiniTool Partition Wizard and launch it to get its main interface.
MiniTool Partition Wizard FreeClick to Download100%Clean & Safe
Step 2: Highlight the partition to be expanded and then click the Expand Partition feature from the left pane.
Step 3: In the Extend Partition window, select where to obtain free space — you can choose one of the other existing partitions or unallocated space, then determine how much space you want to add to the target partition, and finally click the OK button.
Step 4: Click the Apply button on the program interface to execute the changes.
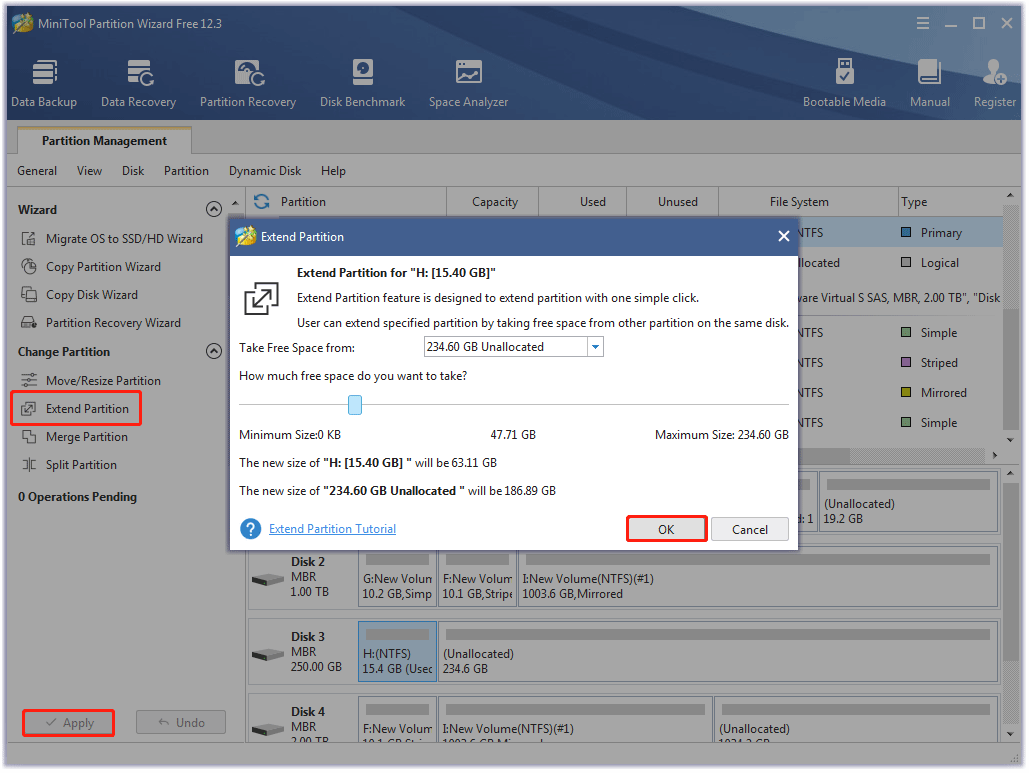
This is how to expand a partition with MiniTool Partition Wizard. If your partition always goes full, you can perform the above steps.
Wait for Your News
Have you solved the issue “Disk Cleanup not opening or working”? Wait for your good news! If you find other solutions to the issue, please share them with us in the comment zone.
During reading, if you find something unclear in this post, please leave them in the comment zone and we will contact you as soon as possible. If you have some suggestions for the Disk Cleanup alternative — MiniTool Partition Wizard, please contact us via [email protected].
Disk Cleanup Won’t Open FAQ
There are many ways to open Disk Cleanup and the common five ways are displayed below.
Way 1: Type disk cleanup into the Windows search bar and then hit the Enter key.
Way 2: Open File Explorer, then right-click a drive and choose the Properties option, and finally click the Disk Cleanup button.
Way 3: Go to the path: Control Panel > System and Security > Administrative Tools > Disk Cleanup.
Way 4: Open Command Prompt or Windows PowerShell, type the cleanmgr command, and hit the Enter key.
Way 5: Press Windows + R to launch the Run dialog box, type cleanmgr, and click the OK button.
User Comments :