This MiniTool guide focuses on DiskPart clean vs clean all, explaining their functionalities, key differences, and data erasure levels. It clarifies why data deleted by clean may be recoverable, while clean all makes recovery extremely difficult in most cases. It also summarizes common issues and risks when running these commands.
“DiskPart clean vs clean all” is frequently discussed in forums, especially regarding their differences in data erasure levels and practical use cases.
I’ve been using DiskPart clean to wipe disks, but I’m confused about the difference between it and clean all. From what I understand, they remove disk partitions and files contained. Can anyone explain in more detail? Is clean all safer if I want to prevent data recovery?reddit.com
This post provides a thorough explanation of these two commands. Before comparing them in detail, it is necessary to understand the DiskPart utility and the purpose of the clean and clean all commands.
A Brief Introduction to DiskPart Clean and Clean All
What Is DiskPart
DiskPart is a built-in command-line disk management utility in Windows, which is used to manage disks, partitions, and volumes. Compared with the graphical Disk Management tool, DiskPart offers greater flexibility and more control over your disks.
DiskPart allows you to clean disks, convert the partition table, change disk properties, and set active partitions by executing specific commands.
Among these commands, clean and clean all are two of the most commonly used options.
What DiskPart Clean and Clean All Are Designed For
Both the clean and clean all commands are designed to remove partition information and data on a disk, returning it to an Unallocated or Not Initialized state.
Although they have a similar purpose, they work differently and are used in different situations.
DiskPart Clean VS Clean All: In-Depth Differences
The DiskPart clean command quickly removes all partitions and files on a disk, but the actual data remains on the disk and may still be recoverable.
In contrast, the clean all command overwrites every sector of the selected disk, making file recovery extremely difficult in most practical scenarios.
The main difference between these two commands is the data erasure method.
In addition, the following sections compare DiskPart clean and clean all in terms of functionality, execution time, disk health impact, and use cases.
Functionality
What does DiskPart clean do:
The clean command deletes only the volume formatting and file system metadata on the selected disk. It does not overwrite the actual data stored on the hard drive.
What does DiskPart clean all do:
The clean all command not only removes partition information but also writes zeros to every sector of the selected disk. This process overwrites all data, file system structures, and hidden sector information.
Clean Duration
How long does clean take:
The clean command executes very quickly, usually taking a few seconds even for large disks, because it only removes partition and file system information.
How long does clean all take:
The clean all command takes longer, often lasting several hours for large-capacity disks. The disk read and write speeds also affect the execution time, as the clean all command writes zeros to each sector.
Therefore, executing clean all on SSDs is usually faster than running it on HDDs because SSDs have faster read/write speeds.
Data Erasure Level
Clean:
The DiskPart clean command deletes data at a logical level. It only removes partition and file system information, while the actual data remains intact.
Clean all:
Clean all performs data erasure at the physical level by overwriting all original data with zeros. Both partition information and stored files are permanently erased.
Data Recovery Difficulty
Clean:
Files deleted by the clean command can often be recovered by using professional data recovery software.
Such tools can scan the disk sectors that have not been overwritten and find the remaining data. Furthermore, some partition recovery tools can rebuild the original partition structure and restore the partition along with files.
Clean all:
After executing the clean all command, data recovery is generally impossible even for professional data recovery agencies, as the disk contains no identifiable information.
Common Use Cases
Clean:
Clean is often used in situations where secure data erasure is not required, such as:
- Remove a corrupted or damaged partition structure.
- Convert MBR to GPT.
- Repartition the disk.
- Prepare a disk for system reinstallation or other uses.
Clean all:
Clean all is typically used when complete data destruction is needed, such as:
- Erase files before hard drive disposal.
- Remove sensitive information before selling, lending, or gifting a hard disk.
- Meet specific data erasure requirements in other scenarios.
Impact on Disk Health (HDD VS SSD)
Clean:
DiskPart clean is safe for both HDDs and SSDs because it only removes partition information without writing zeros sector by sector.
Clean all:
Clean all overwrites every sector on the selected disk. This has minimal impact on HDDs because they are designed for large-volume sequential writes.
In contrast, SSDs use NAND flash with a limited number of erase cycles, and their lifespan is measured by Total Bytes Written (TBW).
Each execution writes data equivalent to the full disk capacity, contributing to the total bytes written (TBW) and potentially reducing the SSD’s lifespan over time.
Therefore, it is not recommended to execute the clean all command repeatedly on SSDs.
Further Reading:
DiskPart Clean VS Format
Many forum discussions reveal confusion between DiskPart clean and format. The following contents compare their differences in terms of scope, use cases, and data erasure level.
1. Scope
Clean operates on the entire disk and clears all partitions and volume information. Format is applied to a single partition.
2. Disk status after execution
Clean returns the disk to an Unallocated or Not Initialized state, requiring the disk to be repartitioned before it can be used.
Formatting creates a new file system on an existing partition. After formatting, the partition is ready to store files.
3. Use cases
Clean is used to rebuild or reconfigure the partition structure. Format is used on existing partitions and creates a new file system.
Both clean and format can be used to refresh the disk and resolve some disk access errors or readability issues.
4. Data erasure and recovery
Files deleted by DiskPart clean and quick format remain on the disk and can usually be easily recovered. In contrast, clean all and full format eliminate all files permanently and make them unrecoverable.
| Clean | Clean all | Quick format | Full format | |
| Scope | Entire disk | Entire disk | A single partition | A single partition |
| Functionality | Deletes the partition table and files | Deletes the partition table and overwrites every sector with zeros | Deletes file system index | Overwrites all sectors within the partition |
| Data overwriting | No | Every sector | No | Every sector |
| Recovery possibility | High | Nearly impossible | High | Nearly impossible |
| Execution speed | Very fast | Extremely slow | Very fast | Extremely slow |
| Impact on disk health | Minimal | Minimal for HDD; increased wear for SSD | Minimal | Minimal for HDD; increased wear for SSD |
After understanding the differences between DiskPart clean and clean all, the next section explains how to execute these commands.
How to Run DiskPart Clean and What to Do Afterward
This section provides comprehensive information on executing the clean and clean all commands, including detailed steps and important precautions.
It also compares running clean (all) on data disks and system disks and guides you through post-clean steps to reuse the disk for data storage.
How to Run DiskPart Clean
Follow the steps below to run DiskPart clean on Windows:
Step 1. Type cmd in the Windows search box. When Command Prompt shows up, right-click it from the best match result and choose Run as administrator.
Step 2. In the UAC window, select Yes to continue.
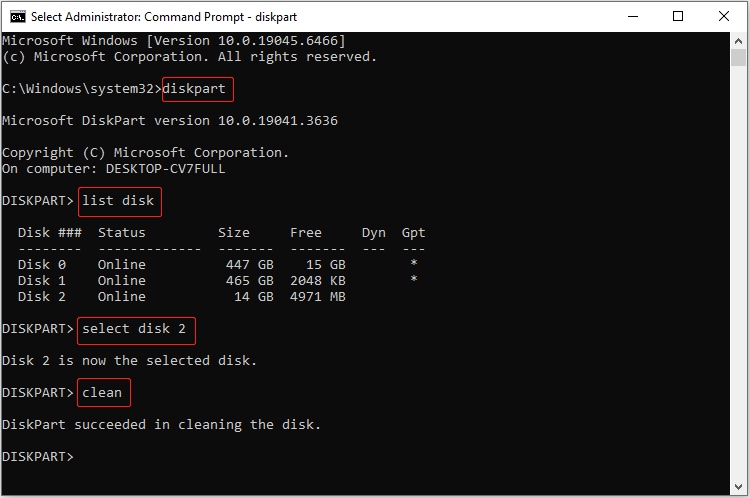
Step 3. Input the following commands one by one and press Enter after each:
- diskpart
- list disk
- select disk # (replace # with the actual disk number)
- clean
How to Run DiskPart Clean All
Follow the instructions below to execute the clean all command:
Step 1. Run Command Prompt as an administrator.
Step 2. Type the commands below and press Enter after each:
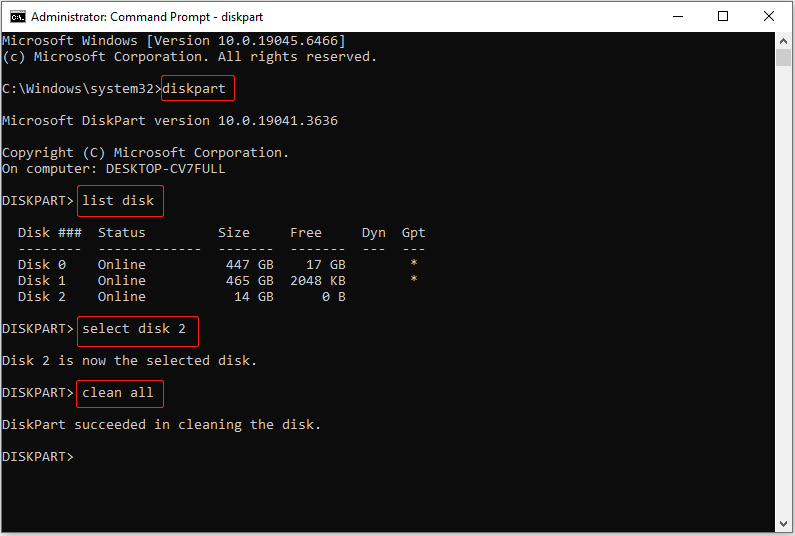
- diskpart
- list disk
- select disk # (replace # with the actual disk number)
- clean all
#1. How to Know When DiskPart Clean All Is Done
DiskPart clean all can take several hours to complete, and there is no progress bar, making it difficult to determine whether the process is finished.
Once the operation is completed, you will receive a message saying DiskPart succeeded in cleaning the disk. In addition, after execution, DiskPart will return to the Command Prompt (DISKPART>).
#2. Why DiskPart Clean All Has No Progress Indicator
Unlike Disk Management, DiskPart itself is a command-line administrative tool that is not designed with a user-friendly interface.
Furthermore, clean all overwrites every disk sector with zeros, which is a low-level operation, making it difficult to provide an accurate progress percentage.
#3. Signs That DiskPart Clean All Is Still Running
The following signs usually indicate that clean all is still in progress:
- No message has returned in DiskPart, and new commands cannot be entered.
- Disk Management or File Explorer freezes and becomes unresponsive.
- The disk write speed in Task Manager > Performance shows values other than 0 KB/s.
#4. What Happens if DiskPart Clean All Is Interrupted
If your PC is restarted or the disk is removed during the clean all operation, the overwrite process will be interrupted. It is not recommended to interrupt it, as this may cause the following issues:
- Not all files are completely overwritten, and you may need to re-execute the clean all command for a secure data erasure.
- The disk may become damaged or not be recognized by the computer.
Therefore, it is suggested to keep the power supply and disk connection stable during clean all and wait for the process to complete automatically.
DiskPart Clean and Clean All on System Disk VS Data Disk
Running the DiskPart clean or clean all commands on data disks will delete your files.
For system disks, these commands will delete the boot and recovery partitions, as well as all system files needed for Windows startup. As a result, your computer won’t be able to boot, and you will need to reinstall Windows.
You can clean a data disk successfully while Windows is running, but cleaning a system disk will usually trigger the following error:
Virtual Disk Service error: Clean is not allowed on the disk containing the current boot, system, pagefile, crashdump or hibernation volume.
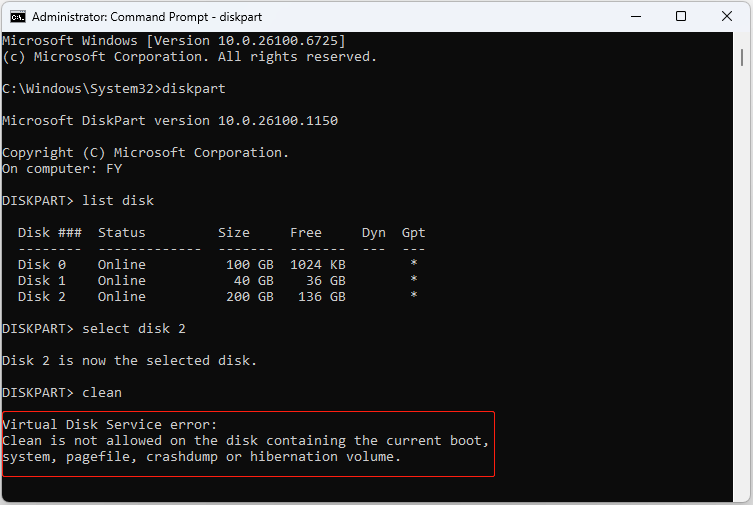
This occurs because DiskPart clean cannot run when the selected disk is in use.
To clean a system disk successfully, you need to run the DiskPart commands from Windows Recovery Environment (WinRE) or Windows Preinstallation Environment (WinPE).
How to Run DiskPart Clean and Clean All From WinRE/WinPE
Run DiskPart clean from WinRE:
Step 1. Click Start > Power. Press and hold the Shift key on your keyboard and click Restart.
Step 2. When the blue recovery mode appears, click Troubleshoot > Advanced options > Command Prompt.
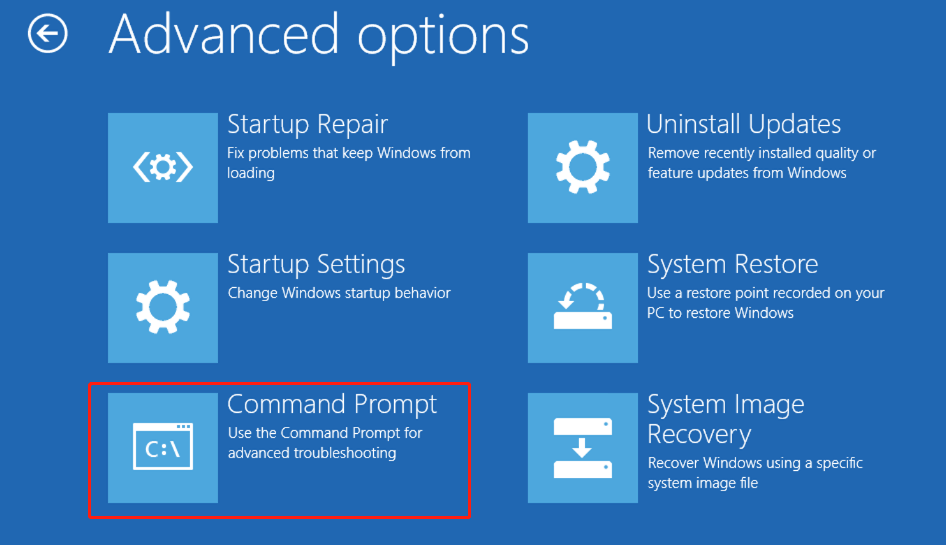
Step 3. Now you can input commands to open the DiskPart tool and clean the system disk.
Run DiskPart clean from WinPE:
Step 1. Download the Windows Media Creation tool and use it to create installation media.
Step 2. Restart your computer. During boot, press the BIOS key (depending on the motherboard manufacturer), such as F2, F8, F12, Del, Esc, to enter BIOS.
Step 3. Change the boot order to start your PC from the burned drive.
Step 4. Continue the process of installing Windows until it asks you for the product key. Then press Shift + F10 to open Command Prompt.
Step 5. Execute the commands to access DiskPart and clean the system disk.
What to Do After DiskPart Clean (All)
After running DiskPart clean or clean all, the disk usually appears as Unallocated, and you will need to create new partitions to reuse it.
In some cases, it may show as Not Initialized and need initialization. The following explains why that happens and how to initialize and repartition the disk.
Why Some Disks Appear Not Initialized After Clean
After cleaning the disk, the partition table (MBR or GPT) is cleared, and the disk is reset to an unconfigured state. Therefore, Windows no longer recognizes the disk structure.
In addition, hardware failures may also cause the hard drive to appear as Not Initialized.
To reuse the disk for data storage, you need to initialize it and create new partitions.
How to Initialize and Partition a Disk
Follow the instructions below to initialize and partition your disk:
Step 1. In Disk Management, right-click the target disk and choose Initialize Disk.
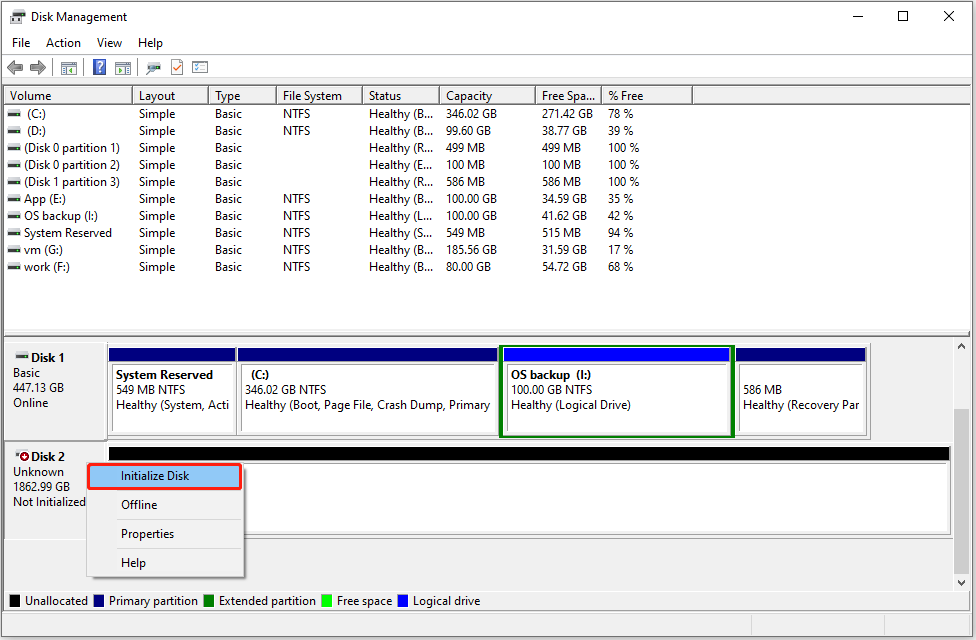
Step 2. Choose a partition table and click OK. It is recommended to use GPT for disks larger than 2 TB.
Step 3. After disk initialization completes, the disk shows Unallocated. Right-click the unallocated space and choose New Simple Volume.
Step 4. Click Next.
Step 5. Specify the volume size and click Next.
Step 6. Set up the drive letter, file system, and volume label, then click Finish. After that, the disk is available for file storage.
Common DiskPart Clean (All) Problems
This section outlines common issues when running DiskPart clean or clean all and corresponding solutions. It mainly explains why the clean all command may get stuck and provides fixes for common DiskPart errors during the cleaning process.
DiskPart Clean All Is Stuck
If DiskPart clean all does not succeed after several hours, it could be caused by various factors. The most common reasons are as follows:
- Clean all takes longer when overwriting a large-capacity disk, especially an HDD with slow write speeds.
- Bad sectors or hardware failures on the disk can cause the clean all process to get stuck.
- System compatibility, software conflicts, or disk connection issues can interfere with the clean all command.
To resolve the issue, try the following fixes:
- For large-capacity disks, be patient and wait for the process to complete.
- If the disk status does not change for a long time, restart your computer and run the clean all command again.
- Use CHKDSK to check the disk for bad sectors and file system errors.
- Run DiskPart clean all in WinRE or WinPE.
- If the issue persists, use alternative methods (listed later) to clean the disk.
DiskPart Has Encountered an Error
When running DiskPart clean or clean all, several errors may occur and prevent the disk from being cleaned. Below are the most common errors and their corresponding solutions.
| Errors | Solutions |
| The media is write protected. | Unlock the disk. Remove write protection. Clear the read-only attribute. |
| Access is denied. | Unlock the USB drive or SD card. Remove write protection. Remove the read-only attribute. Use Rufus to format the disk. |
| The request could not be performed because of an I/O device error. | Update or reinstall the disk driver. Clear the read-only attribute. |
| Data error <cyclic redundancy check>. | Run CHKDSK. Uninstall antivirus software and other suspicious programs. Erase the drive. |
| A device which does not exist was specified. | Restart the computer. Scan for hardware changes in Device Manager. Update the disk firmware. Remove PSU extension cables. |
How to Recover Files or Partitions After DiskPart Clean
If you accidentally run DiskPart clean on the wrong disk and lose important files, you will need data recovery software to restore them.
Alternatively, you can use professional partition recovery software to recover lost partitions along with their files.
Before attempting recovery, there are important precautions to maximize the chances of successful recovery.
Important Recovery Precautions After DiskPart Clean
The key point to successful data recovery is ensuring that the lost files are not overwritten. The following precautions focus on this point.
- Do not partition the disk. Creating new partitions and formatting the drive will further damage the original file structure, making recovery more difficult.
- Do not write new files to the disk. If you have already partitioned the drive, avoid storing any new files on it. Overwriting the original data will make recovery impossible.
- Perform data recovery as soon as possible. The sooner you attempt recovery, the higher the chance of successful recovery.
Next, learn how to restore lost files after running DiskPart clean.
Recover Files After DiskPart Clean
MiniTool Power Data Recovery is highly recommended to recover files due to its robust recovery capabilities, broad compatibility, and intuitive interface.
| Feature | Details |
| Compatible Windows versions | Windows 11/10/8.1/8 |
| Suitable disk types | Internal or external HDDs, SSDs, USB drives, and SD cards. |
| Supported file types | Documents, pictures, videos, audio files, emails, and archives. |
| Valid data loss situations | DiskPart clean, format, accidental deletion, virus infection, partition loss, and disk corruption. |
| Free file preview | Photos, videos, documents, emails, audio files, and web pages. |
| Free recovery capacity | 1 GB of free data recovery. |
Get the free edition of this recovery tool and launch it to recover files lost after DiskPart clean.
MiniTool Power Data Recovery FreeClick to Download100%Clean & Safe
Step 1. Scan the lost partition.
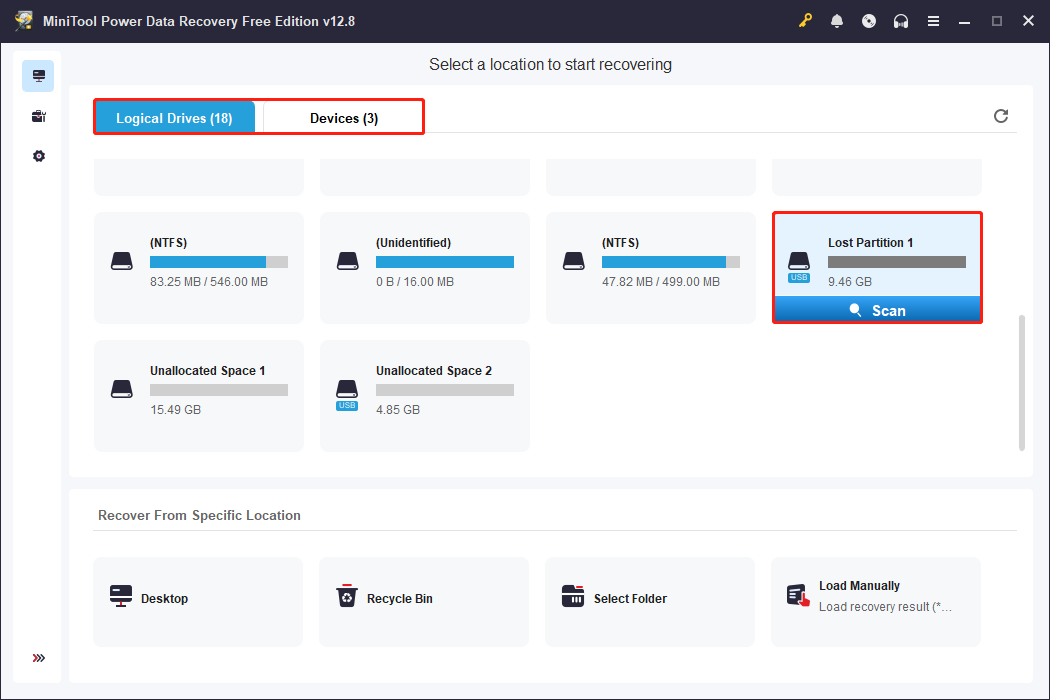
On the main interface of the recovery tool, you will see two recovery modules:
- Logical Drives: Displays all existing and lost partitions, as well as unallocated space.
- Devices: Lists physical disks connected to your computer.
Select the target partition or disk and click Scan to start scanning for lost files.
To get the best scan results, wait patiently until the full scan completes.
Step 2. Find and preview required files.
After scanning, locate the files you want to recover and then select them. Two file viewing options are available:
- Path: Displays files in a tree structure based on original file paths and current status.
- Type: Organizes files by data type, such as documents, images, audio, videos, and other files.
To locate the target files more efficiently, you can use the Filter and Search features.
- Filter: Allows you to filter files by type, modification date, size, and category.
- Search: Lets you search for specific files by using the file name. Either a partial or complete file name is supported.
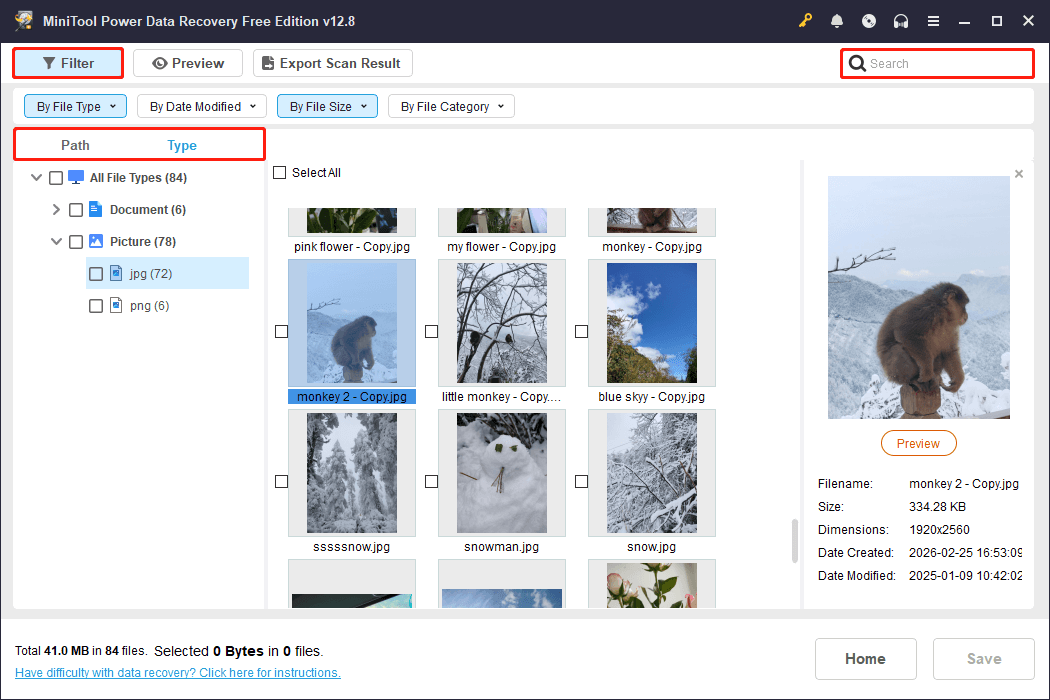
Additionally, this recovery tool offers a Preview feature. Simply double-click a file to preview its content, ensuring you recover the correct file. Supported file types include documents, photos, videos, audio, and more.
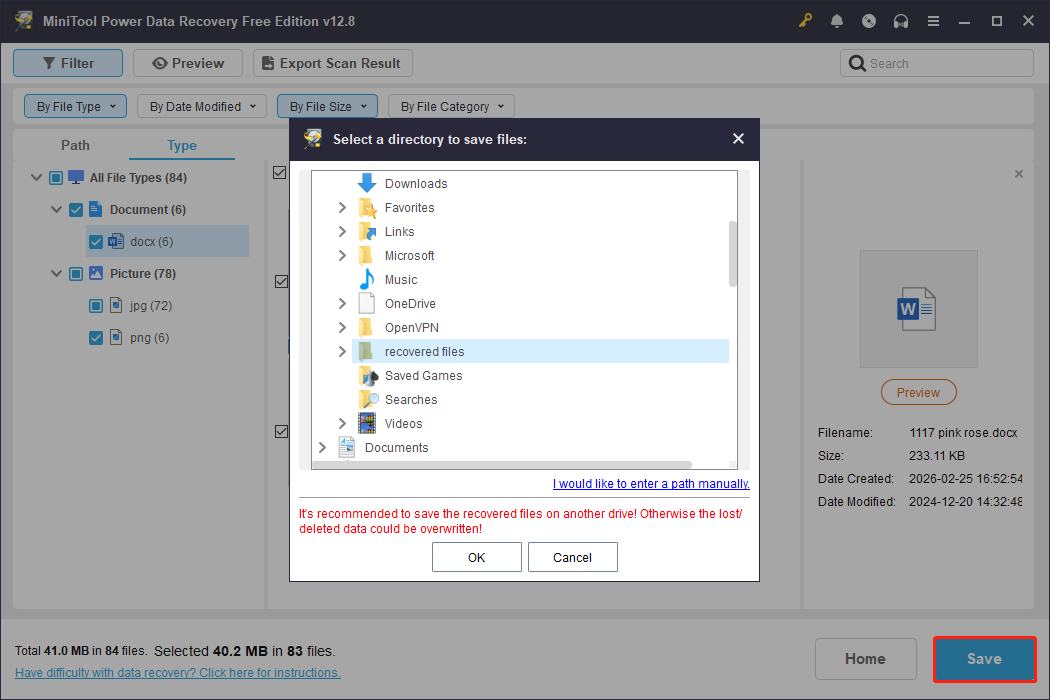
Step 3. Save wanted files.
Ensure that all needed files are checked, and then click Save. In the new window, select a proper location to store the recovered files.
For data exceeding the free 1 GB recovery capacity, upgrade to a full edition of the software to recover the additional files.
Once the recovery process completes, click View Recovered to check your files.
Read More:
Running the clean command on the system disk in recovery mode removes partition structures containing system files, causing the system unbootable.
If you need to recover files from an unbootable computer, use MiniTool Power Data Recovery Bootable. It allows you to create a bootable recovery drive and access your files without booting Windows.
Step 1. Insert a USB drive that does not contain any important files into the working computer. Then get MiniTool Power Data Recovery Bootable installed.
Step 2. Run the recovery software. Next, click the Bootable Media Builder icon in the top right corner to create a burned USB drive.
Step 3. Insert the bootable USB drive into the malfunctioning computer. Then boot from the burned USB drive.
Step 4. Follow the on-screen instructions to launch MiniTool Power Data Recovery and recover your files.
Recover Partitions After DiskPart Clean
In addition to file recovery, you can opt to recover lost partitions along with the data contained directly. MiniTool Partition Wizard offers a Partition Recovery feature, allowing you to restore lost or deleted partitions.
This tool supports partition recovery as long as new partitions have not been created. It is compatible with various storage devices, including HDDs, SSDs, USB flash drives, and SD cards.
MiniTool Partition Wizard FreeClick to Download100%Clean & Safe
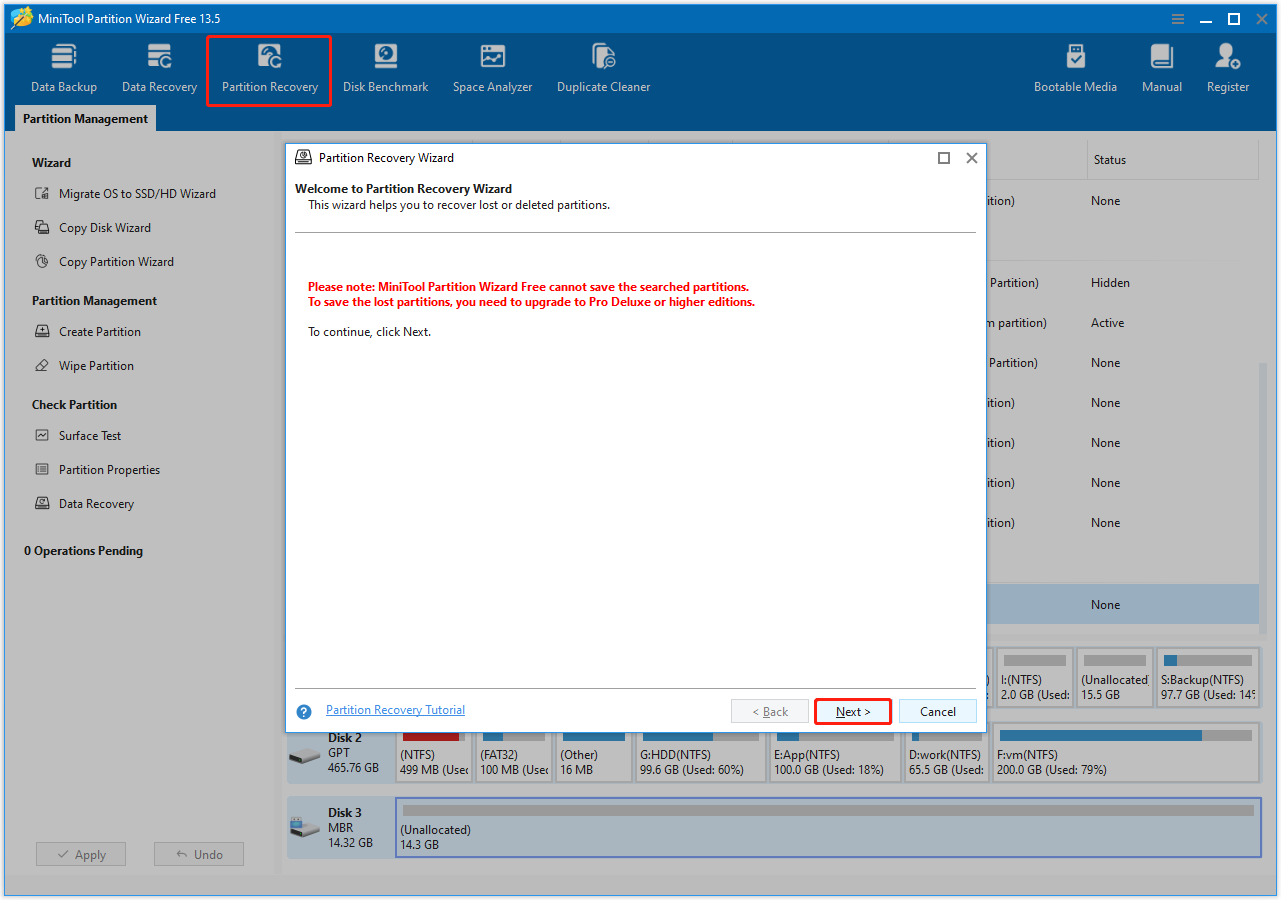
Step 1. Launch MiniTool Partition Wizard to enter its main interface. Choose Partition Recovery and then click Next.
Step 2. Select the disk from which you need to recover partitions and click Next.
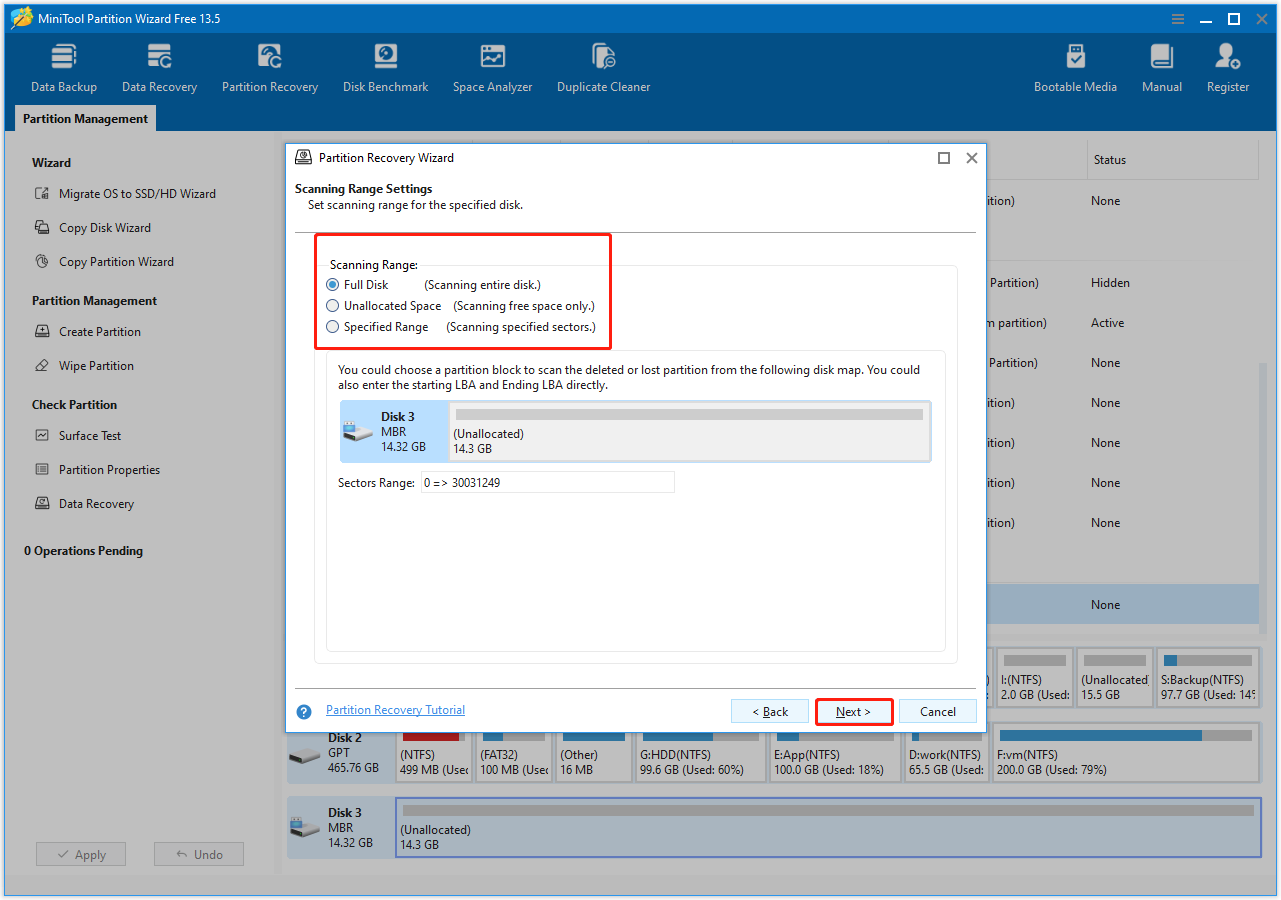
Step 3. Choose a scanning range from Full Disk, Unallocated Space, and Specified Range, and click Next.
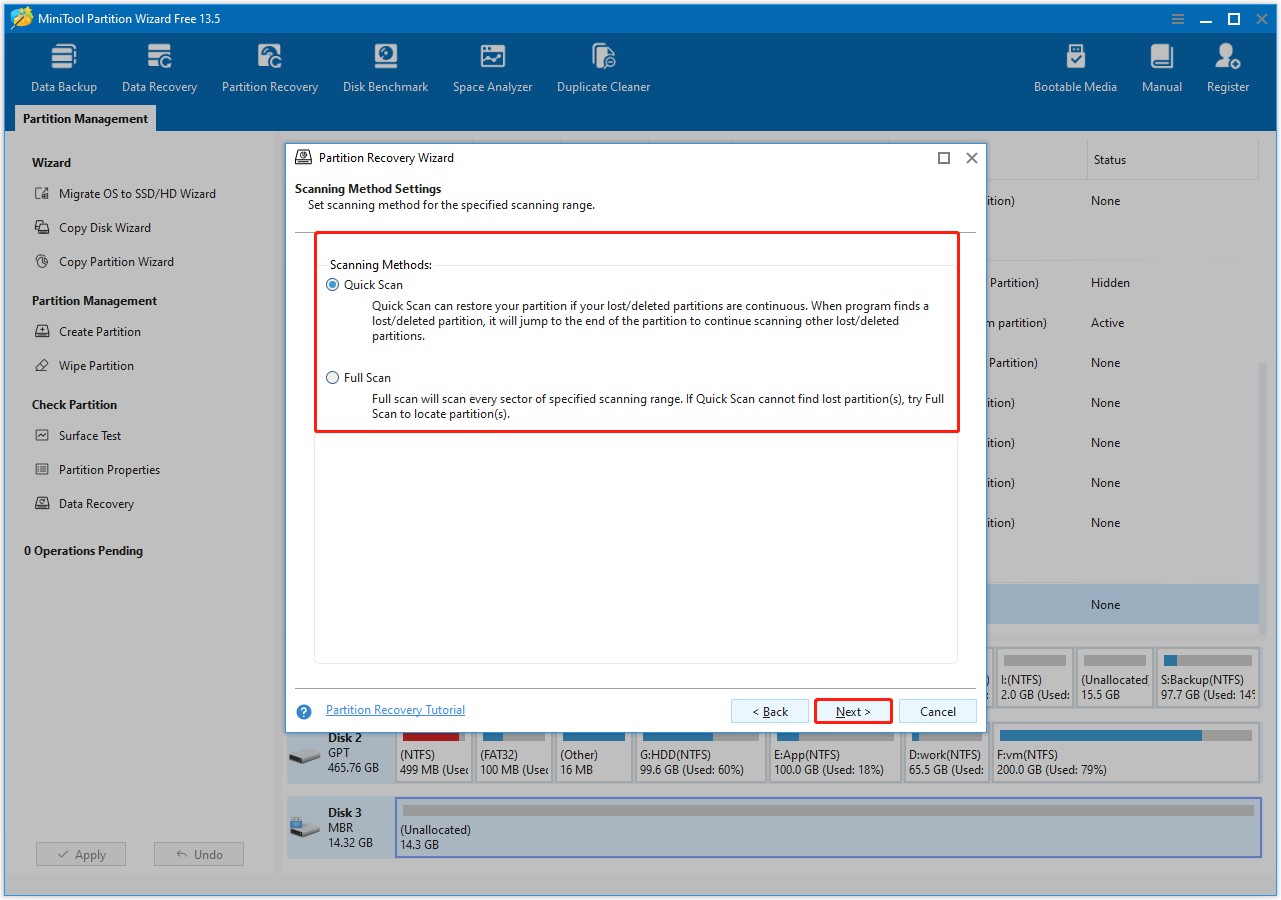
Step 4. Choose a scanning method and click Next.
- Quick Scan: Finds and restores continuous lost partitions quickly.
- Full Scan: Scans every sector of the specified scanning range for lost partitions. It takes longer than Quick Scan.
It is recommended to choose Quick Scan the first time you attempt partition recovery. If Quick Scan fails, try Full Scan.
Step 5. Wait for the scanning process to complete. Finally, select all required partitions and click Finish.
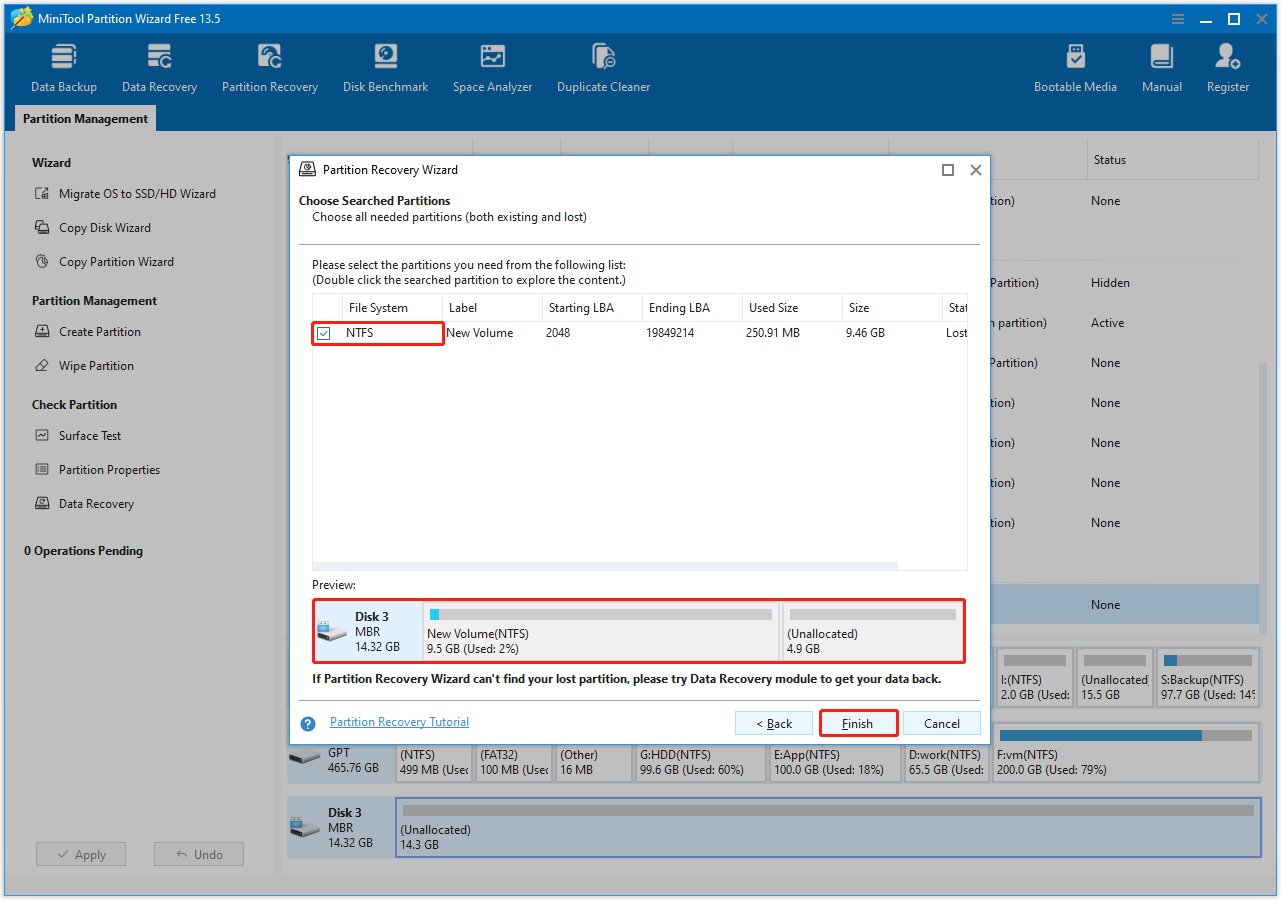
Step 6. The recovered partition does not have a drive letter. To make it visible in File Explorer, select it and click Change Drive Letter.
In the new window, choose an available drive letter and click OK.
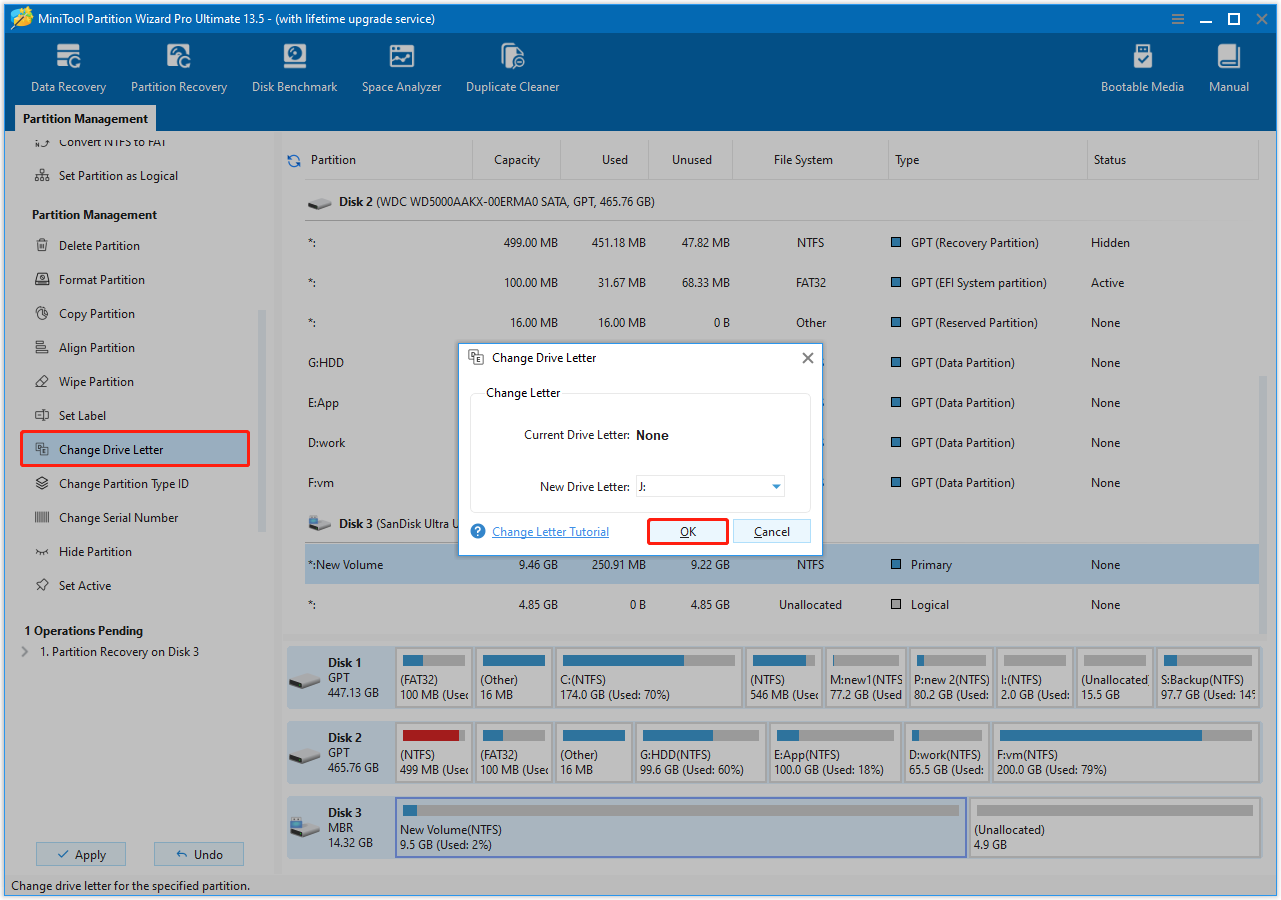
Step 7. Click Apply to apply all pending actions. After that, you can open the recovered partition to view your files.
The process of recovering files or partitions deleted by DiskPart clean is now complete.
To avoid the complexity of recovery, be cautious when performing actions such as cleaning a disk, which may lead to data loss. Additionally, always back up files before undertaking such actions.
Alternatives to DiskPart Clean and Clean All
In this section, we will introduce several alternatives to the DiskPart clean and clean all commands. If DiskPart fails to work, these alternatives can help achieve the same goal.
The clean command only removes partition information and data, which is relatively easy to complete. In most cases, a quick format, partition deletion, or disk repartitioning can refresh the disk or remove files.
Therefore, we outline the alternatives to the DiskPart clean all command. These alternatives include disk wiping software, full format, or the Secure Erase feature that is specific to certain computers and disk models.
Disk Wiping Tools
Disk wiping software is designed to securely erase data from file storage devices. Similar to the DiskPart clean all command, these tools ensure that data is completely overwritten and cannot be recovered.
These tools are commonly used when secure data erasure or disk cleaning is required. Popular options include DBAN and KillDisk.
MiniTool Partition Wizard also offers a Wipe Disk feature, which utilizes advanced algorithms and is free to use. It supports various types of storage devices, including hard drives, solid-state drives, and removable drives.
If necessary, follow the steps below to wipe a disk using MiniTool Partition Wizard:
Step 1. On the main interface of the partition manager, select the disk and choose Wipe Disk from the left sidebar.
Step 2. Choose a wiping method and click OK.
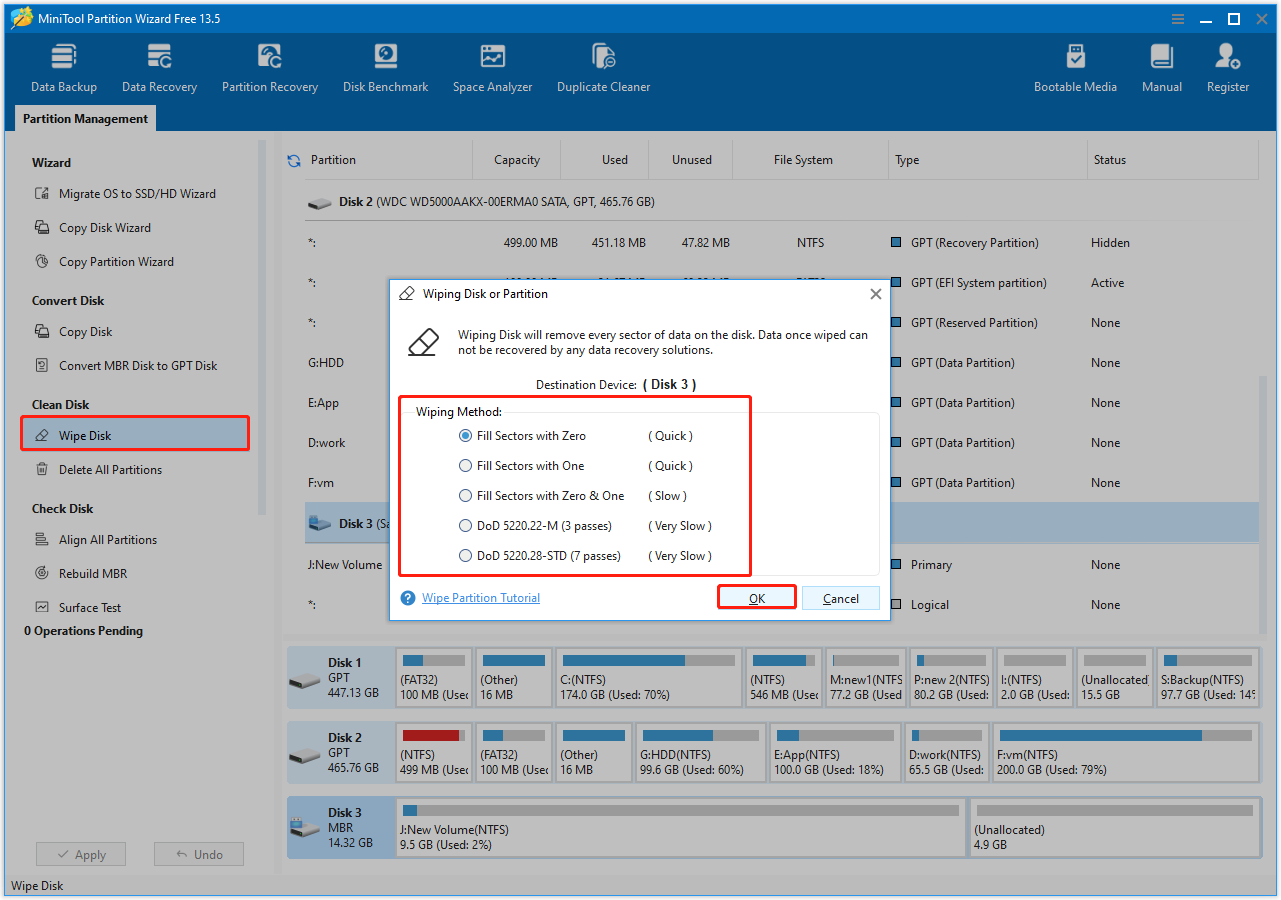
Step 3. Click Apply to start wiping the disk.
Full Format
As mentioned above, a full format also overwrites every sector of the specified partition. Therefore, it is also a reliable alternative to the DiskPart clean all command.
Follow the steps below to perform a full format using Disk Management:
Step 1. Right-click the Start button and choose Disk Management.
Step 2. Select the target disk partition and choose Format.
Step 3. Set up the volume label and file system. Make sure to uncheck the Perform a quick format option.
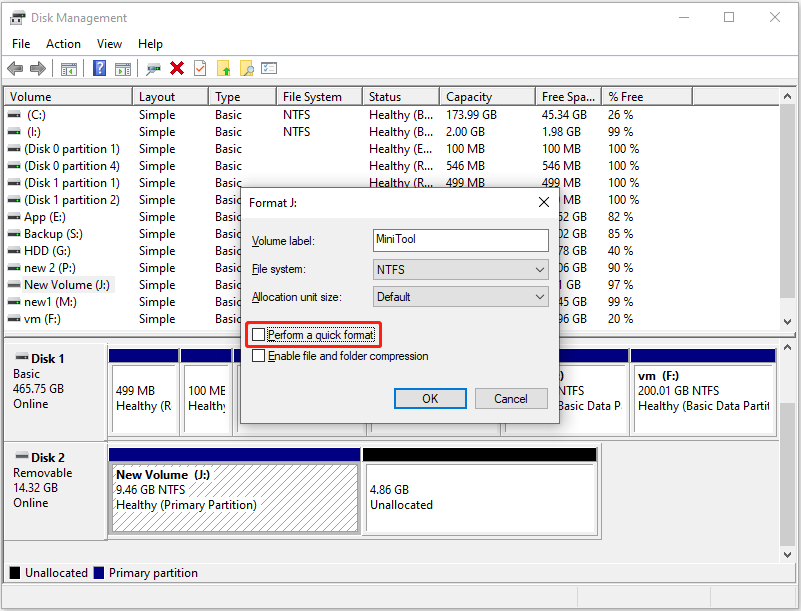
Step 4. Click OK > OK to start the full format process.
Secure Erase Feature
Unlike wiping and formatting options, Secure Erase is typically performed from the BIOS/UEFI. It executes a hardware-level data erasure without booting into Windows.
Many modern computers and disk models support the Secure Erase feature. Ensure that your BIOS/UEFI is up to date, and follow the steps below to use this feature.
Step 1. Remove all external storage devices from your PC.
Step 2. Restart the computer. During boot, press the BIOS key, such as F10, F8, F6, F2, Del, or Esc, to enter BIOS.
Step 3. Click Security.
Step 4. Choose Hard Drive Utilities or Hard Drive Tools.
Step 5. Select Secure Erase and follow the instructions on your screen to complete the process.
Bottom Line
To sum up, this guide outlines the differences between the DiskPart clean and clean all commands. It compares aspects such as their working principles, operation duration, data erasure level, and impact on disk health.
The clean all command takes longer to complete, and you will see a completion message once it is finished. If you encounter errors while running these commands, refer to the troubleshooting solutions outlined above to fix them.
After executing these commands in Command Prompt, you will need to initialize and partition the disk for reuse.
For file recovery after DiskPart clean, consider using MiniTool Power Data Recovery or MiniTool Partition Wizard.
If you experience any issues while using MiniTool software, please reach out to the support team at [email protected].
DiskPart Clean VS Clean All FAQ
Note that simply closing the Command Prompt window may not stop the process, as it will continue running in the background.
Additionally, any files that have already been cleaned will be permanently lost and cannot be recovered.
In addition, third-party disk wiping tools like MiniTool Partition Wizard can also help erase files on a hard disk forever.
About The Author

Position: Columnist
Shirley holds a bachelor’s degree in English and has been an editor at the MiniTool Team for many years. She specializes in IT-related content, with a focus on data recovery, file backup, disk management, and other technical topics. She is committed to delivering clear, accurate, and practical solutions to help users resolve common computer issues.
User Comments :