A lot of users don’t know how to recover BIOS on HP. In this post, MiniTool provides a full guide for the HP BIOS recovery on Notebook/Desktop PCs. It also introduces some solutions to HP BIOS corruption failure.
BIOS (Basic Input Output System) is firmware embedded on the chip of your motherboard. It can help facilitate the hardware initialization and perform POST (Power-On Self-Test) on your computer before the OS takes over.
Sometimes, however, the BIOS may get corrupted after a failed BIOS update on HP. Once corrupted, you will encounter various issues and errors such as black screen, HP notebook BIOS update failed, Boot Guard verified failed, and so on. In these cases, you need to recover BIOS. Here we will focus on HP BIOS recovery. Let’s keep reading.
I received a black screen after rebooting the system during the update BIOS. BIOS does not load, flashes caps lock. while creating USB "IHISI: Get support mode to fail in SMI!" when you press WIN+B nothing. hard reset nothing. HELP!
https://h30434.www3.hp.com/t5/Notebook-Operating-System-and-Recovery/recovery-bios/td-p/6749228
About HP BIOS Recovery
Before you perform the BIOS recovery HP, let’s have an overall understanding of this feature.
What Is a BIOS Recovery
As you might know, some computer manufacturers provide BIOS recovery features like Dell BIOS Auto Recovery in case BIOS gets corrupted. Many HP computers also come with an emergency BIOS recovery feature that helps users to recover or install the latest version of BIOS from the hard drive.
Usually, if the BIOS gets corrupted, the system can automatically try to perform the HP BIOS update and recovery from a hidden partition when the computer restarts. If the automatic BIOS recovery fails to work and the computer can’t boot, you can create a USB recovery drive to restore the BIOS manually.
When Need to Perform an HP BIOS Recovery
Here comes a new question – how to identify if the BIOS of your computer gets corrupted? If you experience the following symptoms when or after restarting the HP computer, then it indicates you need to perform a BIOS recovery HP.
- The system cannot start normally, the computer beeps 2 times, or the Caps lock or Num lock keys blink.
- Some BIOS-related errors or issues occur such as HP BIOS update failed, Boot Guard verified failed, BIOS corruption failure HP, BIOS application error 501, etc.
- Your computer is stuck on a black or blank screen when powered on.
- When your computer is powered on, the internal fan starts running but the display is still blank and Windows doesn’t start.
How to Recover BIOS on HP Notebook/Desktop PCs
Now, let’s see how to recover BIOS on HP Notebook/Desktop PCs. There are 2 feasible ways to recover BIOS HP. The first way is to perform HP BIOS recovery via the key combination, while the other is to create a USB BIOS recovery drive.
# 1. BIOS Recovery HP via a Key Combination
If your computer can boot normally, you can use the HP BIOS update and recovery utility via the key combination. By doing so, your HP computer might be able to recover BIOS from an earlier version and restore basic functions.
This BIOS recovery HP tool may not be able to recover the BIOS depending on the cause of the corruption. If the BIOS gets corrupted due to physical damage, you may need to replace the motherboard.
Step 1. Power off your computer and make sure that the AC adapter is connected to the power source.
Step 2. Press and hold the Win + B keys and then press the Power button at the same time.
Step 3. Wait for 2 or 3 seconds, continue to press and hold the Win + B keys but release the Power button. If smooth, the HP BIOS Update screen will be displayed after a series of beeps.
On HP desktop computers, the power light remains on and the display screen may remain blank for about 40 seconds before anything is displayed. If the HP BIOS update screen is not displayed, press and release the Power button and immediately press the Win + B keys simultaneously, and repeat this process until you hear a series of beeps.
Step 4. If the HP BIOS Update screen is not displayed here, you can take some measures according to the following situations:
- Repeat the above steps but press the Win + V keys instead. If it is still not displayed, your computer may not support the HP BIOS update and recovery utility or there is an issue with your hard drive.
- If the power light is turned off, it may indicate that the Power button was held too long. In this case, you can repeat the above steps but make sure to hold the Power button for only 2 to 3
- If the computer shuts down suddenly and displays a boot issue, you can follow the on-screen instructions to resolve it.
- If the BIOS recovery message is repeatedly displayed, you can try recovering the BIOS via a USB recovery drive.
Step 5. After the BIOS recovery HP is complete, click on Continue Startup to restart your computer.
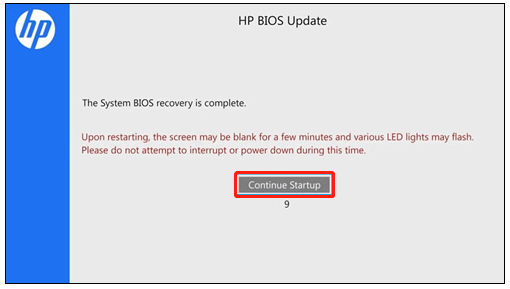
–image from the HP community
# 2. BIOS Recovery HP via a USB Drive
The BIOS recovery HP is separate from the BIOS and can be used to create a USB recovery drive. If your computer cannot boot normally or fails to recover BIOS via the key combination, you can use the USB drive to restore BIOS on HP notebook/desktop PCs.
Here we divide this process into the 3 simple parts below. Let’s follow them one by one.
Part 1. Format the USB Drive to FAT32
To install the BIOS file smoothly, you need to prepare an empty USB drive and format it to FAT32. You can use Windows built-in tools like Diskpart or Disk Management to do this work, but they have limitations in formatting a drive larger than 32GB.
If you have a large USB drive or encounter some issues like “Windows was unable to complete the format”, we highly recommend you use a professional formatter like MiniTool Partition Wizard. It is a powerful partition manager that can be used to format/extend/resize/wipe/create partitions, migrate OS, convert NTFS to FAT32, etc.
MiniTool Partition Wizard FreeClick to Download100%Clean & Safe
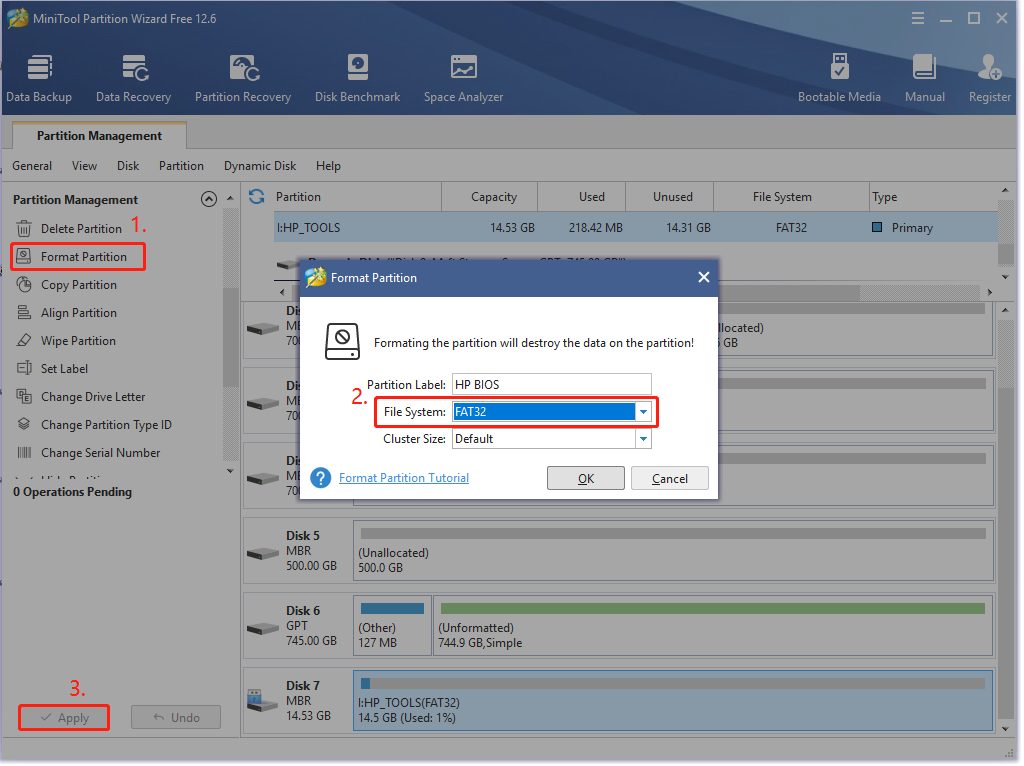
Step 1. Launch the MiniTool program to enter its main interface, select the USB drive from the disk map and click on Format Partition from the left action panel.
Step 2. In the pop-up dialog box, select FAT32 from the File System drop-down menu and click on OK to save the change. Here you can set the Partition Label and Cluster Size according to your needs.
Step 3. Click on Apply to execute the pending changes. After that, you can use the USB to create a BIOS recovery drive.
Part 2. Create a USB Recovery Drive for the HP BIOS
Before you do, you need to prepare a computer that is working normally and has an active internet connection. Then follow the steps below carefully.
Step 1. Note down the product number of your notebook that needs to perform the HP BIOS recovery. If you don’t know how to find the product and serial number on HP PCs, read this post “HP Warranty Check/Lookup | HP Serial Number Lookup”.
Step 2. Insert the USB drive into the working computer and navigate to the HP Customer Support page, and select Laptop/Desktop according to your needs.
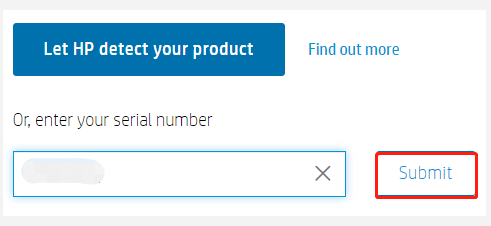
Step 3. Enter the serial number or product number into the search box and click on Submit.
Step 4. Select BIOS and check the details of the latest BIOS version for the HP BIOS recovery, and click on Download.
Make sure you select the correct BIOS update before proceeding. If you select one that doesn’t apply to your computer, installing the wrong BIOS may lead to the computer not working problem.
Step 5. Once downloaded, double-click the executable file and click on Yes to run the setup.
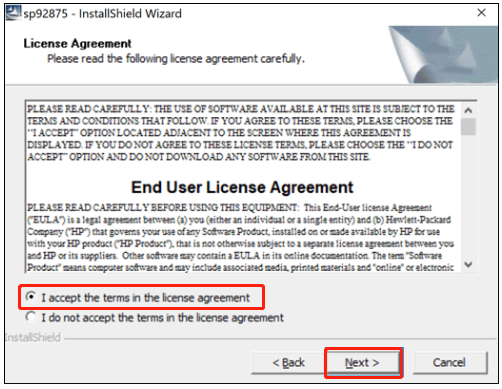
Step 6. On the InstallShieldWizard window, click on Next. Then select I accept the terms in the license agreement and click on Next.
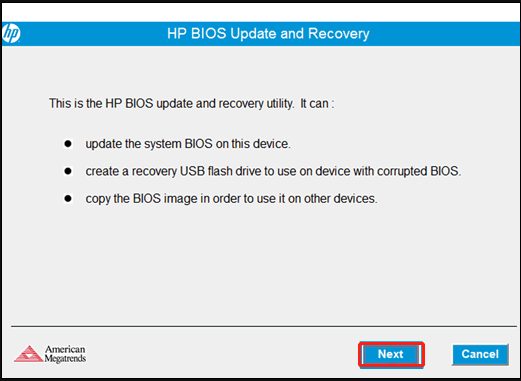
Step 7. Now, the HP BIOS Update and Recovery screen should appear, click on Next to go on.
The screens that are displayed during the process may vary depending on your computer. For example, some computers show the “HP System BIOS Update Utility” window.
Step 8. Select the Create Recovery USB flash drive option and click on Next.
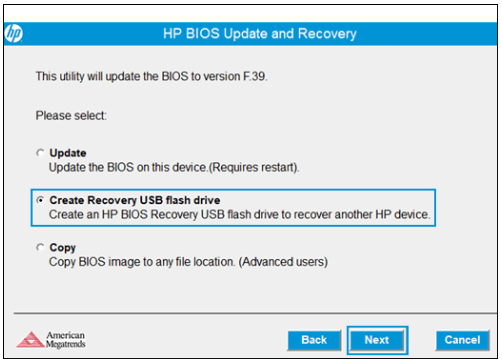
Step 9. Select the USB drive from the list and click on Next.
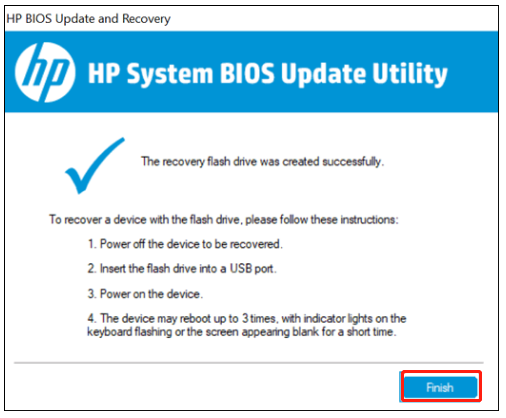
Step 10. Wait for the tool to copy the BIOS file to the USB flash drive. When you see the “The recovery flash drive was created successfully” message, click on Finish. Then remove the USB drive from your computer.
–images from the HP support
Part 3: Recover BIOS Using the USB Drive
Now, you can use the HP BIOS recovery option with the USB recovery drive.
Step 1. Power off your computer that needs to recover BIOS and wait for 5 to 10 seconds.
Step 2. Insert the USB recovery drive into the HP computer.
Step 3. Press and hold the Win + B keys at the same time. And then hold the Power button for 2 to 3 seconds.
Step 4. Continue to press and hold the Win + B keys but release the Power button until you hear a series of beeps.
Step 5. Your system should detect the USB recovery drive and start recovering BIOS automatically. Here you just need to follow any on-screen instructions to complete the BIOS recovery HP.
What’s Your Opinion
This post mainly discussed how to recover BIOS on HP computers. If you are bothered by the HP BIOS update failed/corruption issue, you can perform HP BIOS recovery via the above methods. Of course, we are very glad to see your opinions about this subject in the following comment area.
If you have any problems or difficulties with the MiniTool software, you can send us an email via [email protected].
User Comments :