The reboot and select proper boot device error can be caused by an incorrect boot order, a corrupted boot loader, and hardware issues. This MiniTool guide offers several solutions, such as checking drive connections, adjusting BIOS settings, repairing boot files, and reinstalling Windows.
Quick Answer:
If your PC shows “reboot and select proper boot device”, Windows cannot find a bootable system drive. This error is commonly caused by an incorrect boot order, BIOS misconfiguration, corrupted boot files, or a failing disk.
Try these fixes in order:
- Remove USB drives and other external devices.
- Check the connected cables for physical damages.
- Enter BIOS and set the system disk as the first boot option.
- Match UEFI/GPT or Legacy/MBR boot mode.
- Run Startup Repair.
- Repair MBR using MiniTool Partition Wizard or Bootrec.
- Check disk health and file system errors.
- Reinstall Windows as a last resort.
——————————————————————————————————————————————
What Does the Reboot and Select Proper Boot Device Error Mean
“Reboot and Select proper Boot device or Insert Boot Media in selected Boot device and press a key”.
If your PC displays this message, it means the system firmware has successfully started, but it cannot find a valid bootable drive to load Windows from.
In other words, the computer is powered on normally, but it fails at the boot stage, where it tries to locate a drive containing the operating system.
Causes of the Reboot and Select Proper Boot Device Error
This frustrating boot error stems from various reasons, including:
- Wrong boot order: The PC is attempting to boot from a data disk, USB flash drive, or DVD rather than the system drive.
- Incorrect boot mode: The BIOS boot mode (Legacy BIOS or UEFI) isn’t compatible with the operating system.
- Loose/bad cables: The SATA data or power cables to the hard drive may be loose or faulty.
- External interference: Connected USB drives or memory cards affect boot detection.
- Corrupted boot files: MBR (Master Boot Record) and BCD (Boot Configuration Data) may be damaged, preventing the system from loading.
- Inactive partition: The partition containing Windows boot files should be marked as active. If not, BIOS may fail to recognize this drive as bootable.
- Failed HDD/SSD: The system drive is faulty, making it invisible to the motherboard.
- Dead CMOS battery: A failing CMOS battery on the motherboard can lead to refreshed BIOS settings, causing the PC to be unable to track the installation location of your OS.
How to Fix Reboot and Select Proper Boot Device Windows 11/10
After analyzing the underlying causes of this error, we summarize several possible solutions.
Try checking hardware connections, configuring BIOS or UEFI settings correctly, repairing boot files, setting system partitions to active, checking the disk health, and reinstalling Windows.
#1. Check Hardware Connections
Option 1: Remove External Devices
USB flash drives, CDs/DVDs, memory cards, and external hard drives may interfere with the computer, triggering the reboot and select proper boot device error.
To resolve this issue, remove all external devices. Then, restart Windows 11/10 to check if the issue persists.
Option 2: Check the Connected Cables
The boot drive, especially the HDD, is connected to the computer through a SATA data cable and a power cable. If one of the cables is broken, faulty, or not connected, the insert boot media in selected boot device error message occurs.
Follow the instructions to check the cables:
Step 1: Turn off your computer and unplug the power cord.
Step 2: Carefully open the computer case.
Step 3: Locate the hard drive, find the data and power cables, and check for damage. If the fault is major, replace cables immediately.
Step 4: Unplug both cables from the drive and motherboard. Then, firmly plug them back in to ensure they have a secure connection.
Step 5: Close the case, reconnect the power cord, and turn on the computer.
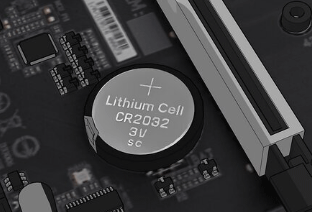
Option 3: Reset or Replace CMOS Battery
Resetting or replacing the CMOS battery is an effective solution to this startup problem, which is highly recommended by some forum users.
Try this approach through these steps:
Step 1: Shut down the PC and disconnect the power cord.
Step 2: Locate the small coin-cell battery on the motherboard and gently remove it.
Step 3: Wait 5-10 minutes to fully clear the memory.
Step 4: Place the CMOS battery back, ensuring the + side faces up. If the battery is damaged, replace it with a new one.
(Image from wikiHow)
Step 5: Close the case and plug in the power.
Step 6: Restart the system to enter the BIOS menu. Next, set the boot order again (introduced in option 1 under the #2 section), as the CMOS battery resetting can reset BIOS settings.

#2. Configure BIOS or UEFI Settings Correctly
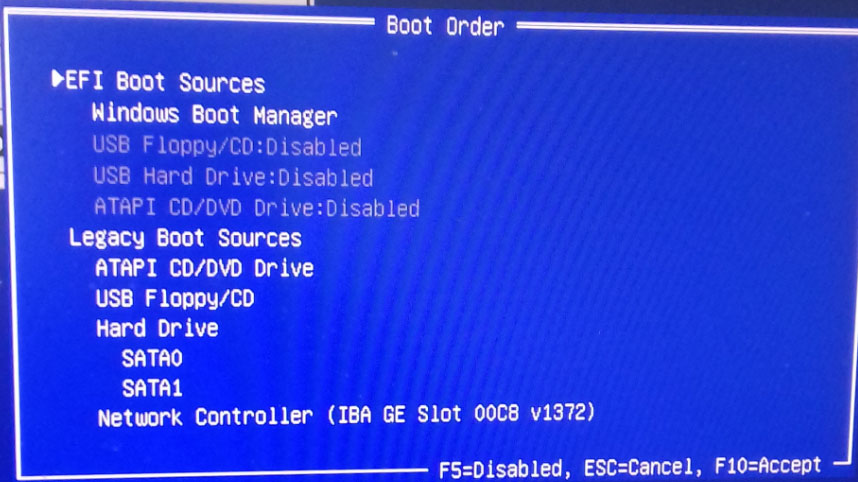
Option 1: Verify Boot Order
Windows 11/10 reboot and select proper boot device error is primarily caused by a messed-up boot sequence. If you connect multiple devices to the computer, Windows sometimes incorrectly recognizes the boot drive.
Check the boot order in BIOS:
Step 1: Press Del, F2, F10, Esc, or a key specified by the manufacturer during startup to access the BIOS or UEFI setup menu.
Step 2: Navigate to the Boot, Boot Order, or Boot Priority section or a similar menu.
Step 3: Move your primary hard drive to the first position, or directly highlight the boot drive, such as Windows Boot Manager, then press F10 to save changes.
(Image from Microsoft)
Windows should run normally from the primary hard drive. If the error persists, continue with the troubleshooting tips below.
Option 2: Match Boot Mode
Windows has two boot modes:
- UEFI: Used for modern operating systems like Windows 10 and Windows 11, requiring the GPT partition type for its primary hard drive.
- Legacy/CSM: Used for older systems such as Windows 7 and 8, using the MBR partition style to define hard disk partitions.
If the boot mode doesn’t match how Windows was originally installed on your drive, the reboot and select proper boot device error occurs.
Follow the steps:
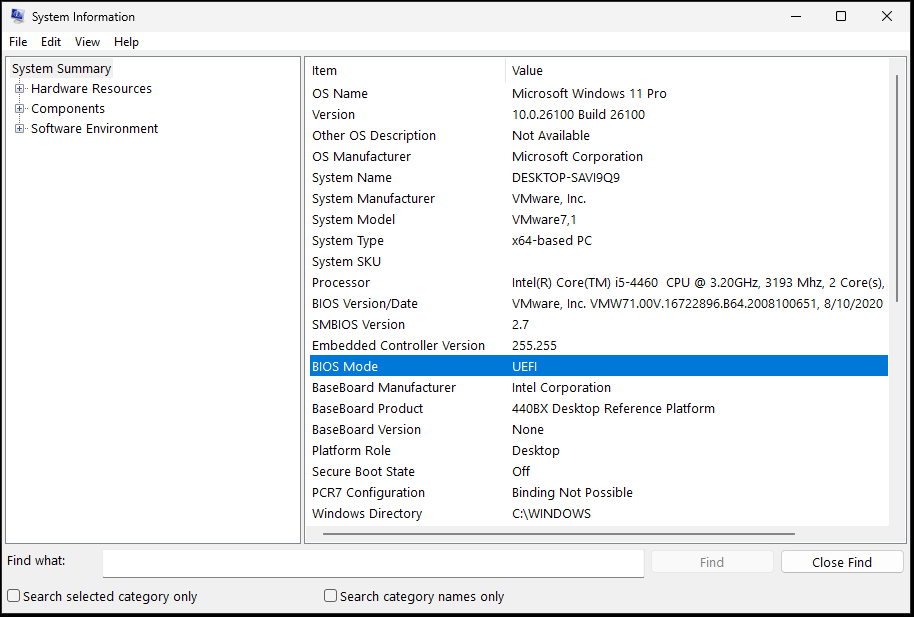
Step 1: Boot Windows to Safe Mode.
Step 2: Type system information to Search and press Enter to open this tool.
Step 3: Check BIOS Mode to know the boot mode.
Step 4: Enter the BIOS/UEFI menu by pressing Del, Esc, F2, or F10.
Step 5: Look for a tab labeled Boot, Advanced, or System Configuration.
Step 6: Locate Boot Mode, UEFI/BIOS Boot Mode, CSM, Compatibility Support Module, or a similar one, then configure some options:
- UEFI: Disable CMS; set boot mode to UEFI.
- Legacy: Enable CSM; set boot mode to Legacy
Step 7: Press F10 to save changes and exit.
Windows may start up without any error. If this approach doesn’t work, proceed with the fixes below.
Option 3: Restore BIOS to Defaults
BIOS resetting can restore misconfigurations that may result in the insert boot media in selected boot device error.
Follow the steps:
Step 1: Restart your computer and enter the BIOS/UEFI setup.
Step 2: Locate an option like Load Optimized Defaults, Load Setup Defaults, or Restore Defaults.
Step 3: Confirm to load defaults and press F10 to save changes & exit.
Step 4: The PC will restart with default settings.
#3. Repair Boot Files
Option 1: Run Startup Repair
Windows 11/10 Startup Repair helps scan for and fix common problems that prevent the system from starting. The tool is particularly useful if there are missing or damaged system files and corrupted Boot Configuration Data.
Try Startup Repair through these steps:
Step 1: Restart the system, and press the Power button to interrupt the boot when the Windows logo appears on the computer screen. Repeat this operation two or three times until you enter the Automatic Repair window.
Step 2: Click Advanced options to proceed.
Step 3: Under the Choose an option interface, navigate to Troubleshoot > Advanced options and choose Start-up Repair.
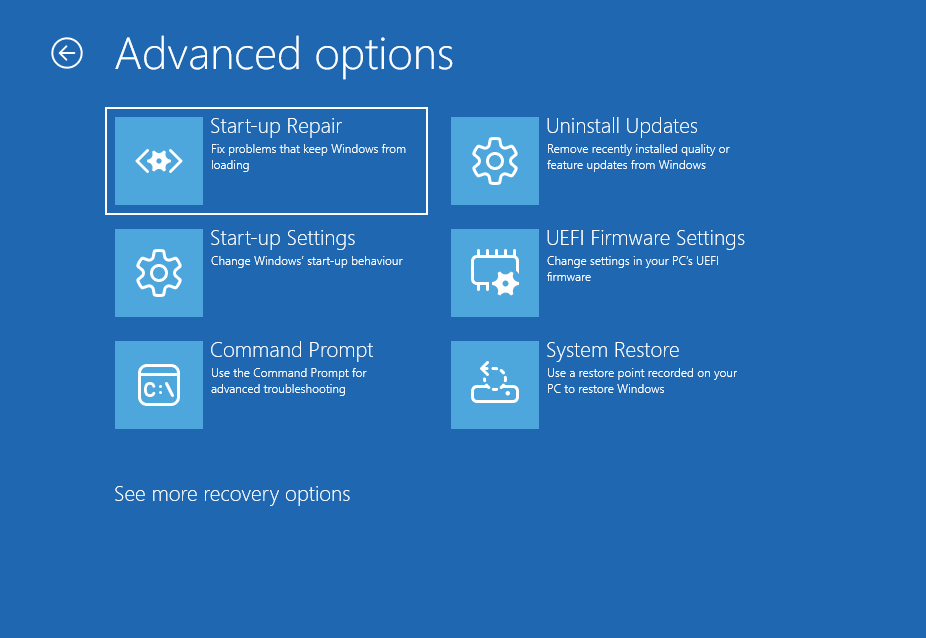
Step 4: The tool begins detecting and repairing the found issues.
If Startup Repair cannot work, run Bootrec to repair boot files.
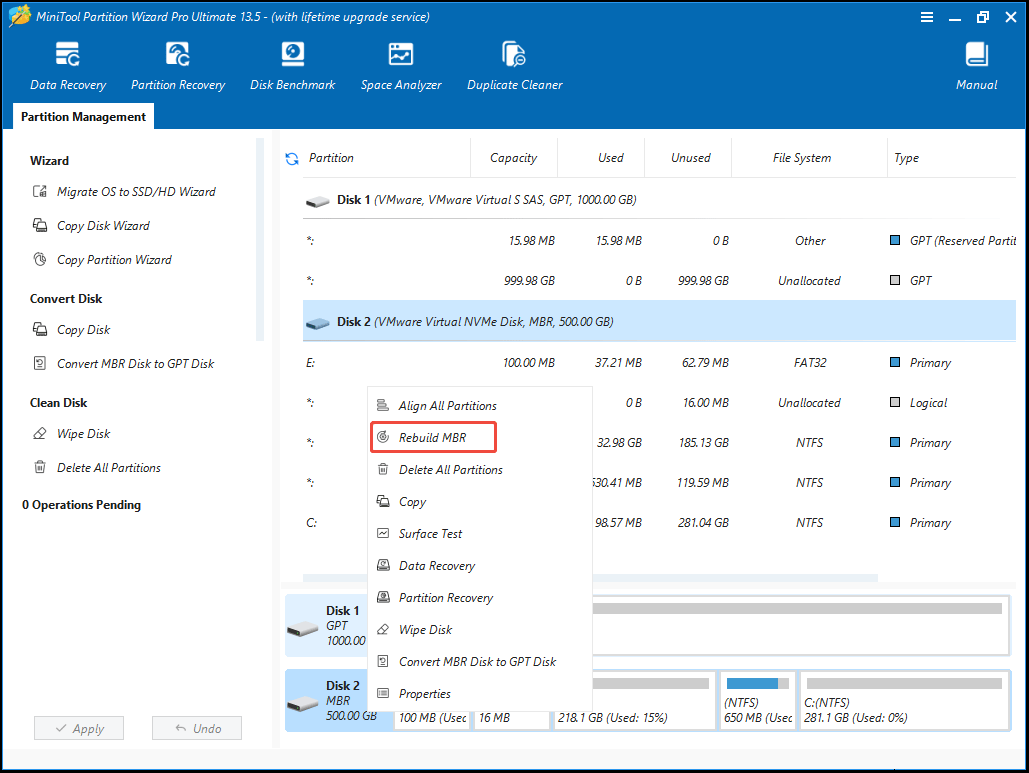
Option 2: Use MiniTool Partition Wizard to Rebuild MBR
To repair a corrupted Master Boot Record (MBR) that may trigger the reboot and select proper boot device error, you can use MiniTool Partition Wizard.
This partition management tool includes a Rebuild MBR feature that recreates the MBR without affecting existing data.
This method is applicable only to disks using the MBR partition style. If your system disk uses GPT and UEFI, this feature is not required.
Step 1: Launch MiniTool Partition Wizard Free Edition and upgrade to a Pro or higher edition.
MiniTool Partition Wizard FreeClick to Download100%Clean & Safe
Step 2: Since the system is unbootable, click Bootable Media and follow the on-screen instructions to create a bootable USB drive.
Step 3: Configure the computer to boot from that USB drive and access the main interface of this software.
Step 4: Right-click on the MBR disk and select Rebuild MBR.
Step 5: Click Apply to make the change take effect.
Option 3: Run the Bootrec Command
Bootrec is a command-line tool used to troubleshoot critical boot issues, such as a corrupted MBR or BCD, preventing the system from loading.
To solve the issue, run the Bootrec utility:
Step 1: Select Command Prompt under Advanced options in WinRE (Windows Recovery Environment).
Step 2: Type the following commands and press Enter after each one.
- bootrec /fixmbr: Writes a new Master Boot Record to the system drive to fix MBR corruption.
- bootrec /rebuildbcd: Scans for Windows installations and adds them to the BCD store, fixing missing or corrupted BCD.
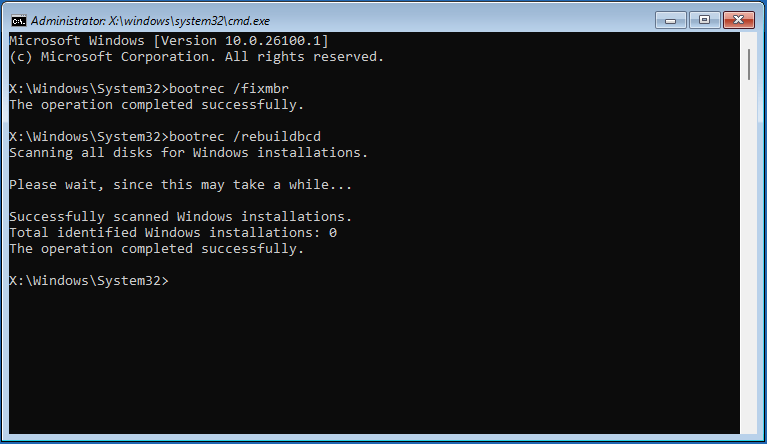
Restart Windows 10/11 and check if reboot and select proper boot device is resolved.
#4. Reactivate System Partition (MBR + Legacy BIOS Only)
Sometimes the partition holding the crucial boot files has been marked as inactive, causing the boot issue. Reactivating the system partition is an effective solution.
Option 1: Run MiniTool Partition Wizard
MiniTool Partition Wizard offers the Set Active feature to mark a system partition as active.
Step 1: Right-click on the system partition and select Set Active.
Step 2: Click Apply to put the change into effect.
Option 2: Use Command Prompt
In addition, you can execute some commands to reactivate the system partition.
Step 1: Open Command Prompt in WinRE.
Step 2: Type diskpart and press Enter.
Step 3: Run the following commands one after another:
- list disk
- select disk x (x means the system disk number)
- list partition
- select partition n (n refers to the drive letter of the system partition)
- active
- exit
#5. Check Disk Health and Fix File System Errors
Windows may fail to load properly due to a failing hard drive. To check the disk health, run the CHKDSK tool.
Step 1: Access Command Prompt in WinRE.
Step 2: Type chkdsk c: /f /r and press Enter.

After checking, restart the system and see if the error is addressed.
#6. Clean Reinstall Windows as a Last Resort
If these methods prove ineffective, consider a clean reinstallation of Windows 11/10.
This action deletes your personal files; therefore, back up vital files in advance with MiniTool ShadowMaker.
MiniTool ShadowMaker TrialClick to Download100%Clean & Safe
Since the system is unbootable, get MiniTool ShadowMaker Pro or higher to create a bootable USB drive and boot Windows from it. Then, launch this software and go to Backup for file backup.
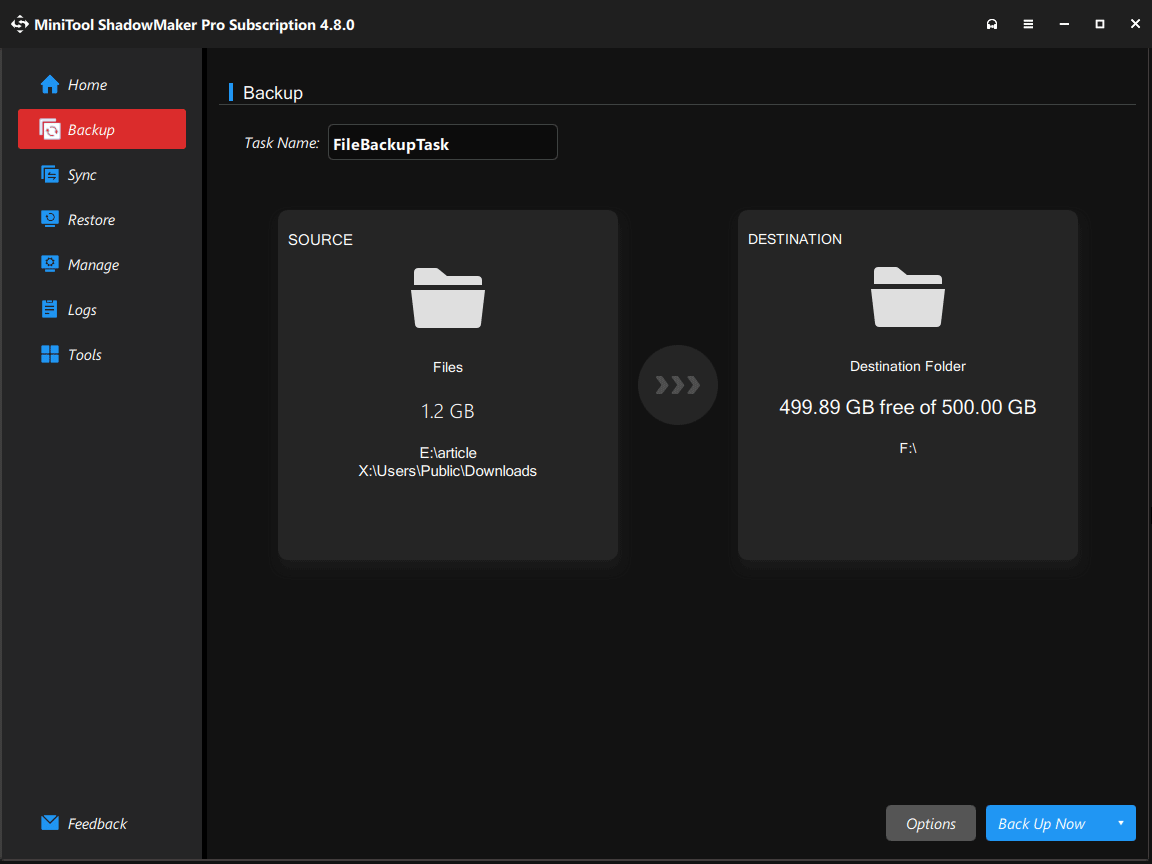
After backup, clean install Windows 11/10.
Bottom Line
Encountering the reboot and select proper boot device error is annoying. This post covers several methods to fix it. Try them.
If you experience some issues when using MiniTool software, send an email to [email protected].
Reboot and Select Proper Boot Device FAQ
A reboot means restarting a device so the operating system loads again. It normally does not delete files, applications, or settings.
A reset means restoring some or all settings to their original state and may remove installed apps, personal files, or system configurations depending on the reset type.
In short, reboot means turn off and start the system again, while reset means restore settings and reinstall the system.
About The Author

Position: Columnist
Shirley holds a bachelor’s degree in English and has been an editor at the MiniTool Team for many years. She specializes in IT-related content, with a focus on data recovery, file backup, disk management, and other technical topics. She is committed to delivering clear, accurate, and practical solutions to help users resolve common computer issues.
User Comments :