This post from MiniTool covers everything you need to know about Surface Recovery Image, including what it is, how to download it, how to create a recovery USB drive, and how to restore your Surface using the recovery image.
Quick Answer
A Surface Recovery Image is an official recovery package from Microsoft designed to reset, restore, or reinstall Windows on Surface devices. To use it:
- Format a USB drive to FAT32.
- Download the correct recovery image for your Surface model.
- Create a recovery USB drive.
- Copy recovery image files.
- Boot Surface from USB and start recovery.
Use a Surface-specific recovery image instead of a generic Windows ISO, as it includes essential Surface drivers and firmware components.
What Is a Surface Recovery Image?
A Surface Recovery Image is an official software package. It can reinstall Windows seamlessly and restore your Surface device to factory-fresh condition.
A recovery image typically includes:
- Windows installation files
- Surface-specific device drivers
- Firmware packages
- Recovery tools
- System configuration files
Unlike standard Windows installation media, a Surface Recovery Image is specifically tailored for Surface hardware, offering enhanced compatibility during recovery.

When Do You Need a Surface Recovery Image?
A Surface Recovery Image is not just for system reinstallation. It can also fix startup and operating system issues. You may need it in the following situations:
- Surface is stuck on the logo screen.
- Surface shows a black screen.
- Surface enters a boot loop repeatedly.
- Startup errors prevent Windows from loading.
- Recovery partition is missing or damaged.
- Factory reset before selling a Surface device.
- System files become corrupted.
Before You Start the Surface Recovery Image Download
If your Surface laptop isn’t working, then you need to download Surface recovery image first and use it to refresh/reset the system, which can help troubleshoot problems with the Surface machine. In addition, a flash USB drive is required to download the image. Here you need to prepare a correct USB drive depending on your Surface models:
| Surface Device | Recommended USB Size |
| Surface Pro series | 16GB or larger |
| Surface Laptop series | 16GB or larger |
| Surface Go series | 16GB or larger |
| Surface Book series | 16GB or larger |
| Surface Studio series | 16GB or larger |
| Surface RT | 8GB or larger |
| Surface 2/3 | 8GB or larger |
| Surface Hub series | 32GB |
More important thing is to make sure that the USB drive should be formatted to FAT32. When it comes to formatting a USB drive, the Windows Disk Management or Diskpart tool may be your first choice. However, both the two tools have limitations in formatting a USB drive larger than 32 GB.
To format the USB drive quickly and effectively, we highly recommend you use a professional disk management tool like MiniTool Partition Wizard. It is a multifunctional partition manager that can format a USB drive to FAT32/NTFS/exFAT/Ext/Linux Swap with a few clicks. Moreover, this tool boasts many other powerful features like converting NTFS to FAT32 without data loss, converting MBR to GPT, extending partition, measuring disk, etc.
MiniTool Partition Wizard FreeClick to Download100%Clean & Safe
Here’s how to format the USB drive using the MiniTool software.
Step 1. Launch the MiniTool program to enter its main interface, select the USB drive from the disk map and click on Format Partition from the left action panel. Also, you can right-click the USB drive and select Format.
Step 2. In the pop-up dialog box, select FAT32 from the File System drop-down menu and click on OK to save the change. Here you can set the Partition Label and Cluster Size according to your needs.
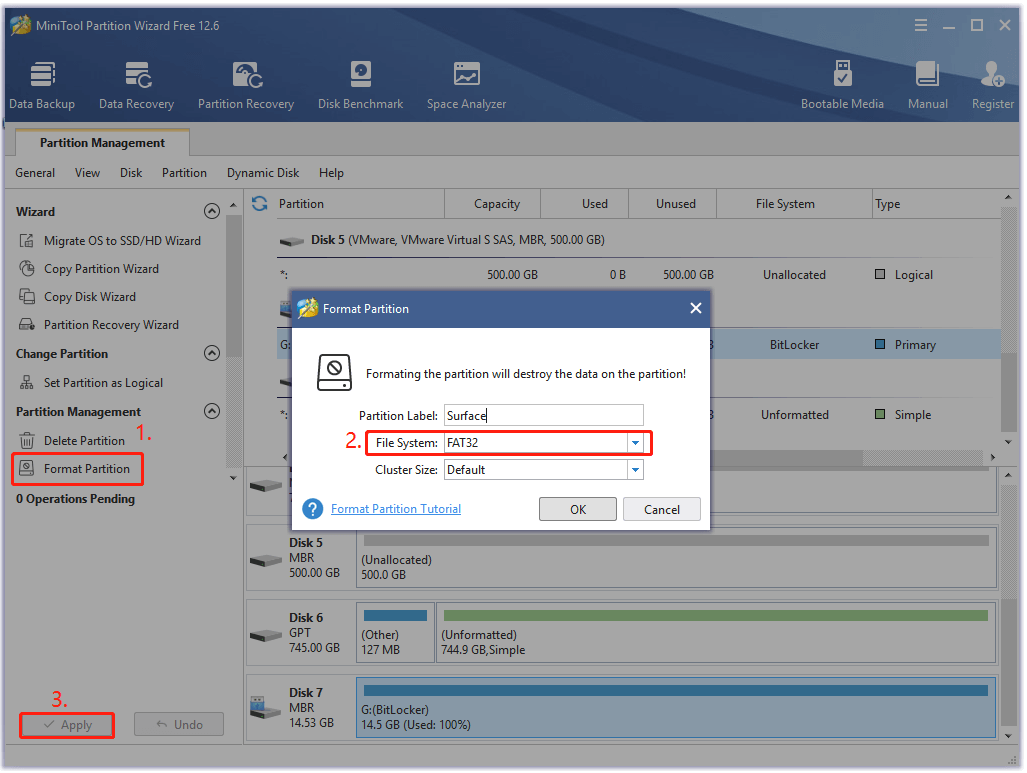
Step 3. Click on Apply to execute the pending changes. After that, you can create a Surface recovery image using the USB drive.
How to Download the Surface Recovery Image
Now, let’s see how to get the Surface recovery image downloaded on your Surface.
Step 1. Click here to open the Microsoft Surface Recovery Image Download page.
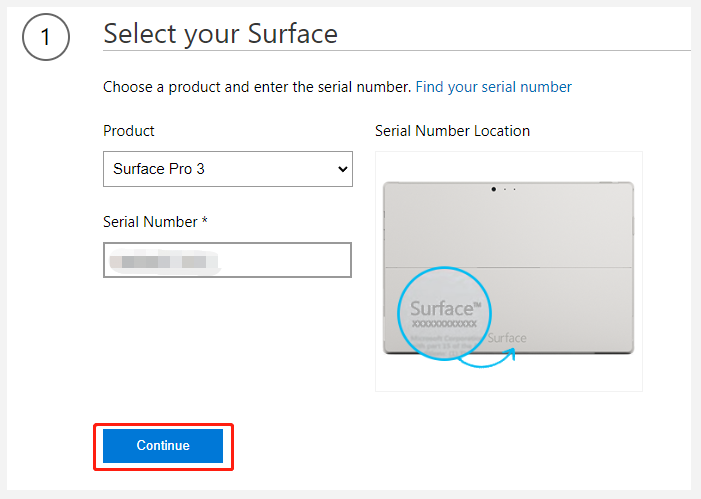
Step 2. Scroll down the page to the Select your Surface device section, and then select your Surface models such as Surface Pro 3 from the drop-down menu, enter the Serial number of your device, and click on Continue.
Step 3. Click on the Download recovery image link and select a location to save the recovery_rd.img zip file on your Surface laptop.
Step 4. Decompress the downloaded recovery_rd.img file. Once done, you can move down to the following part to create the Surface Pro 3 recovery images via the USB drive.
How to Create a Surface Recovery USB Drive
Once you have downloaded the Surface Pro 3 recovery images, you can follow the steps below to create the recovery USB drive. For that:
Step 1. Make sure that your Surface is turned on and plugged in, and insert the USB drive into the ports before you start creating the Surface Pro recovery image. If possible, we recommend you use a USB 3.0 drive.
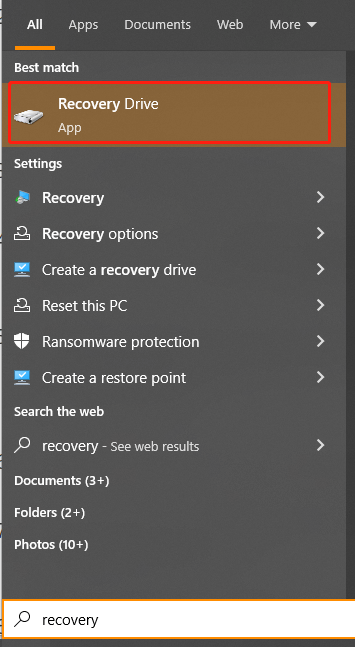
Step 2. Type recovery in the Search box and select the Recovery Drive or Create a recovery drive app from the top result. Then click on Yes in the User Account Control window to confirm the operation.
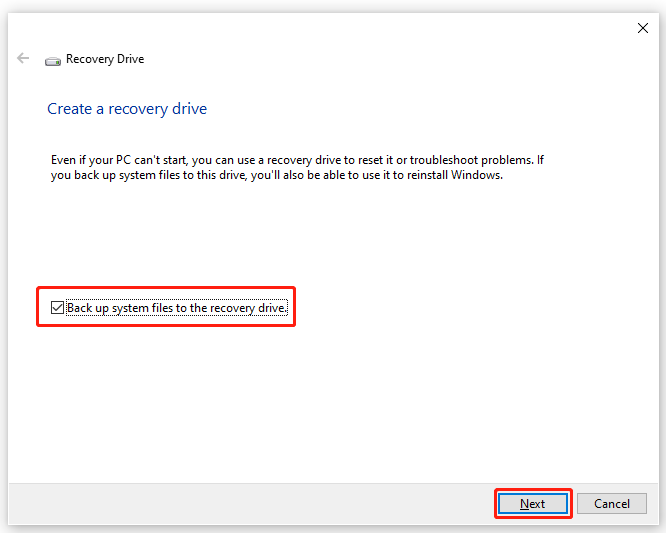
Step 3. In the pop-up window, make sure you select the checkbox next to Back up system files to the recovery drive and click on Next.
Step 4. Wait for the tool to detect your USB drive automatically. Once detected, select the USB drive and click on Next > Create. This process will copy many files/folders into the recovery drive, so you may need to wait for a while.

Step 5. When the Surface Pro recovery image is created, click on Finish.
Step 6. Now, double click the recovery_rd.img folder you just downloaded, press Ctrl + A keys to select all the files inside the recovery image folder, right-click them and select Copy.
Step 7. Open your USB recovery drive you just created, right-click it and select Paste > Replace the files in the destination. Then wait for the copying process to complete.
Once done, make sure you Safely eject the USB drive from the taskbar. Then you can boot your Surface from the USB recovery drive and perform a reset/refresh of your system with the image.
How to Restore Surface Using Recovery Image
Sometimes you may need to reset or restore your Surface to the factory settings when the system is not working properly. How to reset the Surface using the USB recovery drive? Here are detailed steps:
Warning: Resetting the Surface will delete all personal files, and remove all apps and settings. Before you start, make sure you have backed up the product keys, and installation files of your desktop apps like Microsoft Office, Microsoft Project, and Visio so that you can reinstall them after the reset.
Step 1. Make sure that your Surface is turned off and the USB recovery drive is inserted into your machine properly.
Step 2. Press and hold the volume-down button at the side of your Surface while you press and release the Power button.
Step 3. Once the Surface or Microsoft logo appears, release the volume-down button.
Step 4. Select the Language and Keyboard layout that you want when prompted.
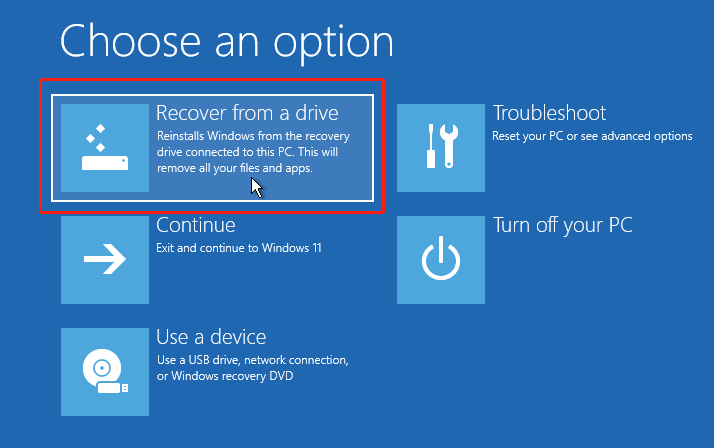
Step 5. In the Choose an option, select Troubleshoot and select Recover from a drive. If you are asked for a recovery key, select the Skip this drive at the bottom of the screen.
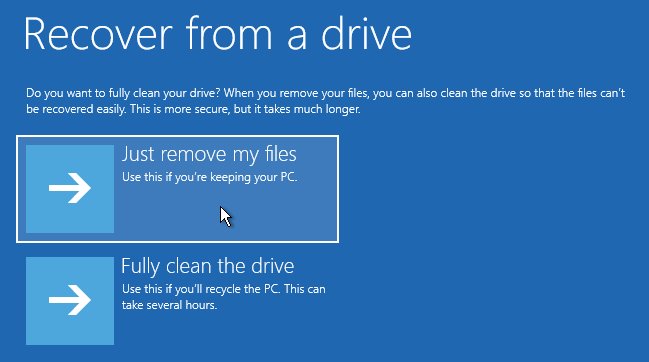
Step 6. You can select either Just remove my files or Fully clean the drive. The former option will refresh but keep your PC, while the latter will recycle your Surface and may take hours to complete.
Step 7. Click on Recover, then your Surface will restart and display the Surface logo during the resetting process.
Surface Recovery Image Not Working? Try These Fixes
If the recovery process fails, try these solutions.
Fix 1. Verify FAT32 Formatting
Recovery USB drives frequently fail when formatted as NTFS or exFAT. Reformat the USB drive to FAT32 and recreate the recovery media.
Fix 2. Check the Surface Model Image
Surface Recovery Images are device-specific. Make sure to download the correct Surface model image.
Fix 3. Recreate Recovery Media
Corrupted download files or interrupted extraction can result in invalid recovery drives. Delete the existing files and recreate the USB drive.
Fix 4. Enable USB Boot
Verifying that USB boot options are enabled is necessary. Here are the steps:
- Turn off Surface.
- Press and hold Volume Up.
- Press and release Power while holding Volume Up.
- The UEFI menu will appear. Look for Boot Configuration or Configure Alternate System Boot Order.
- Ensure that USB Storage is at the top of the boot list, or enable booting from USB Devices.
Fix 5. Temporarily Disable Secure Boot
In certain situations, Secure Boot settings may hinder the detection of recovery media. To resolve this, temporarily disable Secure Boot, complete the recovery process, and then re-enable it afterwards.
Surface Recovery Image vs Windows ISO
Many users are curious if a generic Windows ISO file can substitute for a Surface Recovery Image. Here’s the comparison:
| Feature | Surface Recovery Image | Windows ISO |
| Surface drivers included | Yes | No |
| Surface firmware support | Yes | Limited |
| Device optimization | Yes | No |
| Recommended for Surface devices | Yes | Not always |
A Surface Recovery Image is typically the better choice as it is specifically designed for Surface devices.
Key Takeaways
- A Surface Recovery Image is used to reinstall Windows and restore Surface devices.
- Recovery images contain drivers and firmware specific to Surface devices.
- Typically, a USB drive with at least 16GB of storage is required.
- USB drives should be formatted to FAT32.
- Please note that recovery procedures may erase personal data.
- Be sure to back up important files before resetting your device.
Surface Recovery Image FAQ
Find it on the device or packaging, or run wmic bios get serialnumber in Command Prompt if Windows boots. If not, check the UEFI menu. If all else fails, use a generic Windows ISO.
- Incorrect boot order settings.
- Improper USB formatting (not FAT32).
- Enabled Secure Boot restrictions.
- Wrong button timing at startup.
- Misplaced recovery files in the subfolder.
- Corrupted USB media.
- Wrong recovery image.
- Disabled USB boot.
Conclusion
A Surface Recovery Image provides a reliable way to reinstall Windows and restore Surface devices affected by startup errors, system corruption, or recovery failures. Creating recovery media before major problems occur can save time and simplify troubleshooting later.
Additionally, you can send us an email via [email protected] when you have difficulty formatting the USB drive with MiniTool Partition Wizard.
About The Author

Position: Columnist
Charlotte is a technology columnist with a strong focus on the Windows operating system, specializing in disk management, backup, and data recovery. She is passionate about analyzing computer errors, identifying root causes, and delivering practical solutions. In her free time, she stays updated on the latest developments in computer systems and hardware while continuously learning new technologies to broaden her expertise. Her writing style is clear and easy to understand, making complex technical topics accessible even to users with limited computer knowledge.
User Comments :