Event ID 8193: Volume Shadow Copy Service Error
Volume Shadow Copy Service, also known as Volume Snapshot Service or VSS, is an inbuilt utility in Windows that allows you to create backup snapshots or copies of computer files/volumes whether you are in use or not. When your files are lost or the system is crashed, you can use it to restore them.
However, when Volume Shadow Copy Service is incapable of completing a backup or restore operation, you will receive Event ID 8193 in Event Viewer. The complete error message is: Event ID: 8193. Volume Shadow Copy Service error: Unexpected error calling routine. Access is denied.
Many factors can contribute to VSS error 8193 Windows 10. Here are some possible culprits:
- Volume Shadow Copy Service is disabled.
- The Network Service account is disabled and System Writer is initialized.
- Other applications that use Volume Shadow Copy Service interfere with the process.
- Some components of Volume Shadow Copy Service are missing or corrupted.
- The disk space is insufficient.
How to Fix Event ID 8193: Volume Shadow Copy Service Error on Windows 10/11?
Fix 1: Enable VSS Manually
First, you should check if Volume Shadow Copy Service is disabled. If so, you can start it manually. If not, try stopping and restarting it to check for any improvements.
Step 1. Open Control Panel and choose Small icons beside View by.
Step 2. Tap on Administrative Tools > Service > Volume Shadow Copy.
Step 3. Right-click on Volume Shadow Copy to choose Properties in the drop-down menu.
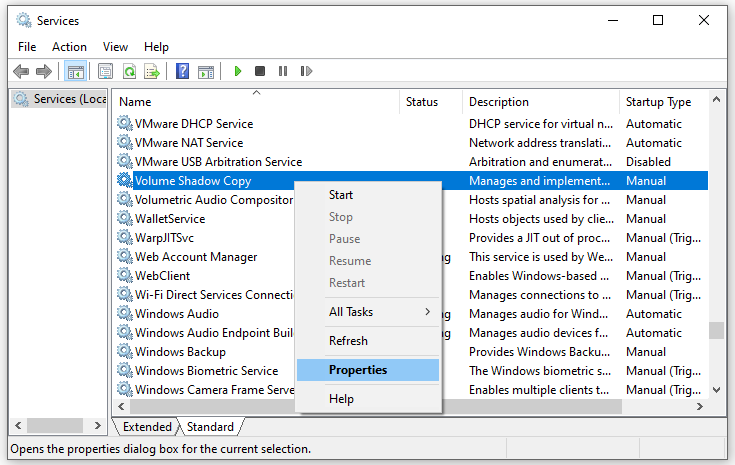
Step 4. Set the Start type to Automatic.
Step 5. Click on Start > Apply > OK to enable Volume Shadow Copy Service and run it.
Fix 2: Run SFC & DISM
If the VSS components or system image are corrupted, it will result in VSS Event ID 8193. System File Checker (SFC) can help you to scan your Windows system files for corruption or any other changes. Once it detects some system files that have changed, it will replace the files with the correct version. If SFC cannot repair the detected files, you can use Deployment Image Servicing and Management (DISM) to repair them. Here’s how to do it:
Step 1. Type cmd in the search bar to locate Command Prompt and right-click on it to select Run as administrator.
Step 2. In the command window, type sfc /scannow, hit Enter and wait for the process to complete.
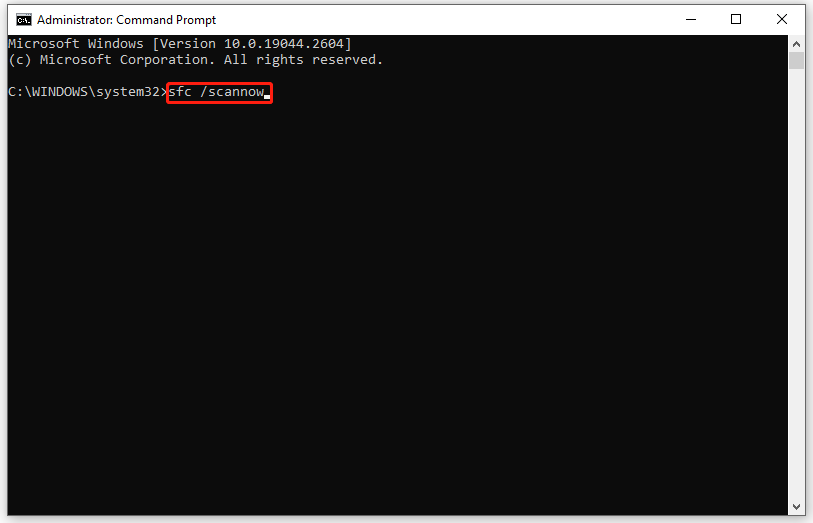
Step 3. If SFC finds some errors and it cannot solve them, run the following commands.
- DISM /Online /Cleanup-Image /CheckHealth
- DISM /Online /Cleanup-Image /ScanHealth
- DISM /Online /Cleanup-Image /RestoreHealth
Step 4. Reboot your computer to examine if Event ID 8193 disappears.
Fix 3: Delete Temporary Internet Files
The disk in which the shadow copy is being created might be running low on space, leading to Event ID 8193 VSS. To spare more storage space, you can delete the Temporary Internet files.
Step 1. Type control panel in the search bar and hit Enter.
Step 2. Press Network and Internet > Internet Options.
Step 3. In the General tab, click on Delete under Browsing history. Also, you can tick Delete browsing history on exit, which will delete temporary internet files each time you close your browser.
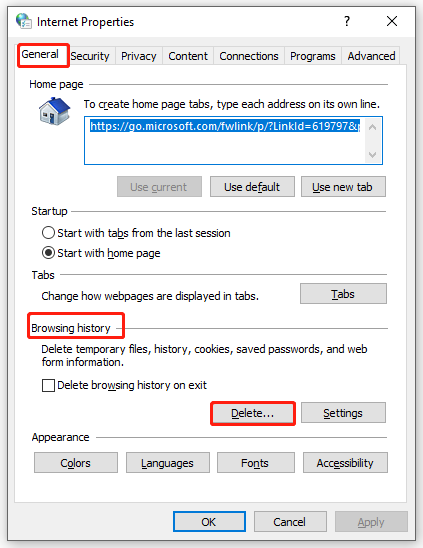
Step 4. Click on Apply & OK.
Step 5. Restart your computer to see if VSS Event ID 8193 persists.
Fix 4: Allow Permissions for Network Service Account
When the Network Service account doesn’t have appropriate permissions in Registry Editor, Event ID 8193 volume shadow copy service error: Access is Denied. might also crop up. To solve this issue, make sure to grant all permissions to the Diag key. Here are two ways for you: one is to allow the permissions directly via Registry Editor, the other is via Windows PowerShell.
# Way 1: via Registry Editor
Step 1. Press Win + R to evoke the Run box.
Step 2. Type regedit and hit Enter to launch Registry Editor.
Step 3. Navigate to the following path:
Computer\HKEY_LOCAL_MACHINE\SYSTEM\CurrentControlSet\Services\VSS\Diag
Step 4. Right-click on the Diag key and select Permissions in the drop-down menu.
Step 5. Click on NETWORK SERVICE > check Allow beside Full Control > hit OK to save the changes.
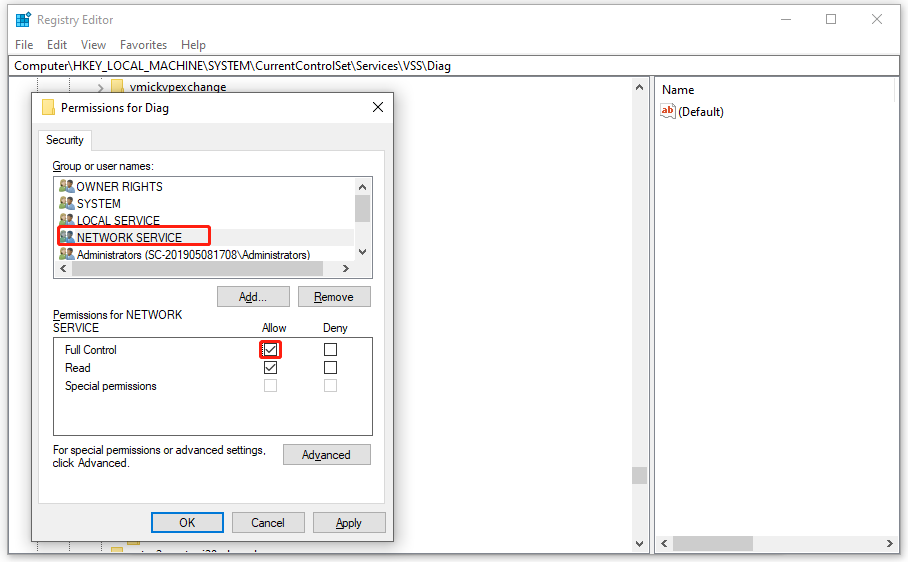
Step 6. Exit Registry Editor.
Changing the registry can be risky, so you had better create a backup of the registry database in advance. If something goes wrong, you can follow this guide to restore the registry from the backup - How to Backup and Restore Registry in Windows 10.
# Way 2: via Windows PowerShell
Step 1. Right-click on the Start icon and highlight Windows PowerShell (Admin).
Step 2. Run the following command one by one and don’t forget to hit Enter after each command.
- $path = ‘HKLM:\System\CurrentControlSet\Services\VSS\Diag\’
- $sddl = ‘D:PAI(A;;KA;;;BA)(A;;KA;;;SY)(A;;CCDCLCSWRPSDRC;;;BO)(A;;CCDCLCSWRPSDRC;;;LS)(A;;CCDCLCSWRPSDRC;;;NS)(A;CIIO;RC;;;OW)(A;;KR;;;BU)(A;CIIO;GR;;;BU)(A;CIIO;GA;;;BA)(A;CIIO;GA;;;BO)(A;CIIO;GA;;;LS)(A;CIIO;GA;;;NS)(A;CIIO;GA;;;SY)(A;CI;CCDCLCSW;;;S-1-5-80-3273805168-4048181553-3172130058-210131473-390205191)(A;ID;KR;;;AC)(A;CIIOID;GR;;;AC)S:ARAI’
- $acl = Get-Acl -Path $Path
- $acl.SetSecurityDescriptorSddlForm($sddl)
- Set-Acl -Path $Path -AclObject $acl
Step 3. After all the commands are complete, quit Windows PowerShell.
Fix 5: Uninstall Suspicious Applications
Event ID 8193 can also be caused by the interference of some applications. You can visit Event Viewer to check if some events that have similar dates hinder the normal function of Volume Shadow Copy Service.
Step 1. Type eventvwr.msc in the Run dialog and hit Enter to open Event Viewer. If prompted by UAC, click on Yes.
Step 2. In Event Viewer, expand Windows Logs and double-click on Applications.
Step 3. In the Actions pane, hit Filter Current Log.
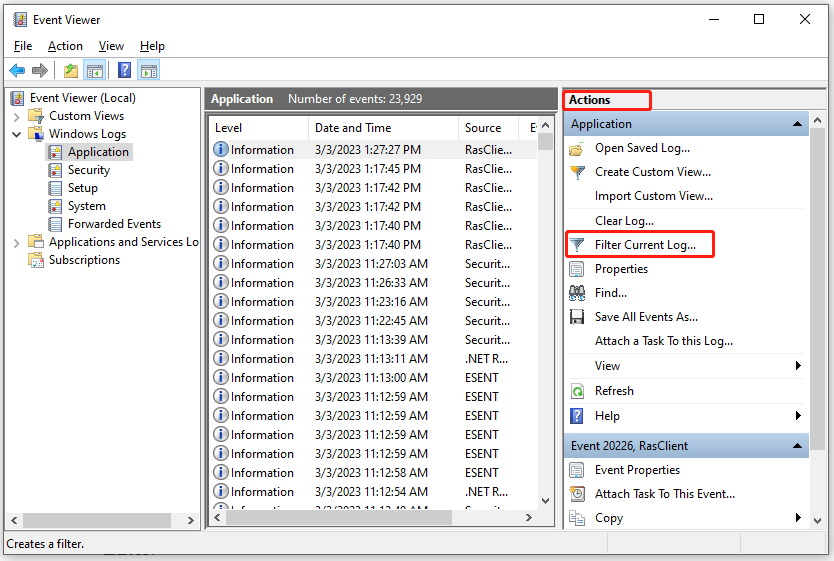
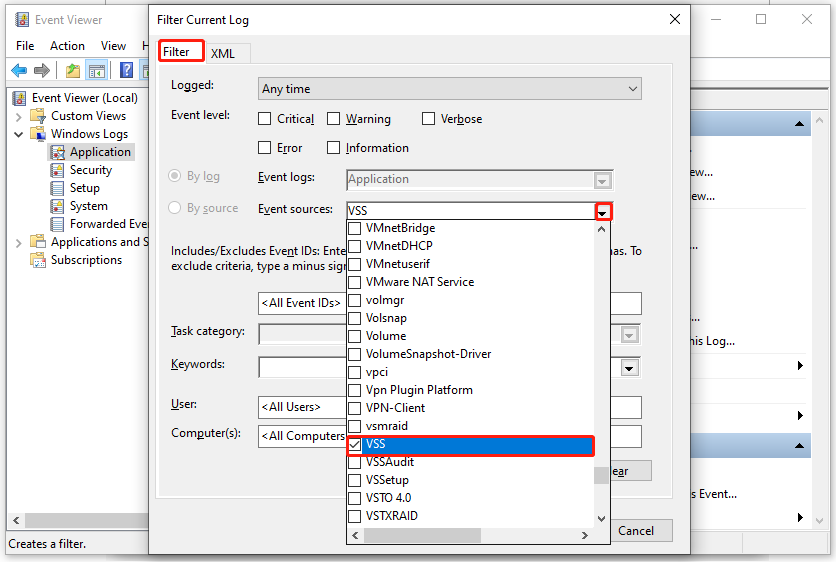
Step 4. Under the Filter tab, select VSS from Event sources drop-down menu. Select other options according to your needs and hit OK.
Step 5. Review the events that have a similar date and time as Event ID 8193 and double-click on them to hit Event Log Online Help. Follow the instructions to fix the error. If the error is still there, please uninstall the suspicious application or ask its vendor for help.
Fix 5: Use System Restore Point
Another option is to use a system restore point to revert your computer’s state to a previous point before VSS Event ID 8193 appears. This feature restores your Windows device to an earlier state by reversing the system files, installed applications, Windows Registry and system settings.
Step 1. Press Win + S to evoke the search bar > type Create a restore point > hit Enter.
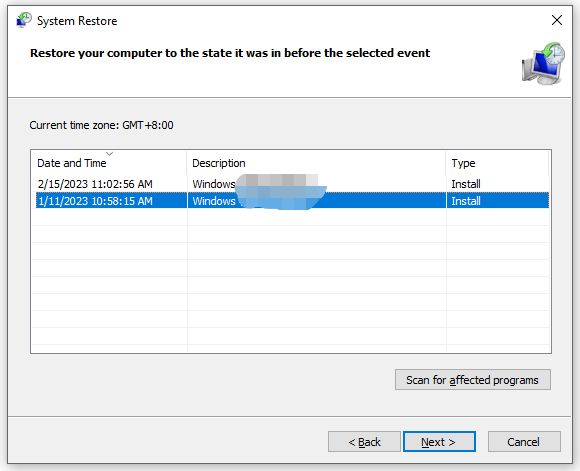
Step 2. Click on System Restore and hit Next.
Step 3. Now, you can choose a restore point based on Date and Time (before Event ID 8093 appears) and hit Next.
Step 4. After the process is done, click on Finish to quit the System Restore window.
Warning: The system restore process cannot be interrupted once it starts.
Fix 6: Reinstall Your Windows
The last resort to address Event ID 8193 is to repair the Windows operating system using the installation media. Follow the guidelines below:
Make sure you have a stable internet connection and prepare an empty USB disk with a minimum of 8 GB storage space. If there is some data on the flash drive, it might be lost.
Move 1: Create a Bootable USB Disk
Step 1. Download Windows 10 Media Creation Tool from the official Microsoft website.
Step 2. Run it and then accept the license terms.
Step 3. Check Create installation media (USB flash drive, DVD, or ISO file) for another PC and hit Next.
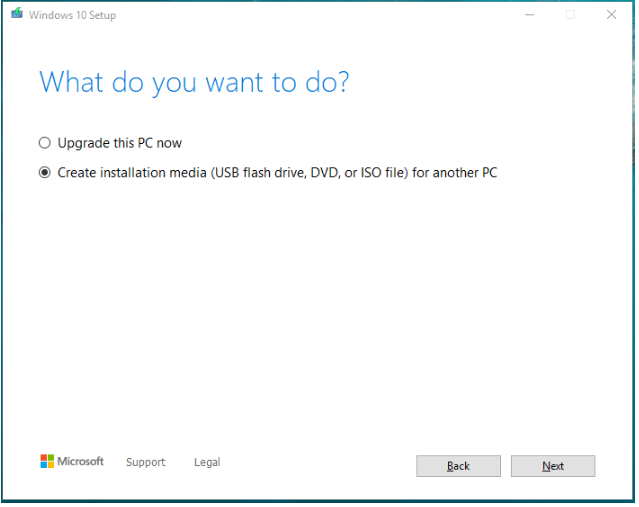
Step 4. Choose Language, Architecture & Edition and hit Next to continue.
Step 5. Tick USB flash drive and hit Next.
Step 6. Connect your USB drive to the computer and hit Next. After Windows 10 installation files are downloaded, hit Finish.
Move 2: Reinstall Your System
Step 1. Shut down your computer and then boot your computer into BIOS.
Step 2. Set your device to boot with the bootable USB disk you created just now.
Step 3. When you see the Windows Setup page, click Next to contine if you think the default language and preference is fine.
Step 4. Click on Install now > I don’t have a product key > select the Windows edition you want to install > hit Next > press I accept the license terms > hit Next > Custom: Install Windows only (Advanced) > select the partition where the system is installed ( usually, choose drive 0) > hit Delete > Drive 0 Unallocated Space > hit Next. Now, Windows Setup will install your system from scratch.
Suggestion: Back up Your Computer with MiniTool ShadowMaker
As you can see, the manual troubleshooting is so lengthy and changing system settings can be risky. What’s more, Event ID 8193 is so tricky that you are unable to restore your files, folders, or system and even in peril of accidental data loss.
Having that in mind, it is strongly recommended to create a backup of your operating system and important files with a piece of third-party professional backup software – MiniTool ShadowMaker. With this tool in hand, you can back up your files, folders, disks, partitions, and system easily on Windows devices and restore them when data loss crops up. When the operating system is crashed, you can use the system image you backed up to restore the system to an earlier state. At the same time, it also supports file sync and disk clone. Now, let’s see how to back up your system within just a few steps:
Move 1: Back Up Your System
Step 1. Download and follow the installation wizard to install MiniTool ShadowMaker Trial (free for 30 days).
MiniTool ShadowMaker TrialClick to Download100%Clean & Safe
Step 2. Launch it and hit Keep Trial.
Step 3. Under the Backup page, you can see the system is selected by default in SOURCE, so you just need to select a destination path for the backup image files in DESTINATION ( Here, a USB flash drive or external hard drive is preferred).
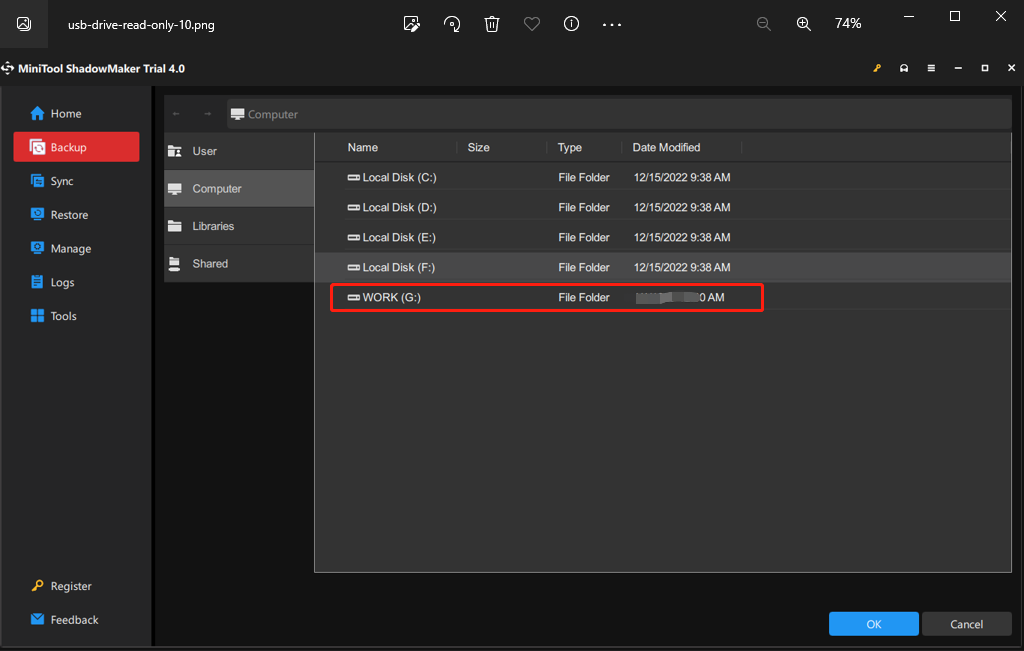
If you need to back up your important files, you can hit SOURCE > Folders and Files > choose a storage path in DESTINATION.
Step 4. Click on OK to return to the Backup page and press Back Up Now to start the task immediately.
Move 2: Create a Bootable USB Disk
After the system backup is done, you need to create a bootable USB disk. When there are some severe system changes on your computer and it fails to boot, you can boot your device from this bootable disk and perform a system recovery. Here’s how to do it:
Step 1. Launch this program and go to the Tools page.
Step 2. Tap on Media Builder > WinPE-based media with MiniTool plug-in > choose USB Flash Disk > hit Yes when the warning message appears.
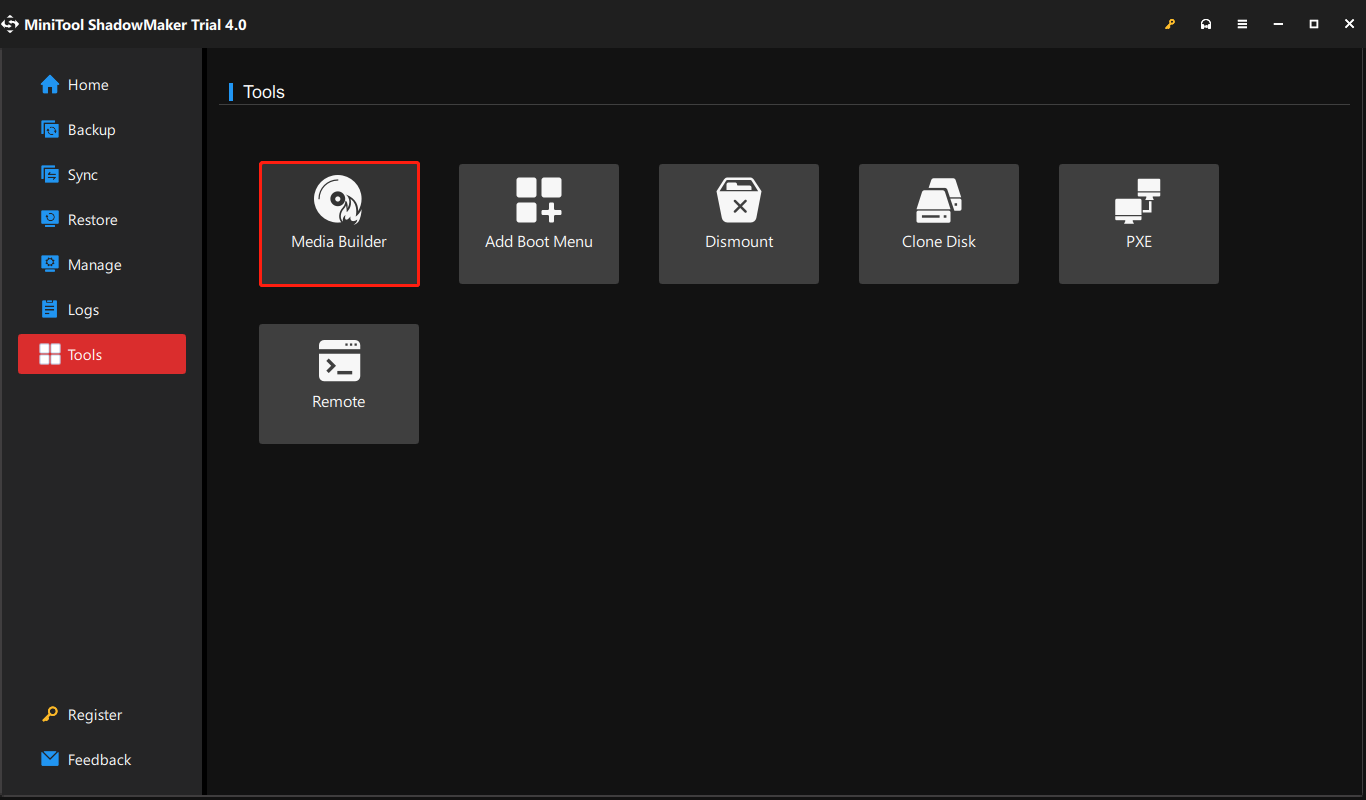
Step 3. After the process is complete, hit Finish.
We Need Your Voice
That’s everything about Event ID 8193: Volume Shadow Copy Service error today. If you don’t know the accurate cause of it, you can try the solutions mentioned above one by one until Event ID 8193 disappears from your Windows machine. Most importantly, it is necessary to develop a habit of backing up as a plan B in case of unexpected accident data loss and system crashes.
Sincerely hope that you can benefit from this post. If you are still puzzled about the solutions for Event ID 8193 or MiniTool ShadowMaker, leave your ideas in the comment zone or contact us via [email protected]. Appreciate your time!
User Comments :