You can find all the information about hidden files at MiniTool. To recover hidden files on Windows, try using data recovery software, restoring from previous versions, or checking the Recycle Bin. To show hidden files, use File Explorer or Command Prompt. Finally, learn how to unhide files permanently and prevent them from being hidden.
An Introduction to Hidden Files
What you see when you open a folder isn’t the whole truth. Operating systems have hidden files that silently influence how your computer operates.
These files typically store system configuration information, maintain system integrity, and sometimes protect your privacy.
However, because they are invisible by default, you may not even know they exist. The following section will explain the significance of hidden files and common reasons they are hidden.
What Are Hidden Files
Hidden files are items stored within the file system, which can be either files or directories. They remain hidden in File Explorer or command-line outputs unless the hidden attribute is removed or the files are explicitly set to be visible.
These files typically fall into two categories:
- System-hidden files: These include essential system configuration files, user profiles, or cache files from specific applications, which are hidden by default.
- User-hidden files: These are files that users choose to hide, such as important work files or private data.
Why Are the Files Hidden
The main reasons for hiding files are as follows:
- Protect system files: Prevent accidental deletion or modification of critical files and avoid system crashes.
- Maintain a clean interface: Reduce the number of configuration files seen in folders and improve the user experience.
- Store configuration data: Applications and the system store settings, caches, and other information in hidden files.
- Enhance security and privacy: Some files may contain sensitive information; hiding them reduces the risk of unauthorized access.
- Meet compatibility and operational requirements: Some background programs rely on hidden files to maintain normal operation.
If you need to troubleshoot problems or modify configurations, you can choose to show hidden files, but be careful to avoid accidentally deleting files.
And if you accidentally delete hidden files, there are several methods to help you recover them.
How to Recover Hidden Files on Windows (Deleted/Lost)
This section teaches you how to recover deleted hidden files on Windows using recovery software, File History backups, and the Recycle Bin.
Before recovery, learn about these common causes of file loss or deletion:
- Accidental operation (deleting or changing attributes)
- System update or crash
- Virus or malware attack
- Corruption or formatting of external devices (USB flash drive, SD card)
Now, try the following recovery methods one by one to recover hidden files on Windows.
Method 1: Recover Using MiniTool Power Data Recovery
First, we recommend MiniTool Power Data Recovery, a professional data recovery software, to recover deleted files.
MiniTool boasts powerful data scanning and recovery capabilities, penetrating deep into the disk’s underlying structure. This allows it to identify files marked as hidden or that have already been deleted.
In addition, this tool supports various storage devices, such as hard drives, USB flash drives, SD cards, and more. Almost all file types are supported, such as documents, pictures, videos, audios, and so on.
As a user-friendly tool, it provides a preview function, which allows you to verify the file content before recovery to avoid unnecessary operations.
Furthermore, its recovery process does not overwrite existing data, reducing the risk of secondary damage.
Now, download and install this free file recovery software to enjoy a 1 GB free recovery quota.
MiniTool Power Data Recovery FreeClick to Download100%Clean & Safe
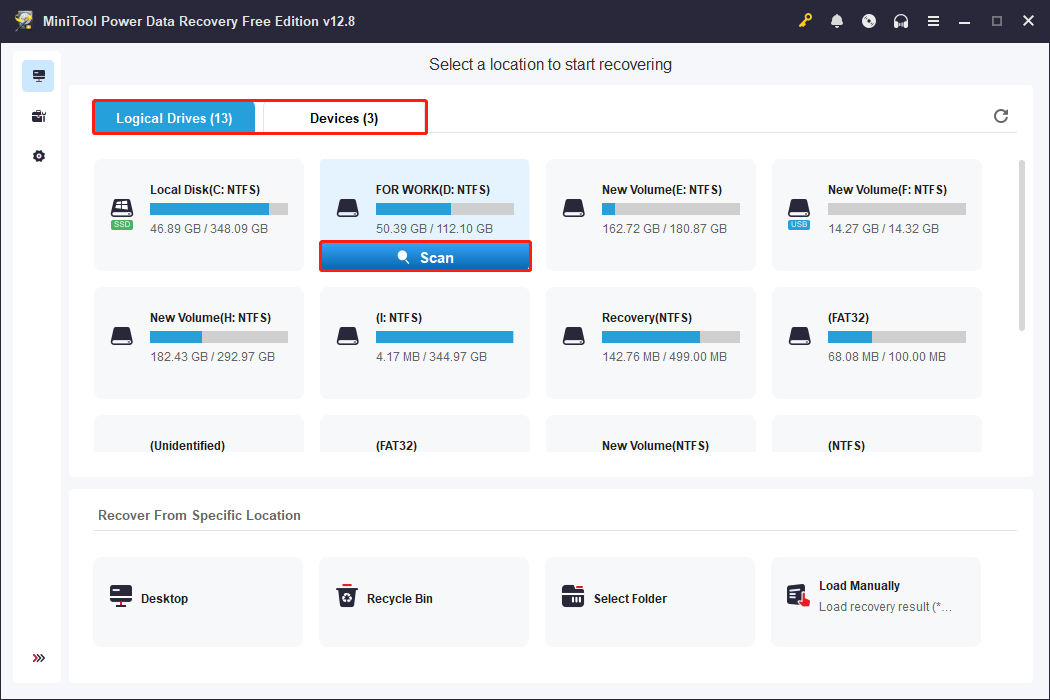
Step 1: Open the software and scan the disk
Launch MiniTool Power Data Recovery. All available partitions and disks will be displayed in the main interface.
Under Logical Drives or Devices, find the partition or disk where the hidden files are stored. Select it and click the Scan icon. The software will perform a deep scan of the selected disk.
Step 2: Browse and find the target files
The found files will be displayed progressively during the scan. After the scan is completed, find the target file by using the Path, Type, Filter, and Search features.
- Path: Displays the file’s original storage location on the disk. Suitable for situations where recovery based on the directory structure is required, such as system configuration files.
- Type: Categorizes scan results by file type, such as documents, pictures, videos, audios, and more. Particularly useful when restoring a certain category of file.
- Filter: Provides diverse filtering functions, allowing filtering by file type, modification date, file size, and file category. It helps further narrow the scope.
- Search: Allows you to directly enter a partial or full filename to search for the specific hidden files.
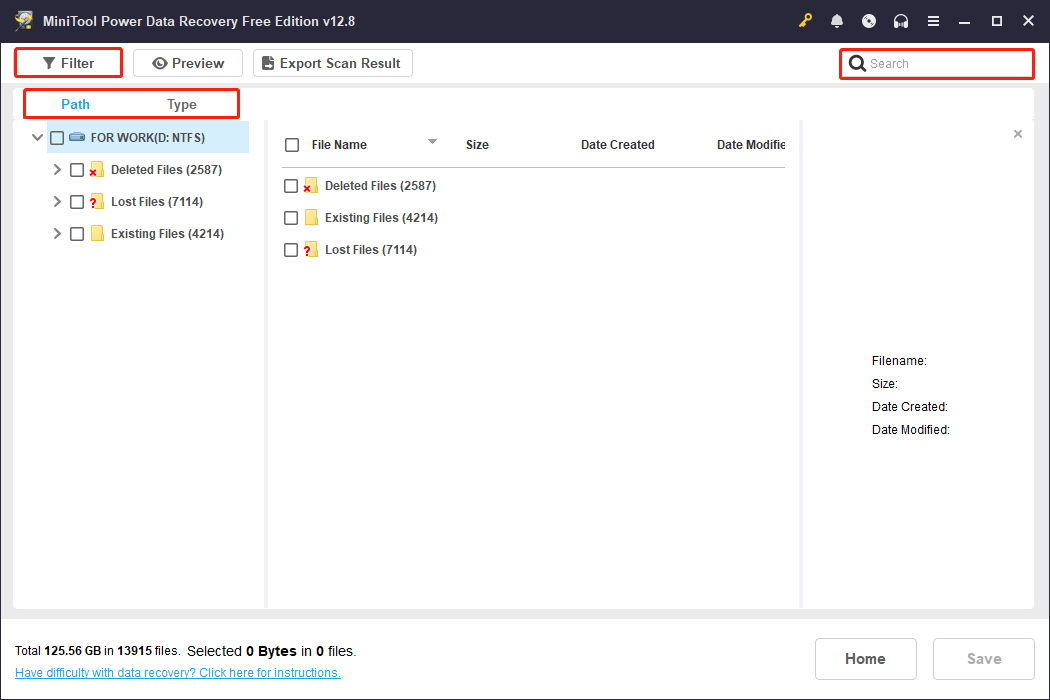
Before recovery, double-click the file to preview and confirm whether the content is correct. This operation avoids recovering invalid or incorrect files.

Step 3: Select and recover files
Select the hidden files that need to be recovered and click the Save button. Then, choose a safe storage location (do not save to the original disk) and click OK to start recovery.
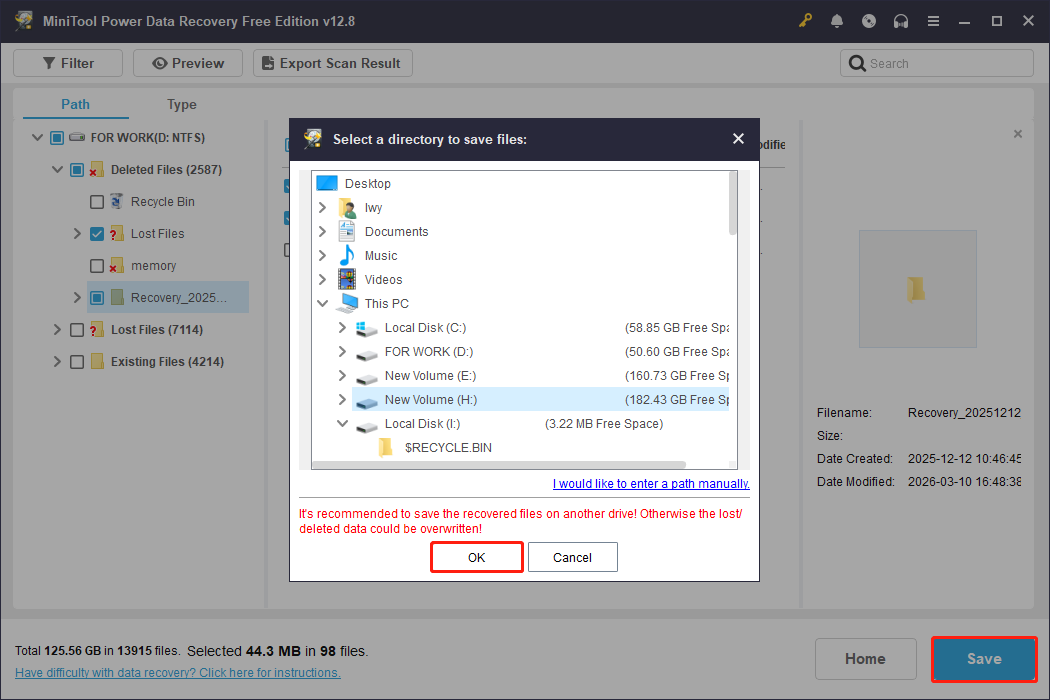
When the Recovery Completed window shows, click View Recovered to check your files.
Method 2: Restore from the Previous Versions
If you have the File History service enabled and previously added deleted hidden files to the backup source, try restoring from previous versions.
Windows automatically saves snapshots of these hidden files when File History is enabled. They can be recovered using the previous versions feature, even if the files are accidentally deleted.
Here’s how to recover them from previous versions.
Step 1: Navigate to the folder where the deleted hidden files were stored.
Step 2: Right-click the folder and choose Restore previous versions.
Step 3: When all previous versions of this folder are displayed, select the one containing the deleted files you need and click Restore.
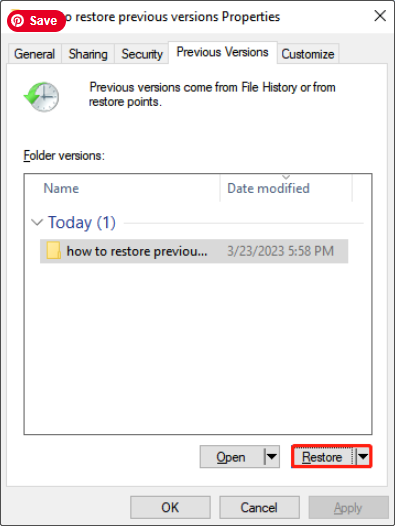
The folder will be restored to the selected version. Alternatively, to restore it in another location, click the dropdown button next to Restore, click Restore to, and select the target location.
After the restoration finishes, open that folder and check if the lost hidden files appear.
Method 3: Restore from the Recycle Bin
You can also take advantage of the Recycle Bin when recovering hidden files.
When files are deleted, they are not immediately cleared from the disk, but are temporarily moved to the Recycle Bin for storage. The same applies to hidden files.
This operation is simple and quick and will not destroy the original data. Here is how to restore hidden files from it.
Step 1: Double-click the Recycle Bin icon to open it.
Step 2: Scroll down the list to find the deleted hidden files.
Step 3: Select them, right-click the selected area, and choose Restore.
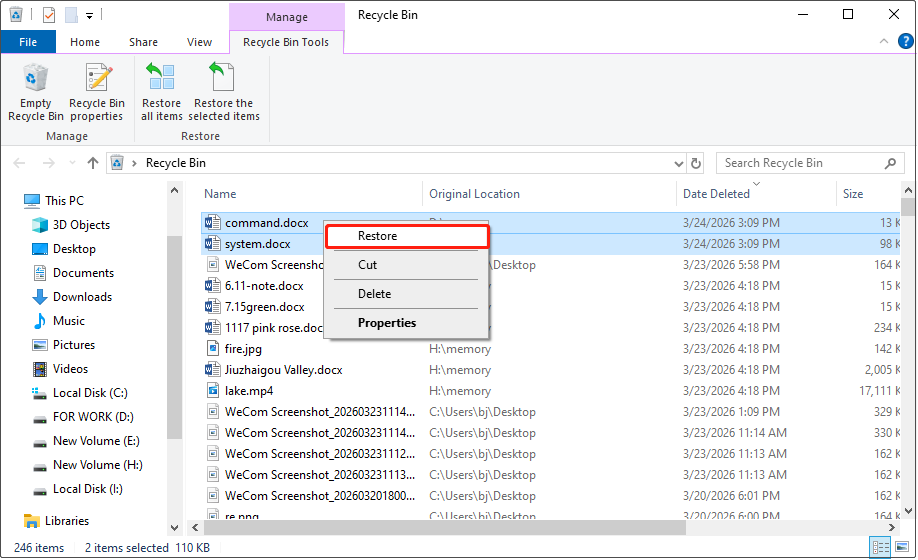
Then, the files will be restored to the original location.
In case you don’t know how to show hidden files, the following section provides specific methods.
How to Show Hidden Files on Windows
While these hidden items usually run silently in the background, sometimes you might need to show them to better manage and protect your data.
These hidden files can be easily made visible again through enabling the hidden items option, changing folder settings, or running the command.
Option 1: Show Hidden Items Using the Ribbon
Enabling “Hidden items” in Windows File Explorer is the most intuitive and fastest method. This eliminates the need to go into complex system settings or command line operations.
When this option is turned on, all files and folders marked as hidden will appear. Here is how to enable it.
Step 1: Press Win + E to open File Explorer.
Step 2: Switch to the View tab and check the box for Hidden items.

All hidden files and folders will be displayed on your computer.
![[SOLVED] Show Hidden Files Button Not Working on Windows 10 - Fix](https://images.minitool.com/minitool.com/images/uploads/2018/11/win10-show-hidden-files-not-working-thumbnail.jpg)
Option 2: Show Hidden Files, Folders, and Drives Using Folder Options
You can also display hidden files using folder options. This system-wide setting enables the visibility of hidden files effectively. Follow the steps to turn it on.
Step 1: Right-click the Start button and choose File Explorer.
Step 2: Go to the View tab and click the Options module.
Step 3: Select the option for Change folder and search options.
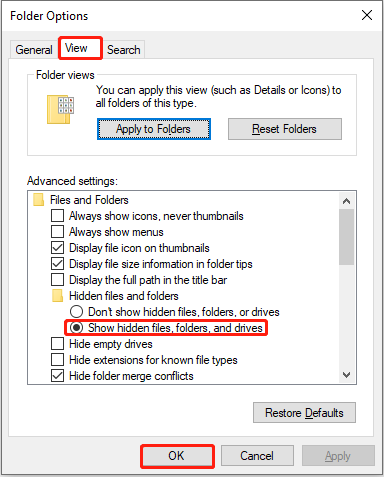
Step 4: In the dialog box, go to the View taband navigate to Hidden files and folders.
Step 5: Check the box for Show hidden files, folders, and drives.
Step 6: Click OK. The settings will take effect immediately, and hidden contents will be displayed.
Option 3: Show Hidden Files Using Command Prompt
Some malware makes files invisible in Explorer by modifying file attributes such as hidden or system. The attrib command force the file to be displayed again.
Compared to changing folder settings in File Explorer, this method not only shows hidden files but also removes their hidden attribute, making them visible as regular files.
Follow the steps below to execute the attrib command:
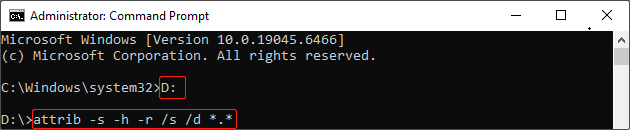
Step 1: Type Command Prompt in the Windows search box, right-click the best match, and choose Run as administrator.
Step 2: Type the letter of the infected drive followed by a colon (e.g., D:) and press Enter.
Step 3: After that, type attrib -s -h -r /s /d *.* and press Enter.
- -s: Removes the system file attribute, making the file no longer marked as a system file.
- -h: Removes the hidden attribute, making the file visible again.
- -r: Removes the read-only attribute, allowing the file to be edited or deleted.
- /s: Recursively applies to files in the current directory and all subdirectories.
- /d: Applies to folders, not just files.
This method bypasses the virus’s restrictions on the graphical interface and can quickly and effectively retrieve maliciously hidden files.
How to Unhide Specific Files Permanently
While temporarily showing hidden files can fix the issue, if you need long-term access to the files, it is best to permanently unhide them.
This not only avoids frequent switching of display options but also ensures that files remain visible and available for daily work.
Here is how to permanently unhide specific files.
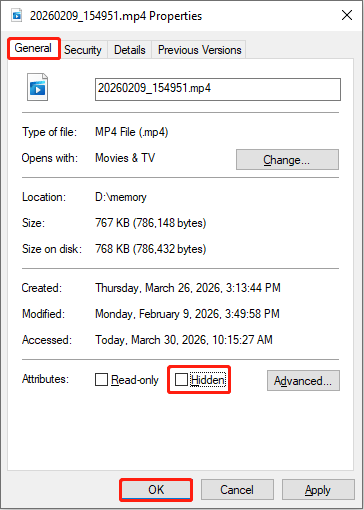
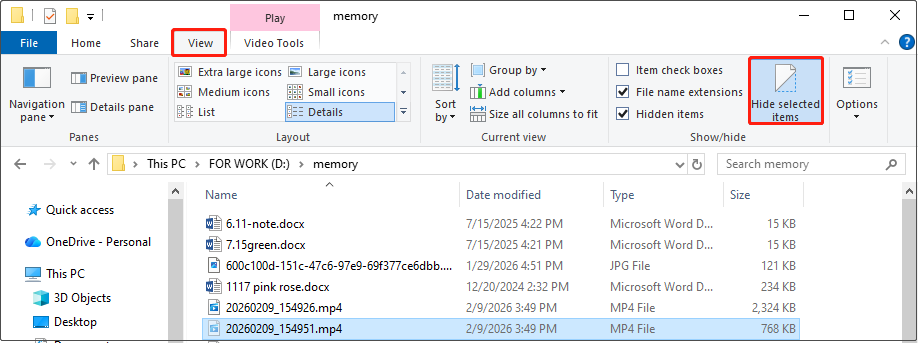
Step 1: Press Win + E to open File Explorer.
Step 2: Right-click the target file and choose Properties.
Step 3: Under the General tab, uncheck the box for Hidden and then click OK.
Alternatively, you can switch to the View tab, select the target hidden file, and uncheck Hide selected items.
Read the last section to learn how to reduce the risk of hidden files being accidentally deleted.
How to Prevent Hidden Files from Being Accidentally Deleted
In the end, to prevent hidden files from being deleted unintentionally in the future, take the following measures:
- Set read-only attribute: Enable the read-only attribute for critical files to prevent accidental deletion.
- Manage permissions: Restrict access to disks containing important files, preventing ordinary users from accessing them.
- Use file protection tools: Enhance security with encryption or anti-deletion software.
- Install antivirus software: Prevent malware from disguising or deleting hidden files.
- Be cautious with operating system directories: Avoid randomly deleting unknown files in system folders.
- Back up files regularly: Helps recover files effectively and quickly even if deleted.
Final Words
When you need to recover hidden files on Windows, try data recovery software or check previous versions and the Recycle Bin.
This article also mentions how to show hidden files through File Explorer and Command Prompt. Whether the files are hidden by system defaults, personal settings, or malicious software, the correct method can make them visible.
If you encounter any issues with MiniTool products, contact us at [email protected]. We’ll provide the answers you need.
About The Author

Position: Columnist
Chelsea graduated from university with a major in English. She has a strong interest in English writing. It is this passion for writing that led her to become an English editor. Her articles mainly focus on data recovery and other computer industry news. As an energetic and outgoing girl, Chelsea enjoys listening to music, singing, riding bikes, and eating in her spare time.
User Comments :