We believe that many of you have encountered Windows 10 file transfer freezes issue. Generally, this issue happens unexpectedly.
Sometimes, the transferred data may get lost due to this file transfer freezes the process issue. Thus, you need to use a piece of free recovery software to get your lost data back. MiniTool Power Data Recovery is recommendable.
Sometimes, Windows 10 file transfer hangs issue has no change for a long time. In this situation, you need to find some ways to get rid of this issue.
Now, in this post, we tell you how to recover your lost data by using the MiniTool data recovery software as well as some available ways to fix this issue. Please keep on reading.
Part 1: When Windows 10 File Transfer Freezes
This issue can happen in different scenes. Here are three common scenes as follows:
Scene 1: Transfer Files from One Drive to Another Drive on Your PC
Scene 2: Transfer Files from PC to External Hard Drive
Scene 3: Transfer Files from External Hard Drive to PC
Scene 4: Transfer Files from USB Disk to PC
File transfer freezes the process issue may happen on Windows 10, Windows 8, and Windows 7 as mentioned in Microsoft community and the Google searching results. So, all of the solutions introduced in this post can be widely used on Windows.
Part 2: How to Recover Lost Data with MiniTool
As mentioned above, we suggest using MiniTool Power Data Recovery to recover your lost data which is caused by file transfer freezes the process issue.
If you want to check whether this software can find your needed data, you can use the Trial Edition. If you want to recover the files without limitation, you can use an advanced edition of this software.
MiniTool Power Data Recovery TrialClick to Download100%Clean & Safe
This professional data recovery software has four recovery modules, and they are This PC, Removable Disk Drive, Hard Disk Drive and CD/DVD Drive.
Which data recovery module should be used to recover your lost data, you can find the answer from the following contents.
In this post, we will run MiniTool Power Data Recovery Personal Deluxe Edition on Windows 10.
How to Recover Lost Data from Your Computer
If file transfer freezes Windows 10 issue happens when you want to transfer data from one drive to another on your PC, from PC to external hard drive or from external hard drive to PC, then you lose your transferred data. In this situation, you need to recover data from your computer or external hard drive.
This PC recovery module is recommended to do this job. And we will run MiniTool Power Data Recovery Personal Deluxe Edition on Windows.
Step 1: Choose the Target Hard Drive to Scan
Open the software and then you will see the This PC module interface as follows. Then, you need to choose the drive in which the lost data is originally stored. Take drive E: as an example. Please choose that drive and click on Scan button to start the scanning process.
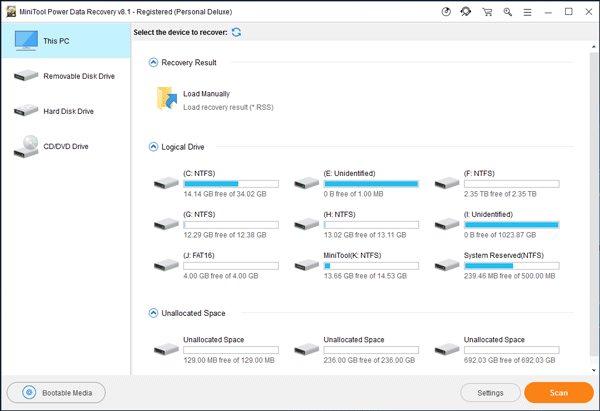
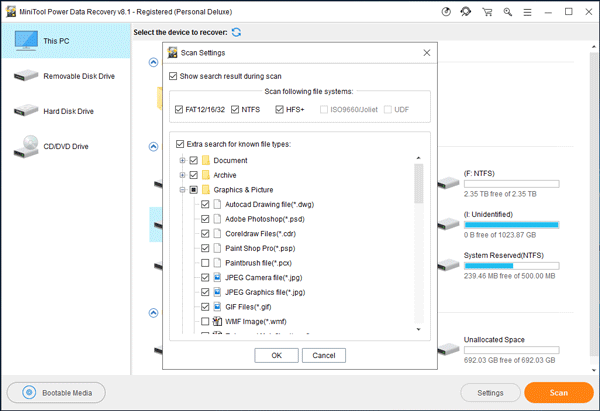
With this software, you can use its Settings function to decide the file types you want to recover before the scan. Please click on the Settings button and check the target file types from the pop-out window. Then, click on OK button to go back to the This PC interface.
Step 2: Find the Files You Want to Recover from Scan Result Interface
It will take some minutes to finish the scanning process. Please be patient.
When the scanning process is completed, you will see the scan result interface where you can search for the files you want to recover. Here, you can unfold the folder from the left list to find the target files.
Also, you can click on the Type tab to make the software show you the files by type.
If the files you want to recover are pictures and text files, you can click on them and press Preview button to preview them.

Tips: Find the Files You Want to Recover Quickly
In fact, this software has two useful functions which can help you to find your lost files quickly: Show Lost Files, Find and Filter.
1. Show Lost File
If you click on this feature, the program will show you the lost files only. If you want to recover the lost files, this feature is very useful.
2. Find
After clicking on Find button, you will see a pop-out bar on the bottom side of this interface.
Then, you can type the file’s name into the corresponding search bar. You can also check or uncheck Match Case and Match Word according to your need. After that, please click on Find button to locate the file you want to recover directly.
3. Filter
After pressing Filter button, you will see a pop-out window Advanced Filter.
On this window, you can filter the scanned files By Filename/Extension, By Size, and By Date. You can also uncheck Show Deleted Files, Show Lost Files or Show Normal Files accordingly.
After these operations, please click on OK button and start filtering process to find the files you want to recover.
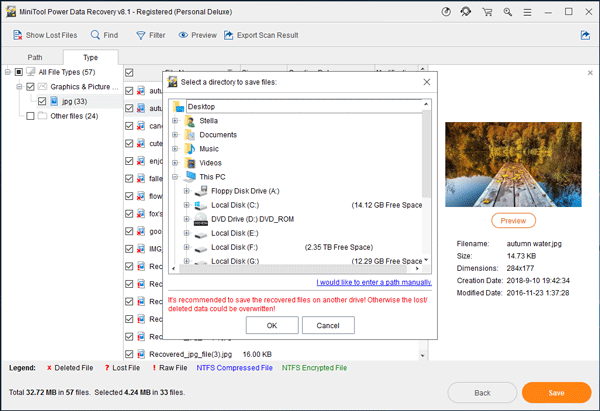
Step 3: Save the Files You Want to Recover to Your Computer
After checking the files you want to recover, you should click on Save button. Then, this software will pop out a small window. Here, you can choose a path on your computer to save these files. After that, please click on OK button.
Please remember that don’t save the files to the original location. Otherwise, these lost files will be overwritten and become unrecoverable.
Finally, you can use these recovered files directly.
You can see that with this data recovery software, it is an easy job to recover your lost data from your computer or external hard drive.
How to Recover Lost Data from USB Disk
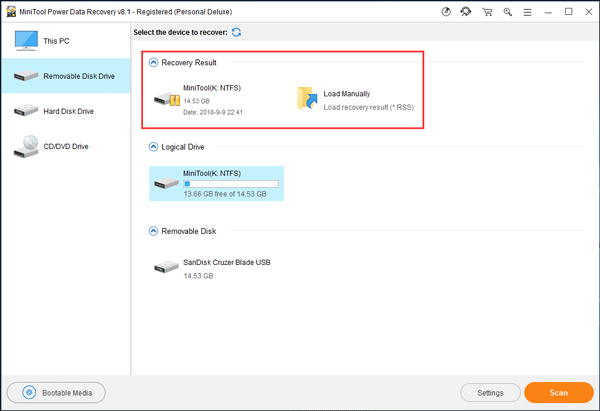
If the lost data is saved on your USB disk originally, you need to use the Removable Disk Drive module to get your lost data back.
Please connect the USB disk to your computer and open this data recovery freeware to start the data recovery operation.
Step 1: Choose the Target USB Disk to Scan
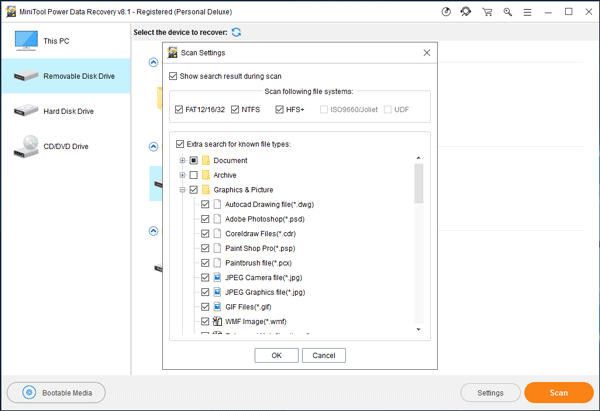
Choose Removable Disk Drive module and this software will show you the target USB disk. If the device is not shown here, please press refresh button until it is shown on the interface.
You can still use the Settings function to decide the data types you want to recover. Then, please choose the target drive and click on Scan button to start the scanning process.
Step 2: Check the Files You Want to Recover from the Scan Result Interface
After the scanning process, you will still enter the scan result interface. The way to find your lost files is same with This PC module. We will not repeat it here.

With this free data recovery software, you can export the scan result to your computer in the .rss file from the scan result interface. Please click on Export Scan Result button to save it to your computer directly if you want to.
Still, an advanced edition of this software allows you to recover your lost data without limitations.
Moreover, an advanced edition of MiniTool Power Data Recovery also enables you to load the latest scan result and manually load the recovery result which you have saved before. (CD/DVD Drive module is an exception)
Part 3: How to Fix Windows 10 File Transfer Hangs Issue
If it seems that Windows 10 file transfer freezes there forever, it is time for you to fix this issue. We summarize five ways in this part, and you can choose one according to your situation.
Way 1: Stop This Transferring Process and Try Again
Step 1: Press Ctrl + Alt + Del at the same time and then choose Task Manager from the pop-out interface.
Step 2: Choose the transferring process and click on End Task button to stop this transferring process.
After the transferring process quits, you can try to transfer data again.
If this issue still happens, you can try way 2.
Way 2: Stop the Running Programs and Services which Lead to This Issue
It is said that the running programs and services which are taking high CPU or Disk usage may lead to this Windows 10 file transfer freezes issue. So, you can stop them to get rid of this issue.
Step 1: You still need to enter Task Manager by pressing Ctrl + Alt + Del simultaneously as mentioned in way 1.
Step 2: Choose the target running programs and services which are taking high CPU or Disk usage. Then, click on End Task button.
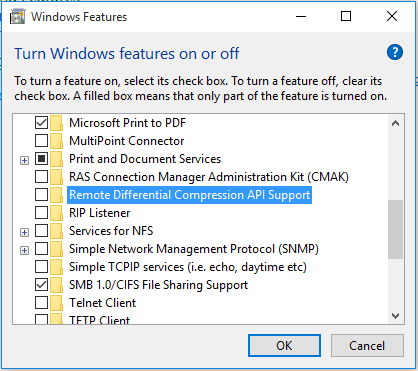
Way 3: Disable Remote Differential Compression
Remote Differential Compression task can take a lot of time and cause congestion. Thus it may lead to this Windows 10 file transfer hangs issue. Please disable this task to have a try.
Step 1: Open Control Panel from your computer and choose Programs from the pop-out window. Then, click on Turn Windows features on or off under Programs and Features option.
Step 2: Find Remote Differential Compression API Support option and uncheck the box next to it.
Step 3: Click OK button to save the changes.
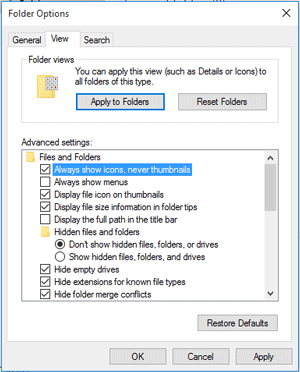
To speed up the transferring task Windows 10, you can choose to turn off Thumbnail by following these steps:
Step 1: Open File Explorer and click on View option from the above bar.
Step 2: Click on Options and Change folder and search options will appear. Click it to continue.
Step 3: Tap View tab to find Always show icons, never thumbnail option. Check this option and click on OK button to turn off thumbnail.
If this method is unavailable, please use the next way.
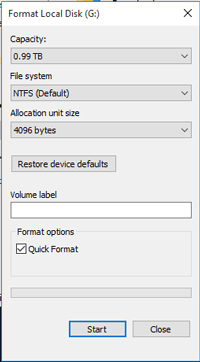
Way 4: Format the Destination Drive to NTFS
Some users reflect that if the destination drive is not formatted properly, file transfer freezes Windows 10 issue may happen. In general, this issue always happens to a newly purchased drive. In this situation, you need to format it to NTFS and use it again.
Step 1: In Windows Explorer, right-click on the target drive and choose Format option from the pop-out menu.
Step 2: Normally, NTFS file system is checked by default on the pop-out window. Then, you need to uncheck the Quick Format option from the window and click Start button.
In addition to this method, you can also use the professional partition manager – MiniTool Partition Wizard and its Format Partition feature to do this job. Get the detailed steps from this tutorial: How to Format Partition.
If this issue still exists, please go to the way 5.
Way 5: Disable Antivirus
Some users say that they solve this issue by disabling antivirus. So, you can also have a try.
To force close your antivirus software, you can open the Task Manager and end this task.
Part 4: Summary
In this post, we show you how to deal with Windows 10 file transfer freezes issue.
If you lose your data due to this file transfer freezes Windows 10 problem, you can use the best free data recovery software – MiniTool Power Data Recovery and its This PC & Removable Disk Drive modules to recover your lost data.
If you want to get rid of this issue, you can try the five ways mentioned in this post to fix this issue. Hope they can help you out.
Meanwhile, if you have your method to solve this problem, you can share with us. Of course, if you have any question when you are using MiniTool software, please feel free to contact us by leaving a message on the following comment zone or sending an email to [email protected].
About The Author

Position: Columnist
Stella has been working in MiniTool Software as an English Editor for more than 8 years. Her articles mainly cover the fields of data recovery including storage media data recovery, phone data recovery, and photo recovery, videos download, partition management, and video & audio format conversions.
User Comments :