When you have multiple wired network profiles named “Network” and “Network 2”, renaming network is particularly useful because it makes it easier to tell which is your active network profile. You can read this post from MiniTool to find the methods.
In Windows 7, it is easy to rename your network connection. You just need to go to the Network and Sharing center and click your connection to change its name. In Windows 10, you can’t do that anymore. However, there are two methods for you to change your network name.
How to Change Network Name Windows 10
Method 1: Use Registry Editor to Change Network Name
The first method for you is to use Registry Editor to change network name Windows 10. Here is what you need to do:
Step 1: Press the Windows key + R key at the same time to open the Run dialogue box. Then type regedit and click OK to open Registry Editor.
Step 2: Then you need to go to the following key in the left pane:
HKEY_LOCAL_MACHINE\SOFTWARE\Microsoft\WindowsNT\CurrentVersion\NetworkList\Profiles
Step 3: Now you need to go through all subkeys under the Profiles key until you find the key with that has ProfileName set as the name of your network.
Step 4: In the right pane, double click the ProfileName to change its value. Change the Value data to the name of your network connection that you want.
Close Registry Editor and you might need to restart your computer or to sign out and sign in again in order to apply changes. Then you have changed network name Windows 10 successfully.
Method 2: Use Local Security Policy to Change Network Name
If you don’t want to use the previous method, there’s another method for you to rename the network on Windows 10. So, here’s how to do that by using Local Security Policy.
Step 1: Press the Windows key + R key at the same time to open the Run dialogue box, then type secpol.msc and click OK to open Local Security Policy.
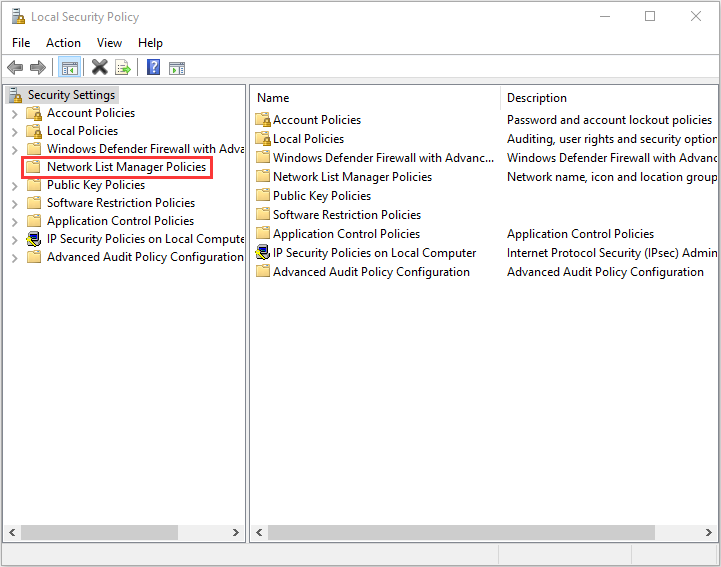
Step 2: In the Local Security Policy window, find Network List Manager Policies in the left pane and click it.
Step 3: Now in the right pane, right-click the network name that you want to change and choose Properties.
Step 4: In the Properties windows, under the Name section, you should click the dot next to Name. Then you can input the name that you wish to use for your connection.

Step 5: Click Apply then OK to save the changes.
Then you have to log in again or to restart your computer to apply the changes. Then you can check if you rename network profile on Windows 10 succesfully.
Final Words
In conclusion, this post has shown you how to change network name Windows 10 with 2 feasible methods. The methods mentioned in this post are common and proved to be helpful. So, you can also try them.
User Comments :