If you don’t want the fast user switching feature available when you share your computer, you can choose to disable this feature. Here is how to disable fast user switching in Windows 10. Just read this post from MiniTool, you can find 2 effective methods.
Why Disable Windows 10 Fast User Switching
In Windows 10, there is a useful feature called fast user switching that is designed to mainly allow users to sign into a computer while other users are still signed in and their apps are running. To use this feature, you can press Ctrl + Alt + Del and choose Switch User or press the Alt + F4 keys without any currently open windows selected and choose Switch User.

Although this feature doesn’t force other users to sign out, it brings some disadvantages. For instance, Windows uses extra resources (including processor, memory, and disk) on other users, especially some resource-intensive apps or background services are active; when other users are signed in, you cannot restart or shut down your machine since they may lose any open files that haven’t been saved.
If you have multiple users on your computer and you don’t want fast user switching available, you can disable this feature. In the following part, we show you two methods including editing Windows Registry and Local Group Policy.
How to Disable Fast User Switching Windows 10
Use Windows Registry Editor to Disable Fast User Switching
You can edit Windows Registry to do this work. But note that the Registry Editor is a powerful tool but mistaken operations can cause your system to be unstable or unbootable. Thus, follow the instructions below and you shouldn’t have any problem.
Step 1: Use the Win + R keys on the keyboard to open the Run box.
Step 2: Type regedit and press Enter.
Step 3: Navigate to this path:
HKEY_LOCAL_MACHINE\SOFTWARE\Microsoft\Windows\CurrentVersion\Policies\System
Step 4: Right-click the right side of the System folder and choose New > DWORD (32-bit) Value. Name it HideFastSwitching.
Step 5: Double-click the created key and set its value to 1.

Step 6: Click OK and reboot your machine, the fast user switching feature is disabled.
Windows 10 Disable Fast User Switching via Group Policy
If you are Windows 10 Pro or Enterprise users, you can use Local Group Policy Editor to disable Windows 10 Switch User option. Note the Home edition doesn’t support the editor.

Step 1: Input gpedit.msc to the Run window and click OK.
Step 2: Go to Computer Configuration > Administrative Templates > System > Logon.
Step 3: Go to the right side and locate Hide entry points for Fast User Switching.
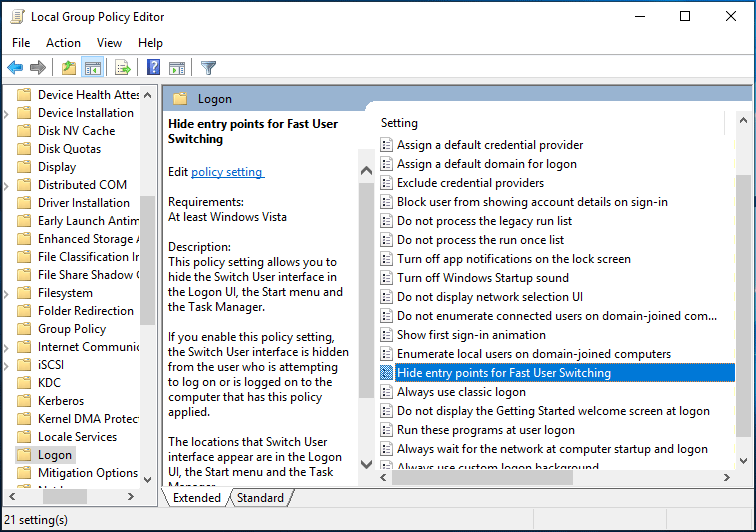
Step 4: Double-click this item and choose Enabled in the pop-up window.
Step 5: Then, save the change and exit the Local Group Policy Editor.
Bottom Line
How to disable fast user switching in Windows 10? Now after reading this post, you know 2 methods. Just choose one based on your actual situations to disable this feature when there is a need.
About The Author

Position: Columnist
Vera has been working at the MiniTool Team for over 10 years as a technical editor and content writer. She mainly focuses on disk and partition management, data recovery, Windows backup and restore, and PC troubleshooting. Through in-depth software testing and hands-on experience, she has helped users solve a wide range of computer problems and better protect their data on Windows devices.
User Comments :