Remote Assistance is a good and useful feature on your Windows computer. You need to enable Remote Assistance if you want to use it to fix an issue remotely or do other things. In this post, MiniTool Software will show you how to turn on Windows Remote Assistance using 3 different methods.
Windows Remote Assistance is a useful feature that allows you to make someone you trust to take over your PC to fix some issues remotely. If you want to use it, you need to enable it in advance. How to enable Remote Assistance on Windows? Here are three methods.
How to Turn on Windows Remote Assistance?
- Via This PC
- Via Command Prompt
- Via Registry Editor
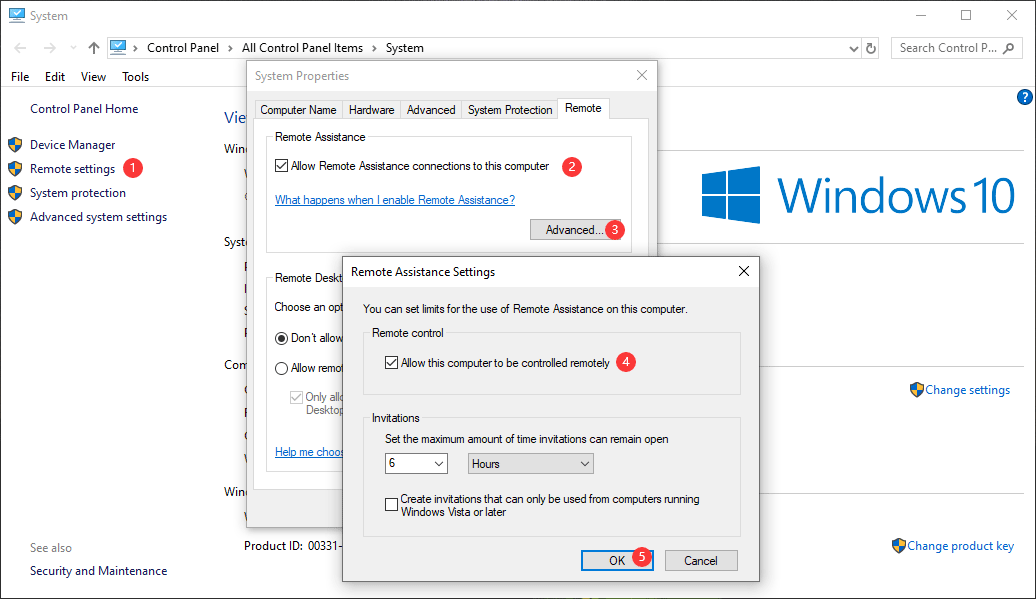
Via This PC
- Right-click on the This PC icon on your desktop and then select Properties.
- Click the Remote settings link from the left menu on the pop-up interface.
- Make sure the Allow Remote Assistance connections to the computer option is checked.
- Click Advanced.
- On the new pop-out interface, if you uncheck Allow this computer to be controlled remotely, the helper can see your screen but can’t control your computer. You can check or uncheck it according to your requirement.
- Click OK twice to save the change.
Via Command Prompt
It is very easy to enable Windows Remote Assistance using command line. The rule is to change the registry key using the enable Remote Assistance command line.
Here we go:
- Run Command Prompt as administrator.
- Run the following command lines to enable Remote Assistance:
reg add “HKLM\System\CurrentControlSet\Control\Remote Assistance” /v fAllowToGetHelp /t REG_DWORD /d 1 /f
reg add “HKLM\System\CurrentControlSet\Control\Remote Assistance” /v fAllowFullControl /t REG_DWORD /d 1 /f
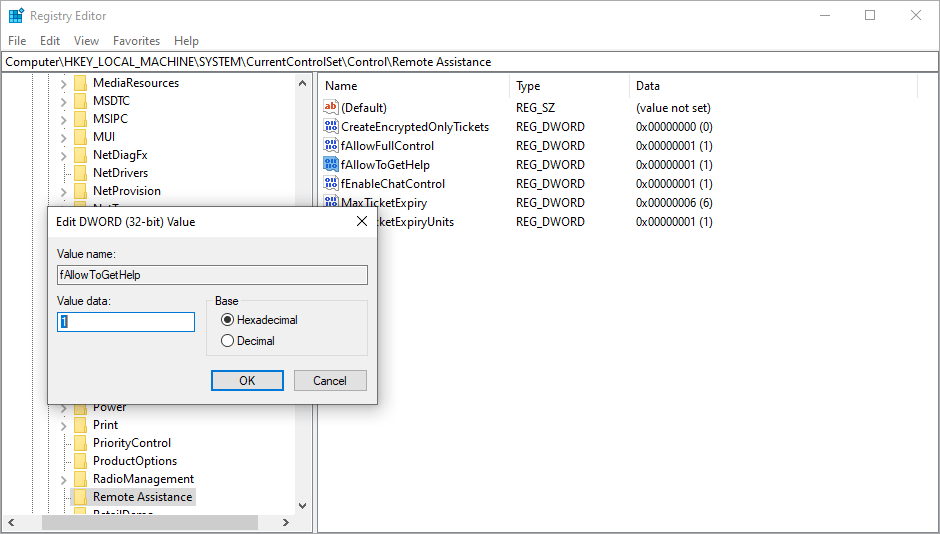
Via Registry Editor
Of course, the direct method to turn on Windows Remote Assistance by changing the registry key via Registry Editor. To protect your registry keys, you should back up them before you make some changes. You can refer to this post to make a backup: How to Back up Individual Registry Keys Windows 10?
Here is a guide on how to use enable Remote Assistance Windows 10 registry:
1. Use Windows Search to search for registry editor and select the first result to open it.
2. Go to the following path, or you can directly copy and paste the path to the address bar in Registry Editor:
HKEY_LOCAL_MACHINE\SYSTEM\CurrentControlSet\Control\Remote Assistance
3. Double-click fAllowToGetHelp to open its edit DWORD value interface and set its value data to 1. Then, click OK to save the change.
4. If you want another person to take full control of your computer, you can double-click fAllowFullControl and then select its value data to 1. Then, click OK to save the change.
5. Close Registry Editor.
6. Restart your computer.
No matter which method you use to enable Windows Remote Assistance, it can always work. However, if you find Remote Assistance is not working, you need to consider whether it is blocked by Windows Firewall. (How to Check if Firewall Is Blocking a Port or a Program?)
How to Allow Remote Assistance in Firewall?
If it is blocked, you need to allow it in Firewall:
- Open Command Prompt as an administrator.
- Run the following command line: netsh advfirewall firewall set rule group=”remote assistance” new enable=Yes. (You can just copy and paste it to the Command Prompt interface.)
Bottom Line
Reading here, you should know how to enable Remote Assistance on your Windows computer. If you encounter some related issues, you can let us know in the comment. We will reply to you as soon as possible.
About The Author

Position: Columnist
Stella has been working in MiniTool Software as an English Editor for more than 8 years. Her articles mainly cover the fields of data recovery including storage media data recovery, phone data recovery, and photo recovery, videos download, partition management, and video & audio format conversions.
User Comments :