This post mainly helps you to fix Windows 10 Network Profile missing issue. Check how to bring back missing Network Profile option in Windows 10, as well as how to change network from Public to Private by using PowerShell or Registry. For data recovery, hard drive partition management, system backup and restore, MiniTool software comes as professional.
General you can easily change network from Public to Private on Windows 10 by configuring the Network Profile type from Public to Private. However, some Windows users meet a problem that Windows 10 Network Profile missing, and they can’t find the option to change network from Public to Private on Windows 10. How to fix this issue?
This post introduces how to fix Windows 10 Network Profile missing problem and bring it back, and provides some alternative ways to change network type on Windows 10.

Trick 1. Try to Bring Back Missing Network Profile Option Windows 10
One possible cause of missing Network Profile Windows 10 is the usage of third-party firewall or antivirus software. If you don’t use Windows Defender Firewall, but use a third-party firewall, it may cause Windows 10 Network Profile option missing.
To fix this, you can disable any third-party firewall or antivirus program on your Windows 10 computer for a while, and check if the Network Profile option appears again on Windows 10.
How to view Network Profile Windows 10?
You can click press Windows + I to open Windows Settings. Click Network & Internet -> Status, and click Change connection properties link to check if the Public and Private Network profile options get back.
If this doesn’t help you fix Windows 10 network profile missing issue, you can use the 3 alternative ways below to change network between Public and Private on Windows 10.

Trick 2. Change Network from Public to Private with PowerShell
You can use Windows 10 PowerShell to change network type.
Step 1. You can press Windows + X key on the keyboard at the same time, and select Windows PowerShell (Admin) to open Windows PowerShell utility.
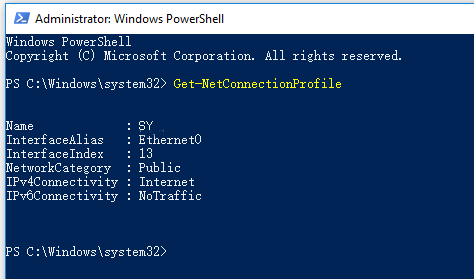
Step 2. Type the following command line and hit Enter to get the network profile index number.
Get-NetConnectionProfile
Step 3. Then type the command line below and hit Enter to change your network profile to Private or Public.
Set-NetConnectionProfile -InterfaceIndex <index number> -NetworkCategory Private

Trick 3. Change Network Profile Type Windows 10 Using Registry
You can also change network profile by using Registry if option to change network from Public to Private is missing.
Step 1. You can press Windows + R to open Run. Type regedit and hit Enter to open Windows Registry Editor app.
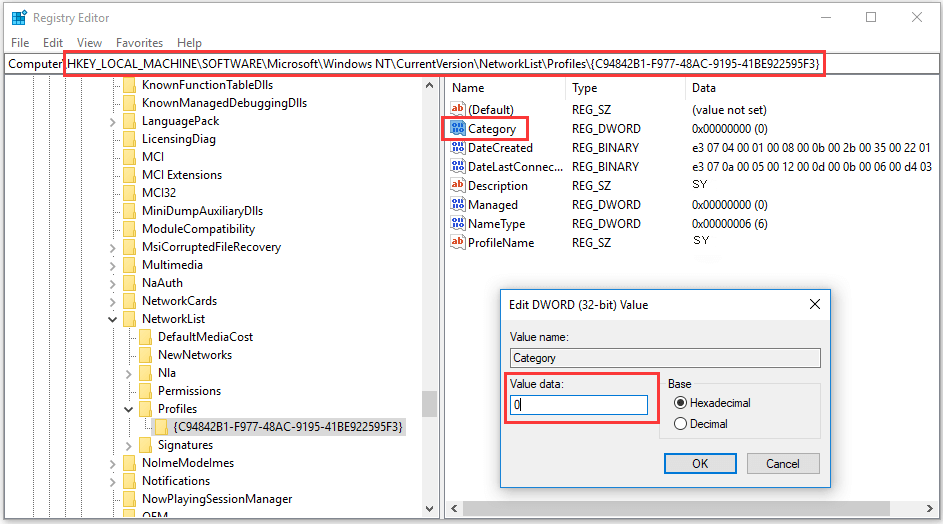
Step 2. Click as follows to find the target key: HKEY_LOCAL_MACHINE –> SOFTWARE –> Microsoft –> Windows NT –> CurrentVersion –> NetworkList –> Profiles
Step 3. Expand Profiles and expand each folder under Profiles to find the ProfileName key which lets you recognize the Network you want to change setting.
Step 4. Double-click Category DWORD open it, and change the value from 0 to 1 to change network from Public to Private or in reverse.

Trick 4. Fix Missing Network Profile Windows 10 with Local Security Policy
You can also open Local Security Policy to change network profile.
Step 1. Press Windows + R, type secpol.msc, and hit Enter to open Local Security Policy window.
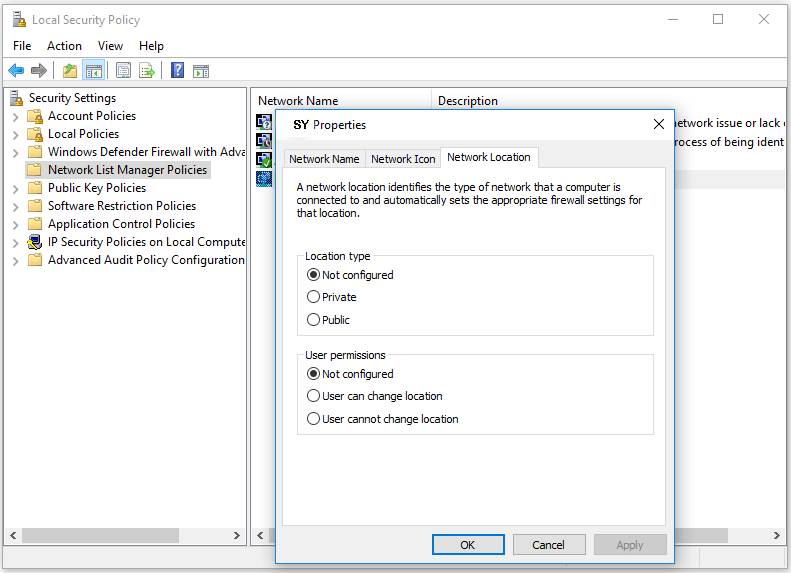
Step 2. Click Network List Manager Policies to list all networks.
Step 3. You can double-click one preferred network you’d like to change network type, and tap Network Location tab. Under Location type, you can freely set the network profile as Not configured, Private or Public.
Bottom Line
Hope now you can fix Windows 10 network profile missing problem, and know how to change network from Public to Private with PowerShell, Registry, or Local Security Policy on Windows 10.
User Comments :