What is hard drive removal policy? How to access it on Windows 10/11? Microsoft Windows supports two main removal policies for external drives, Quick removal and Better Performance. In this post on MiniTool Website, we will show you more details about them.
Hard Drive Removal Policy
It is essential to know how to remove external hardware such as hard drives and USB drives safely because improper removal might lead to unexpected data loss. To remove the hard drive safely, you should:
1. Make sure you are ready to disconnect the device, that is to say, you should make sure all the tasks on the hard drive are complete.
2. Choose to eject the storage device and then disconnect it from your computer.
Microsoft Windows supports two types of hard drive removal policies – Quick removal and Better performance.
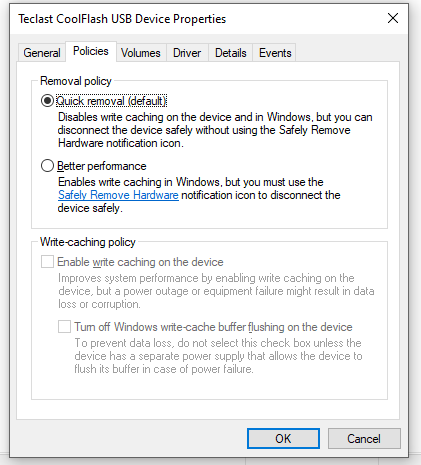
- Quick Removal: It will disable write caching on the target device so you can disconnect your device without using the Safely Remove Hardware This type of hard drive removal policy will prevent botched transfers when removing the drive too early.
- Better Performance: If you prefer a better performance to transfer files, the Better performance policy can meet your need. It will enable write caching in Windows and you must use the Safely Remove Hardware notification icon to disconnect the device safely.
Previously, the default hard drive removal policy in Windows is Better performance. However, Microsoft changed the default removal policy for external storage devices in Windows 10 version 1809 or versions latter to Quick removal.
How to Access Windows 10 Disk Removal Policy?
You can access Windows 10 external hard drive policy from File Explorer, Device Manager, or Disk Management. Here’s how to enter it in three ways respectively.
Way 1: via File Explorer
1. Open File Explorer.
2. Find your external hard drive and right-click on it to choose Properties.
3. In Hardware, choose the target hard drive and hit Properties.
4. In General, hit Change settings.
5. Go to Policies and you will see the external hard drive removal policy on your computer.
Way 2: via Device Manager
1. Right-click on the Start icon to highlight Device Manager.
2. Expand Disk drives.
3. Right-click on the target disk drive and choose Properties.
4. In Policies, you can see the two types of hard drive removal policies: Quick removal and Better Performance.
Way 3: via Disk Management
1. Type disk management in the search bar and hit Enter.
2. Right-click on the target disk and hit Properties.
3. Go to Hardware > select your disk drive > choose Properties.
4. Find Quick removal & Better performance in Policies and customize your USB removal policy.
Suggestion: Create a Backup for Your Important Files
As stated earlier, it is of importance to safely remove your external hard drive or USB flash disk from your computer. If your drive isn’t rejected correctly, it will result in corrupted files and folders. What’s worse, all your data on this drive might be erased.
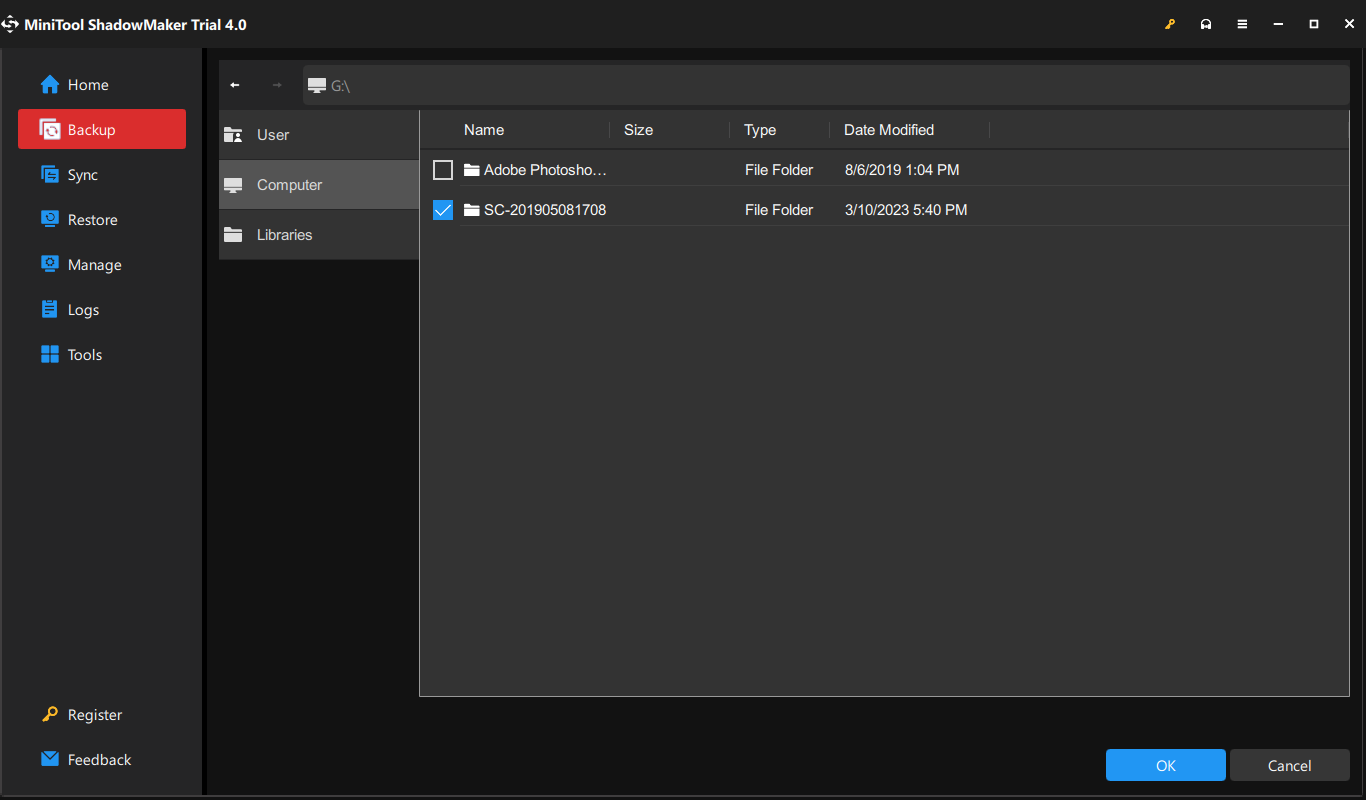
To keep your data safe, it is highly recommended to back up your files regularly. When it comes to backup, the free backup software – MiniTool ShadowMaker is the top choice for you. It is compatible with Windows operating systems and enables you to back up and restore files, folders, disks, drives and systems. Here’s how to create a backup for your files.
Step 1. Run this tool and go to the Backup page.
MiniTool ShadowMaker TrialClick to Download100%Clean & Safe
Step 2. Press SOURCE > choose Folder and Files, and then you can choose the files you want to protect. As for choosing a storage path, go to DESTINATION.
Step 3. Click on Back Up Now to start the process.
Final Words
That’s all about hard drive removal policy in Windows 10. You can choose from Quick removal and Better performance according to your need. Meanwhile, don’t forget to back up your important files with MiniTool ShadowMaker before removing your external storage devices.
User Comments :