Why would you usually encounter high CPU and disk usage from SrTasks.exe? How can you troubleshoot it? In this guide on MiniTool, we will walk you through the following methods step by step. Let’s get started!
What is SrTasks.exe? It is the executable of a legitimate Microsoft process called System Protection Background Tasks, located in C:\Windows\System32 and which is unique for Windows 10 and Windows 8. Windows Task Scheduler uses it for automatically creating system restore points.
It’s common to see high CPU and disk usage from SrTasks.exe in Windows 10/8. You may have noticed that SrTasks.exe can hog up your system resources and you cannot stop it simply.
However, this post is about to delve into the factors and methods for the resource-intensive issue.
Fix High CPU and Disk Usage from SrTasks.exe
Potential causes of System Protection Background Tasks eating up high CPU and disk usage are as follows:
- Glitches in system
- Conflicts among software
- Virus & malware attacks
- Corrupted system files
Proven solutions on how to fix SrTasks.exe 100% CPU usage and high disk usage are as follows:
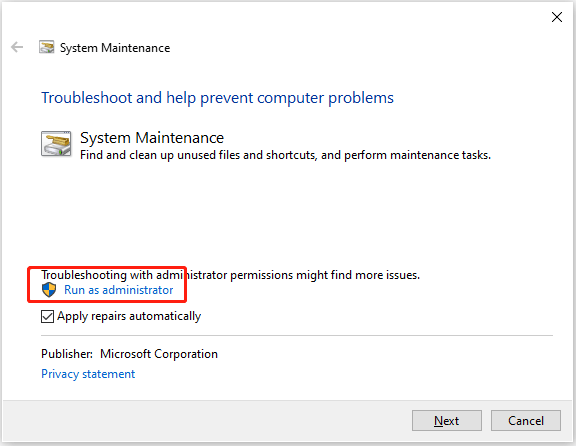
1. Run Performance Troubleshooter
Performance Troubleshooter is pre-installed in Windows, checking and fixing any issues that might slow down your PC’s running. Let’s see how to fire up this tool to fix the problem:
Step 1. Press Win + S to type Control Panel and open it.
Step 2. Navigate to Troubleshooting > choose System and Security > Run maintenance tasks.
Step 3. In the new box, click on the Advanced option. Then tap on Run as administrator > Next to initiate the fixing task.
2. Disable Superfetch
Superfetch pre-loads all the apps you use frequently, which could cause SrTasks.exe
high CPU and disk usage. To disable it:
Step 1. Press Win + R to fire up the Run box and enter service.msc and press Enter.
Step 2. In the Services window, look for SysMain and then right-click on it to choose Stop from the context menu.
Step 3. After stopping, right-click on SysMain again to select Propeties > switch Startup type to Disabled > click on Apply & OK.
3. Scan for Malware & Virus
When the disk and CPU usage of SrTasks.exe increases unusually, you should think if there is any malware or virus disguised as system processes lurking on your computer.
Step 1. Check if SrTasks.exe is a virus.
Right-click on the taskbar and open Task Manager > locate SrTasks.exe > right-click on it to open the file location to check if it’s in the C:/Windows/System32 directory. If not, it may be a virus or malware.
Step 2. Use the built-in Windows Security to remove the virus.

MiniTool ShadowMaker TrialClick to Download100%Clean & Safe
4. Update or Roll Back Windows
SrTasks.exe high disk usage and CPU could stem from an outdated Windows version or the newer update having bugs. Update or go back to the previous update based on your situation.
To update Windows:
Step 1. Go to Settings > Update & Security.
Step 2. Click on Check for updates and then install them if there are any.
To uninstall recent updates:
Step 1. Go to Settings > Update & Security.
Step 2. Under Windows Update, choose View update history > click on Uninstall updates.
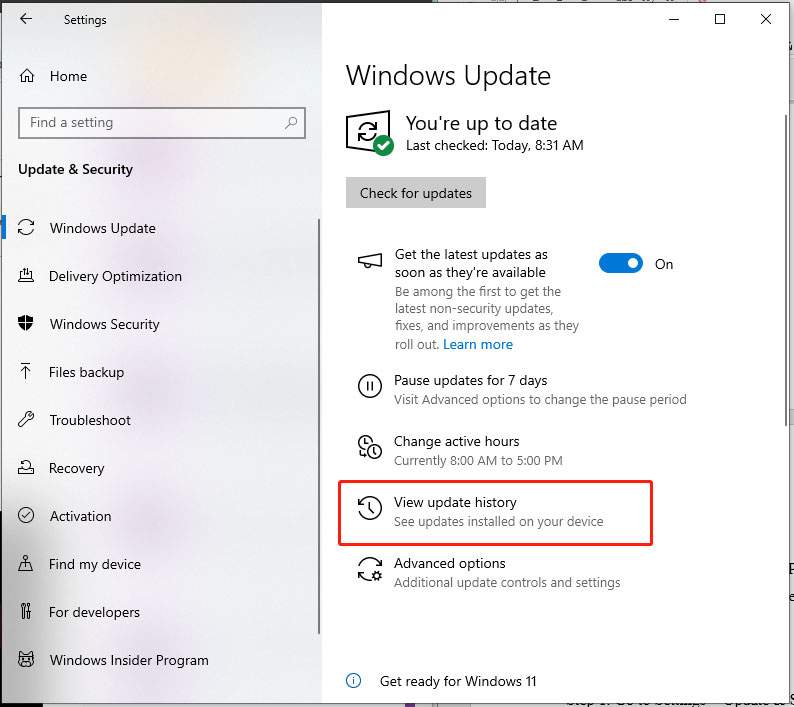
Step 3. In Installed Updates, uninstall the recent Windows updates and then restart your computer.
5. Run CHKDSK
If the disk space allocated to SrTasks.exe is damaged sector where cannot read or write, the SrTasks.exe can get stuck in trying to make a system restore point so that hogging high disk space. To check bad disk sector:
Step 1. Type Command Prompt in the search bar and open it in administrative mode.
Step 2. Type chkdsk c:/x /f /r and press Enter. (C is your drive where the Windows system is on).
6. Disable System Restore
Task Schedulers use SrTasks.exe to create a system restore point. Thus, you can disable system restore to solve the resources-hogging issue if none of the above ways works.
Step 1. Press Win + R to open the Run dialog and type systempropertiesprotection. Click on OK.
Step 2. In System Properties, click on the Configure button > check Disable system protection > tap on Apply & OK.
Step 3. Then follow the instructions on the screen to complete the process.
Related article: Disk Cleanup Is Missing on Windows 11/10? Fix It Now!
Wrapping Things Up
This guide has demonstrated how to fix high CPU and disk usage from SrTasks.exe in detail. You can try them in order until you find the one that works for you. Appreciate your support.
User Comments :