Windows registry items are essential for your system to run smoothly. It’s recommended to back up the registry regularly to prevent system changes from causing issues on your PC. Once something bad happens, you can restore the backed-up registry.
Windows used to automatically back up the registry to a RegBack folder. However, Windows doesn’t do so anymore since Microsoft would prefer you to use the System Restore feature. The following part introduces how to enable automatic registry backup with three methods.
Related posts:
- Top 6 Registry Cleaners to Clean up Your Windows Registry
- How to Delete Broken Registry Items? Follow the 5 Methods!
How to Enable Automatic Registry Backups
Way 1: Via Registry Editor
First, you can enable automatic registry backup on Windows 11. Via Registry Editor.
1. Press the Windows + R keys together to open the Run dialogue box. Type regedit in it to open Registry Editor.
2. Go to the following path:
HKEY_LOCAL_MACHINE\SYSTEM\CurrentControlSet\Control\Session Manager\Configuration Manager
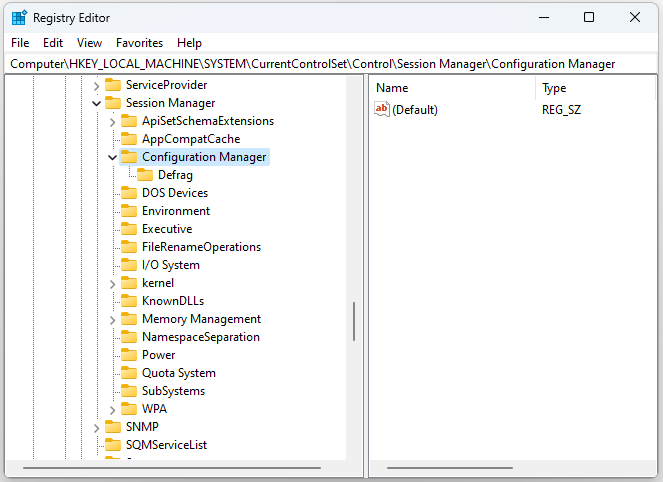
3. Click the Configuration Manager key with the right mouse button to select New > DWORD (32-bit) Value. Then input EnablePeriodicBackup.
4. Double-click the EnablePeriodicBackup DWORD and change the value to 1.
Way 2: Via Task Scheduler
How to back up the registry automatically? You can also use Task Scheduler.
1. Type Task Scheduler in the Search box to open it.
2. Double-click Task Scheduler Library. Then, select Microsoft > Windows > Registry to find RegIdleBack.
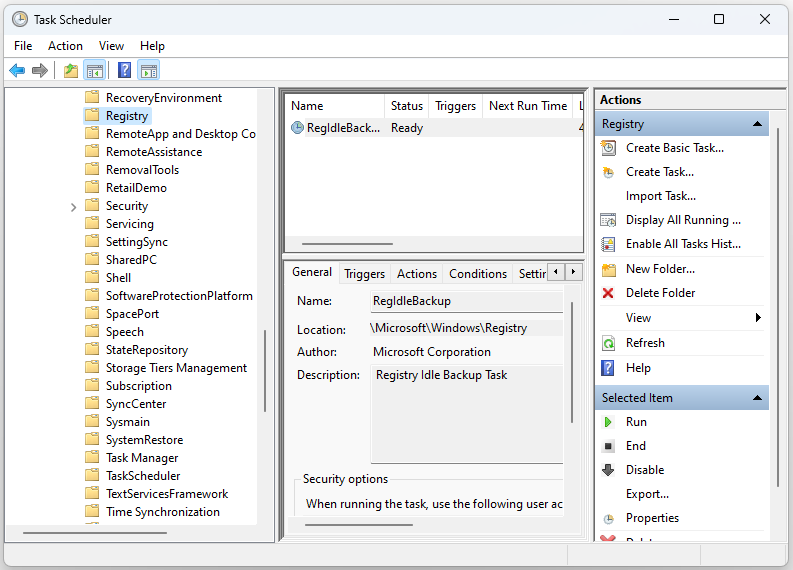
3. Double-click RegIdleBack to select the Triggers tab.
4. Click the New button and click the Begin the task drop-down menu to select On a schedule. Select the Weekly option.
5. Choose a start date in the Start menu. Input a value within the Recur every box. For example, you can enter 1 there to set a once-weekly automatic registry backup.
Way 3: Via a System Restore Point
The System Restore utility has been a part of Windows since XP. That tool enables users to roll back Windows to saved system image snapshots. A restore point is another form of registry backup. Here is how to create it.
1. Type create a restore point in the Search box and select the first result to open System Properties.
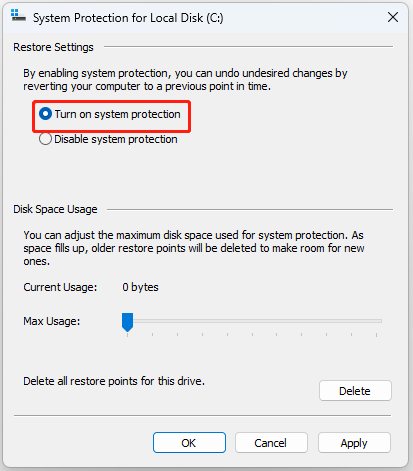
2. Select the system disk under Protection Settings and click the Configure… option.
3. On the next page, select Turn on system protection. Then, click Apply and OK to save the setting.
4. Click Create. A small interface pops up. You need to type a description for the restore point you want to create for easy identification.
5. Click Create. When the creating process ends, you will get a system restore point.
MiniTool ShadowMaker TrialClick to Download100%Clean & Safe
Final Words
Reading here, you should know how to enable automatic registry backup. You can choose one of them based on your needs. I hope that this post will be useful to you.
User Comments :