To download, install or update apps in bulk in Windows 11/10, you can choose to install Winget (Windows Package Manager) on your PC and use this command-line tool. How to install Winget on Windows 11/10? MiniTool shows you much information focusing on this topic and let’s look through it.
Winget, also called Windows Package Manager, is a command-line tool that enables you to quickly search, download, install/uninstall, upgrade, and configure apps on Windows 10/11 computers. This promotes automating app management and saves your time.
To use Winget on your PC, you should first install it. You can install and use Winget on Windows 10 1709 (build 16299) or later and Windows 11. So, how to install Winget? Move to the next part.
How to Install Winget Windows 11/10
See the guide on installing Winget Windows 11/10
Option 1: Winget Download & Install via Microsoft Store
Step 1: Go to the Download Page from Microsoft and click the Get button.

Step 2: In the pop-up window, click Open Microsoft Store.
Step 3: Click the Update or Install button.
Alternatively, you can search for App Installer directly in the Microsoft Store app. Then, update or install it.
After that, restart your Windows 11/10 PC, and Winget is installed on your computer.
Option 2: Winget Download & Install via GitHub
If you want to install Windows Package Manager (Winget) with an offline installer, follow the steps below:
Step 1: Visit the Windows Package Manager release page on GitHub
Step 2: Choose the latest version, and click the .msixbundle download link from the Assets section.

Step 3: Double-click on the downloaded file to update or install this app. Later, restart the PC and Winget has been installed on your Windows 10/11 PC.
How to Use Winget in Windows 11/10
After knowing the ways to install Winget on Windows 11/10, you may wonder about how to use this command-line tool. Look through details from this part now.
Step 1: Type in cmd to the search bar, right-click on Command Prompt and click Run as administrator.
Step 2: Type in Winget and press Enter. This will list many available commands to tell you how to use this tool, as shown below.
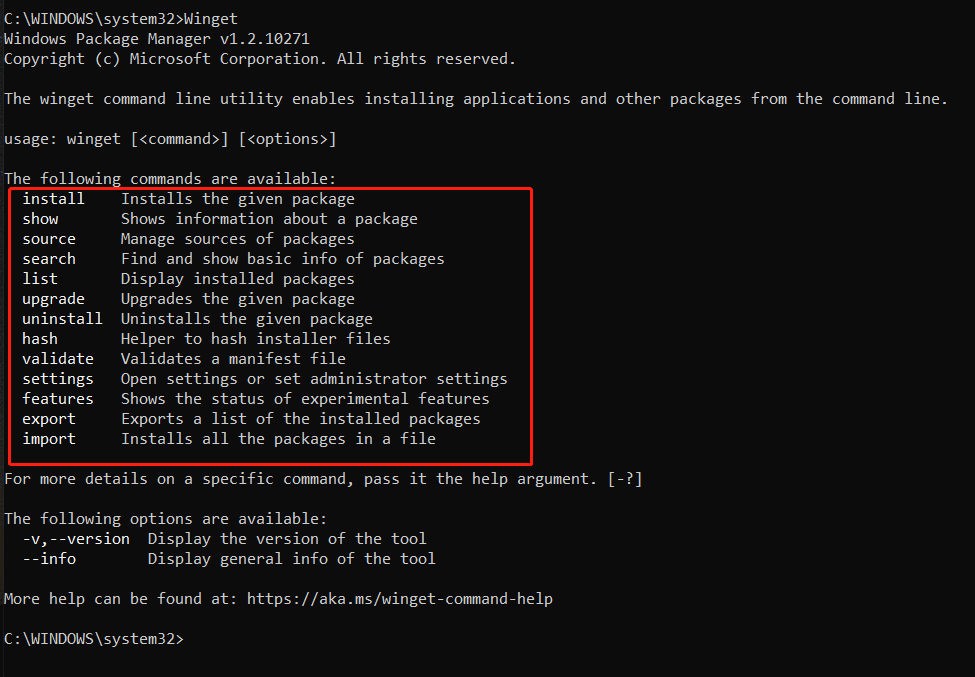
Let’s see some examples.
#1. Update all apps in Windows 11/10 via Winget
winget upgrade – list all the apps with updates
winget upgrade -h –all – update all the applications to the latest versions
#2. Upgrade an app via Winget
winget upgrade
winget upgrade -h –id APP-ID – replace APP-ID with the ID of the app that you want to upgrade
Related article – Tutorial: Install or Uninstall OneDrive with Winget in Windows 11
# 3. Install an app
winget search <appname>
winget install <appname>
Final Words
How to install Winget on Windows 11/10 and use it to upgrade, install, configure, etc. apps? After reading this post, you know much information. Just follow one way mentioned above for Winget installation.
About The Author

Position: Columnist
Vera has been working at the MiniTool Team for over 10 years as a technical editor and content writer. She mainly focuses on disk and partition management, data recovery, Windows backup and restore, and PC troubleshooting. Through in-depth software testing and hands-on experience, she has helped users solve a wide range of computer problems and better protect their data on Windows devices.
User Comments :