Phoenix Lite OS 11
Phoenix LiteOS 11 is created by Phoenix Lite OS company. It supports different languages and it can bypass TPM, Secure Boot, RAM, CPU, and storage checks when installing it. Besides, you can bypass Microsoft’s mandatory account creation during the Phoenix Lite OS 11 setup/installation.
The following are the removed and disabled features of Phoenix LiteOS 11 22H2.
- Removed features include – Cortana, Smart Screen, Edge, and some UWP apps.
- Disabled features include – Defender (optional), Virtual Memory, Widgets, Windows Ink Workspace, Error Reporting, UAC, Advertising, Telemetry, Hibernation, Power Limiting, Logging, and Download Blocking.
Phoenix Lite OS 11 Download
Before you download Phoenix Lite OS 11, you should ensure that your PC meets the requirements below. They are the minimum system requirements of Phoenix Lite OS 11.
- Processor: 64-bit
- RAM: At least 1 GB (4 GB is recommended)
- Hard disk space: At least 16 GB
- Graphics card: DirectX 9 graphics device or a newer version
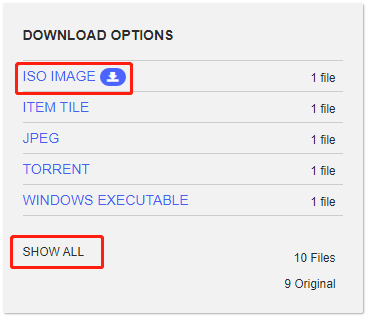
Then you can download Phoenix Lite OS 11 ISO on the Internet. Go to the archive’s official website and search for Phoenix Lite OS 11 and then click ISO IMAGE on the right side of the page. Then click the download button and the Phoenix Lite OS 11 ISO file will be downloaded.
You can also click the SHOW ALL option to get more ISO files. Then, you can choose one of them to download Phoenix Lite OS 11.
Phoenix Lite OS 11 Install
After downloading Phoenix Lite OS 11, you can install it. You should download Rufus and make a bootable USB drive with them. Then install the system from the bootable drive instead of directly running the setup.exe on a live OS.
Tip: Your previous operating system will be removed after installing Phoenix Lite OS 11, thus you had better back up your previous operating system in advance. To do that, the professional backup assist – MiniTool ShadowMaker is worth trying. It supports Windows 11/10/8/7.
MiniTool ShadowMaker TrialClick to Download100%Clean & Safe
Step 1: Download and install Rufus on your device. Then, run it.
Step 2: Connect an empty USB drive to your computer.
Step 3: Click SELECT. Find and open the downloaded Phoenix Lite OS 11 ISO file.
Step 4: Click START to begin the installation media creation process.
Step 5: After the process is finished, plug the bootable USB drive into the computer on which you would like to install Phoenix Lite OS 11.
Step 6: You just need to keep pressing the boot key while the PC boots up to enter its boot menu.
Step 7: Then, select the bootable USB drive as the boot option. Then, you can enter the Windows setup process.
Step 8: Follow the on-screen instructions to complete the installation.
Final Words
What is Phoenix Lite OS 11? How to free download and install the Phoenix Lite OS 11 ISO? You can find answers in the above content. Besides, it’s highly recommended to back up the previous system before installing Phoenix Lite OS 11.
User Comments :