In this post, MiniTool Software will tell you what the Surface Laptop 7 and the Surface Laptop 7 recovery image are, and how to use the Surface Laptop 7 recovery image to reset your Surface Laptop 7 to normal.
What Is Surface Laptop 7?
Surface Laptop 7 is one of the new Copilot+ PCs launched by Microsoft. It runs on Snapdragon X Elite or Snapdragon X Plus processors. We believe that many users have purchased this PC as their AI choice. However, when the device runs into issues and the system can’t boot normally, you will need to download the Surface Laptop 7 recovery image, create a USB recovery image, and then reset the Surface to normal.
What Is the Surface Laptop 7 Recovery Image?
The Surface Laptop 7 recovery image can be used to create a recovery USB disk, which can be used to refresh or reset a Surface device when the system is not working normally. Usually, the manufacturer will supply the recovery image for users.
How to Download Surface Laptop 7 Recovery Image?
If your Surface device has boot issues and the recovery options don’t work for you, you might need to use the recovery image to solve the issues.
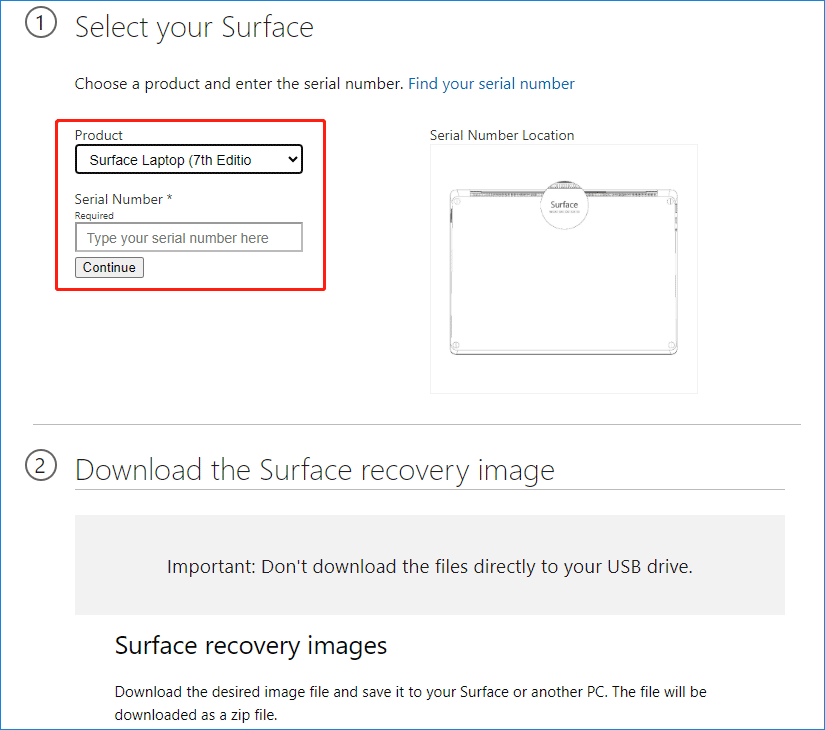
Here is how to download a Surface Laptop 7 recovery image from the official site:
Step 1. Go to the Surface Recovery Image Download page.
Step 2. Scroll down to the What you need section. If you haven’t signed in to your Microsoft account, this section will remind you to do this. Just do it.
Step 3. On the first stage, you need to select your Surface model number and the serial number. The serial number is on the back of the Surface Laptop 7.
Step 4. Click the Continue button.
Step 5. On the nest stage, you will see the available Surface Recovery images. You need to find the one according to the Windows version you are running. Then click the Download image link to start downloading the Surface Laptop 7 recovery image on your PC. Wait until the process ends.

The Surface Laptop 7 recovery image will be downloaded as a .zip file.
How to Create a Surface Laptop 7 Recovery Drive?
Step 1. Connect the USB drive to the computer that has downloaded the recovery image.
Step 2. Type recovery drive into the search box and then select Create a recovery drive or Recovery Drive from the search results. Enter the password to confirm if required.
Step 3. If the User Account Control window pops up, you need to click Yes to continue.
Step 4. Clear the checkbox next to Back up system files to the recovery drive. Then, click Next.
Step 5. Select your USB drive, then go to Next > Create. The needed utilities will be copied to the recovery drive and the process will end within a few minutes.
Step 6. When the above process ends, the recovery drive is ready. Then, you need to click the Finish button.
Step 7. Find the downloaded Surface Laptop 7 recovery image and open it.
Step 8. Select all files from the recovery image folder and copy them to the USB recovery drive you have created. Then, click Choose to replace the files in the destination.
Step 9. Safely remove the USB drive.
How to Reset the Surface Laptop 7 Using the Recovery Drive?
Now, it’s time to reset the Surface Laptop 7 to the factory settings using the recovery drive.
Step 1. Connect the USB drive to the computer that needed to be repaired.
Step 2. Press and hold the volume down button while pressing and releasing the power button.
Step 3. Release the volume down button when you see the Microsoft or Surface logo.
Step 4. Select the language and keyboard layout.
Step 5. Choose Recover from a drive or go to Troubleshoot > Recover from a drive. If a recovery key is prompted, you need to select Skip this drive from the bottom of the screen.
Step 6. Choose Just remove my files or Fully clean the drive according to your situation.
Step 7. Click Recover.
The Surface resetting process starts. You need to wait until the process ends.
Recommendations: Back Up Your Surface and Recover Your Data
Back up Your Surface Device
Before resetting your Surface, you’d better back up your device to safeguard your files. You can use MiniTool ShadowMaker to do this job.
This Windows backup software can back up files, folders, partitions, disks, and systems to another drive. It also supports automatic backup, and full backup, differential backup, as well as incremental backup.
You can try its backup and restore feature for free within 30 days by using the trial edition of this software.
MiniTool ShadowMaker TrialClick to Download100%Clean & Safe
Recover Missing Files from Your Surface Device
If you delete or lose important files by mistake, you can use MiniTool Power Data Recovery to get them back.
As the best free data recovery software for Windows, you can use this software to recover all files from an HDD, SSD, USB flash drive, memory card, SD card, and other storage device. You can first try MiniTool Power Data Recovery Free to scan your drive and see if it can find the needed files. You can also recover 1GB of files for free.
MiniTool Power Data Recovery FreeClick to Download100%Clean & Safe
Bottom Line
After reading this post, you should know how to download the Surface Laptop 7 recovery image and use it to reset your Surface device. It is not a difficult job to do this.
If you encounter issues while using MiniTool software, you can contact us via [email protected].
User Comments :