In order to avoid other people seeing your private data, you can create a guest account on Windows 10. But how to create it? Don’t worry, this post from the MiniTool website will tell you the answer.
What will you do if other people want to use your computer temporarily to check their email or visit the web? Let them use your personal account or add a new account? If you don’t want other people to see your private data and don’t want to spend time creating a new account, then you can add a Windows 10 guest account.
Introduction to Windows 10 Guest Account
You can use the Windows 10 guest account to enable other people to use your computer temporarily without seeing your private data. In addition, if other people log in as a guest, then they cannot install software or change system settings.
Now, it is a little hard to create a guest account Windows 10. But luckily, you can still use the Command Prompt to create it.
Introduction to Create a Windows 10 Guest Account
So how to create a guest account on Windows 10? Follow the instructions below step by step to create it.
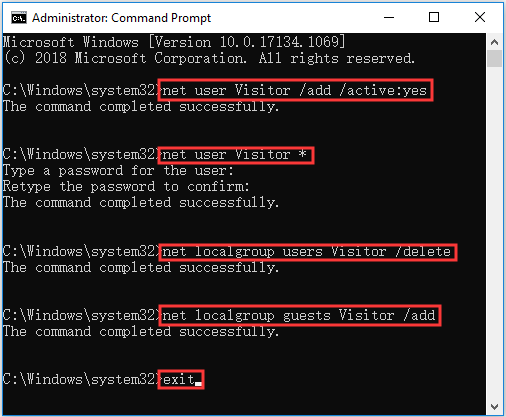
Step 1: Type cmd in the Search box and then right-click the Command Prompt to choose Run as administrator. Click Yes to open Command Prompt.
Step 2: Type net user Visitor /add /active:yes in the window and then press the Enter key to create the account.
Step 3: Type net user Visitor * in the window and then press the Enter key. When asking to type a password for the user, you can press the Enter key twice to create a blank password for the account because the Windows 10 guest account has limited access so that it doesn’t need to be protected.
Step 4: Type net localgroup users Visitor /delete in the window to remove the new user account from the default User group and then press the Enter key. By doing this, there are more limitations to the Windows 10 guest account.
Step 5: Type net localgroup guests Visitor /add in the window to add the Visitor user to the guests group and then press the Enter key.
Step 6: Type exit in the window and then press the Enter key to finish creating the Windows 10 guest account.

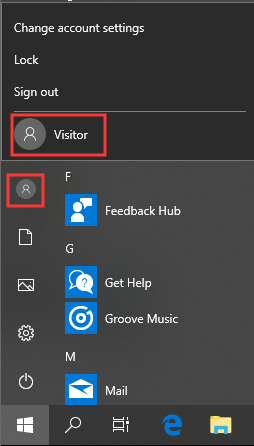
So how to switch to the Windows 10 guest account? Click the Start button and then click on your username, then click Visitor. And you can also choose the Visitor account from the Windows login screen.

Introduction to Delete the Windows 10 Guest Account
Here is the way to delete the Windows 10 guest account:
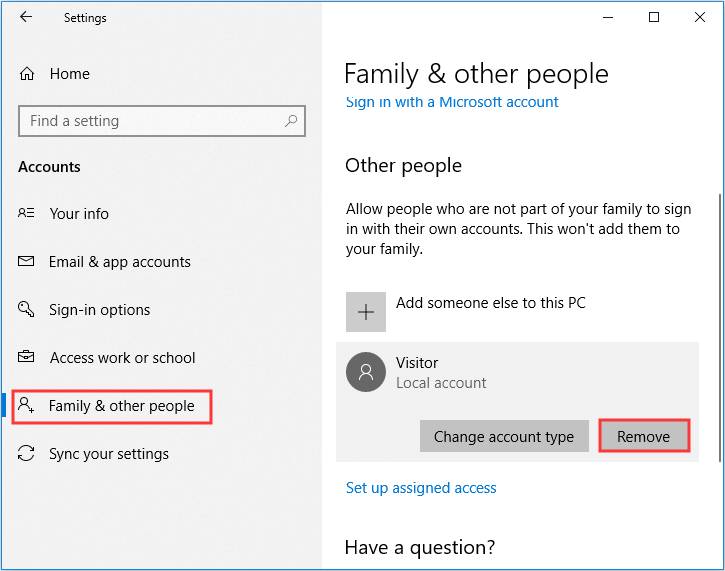
Step 1: Click Start and then click Settings.
Step 2: Choose Accounts and then go to the Family & other people tab.
Step 3: Click the Visitor account to choose Remove.

Bottom Line
How to make a guest account on Windows 10? From this post, you can find the most efficient method to do that. Besides, if you don’t need it anymore, you can remove it easily.

User Comments :