When you play the locally stored videos, you may meet the Windows 10 video stuttering issue. Do you know what the reason is for the annoying issue? Now, read this post from MiniTool to get more details and find some methods to get rid of it.
There are various possible reasons that could lead to the Windows 10 stuttering issue.
1. The system is infected with malware.
2. The video that you cannot play properly is damaged.
3. Your video player is out of date.
4. Your graphics driver is outdated.
5. You haven’t installed Windows updates.
6. You have set up unfavorable system configurations.
The next part is how to fix the video stuttering issue. Keep on your reading.
1. Update Your Graphics Driver
You have to ensure that you are using the latest version of the graphics driver. You will meet the Windows 10 stuttering issue if you have incompatible, corrupt, missing, or outdated drivers. To solve the issue, you need to update the driver.
Step 1: Open the Run box and type devmgmt.msc. Then press Enter to go to Device Manager.
Step 2: Double-click Display adapters to expand it. Then right-click your graphics card driver and choose Update driver.
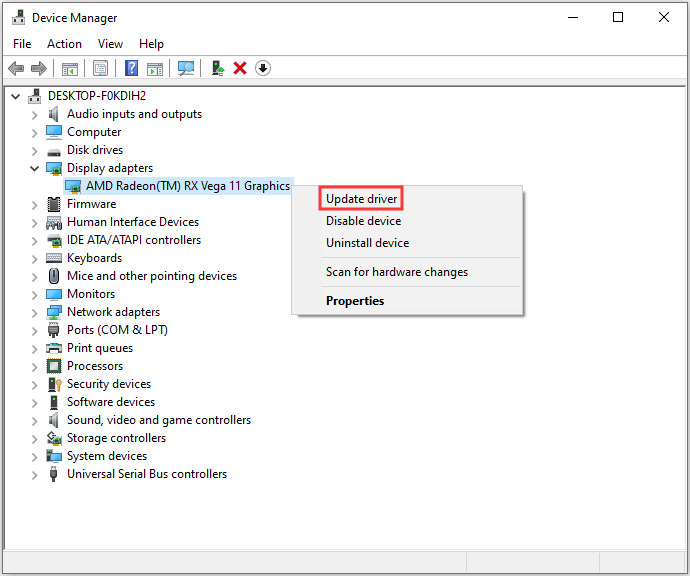
Step 3: You will be asked how you want to search for drivers in the pop-up window. You should choose Search automatically for updated driver software and then follow the instructions to complete the process.
Then, you can check to see if the issue has been fixed. If you find that there is no graphics drives installed, this post – [Solved] No AMD Graphics Driver is Installed on Windows 10 can help you fix the issue.
2. Install the Latest Windows Update
Windows updates can help you fix a lot of system issues and bugs. When you encounter the Windows 10 video stuttering error, you can try installing the latest Windows updates. Here is how to do that:
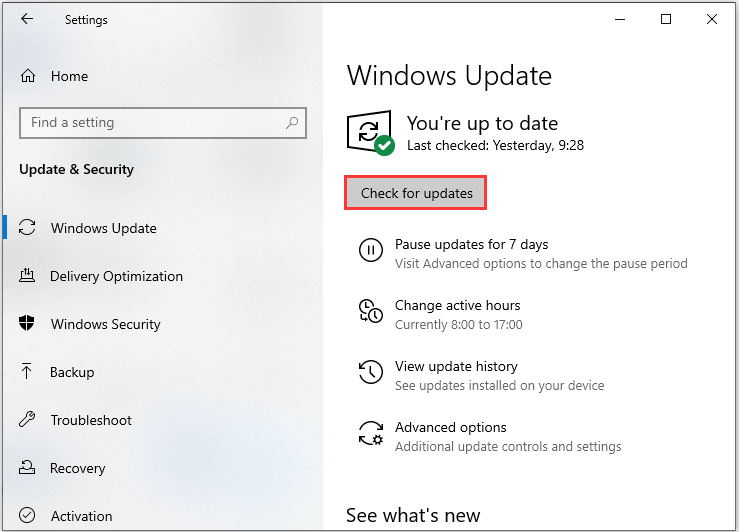
Step 1: Right-click the Start menu and choose Settings.
Step 2: On the Settings window, select Update & Security.
Step 3: Under the Windows Update section, click the Check for updates button to check if there are any new updates. Then Windows will search for available updates. Just follow the on-screen instructions to finish the process.
After installing the latest Windows updates, restart your computer and check if the error gets fixed.
3. Temporarily Disable Your Antivirus Program
Although your antivirus program can help to safeguard your computer, it can lead to certain issues actually. Particularly, if your antivirus is installed not long before the Windows 10 stuttering error occurs, it might be the culprit.
So, you can temporarily disable your newly-installed antivirus program. If the error is gone after disabling it, you should stop using this program and ask its manufacturer for help. Or, you can uninstall the program and switch to another reliable one.

4. Scan for Malware and Virus
You can also use Windows Defender to scan for malware and virus. Follow the steps below to perform a full scan.
Step 1: Press the Windows + I keys at the same time to open Settings.
Step 2: Go to Update & Security > Windows Security > Virus & threat protection.
Step 3: In the new window, click Run a new advanced scan.
Step 4: Choose Full scan and click Scan now. Wait for the process to complete and then you can check if the issue is fixed.
Also see: Free Ways to Schedule a Scan in Windows Defender Antivirus
Bottom Lines
It’s time to make a conclusion. This post has introduced some useful and feasible methods to fix the Windows 10 stuttering issue. If you encounter the same issue, you can try the methods above to get rid of it.
User Comments :