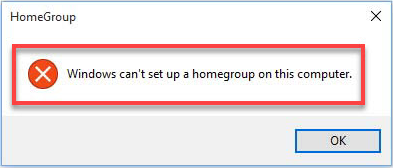
If you’re working in a company or if you want to share files between two computers, then you need to set up a homegroup, but the error message “Windows can’t set up a homegroup on this computer” may appear. Luckily, this post from MiniTool will show you how to solve it.
A homegroup is a group of computers on a home network that can share files and printers. Using homegroups makes sharing easier. You can share pictures, music, videos, documents, and printers with others in your homegroup.
HomeGroup Issues
Here are some of the most common problems that you may encounter with HomeGroups.
1. Cannot connect to HomeGroup Windows 10.
2. Homegroup cannot access other computers, see other computers.
3. HomeGroup Windows 10 not working.
4. Can’t create homegroup only join.
5. I can’t create, join, or use a Homegroup.
6. Homegroup cannot be created on this computer, detected, removed.
Then, I will introduce how to fix the “Windows can’t set up a homegroup on this computer” error.
How to Fix Windows Can’t Set up a Homegroup on This Computer
Method 1: Enable Peer Network Grouping Services
Sometimes you can’t join HomeGroup Windows 10 because services needed for homegroup to work are disabled for some reason, but there’s a method to enable them. Here is how to do that:
Step 1: Search for services.msc in the Search box and open the Services application.
Step 2: Search for Peer Network Grouping, Peer Network Identity Manager, Homegroup Listener and Homegroup Provider in the list.
Step 3: Check if those services are disabled or set to Manual. If yes, you should set them to Automatic and leave your homegroup.
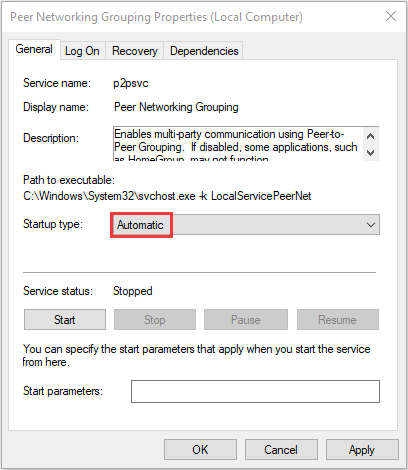
Step 4: Then create a new homegroup and see if it works.
Method 2: Allow Full Control to MachineKeys and Peer Networking Folders
If it doesn’t work, you can try this method. You can try to allow full control to MachineKeys and Peer Networking folders. Here are the steps:
Step 1: Find the following file paths:
C:\Program\Data\Microsoft\CryptoRSA\MachineKeys
C:\Windows\ServiceProfiles\LocalService\AppData\Roaming\PeerNetworking
Step 2: Right-click each folder and choose Properties. Then go to the Security tab, then click a group, and click Edit.
Step 3: At last, check the Allow box next to Full control.
Step 4: Repeat the steps for all that you wish to have access to your homegroup.
Then you can check if you still can’t join homegroup Windows 10.
Method 3: Rename MachineKeys Directory
If the homegroup cannot be set up in Windows 10, the issue might be related to the MachineKeys folder. However, you can rename the MachineKeys directory to fix it. Here is the tutorial:
Step 1: Navigate to C:\ProgramData\Microsoft\Crypto\RSA directory. Then locate MachineKeys, right-click it and choose Rename.
Step 2: Change the name from MachineKeys to MachineKeys-old.
Step 3: Now create a new folder called MachineKeys and give full control permissions to Everyone and all users on your PC.
Then you’ll be able to set up a Homegroup.
Method 4: Turn off AllHomegroup
Sometimes other computers in your network can interfere and cause the “homegroup cannot be set up in Windows 10” issue. However, you can do the following to fix it.
Step 1: First, you should stop all services beginning with Home and Peer on all computers.
Step 2: Now go to the following directory and delete all contents of that folder.
C:\Windows\Service\Profiles\LocalService\AppData\Roaming\PeerNetworking
Step 3: Now shut down all computers in your network except one. Restart the HomeGroup Provider service on this PC.
Step 4: Now create a new homegroup on this PC. Restart all PCs in your network and join the newly created homegroup.
This solution might be a little complicated, but it should be useful.
Final Words
To sum up, this post has introduced how to fix the “Windows cannot set up a homegroup on this computer” error with 4 different methods. If you have encountered the same homegroup error, try these solutions.
User Comments :