HP 250 G5 is an entry-level laptop launched by HP, released in 2016. Despite so many years, some users are still using this computer model and posting on the forum that they want to do the HP 250 G5 laptop SSD upgrade. This article from MiniTool will tell you the complete HP 250 G5 SSD replacement guide.
HP is almost a household name, and its computer products are very famous. Among them, laptops have these series: HP Pavilion series, HP Envy series, HP Spectre x360 series, HP Elite Dragonfly series, and HP Omen series.
The HP 250 G5 mentioned in this article is an older model of HP computers. Recently, I saw someone posting some questions about this model on the forum: HP 250 G5 memory upgrade, HP 250 G5 – Upgrade from HDD to SSD M.2, and HP 250 G5 bay installation issues.
I want to buy the HP 250 G5 W4N23EA and I was wondering if it is able to upgrade from the HDD to an SSD M.2. Do I need to replace the HDD connector? If the above upgrade is possible, I would also like to know if installing a caddy for the HDD is possible for this laptop.
This article will introduce you to how to upgrade SSD on HP 250 G5 in detail. If you are using an HP 250 G5 laptop and want to do the HP 250 G5 SSD upgrade, this article is just for you.
Why Do You Need to Do the HP 250 G5 SSD Upgrade?
Upgrading your HP 250 G5 laptop to an SSD has many benefits, especially in terms of performance, speed, and storage.
- Improve system boot speed: The HP 250 G5 is an older computer, and upgrading to an SSD can reduce the time it takes to boot up.
- Improve overall performance: SSDs have higher read and write speeds, which can make the operating system and applications more responsive.
- Increase storage space: If your current disk storage capacity is not enough, upgrading to a larger SSD can increase storage capacity.
Preparations Before HP 250 G5 Laptop SSD Upgrade
Before doing the HDD to SSD upgrade on HP 250 G5, it’s important to make a few preparations. Here’s a list of what you should do.
1. Back up your data
You may lose data during the SSD upgrade process, so, I recommend you back up data before you start.
2. Prepare some tools
- Screwdriver: Used for taking off the laptop’s back cover.
- Anti-static gloves or wristband: Safeguard electronic components from static discharge.
- USB to SATA adapter: Used to link the prepared SSD to the computer as an external drive.
- Tweezers: Use tweezers to take off the rubber cover from the screw.
3. Buy the right SSD
The HP 250 G5 usually supports 2.5-inch SATA interface hard drives. Make sure the SSD you buy is a SATA III 2.5-inch type, not an M.2 SSD.
Clone HP 250 G5 SSD to New SSD
To do the HP 250 G5 SSD replacement, one of the important steps is to migrate the original data to the new SSD. This method is suitable for those who do not want to reinstall the operating system and some applications.
So how to migrate the old data? Don’t worry, there are many cloning software on the market that can help you, among which I recommend MiniTool Partition Wizard the most.
This software not only can help you partition hard drives, and format FAT32 on USB drives or SD cards, but also can help you convert MBR to GPT without data loss, change cluster size, recover hard drive data, etc.
Well, wondering how to clone your hard drive to a new SSD? Below, I outline two methods by using the third-party software MiniTool Partition Wizard, a professional tool for disk and partition management.
Here is the guide to clone a hard drive to a new SSD.
MiniTool Partition Wizard DemoClick to Download100%Clean & Safe
Method 1: Use the Migrate OS to SSD/HD Feature
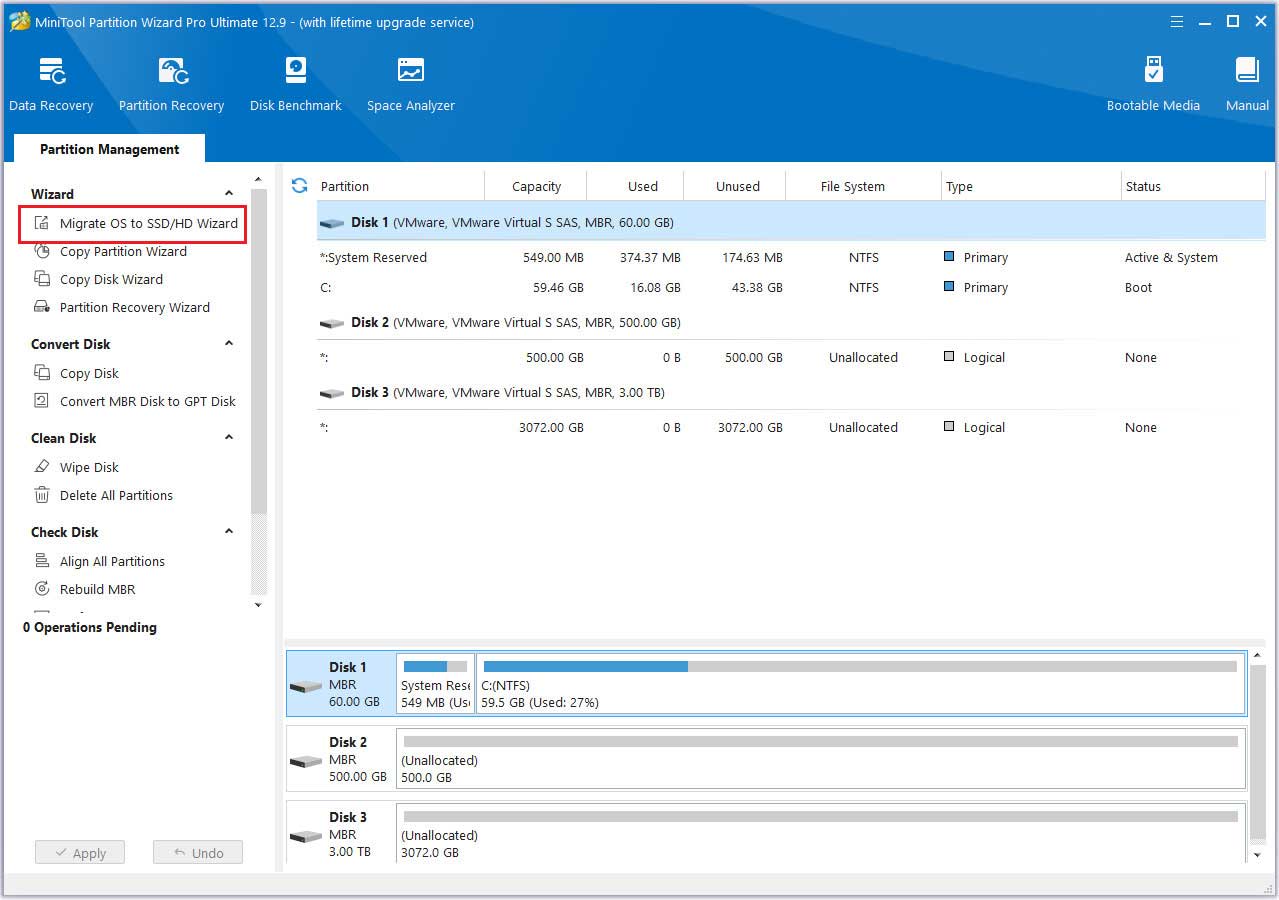
Step 1: Connect the new SSD to your HP 250 G5 laptop via a USB to SATA adapter, then launch MiniTool Partition Wizard to its main interface. Click on the Migrate OS to SSD/HD Wizard feature from the left action panel.
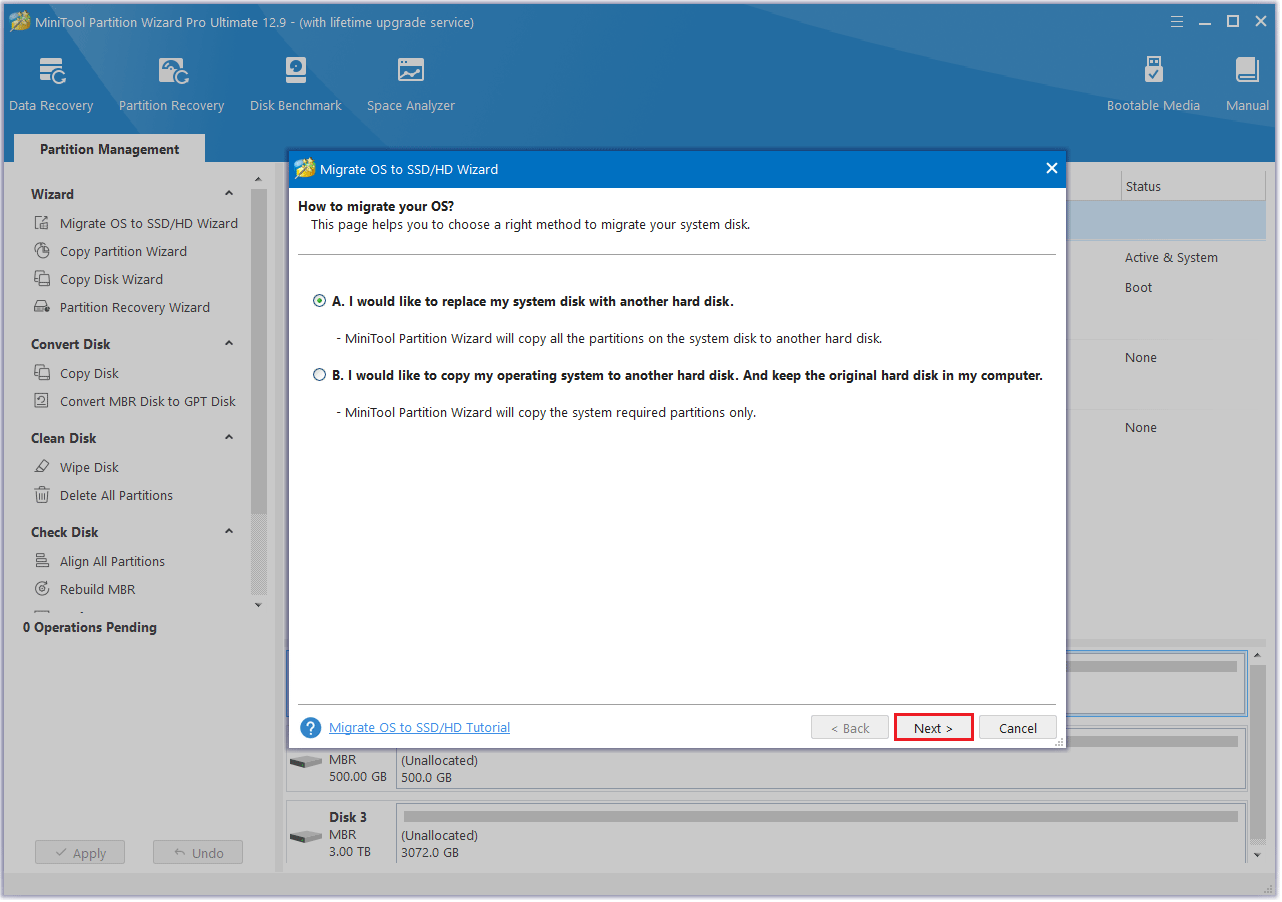
Step 2: In the pop-up window, select the option that suits your needs for migrating the OS, then click Next.
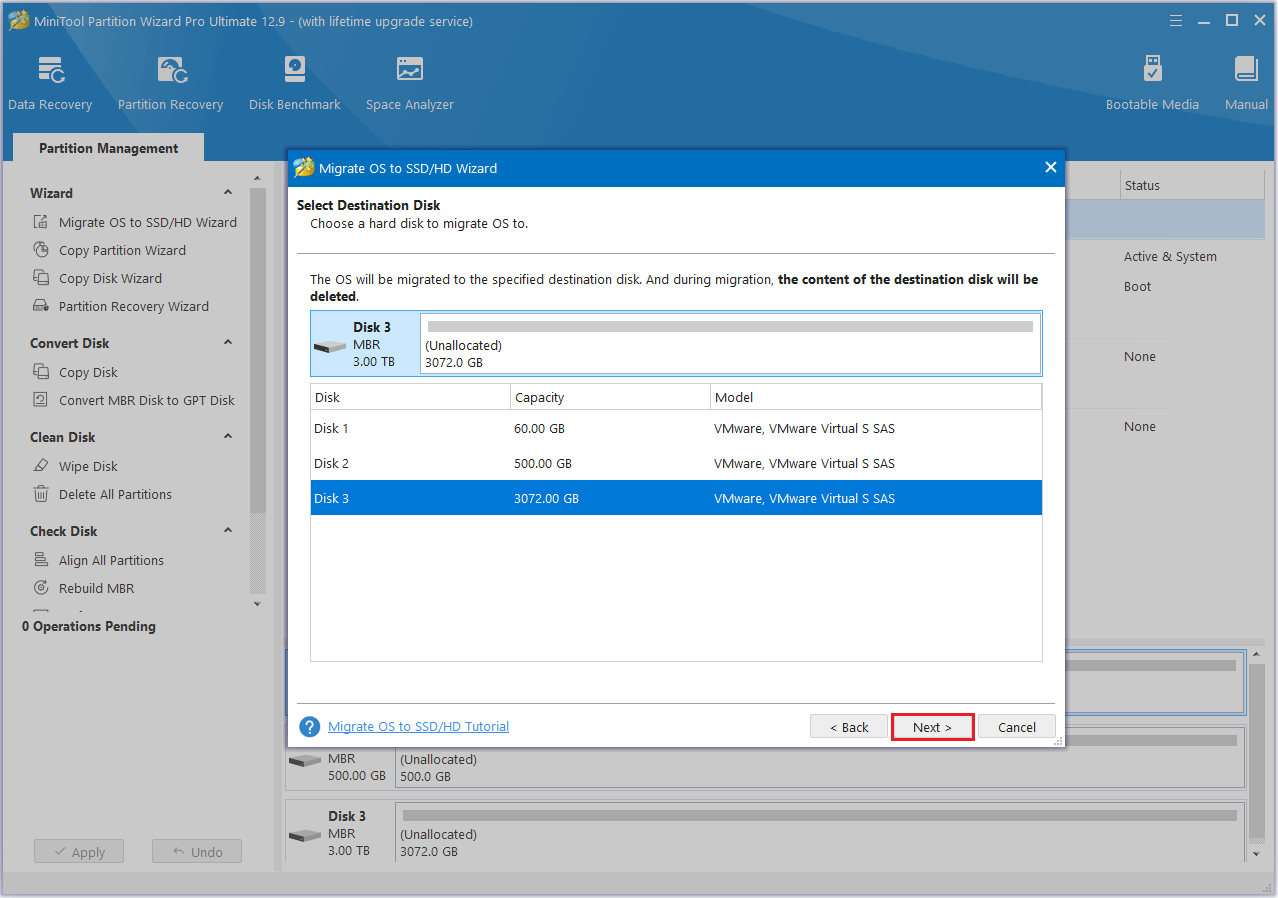
Step 3: Select the new SSD as the destination disk, then click Next. A warning message will pop up, read it and click Yes to continue.
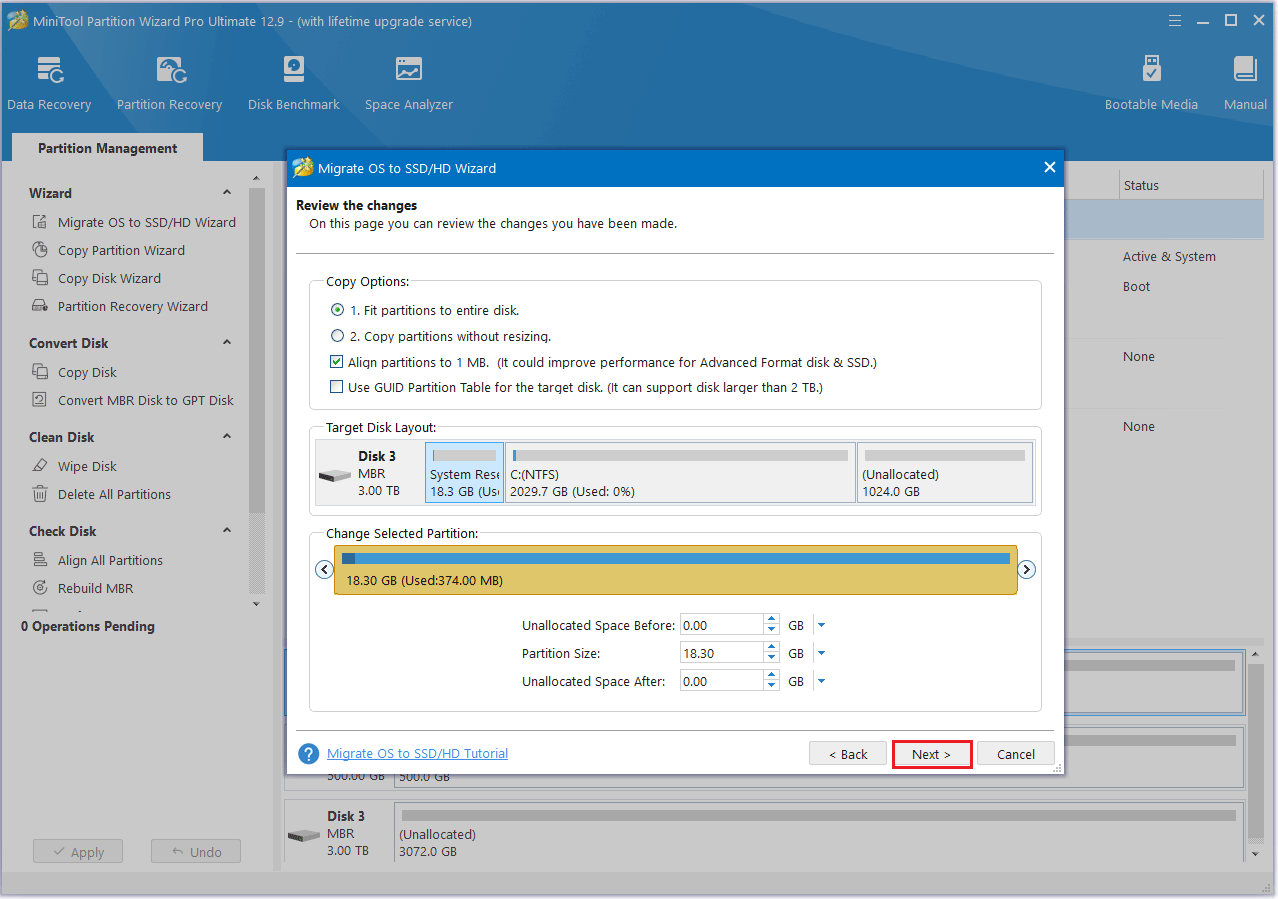
Step 4: Modify the disk layout in the Review the Changes window and then click Next.
- Fit partitions to entire disk: The partitions on the source disk will be extended by an equal proportion to fill the entire new SSD.
- Copy partitions without resizing: All the partitions on the source disk are copied into the new SSD without changes in size or location.
- Align partitions to 1 MB: The Align partitions to 1 MB option will apply 4K alignment on the SSD.
- Use GUID partition table for the target disk: The Use GUID partition table for the target disk option will apply GPT on the SSD, but it only appears when the source disk is an MBR disk.
- Change Selected Partition: You can resize or move the partition according to your needs.
Step 5: A warning message “How to boot from the Destination disk?” will pop up, and click Finish to continue.

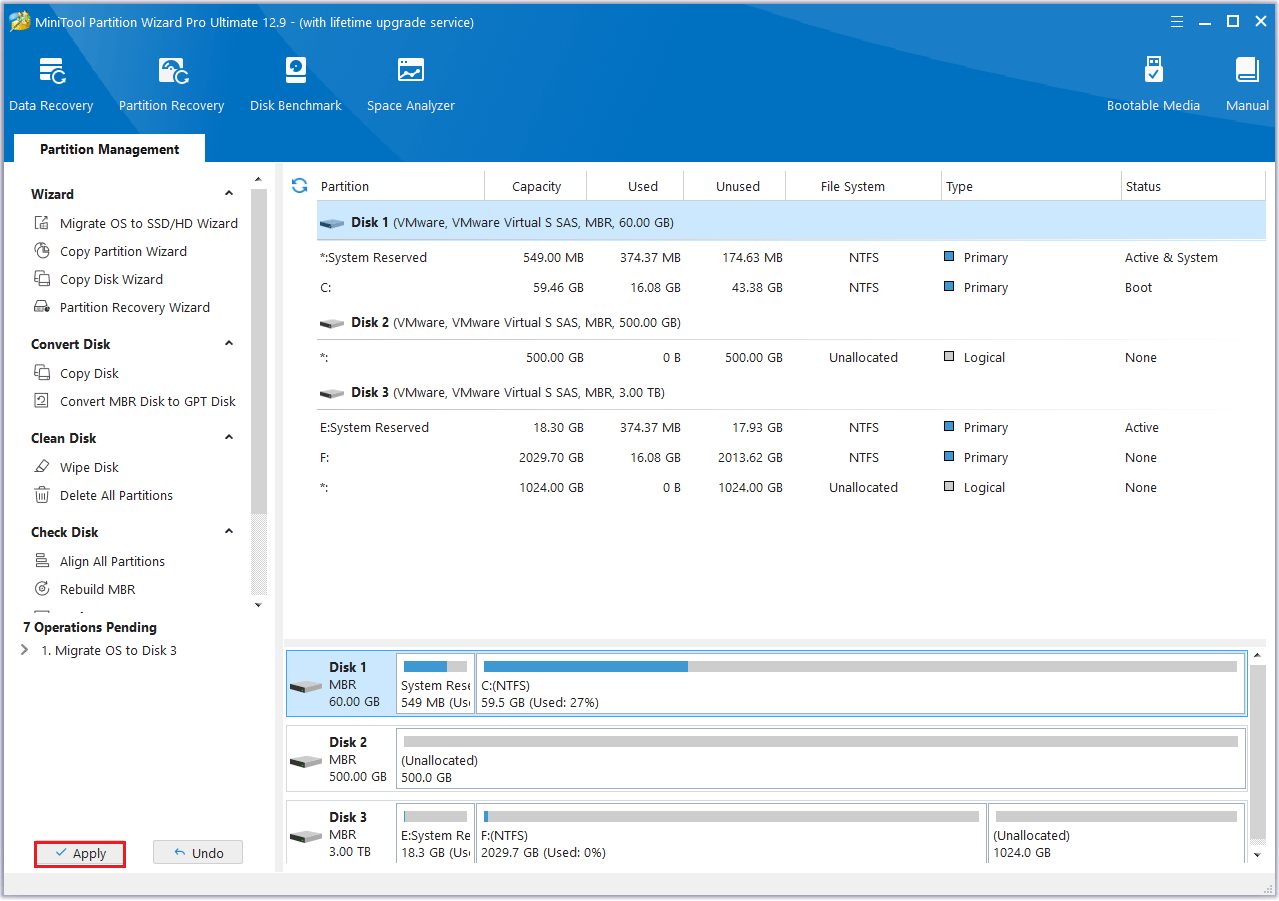
Step 6: Next, click the Apply button to carry out the pending operation.
Method 2: Use the Copy Disk Feature
Step 1: Connect the new SSD to your HP 250 G5 laptop via a USB to SATA adapter.
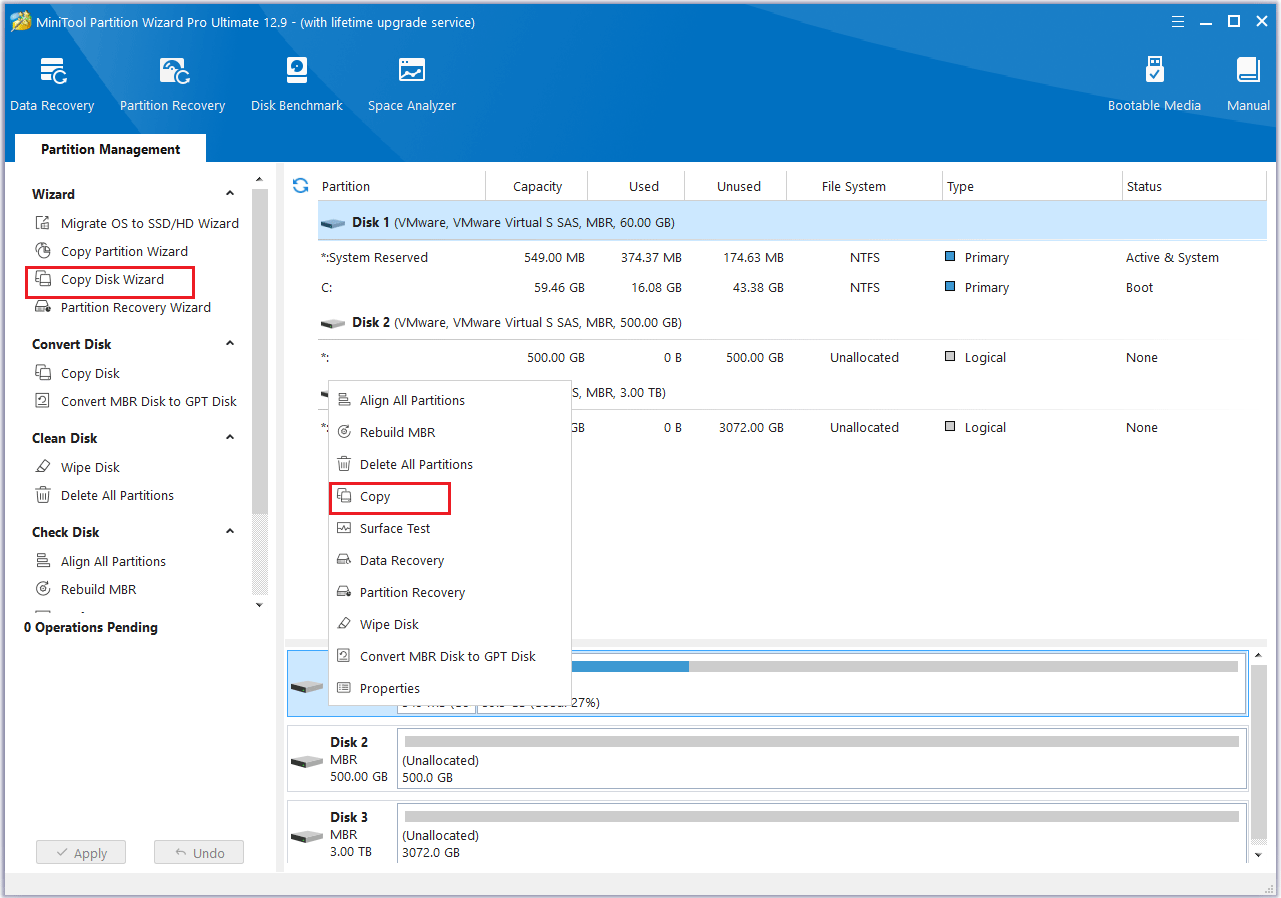
Step 2: Launch MiniTool Partition Wizard to its interface. Right-click the disk and then select Copy from the menu. Also, you can click the Copy Disk feature from the left action panel.
Step 3: In the pop-up window, choose the new SSD as the target disk, then click Next. When prompted to confirm, click OK to proceed.

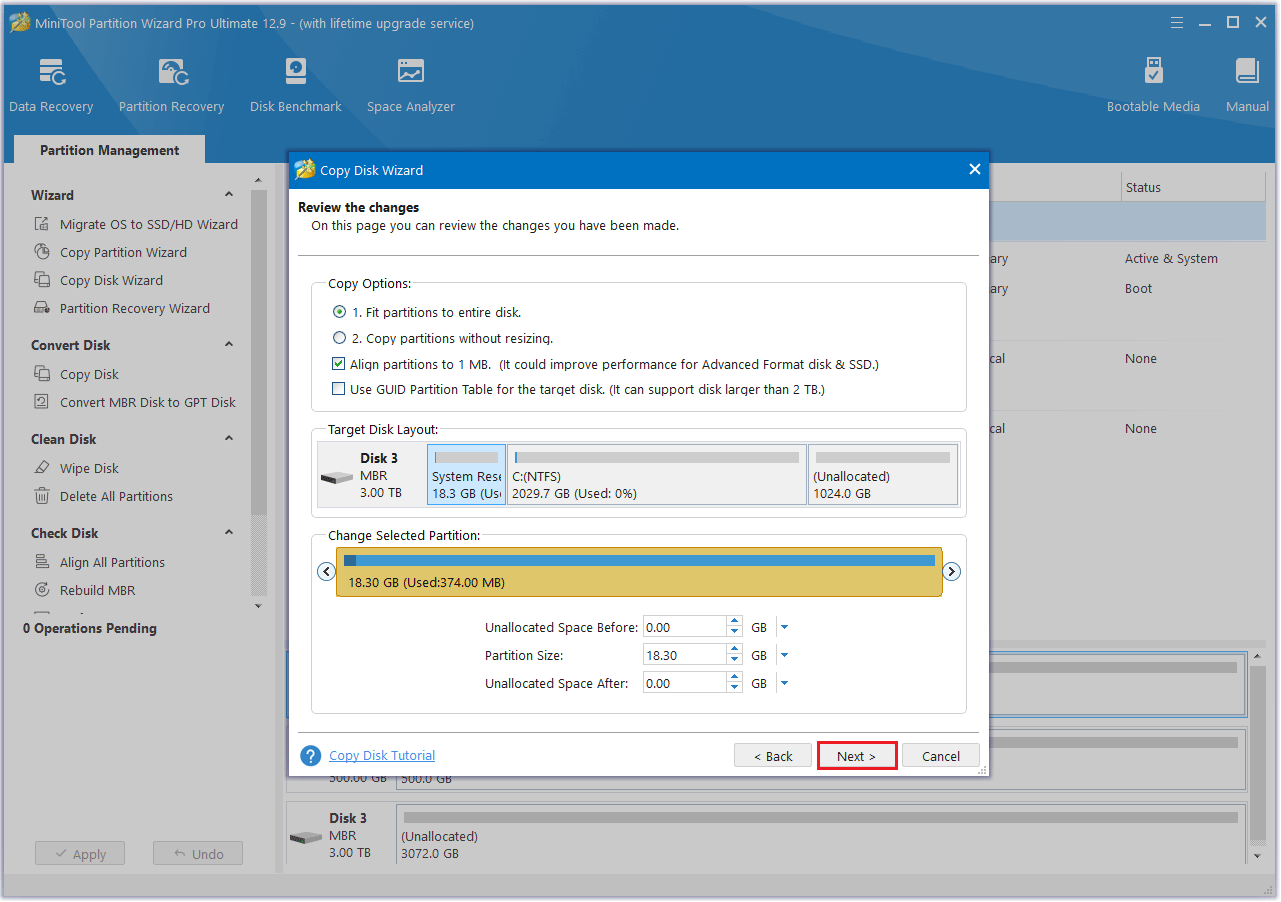
Step 4: Review the chosen Copy Options and Target Disk Layout. If everything looks correct, click Next.
Step 5: Take a moment to read the note for instructions on how to boot from the target disk, then click Finish to return to the main interface
Step 6: Click the Apply button to initiate the pending operation and wait for the cloning process to finish.

How to Install Cloned SSD on HP 250 G5 Laptop
How to install cloned SSD on an HP 250 G5 laptop? Well, in this section, I will show you how to install a cloned SSD on an HP 250 G5 laptop.
Step 1: Turn off the HP 250 G5 computer and unplug all external power devices.
Step 2: Turn off the display and place the computer bottom up on the table.
Step 3: Use a screwdriver to remove the screws and store them safely. Next, use a crowbar to take off the bottom cover. If possible, wear an anti-static wristband while removing the cover to protect the device.
Step 4: Use a screwdriver to remove the screws that secure the SSD.
Step 5: Put the new SSD into the slot, you need to pay attention to the interface alignment.
Step 6: Finally you need to put the cover of the SSD back in place, reconnect the battery cable, and cover the back cover with screws.
If you cannot boot from the new SSD, set it as the boot drive. Here’s a helpful guide.
- If your computer is on, make sure to turn it off before proceeding.
- Click the Power button and then immediately press the BIOS key (F1 or F12) to enter the firmware.
- Press the left or right arrows to go to the Boot menu.
- Use the up or down arrows to select the new SSD.
- Press the “+” or “–” key to move the new SSD to the top of the boot list.
- Press the F10 key to save the boot order and exit the BIOS setup.
Bonus Tip: What to Do with a Replaced HP 250 G5 Hard Drive
If you want to reuse the old hard drive to store other things, you can delete all partitions first and then rebuild the partitions. If you want to sell the hard drive and are afraid that the data on the disk will be leaked, you can erase all the data on the disk. Once this method is used, data recovery software cannot recover the data.
Before that, you’d better check whether the old hard disk has bad sectors. You can use MiniTool Partition Wizard to help you do this. Here is the guide:
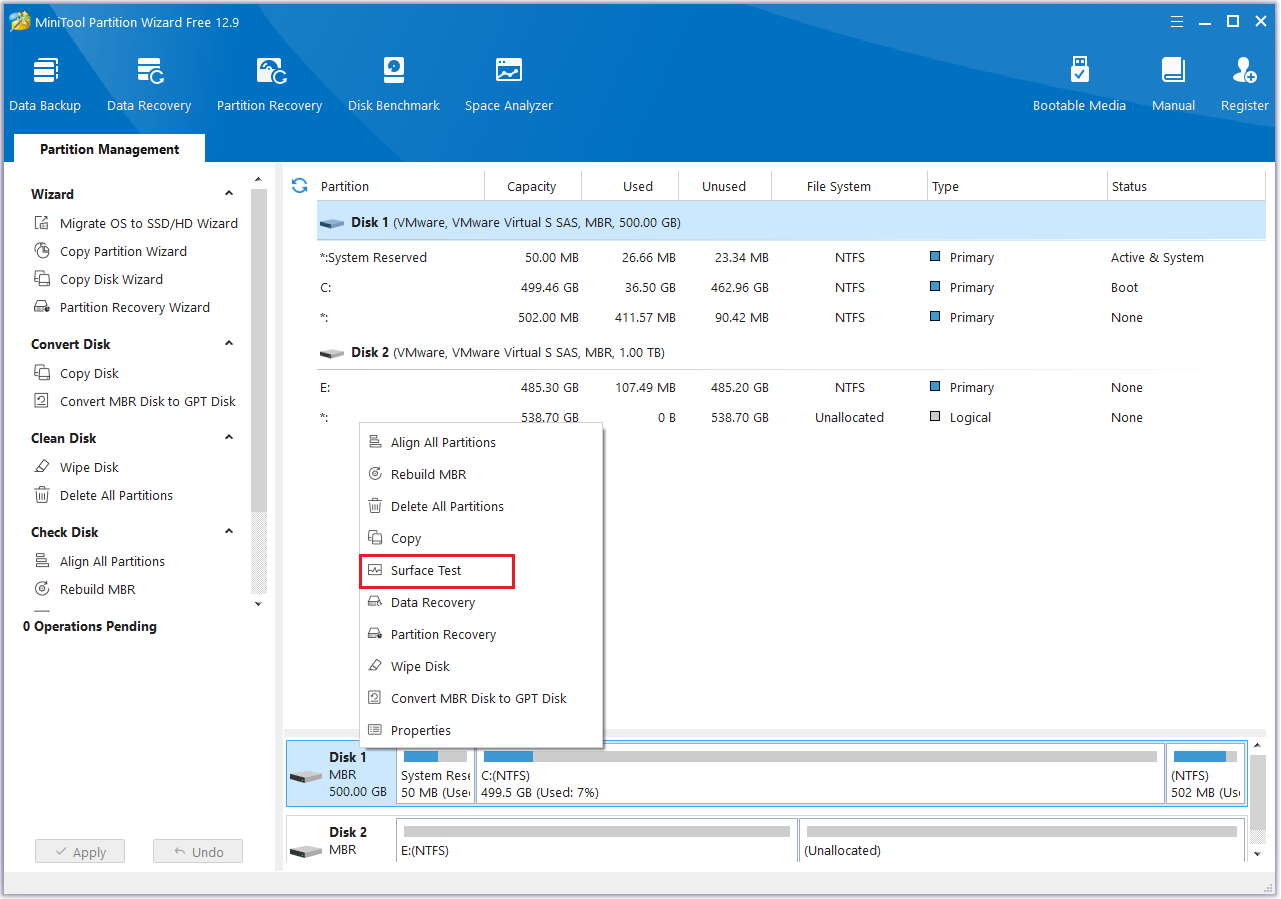
Step 1: Install the software and launch it to access the main interface. Then, select the disk you wish to check and choose the Surface Test option from the context menu to continue.
Step 2: In the pop-up window, click the Start Now button to check the hard drive for errors.
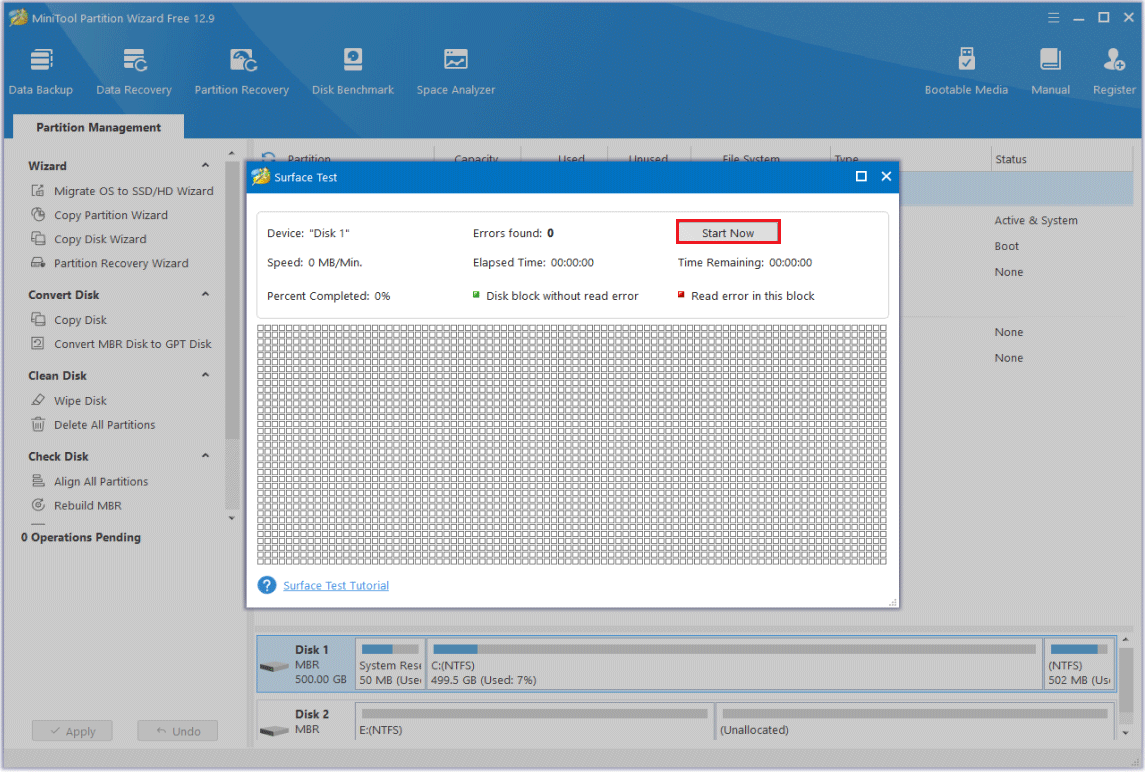
Step 3: Once the process is finished, the disk will be highlighted in green if there are no read errors; otherwise, it will appear red.
Option 1: Delete Partitions and Create Partitions
Right-click the disk you want to delete then select Delete All Partitions. The partition will then be shown as an unallocated space.
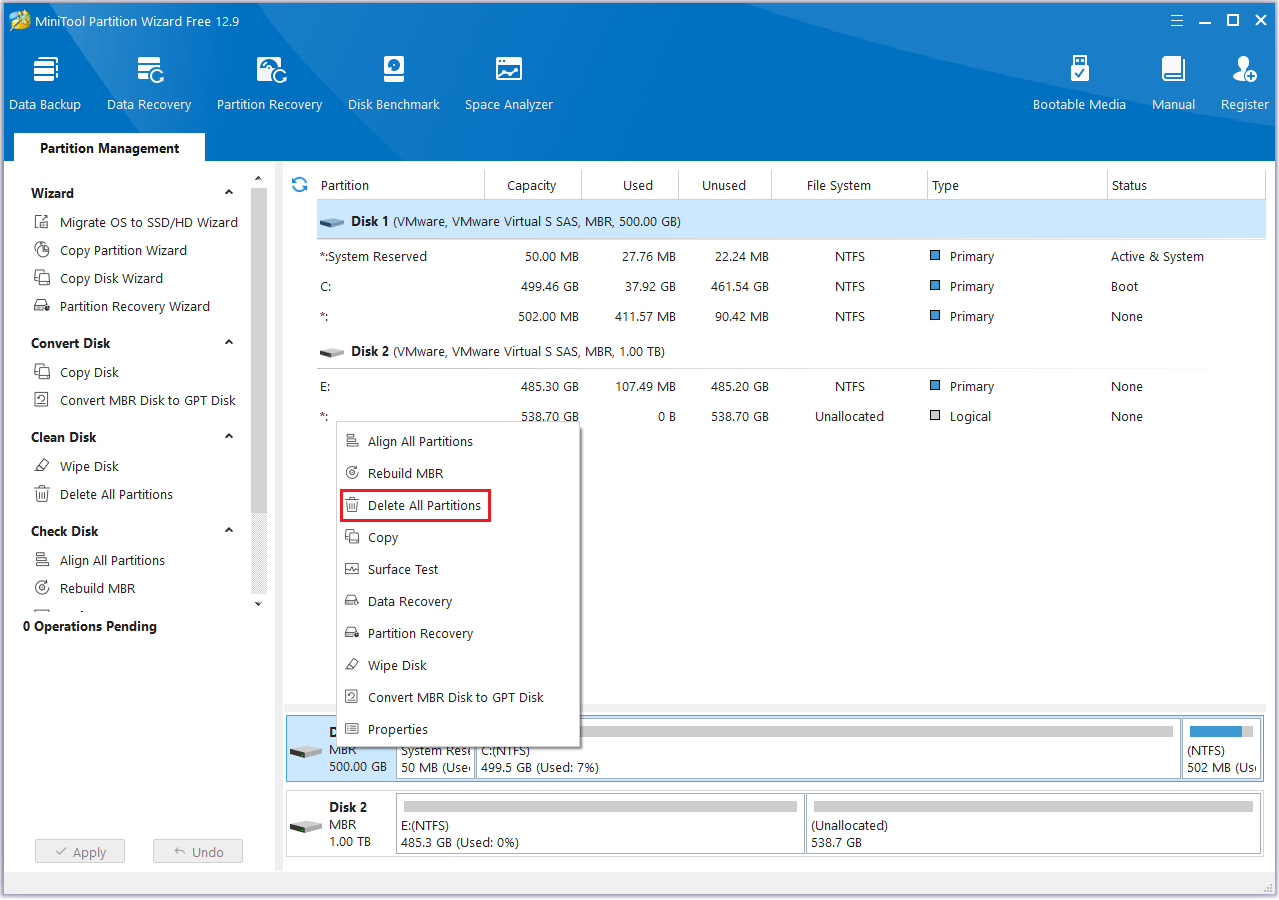
Now you can create the partition you want by using the Create feature in MiniTool Partition Wizard.
Option 2: Wipe Disk
Step 1: Right-click the disk you want to wipe then select Wipe Disk. Or you can highlight the target disk and select Wipe Disk from the left action panel.
Step 2: You will see a pop-up window as shown below. Choose the one way to wipe. Then click the OK button below to proceed to the next step.

Step 3: Once the process ends you will return to its main interface, and you can preview that the target Disk 2 is marked as “Unallocated” without a partition letter. Then, you still need to click the Apply button to execute all changes.
Click to tweet: Do you know how to do the HDD to SSD upgrade on HP 250 G5? If you don’t know, this article will give you a full guide.
Bottom Line
In this post, I have introduced you to a full guide on how to do the HP 250 G5 laptop SSD upgrade. If you have any questions or suggestions while using MiniTool Partition Wizard, you can contact us via [email protected] to get a quick reply.
About The Author

Position: Columnist
Cecilia has been an editor at MiniTool for two years. She primarily focuses on disk and partition-related content, with particular expertise in disk cloning, partition recovery, and PDF document conversion. She is dedicated to providing users with clear and accurate solutions to help them efficiently resolve common computer problems.
User Comments :