Do You Need to Expand Xbox Series S Storage?
Microsoft released the Xbox Series S on September 8, 2020. This console is touted as the smallest all-digital next-generation game console. Its specs are as follows:
- CPU: 8X Cores @ 3.8 GHz (3.6 GHz w/SMT) Custom Zen 2 CPU
- GPU: 4 TFLOPS, 20 CUs @1.565 GHz Custom RDNA 2 GPU
- Memory: 10GB GDDR6 128-bit-wide bus
- Memory Bandwidth: 8 GB @ 224 GB/s, 2 GB @ 56 GB/s
- Gaming Resolution: 1440p
- Performance Target: Up to 120 FPS
- Ports: 1x HDMI 2.1 port, 3x USB 3.1 Gen 1 ports
- Dimensions: 6.5 cm x 15.1 cm x 27.5 cm
- Weight: 4.25 lbs
The Xbox Series S uses a custom NVMe solid-state drive, enabling features such as fast loading times and quick resumes. Depending on the model, it offers two total capacity options: 512GB or 1TB.
- Xbox Series S Robot White: 512 GB Custom NVMe SSD
- Xbox Series S Carbon Black: 1 TB Custom NVMe SSD
With the operating system and system files taking up approximately 148 GB, the 512GB model has approximately 364 GB available for installing games and applications. The 1TB model offers approximately 850 GB of usable space.
However, many large games now exceed 100GB, and usable space is quickly exhausted. Without expansion, you can only play a few games at most.
Fortunately, Microsoft fully considered scalability in the design of the Series S. It offers 2 different and practical storage expansion options: an officially licensed storage expansion card and an external USB drive.
The key differences between the 2 methods are as shown below:
| Feature | Storage Expansion Card | External USB Drive |
| Play games directly | Yes | No (storage only) |
| Performance | Identical to internal SSD | Slower than internal SSD |
| Ease of use | Plug-and-play into a dedicated port | Plug into the USB port, format, and use |
| Warranty status | Supported, maintains warranty | Supported, maintains warranty |
Xbox Series S Storage Expansion: Add the Storage Expansion Card
The official storage expansion card is the simplest, most plug-and-play way to add high-speed storage to your Xbox Series S.
Designed in partnership with Microsoft, these cards slot directly into the console’s dedicated rear expansion port, matching the internal SSD’s speed and compatibility perfectly.
The Xbox Series S storage expansion card is the most convenient but least cost-effective option. Per-GB prices are higher than external drives.
It is ideal for users who want to play games optimised for Xbox Series X|S and don’t mind the high cost.
Specs and Compatibility
- Interface: Proprietary slot (PCIe Gen4 x2, same as internal SSD)
- Speeds: Identical to the stock SSD
- Capacity options: 512GB, 1TB, 2TB (Seagate); 512GB, 1TB, 2TB (WD_BLACK C50)
- Certification: Microsoft-licensed, full Velocity Architecture support
- Use case: Run all games natively (Series X|S optimized, backward compatible, Game Pass)
Step-by-Step Setup
- Power off your Xbox Series S and unplug all cables.
- Locate the Storage Expansion slot on the back of the console (between the HDMI and USB ports).
- Remove the protective cover from the Storage Expansion Card.
- Align the card with the slot and push firmly until it clicks into place.
- Reconnect cables and power on the console.
- The system will automatically detect the card (no formatting needed).
When you first connect the storage expansion card for Xbox Series S, you will be asked whether you plan to use it primarily with this console or with multiple consoles.
- Choose to use the card primarily on a specific console to enable automatic updates.
- Choosing to use the card across multiple consoles will disable automatic game and app updates on that card. However, you can still manually update games from My games & apps.
To change this setting, go to My games & apps > Manage > Storage Devices, select the device you want to change, press the A button, and then switch to the setting that best suits you.
Manage Your Storage
Once installed, you can manage your games and set the default installation location.
- To see both the internal storage and the expansion card listed, go to Settings > System > Storage devices.
- To change the default install location for new games, go to Storage devices, and then select Change install locations from the menu on the right.
- To move existing games, go to My games & Apps, select the game, press the View button, choose Move or copy, and select the expansion card as the desired destination.
Xbox Series S Storage Expansion: Add an External USB Drive
If you want maximum capacity at a lower cost, an external USB drive is ideal. This method utilizes the Series S’s USB 3.1 Gen 1 interface to connect an external USB drive, perfect for archiving games and storing backward-compatible titles.
Requirements
To use an external USB drive with your Xbox Series S, the following basic requirements must be met:
- Connection: USB 3.0 connection.
- Capacity: 128 GB or more.
Usage Limitations
It’s important to understand the features and limitations of using a USB drive compared to using an official storage expansion card:
- Backward-compatibility games: You can store and play thousands of backward-compatible games from Xbox One, Xbox 360, and the original Xbox generation directly from the external USB drive.
- Xbox Series X|S Optimized Games: You cannot run games optimized for Xbox Series X|S directly from an external USB drive. These games must be transferred to the console’s internal SSD or an official expansion card to run.
Recommended External USB Drive
Here are some recommended external USB drives:
- WD_Black P10 Gaming HDD: A high-capacity HDD (up to 5TB or more) offering ample storage at a great price.
- Samsung T7 Portable SSD: Offers a faster external SSD option (USB 3.2 Gen 2), accelerating game transfers between internal and external storage and speeding up loading times for backward compatible games.
- Toshiba Canvio Flex HDD: A reliable and affordable external hard drive.
Step-by-Step Setup
- Connect your external drive to any USB 3.0 port on the Xbox Series S.
- A pop-up will appear, and select Format Storage Device.
- Name the drive (optional) and confirm formatting. This erases all data on the drive.
Once formatted, you can find your drive under Settings > System > Storage devices. From here, you can move games to the USB drive to free up space on your internal SSD.
Further reading:
If you don’t currently plan to use an expansion card or an external hard drive to expand storage on Xbox Series S, you can free up space by effectively managing your storage. Here are some ways to make the most of your existing space:
- Uninstall unused games/apps: Go to My games & Apps > See all > Games, and then select the games you no longer play.
- Clear local saved games: Go to Settings > System > Storage > Manage storage devices> Clear local saved games.
- Delete unwanted captured media (screenshots and gameplay clips): Go to Capture & share > Recent captures > Show all, check the boxes to remove, and then click Delete.
Common Xbox Series S Storage Expansion Issues
When performing storage expansion Xbox Series S, common issues often relate to physical connectivity or power settings.
Issue 1. Storage Expansion Card Not Detected
If your Xbox Series S doesn’t detect the storage expansion card, it’s usually a seating problem.
The most common cause is that the card is not fully inserted. Remove the card, wait 30 seconds, and then forcefully reinsert it until you hear a click.
Issue 2. External USB Drive Not Detected
If your console cannot detect your external storage device, it’s usually due to a power failure.
Solution 1: Ensure you have the latest Xbox update installed.
- Press the Xbox button to open the guide, then select Profile & system > Settings > System > Updates.
- If you see Update available, you need to install it.
- After the update is installed, return to Settings, then select System > Storage. Check if your device appears in the list.
Solution 2: Adjust the storage device’s power management if you are in Sleep Mode.
Sleep mode is a low-power standby state that allows the console to boot up nearly instantly and perform background tasks.
When the console is in Sleep Mode, uncheck the box for When Xbox is off, turn off storage to keep the power running to your external USB drive.
- Press the Xbox button to open the guide.
- Select Profile & system > Settings > General > Power options.
- Confirm your power mode is set to Sleep.
- Uncheck the option When Xbox is off, turn off storage.
Once done, check if your device appears in the list.
If your Xbox still cannot detect your external storage device, try the following:
- Remove the storage device and then reconnect it.
- Connect the device to a different USB port on your console.
Issue 3. External USB Drive Format Failures
If your external USB drive fails to format, it may be a file system conflict. From a user report, formatting it to FAT32 on a PC may be useful.
To do that, try a professional and free partition manager, MiniTool Partition Wizard. It can format drives to exFAT, FAT32, NTFS, and Ext 2/3/4.
Now, download and install this software. Then, try the following steps to format the drive.
MiniTool Partition Wizard FreeClick to Download100%Clean & Safe
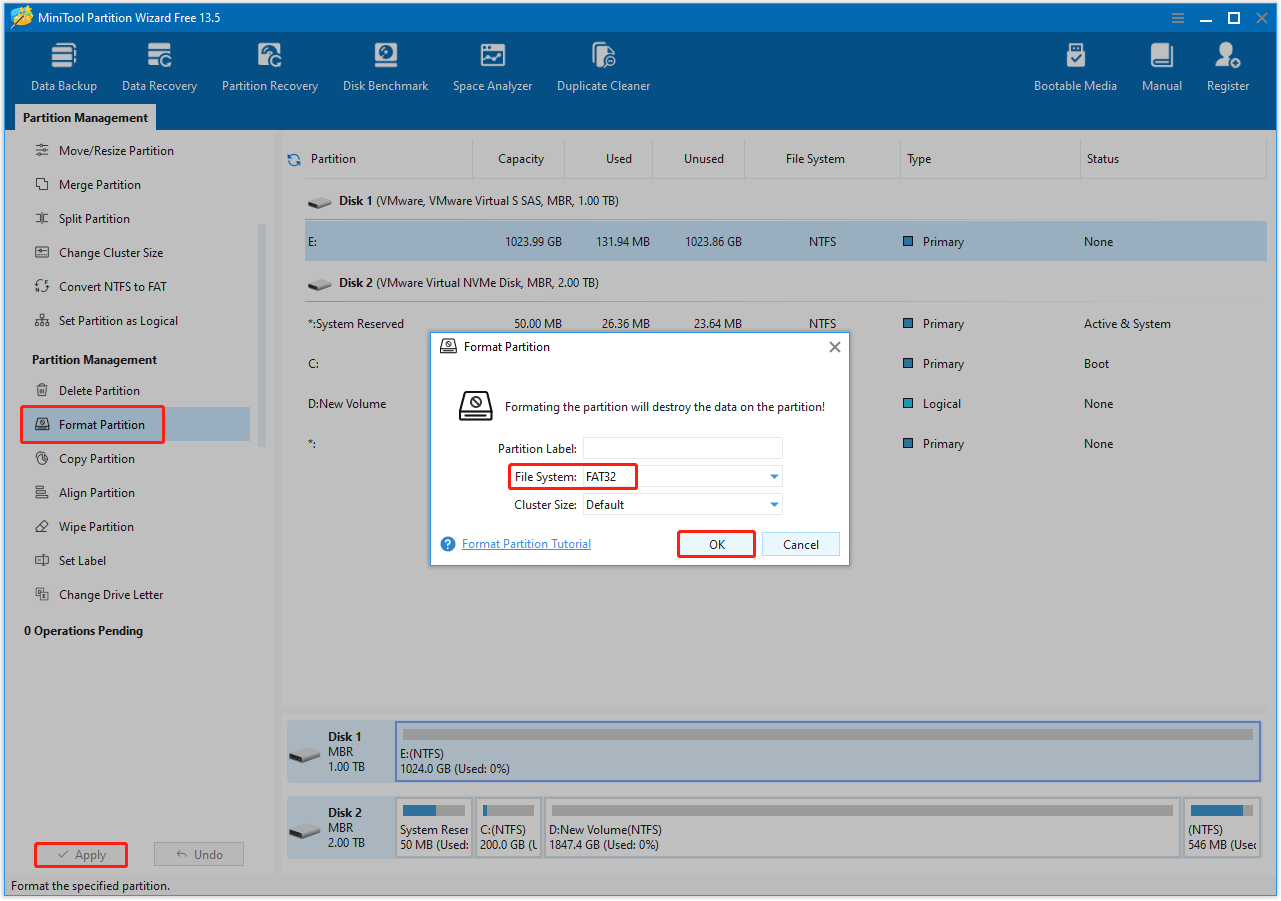
- Run this software to enter its main interface, highlight the partition on the external drive.
- Choose the Format Partition feature from the left action panel.
- In the pop-up Format Partition window, set the File System to FAT32. Then click OK.
- Click Apply to confirm the changes.
Once done, plug your external drive into the Xbox Series S. Then, a pop-up format window will appear, and you need to format the Xbox again.
Xbox Series Storage Expansion FAQ
These proprietary NVMe SSDs offer identical performance to the internal drive, supporting Quick Resume and allowing direct play of games optimized for Series X|S.
Bottom Line
For gamers who don’t want to delete games to make room for new ones, Xbox Series S storage expansion is a crucial upgrade.
Whether you prioritize speed (storage expansion card) or convenience (external USB drive), there’s an option to meet your needs.
If you have any questions related to MiniTool Partition Wizard, just contact us by sending an email to [email protected].
About The Author

Position: Columnist
Vega enjoys helping people with computer problems, including disk management, data recovery, and more. She is constantly expanding her knowledge in related fields. And she will continue to bring more easy-to-understand professional articles to help people solve various problems on the PC.
User Comments :