.NET Framework is a software development framework for building and running applications on Windows. Some Windows 11/10 users report that they receive the error message – 0x80071AB1 (ERROR_LOG_GROWTH_FAILED) when trying to install the .NET Framework version on Windows Update.
Also see:
- How to Check .NET Framework Version on Windows 10 [3 Methods]
- Microsoft .NET Framework 3.5 Download & Install for Windows 10/11
Like many other issues of this nature, the 0x80071AB1 code can be caused by corrupted or missing system files, faulty or corrupt Windows update components, and other system issues. Next, we will introduce how to get rid of the 0x80071AB1 error code on Windows 11/10.
Fix 1: Run Windows Update Troubleshooter
Windows Update Troubleshooter is a practical built-in tool that enables you to detect and fix errors related to corrupted updates or other Windows updates issues. So, you can try running the troubleshooter to check if any issues can be detected and fixed. Here’s a tutorial.
Step 1: Press Win + I to open the Settings window, and then select System from the left vertical menu and click on Troubleshoot from the right menu.
Step 2: Click Other troubleshooters to expand all troubleshooters, and then click Run next to the Windows Update section.
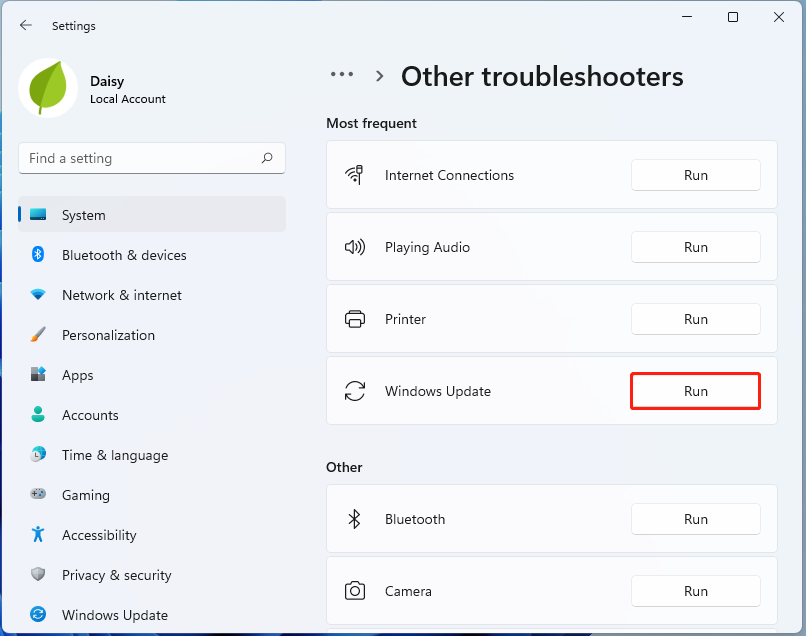
Step 3: Now, this troubleshooter will scan issues associated with the Windows Update components. If any fixes are identified, click on Apply this fix and follow the on-screen instructions to complete the repair.
Fix 2: Install the Pending Updates Manually
Another way to complete the installation would be to download it from the Microsoft Update Catalog and then install it manually. Follow the guide below:
Step 1: Open Settings again and click Windows Update.
Step 2: Go to the Update history. Check if there are failed .NET Framework Update numbers.
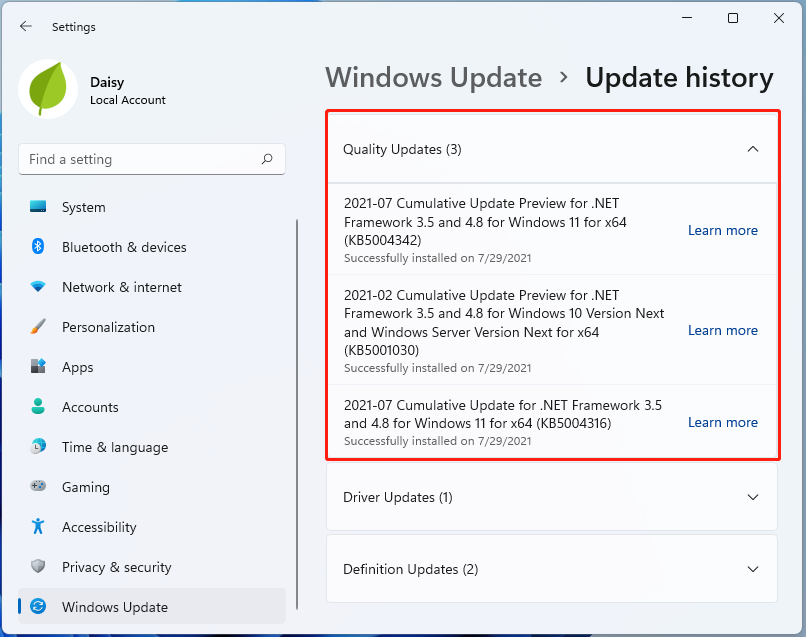
Step 3: Copy the failed update number. Go to Microsoft Update Catalog and search for the update number.
Step 4: Download it on your PC. Then double click to launch the installer and then update it.
Fix 3: Run an SFC or DISM Scan
Another common cause for 0x80071AB1 Windows 11 is related to your system files. To scan and repair your system files, you can try running an SFC (System File Checker) or DISM (Deployment Image Servicing and Management) scan. Here is how to do that:
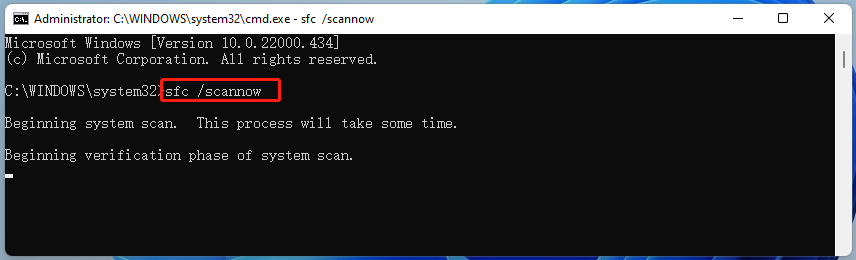
Step 1: Type cmd in the search box on the taskbar, and then right-click the Command Prompt app and select Run as administrator.
Step 2: Type sfc /scannow command in the elevated command prompt. This process may take you much time to scan, please wait patiently.
Step 3. If the SFC scan doesn’t work, you can try running the command below in the elevated Command Prompt window.
- Dism /Online /Cleanup-Image /CheckHealth
- Dism /Online /Cleanup-Image /ScanHealth
- Dism /Online /Cleanup-Image /RestoreHealth
Once done, reboot your PC and check if the installing error code 0x80071AB1 gets fixed.
Fix 4: Reset Windows Update Components
At times, it is useful to fix Windows 11 install error 0x80071AB1 by resetting Windows Update components. Follow the instructions blew to do so:
Step 1: Run Command Prompt with admin privileges.
Step 2: In the CMD popup, type the following commands in turn and press Enter after each one to execute the operations:
net stop bits
net stop wuauserv
net stop appidsvc
net stop cryptsvc
Del “%ALLUSERSPROFILE%\\Application Data\\Microsoft\\Network\\Downloader\\*.*”
rmdir %systemroot%\\SoftwareDistribution /S /Q
rmdir %systemroot%\\system32\\catroot2 /S /Q
regsvr32.exe /s atl.dll
regsvr32.exe /s urlmon.dll
regsvr32.exe /s mshtml.dll
netsh winsock reset
netsh winsock reset proxy
net start bits
net start wuauserv
net start appidsvc
net start cryptsvc
Fix 5: Enable Microsoft .NET Framework 3.5
One of the most effective solutions to install error – 0x80071AB1 Windows 11 is to make sure Microsoft .NET Framework 3.5 is enabled. This is because the update process may be interrupted by that component. Follow the steps below:
Step 1: Press Windows and R to open the Run dialog, type appwiz.cpl in the textbox and click OK.
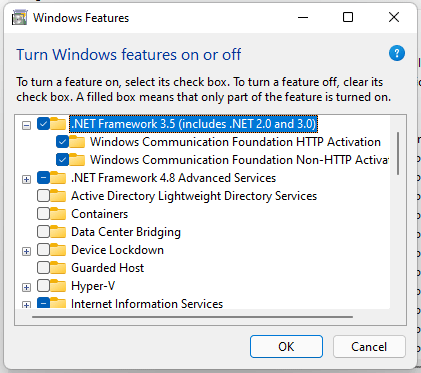
Step 2: In the Programs and Features interface, click the Turn Windows features on or off link.
Step 3: Check the .NET Framework 3.5 (includes .NET 2.0 and 3.0) box. Besides, expand this item and make sure the associated boxes for Windows Communication Foundation HTTP Activation and Windows Communication Foundation Non-HTTP Activation are also selected.
Step 4: Click OK to save the change. Then, check for Windows updates to see if install error – 0x80071AB1 is removed from Windows 11.
Fix 6: Run the WU AutoUpdate Client
As it turns out, the 0x80071AB1 can also occur due to a scenario in which a key Windows Update dependency (WU Auto Update) is behind inhibited by a third-party process or by some type of system file corruption. Follow the instructions below to enforce this method from an elevated PowerShell window:
Step 1: Press Windows + R keys together to open the Run dialog box.
Step 2: Next, type powershell inside the text box, then press Ctrl + Shift + Enter to open the elevated PowerShell command window.
Step 3: At the User Account Control window, click Yes to grant admin access.
Step 4: Inside the elevated PowerShell window, type the following command and press Enter:
wuaclt.exe / updatenow
Step 5: Once the first command is processed successfully, type exit and press Enter once again.
Step 6: Then, restart your computer and see if the problem is fixed once the next startup is complete.
In case the same kind of 0x80071AB1 error is still popping up when you attempt to install a .NET infrastructure update, move down to the next method below.
Fix 7: Restart the Windows Update service
Sometimes simply restarting the Windows Update service might help you to resolve the error code 0x80071AB1 on Windows 11. To do so,
Step 1: Press the Windows and R keys at the same time to open the Run dialogue box. Type services.msc and click OK to open the Services application.
Step 2: From the list of applications, right-click Windows Update to select Stop.
Step 3: Next, open File Explorer and go to C:\Windows\SoftwareDistribution. Remove all the files in the folder.
Step 4: Go back to Services and right-click Windows Update again. This time click Restart.
Once done, restart the computer and check if the 0x80071AB1 error is eliminated.
Fix 8: Use Windows 11 Media Creation Tool
When the 0x80071AB1 error code appears, you can try using the Windows 11 Media Creation Tool to reinstall your Windows. Here is how to do that:
Step 1: Download the Windows 11 Media Creation Tool from Microsoft‘s official website.
Step 2: Navigate to the media creation tool you’ve downloaded > run it > accept the license terms.
Two options are offered in the What do you want to do window.
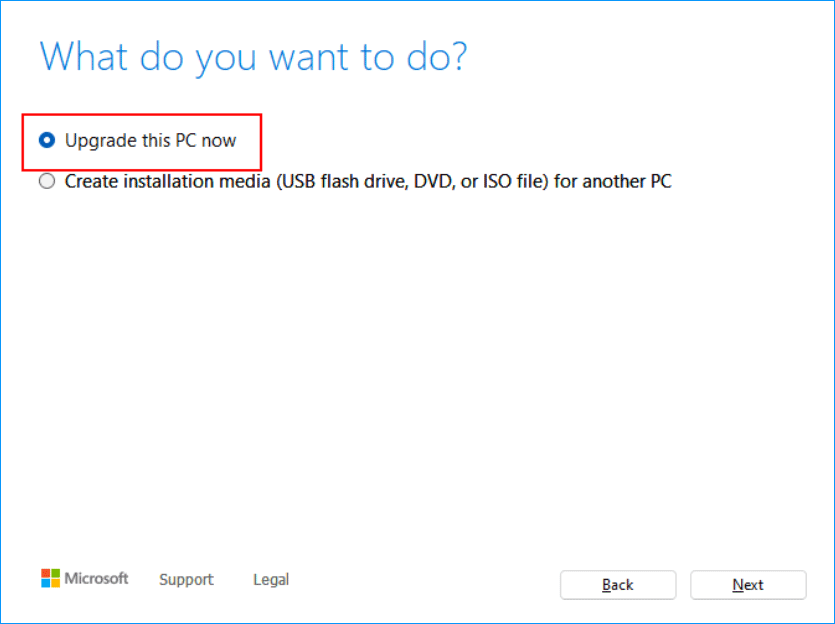
Option 1: Upgrade This PC Now
- Check Upgrade this PC now and click Next.
- Wait while it’s downloading Windows 11. The speed depends on your PC and the internet connection.
- Wait for the settings and configurations verification.
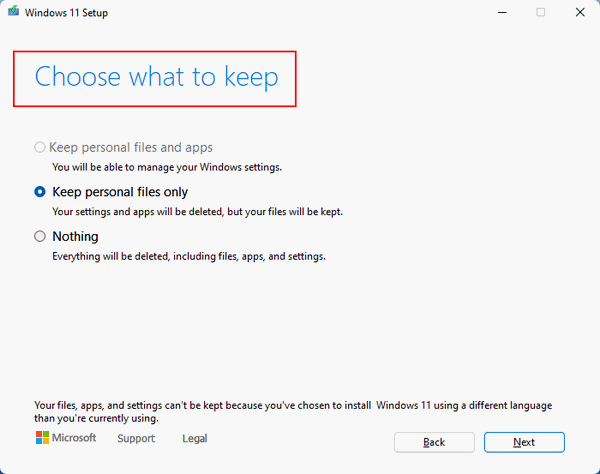
- Choose to Keep personal files and apps, Keep personal files only, or keep Nothing. Then, click Next.
- Follow the on-screen instructions to finish installing Windows 11 on your PC.
Option 2: Create Installation Media
- Check Create installation media (USB flash drive, DVD or ISO file) for another PC and click Next.
- Select Language, Edition, and Architecture manually or check Use the recommended options for this PC.
- Click Next.
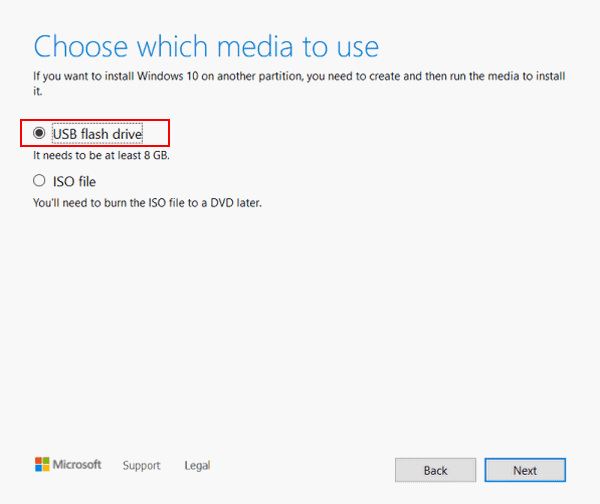
- In the Choose which media to use page, please select USB flash drive or ISO file. Please connect the USB drive you prepare in advance if you select a USB flash drive.
- Click Next and follow the on-screen instructions to finish the rest steps.
Suggestion: Back up Your PC Before Updating Windows 11
Before any operations to the Windows operating system like Windows update, it is advised to back up your PC since Windows updates can lead to some issues. Besides, PC backup and recovery can guarantee minimized system downtime. Also, you can choose to back up your data regularly to keep files safe.
To do this work, MiniTool ShadowMaker is a good assistant that can be compatible with Windows 11/10/8/8.1/7. With it, you can back up and restore files, folders, disks, partitions, and Windows systems. Besides, you can use it to clone your hard drive and sync files.
This backup software offers a Trial Edition that allows a 30-day free trial for all backup features. If you want to use it permanently, get its Pro Edition. Now you can download and try MiniTool ShadowMaker to back up your system.
MiniTool ShadowMaker TrialClick to Download100%Clean & Safe
Step 1: Launch MiniTool ShadowMaker Trial Edition in Windows 11.
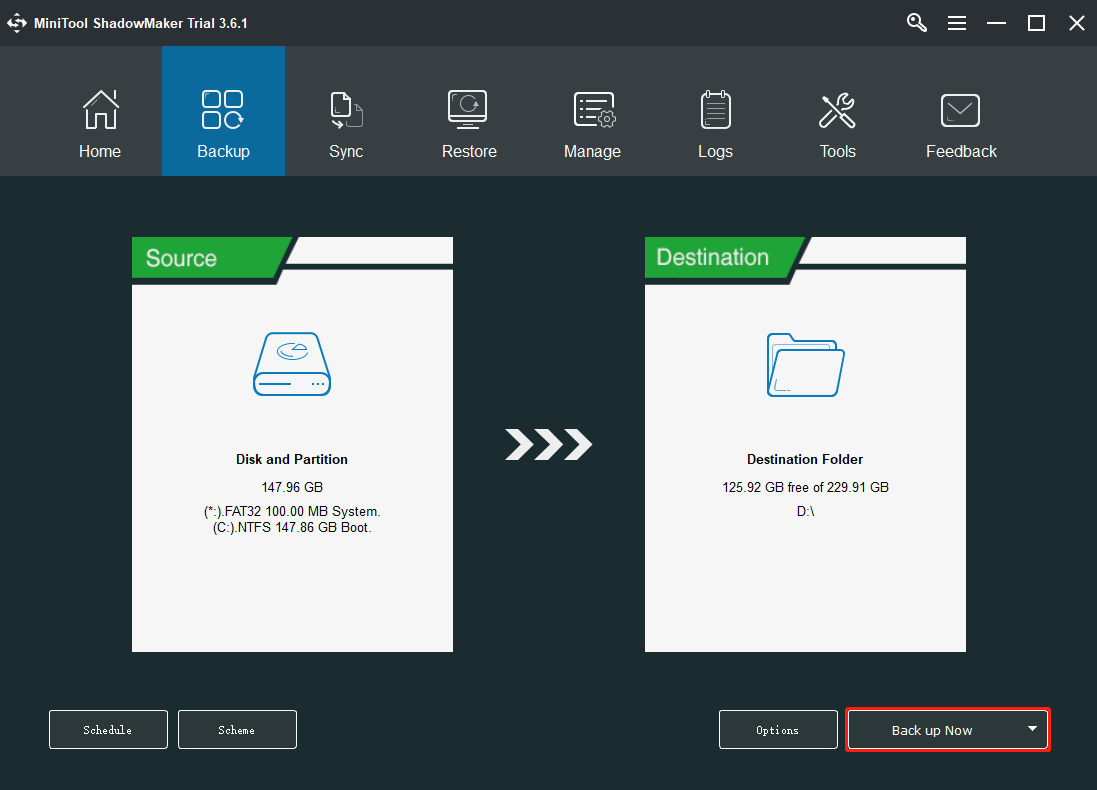
Step 2: Go to the Backup interface, you can see system partitions are selected as the backup source. If you need to back up files, click Source > Folders and Files to select items you want to back up.
Step 3: You only need to click Destination to choose a path to save the system image file.
Step 4: Click Back up Now to execute the backup task at once.
After that, you are advised to click Tools > Media Builder to create a bootable medium with a USB hard drive, USB flash drive, or CD/DVD disc.
Bottom Line
Are you bothered by the annoyance: install error – 0x80071AB1 Windows 11? If you run into the error code during the update process, try the solutions above to easily get rid of that trouble. If you have any other ways to solve the update issue, leave a comment below. Thanks in advance.
User Comments :