Recently, some users receive an error message saying that “Backup and Sync is no longer available and can be removed from your computer”. Why does this issue happen? How to fix the issue? Is there a better choice? This post from MiniTool provides details.
Previously, Google Drive offered two desktop applications for individual consumers, Backup and Sync for individual consumers, and Drive File Stream for organizations. Recently, some users receive the message – “Backup and Sync is no longer available and can be removed from your computer”. What does it mean?
According to Google, they intended to unify Google Drive sync clients (backup and sync and Drive File Stream) into one sync client called Drive for desktop. The following is the timeline:
- Starting July 19, 2021: Backup and Sync will support an onboarding process to help users transition to Drive for desktop.
- Starting August 18, 2021: Anyone still using Backup & Sync will start receiving in-product notifications prompting them to transition to Drive for desktop.
- Starting October 1, 2021: Any users who are still using Backup & Sync after this time will no longer be able to sign in to Backup & Sync. To continue syncing with Drive and/or Google Photos, users will need to switch to the desktop version of Drive.
So, now that Backup and Sync is no longer available, is there a better choice? Let’s try to find other possible ways.
Way 1: Switch to Google Drive for Desktop
If your files are stored in your Google account, you do need to switch to Google Drive for Desktop. Here is how to download and use it.
Download Google Drive for Desktop
Step 1: Go to the Google Drive download page and click Download Drive for Desktop. Then, the website will recognize that your operating system is Windows or macOS. The corresponding file type for your operating system will be downloaded.
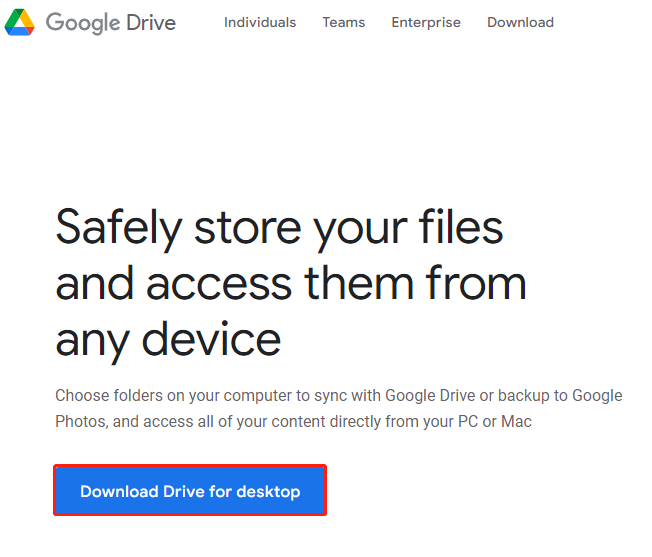
Step 2: Select which folder you want to save the installation file and click Save. For Windows, the file should be named GoogleDriveSetup.exe. For Mac, the file should be named GoogleDrive.dmg. You can also choose to have the file open automatically after it has been downloaded.
Step 3: Next, click Install to start the installation.
- Windows – You will be redirected to your browser, which will open the login page. To access the login page on macOS, click the Google Drive icon in the top menu bar. Once your login is complete, you have successfully installed Google Drive on your desktop. After the installation is complete, a new drive, usually named Google Drive (G:) will be added to your desktop in Windows.
- macOS – An extra window would pop up, requiring your Mac password to confirm the installation. Enter your password and click Install Software. For macOS, a Google Drive icon will show up in the top menu bar of your Mac.
Step 5: Sign in with your Google account to complete the installation.
Use Google Drive for Desktop
You can use Google Drive for Desktop to sync all of your Google Drive files and folders to your PC or upload files from the desktop to your Drive. Because Drive for Desktop is a sync service, it will automatically sync local files to the cloud in the background, which minimizes the time you need to spend waiting for files to sync.
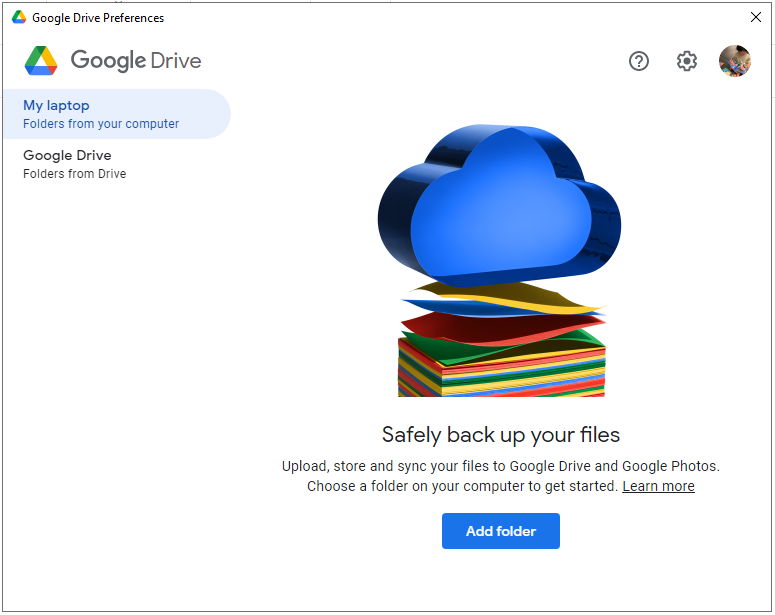
On a Mac, to upload files to your Drive, open your Drive, and select Settings > Preferences. Select your computer from the left sidebar, and click Add folder. Here, your system will pull up your files directory, and you can select the folder you want to sync to Google Drive.
On Windows, simply right-click any folder you want to sync to Google Drive, then select Sync or Backup this folder. You’ll be greeted with the same page as captured above, and you can just select the folder you’d like to sync to Drive.
Select Sync with Google Drive if you want to upload all the files in the folder to the cloud. If you’d like to only sync photos and videos, select the Back Up to Google Photos option.
Do keep in mind that Google Drive is a sync service, not a backup service. This means that any modifications you make to a file on one device will be replicated on all the other devices you’re signed in on. For example, if you edit or delete a file from your desktop, those changes will reflect on your smartphone as well.
Way 2: Google Drive for Desktop Alternative
As we have mentioned in the above part, Google Drive for Desktop can only help you to sync the files. If you want to back up the operating system, partition or the whole hard drive, you may need an alternative to Google Drive for Desktop.
Thus, the best backup software – MiniTool ShadowMaker is strongly recommended.
MiniTool ShadowMaker is a piece of professional backup software. Not only can it help to back up the files, but also it can back up the disk, partition, and even the operating system.
Apart from the backup feature, MiniTool ShadowMaker also offers other features to help you to keep data safe, such as the File Sync, Clone Disk.
So, just get the alternative to Western Digital backup software immediately to back up your Western Digital hard drive.
MiniTool ShadowMaker TrialClick to Download100%Clean & Safe
The Google Drive for Desktop alternative – MiniTool ShadowMaker provides two features to backup the files. They are Backup and Sync. At first, we will show you how to back up the files with the Backup feature.
How to Back up Files with Backup Feature?
In this part, you can refer to the detailed guide on how to back up the files with the Backup feature of MiniTool ShadowMaker.
Step 1: Install and launch MiniTool ShadowMaker
- Install the backup software – MiniTool ShadowMaker.
- Launch it.
- Click Keep Trial to continue.
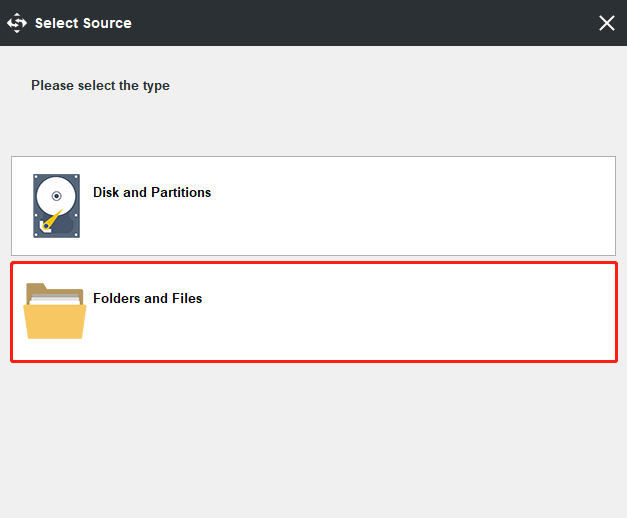
Step 2: Select the backup source
- After entering its main interface, please go to the Backup
- Click the Source module to continue.
- Choose Files and Folders to go on.
- Please choose the files you want to back up to continue.
- Click OK
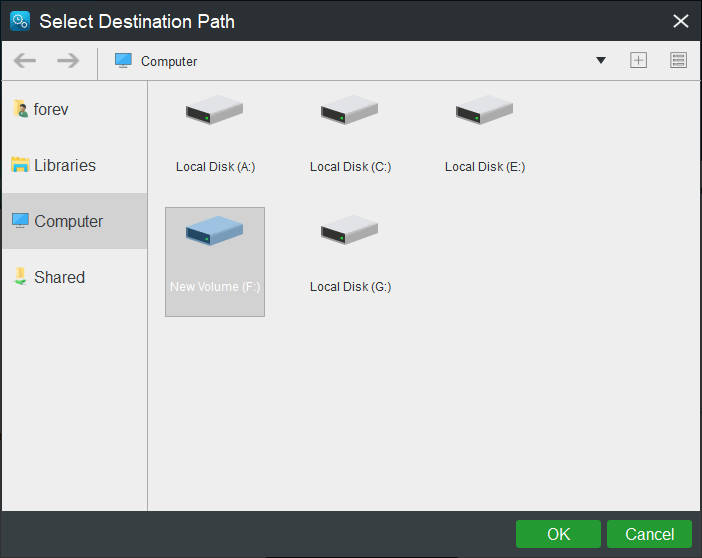
Step 3: Choose the backup destination
- Click the Destination module to continue.
- In the popup window, you can see there are four paths for you to choose.
- Choose a destination based on your needs and click OK to continue. It is recommended to choose an external hard drive.
MiniTool ShadowMaker provides some advanced settings for you to back up files, folders, disks, partitions, and the whole operating system.
- The Schedule setting can help user to set the Western Digital backup on a regular basis. You can set in on daily/weekly/monthly/on event. Please see: 3 Ways to Create Automatic File Backup in Windows 10 Easily.
- The Western Digital backup software provides users three backup schemes and the Incremental backup scheme is chosen by default. You can click the Scheme button to change.
- MiniTool ShadowMaker also enables you to set some advanced backup parameters through the Options button.
Step 4: Start to backup
- After you have selected the backup source and destination, you can click Back up Now to perform the Western Digital backup immediately.
- Or you can choose Back up Later to delay the backup and restart it in the Manage
When all steps are finished, you have successfully backed up the files with MiniTool ShadowMaker.
How to Back up Files with Sync Feature?
Step 1: Launch MiniTool ShadowMaker
- Launch MiniTool ShadowMaker.
- Click Keep Trial to continue.
Step 2: Specify Folders and Path to Sync
- Go to the Sync page and click it in the toolbar.
- Specify the source and destination for file sync.
What to Sync
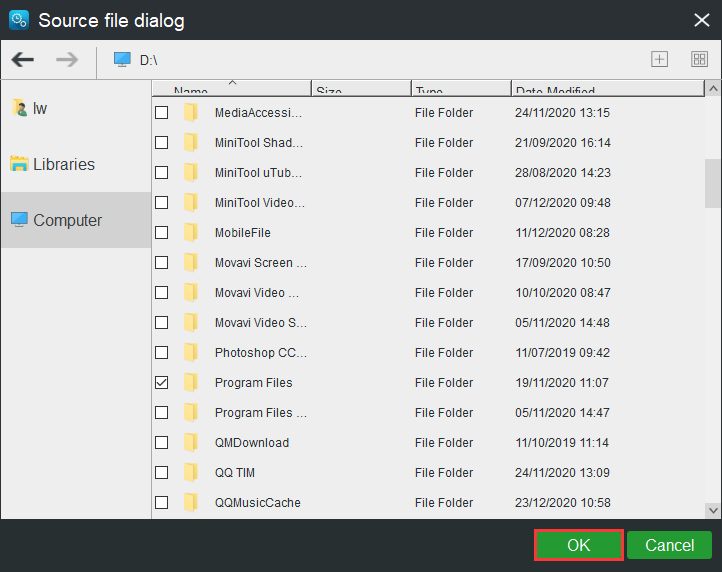
- Go to the Source section.
- Under the Source tab, three paths are available – Administrator, Libraries, and Computer. You can choose a source to select files. Then, click OK to continue.
Where to save synchronized folders
- Under the Destination tab, there are four paths available: Administrator, Libraries, Computer, and Shared.
- To sync files among multiple computers, choose Shared, type Path, Username, and Password in sequence and click OK to finish.
Tip: After you select Shared, you can directly sync files to the computer you select on the same LAN.
Step 3: Start to Sync Files to Another Computer
Please go to Sync.
You can click Sync Now to perform file sync immediately or click Sync Later to postpone it. Besides, you can continue this sync task on the Manage page.
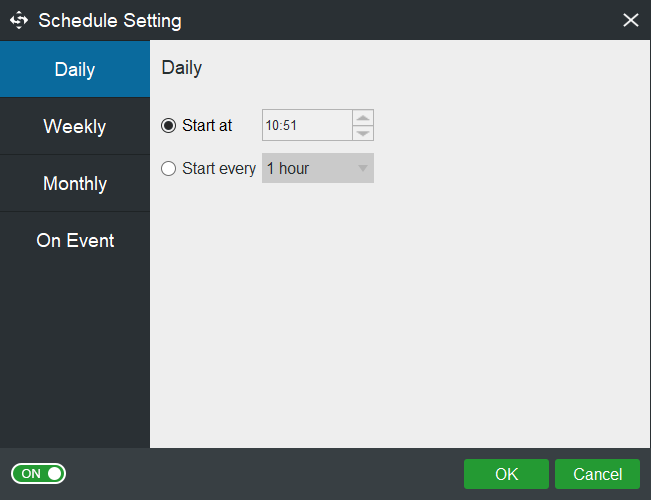
If you want to sync files automatically, here are four schedule settings available: Daily, Weekly, Monthly and On Event. You can choose one to set up a time point and click the OK button to confirm the setting for automatic file sync.
Google Drive for Desktop vs Backup and Sync
Now that you’ve finished syncing the Google Drive desktop app, what are the differences between it and Backup and Sync?
- Both allow the use of files in the “My Drive” folder on the desktop.
- Both can open Microsoft Office or non-Google files.
- Drive for Desktop rises by showing who is editing documents (i.e. Docx files).
- Both can sync folders like Documents or Desktop to a Google Drive account.
- Both can use multiple Google accounts at the same time.
- Both have access to the Apple Photo Library.
- Both accept files uploaded from USB.
- Drive for Desktop is the only drive with a dark mode.
Also see:
- How to Make a Brochure on Google Docs? Follow the Guide Below!
- How to Make Flyer on Google Docs? Here Is a Guide for You!
Bottom Line
In this post, we show you some information on Backup and Sync is no longer available. If you have any other ideas or questions when using MiniTool ShadowMaker, don’t hesitate to tell us by leaving a comment below or contacting our support team via the email [email protected]. We will reply to you as soon as possible.
User Comments :