How to change backup location Windows 10? How to change Windows backup location? How to change iTunes backup location? If you are looking for the answers to the above questions, this post from MiniTool provides the details.
It is a good habit to create regular backups for your files or systems on Windows 10. However, the backup takes up a lot of space on the drive. Thus, you may want to change the backup location, that is to say, back up your files to other places such as larger external drives. Then, let’s see how to change backup location Windows 10.
How to Change Windows Backup Location on Windows 10
Microsoft provides a built-in backup tool for Windows users – File History & Backup and Restore (Windows 7). After you have set up Windows Backup, you can change backup settings as needed. Follow the steps below to change Windows backup location Windows 10.
Way 1: Use File History
File History allows you to back up files to an external hard drive or your network drive. The details are as follows:
Option 1: Via Control Panel
Here is how to change backup location Windows 10 via Control Panel.
Step 1: Type Control Panel in the Search box and choose the best-matched result to open it.
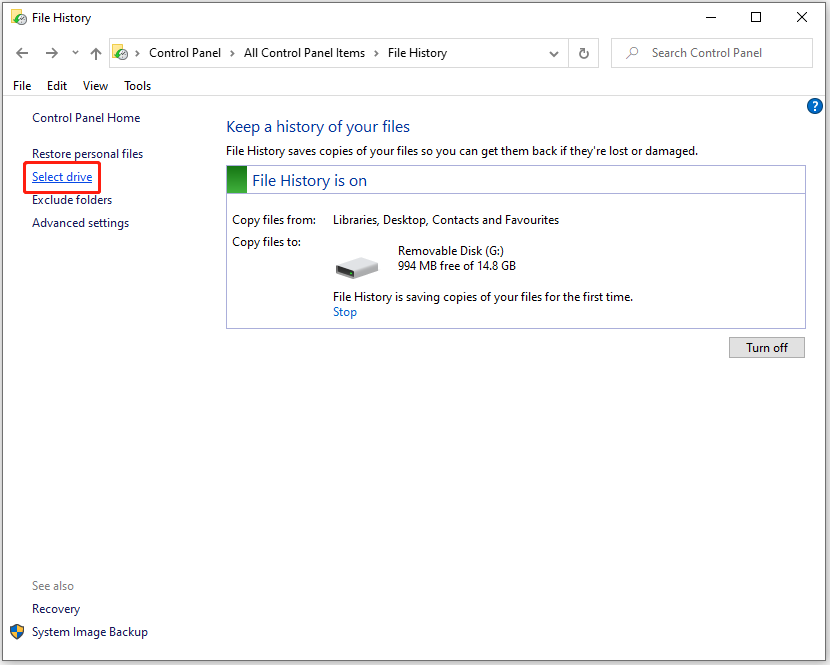
Step 2: Search for File History and open it. Then, click Select drive from the left side.
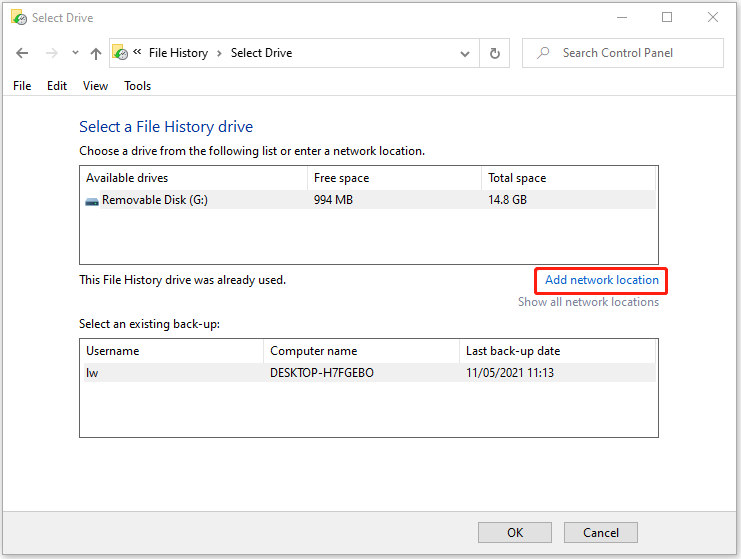
Step 3: Here, the local and network drives are listed. If you don’t see the network drive you want to use, click Add network location and select it.
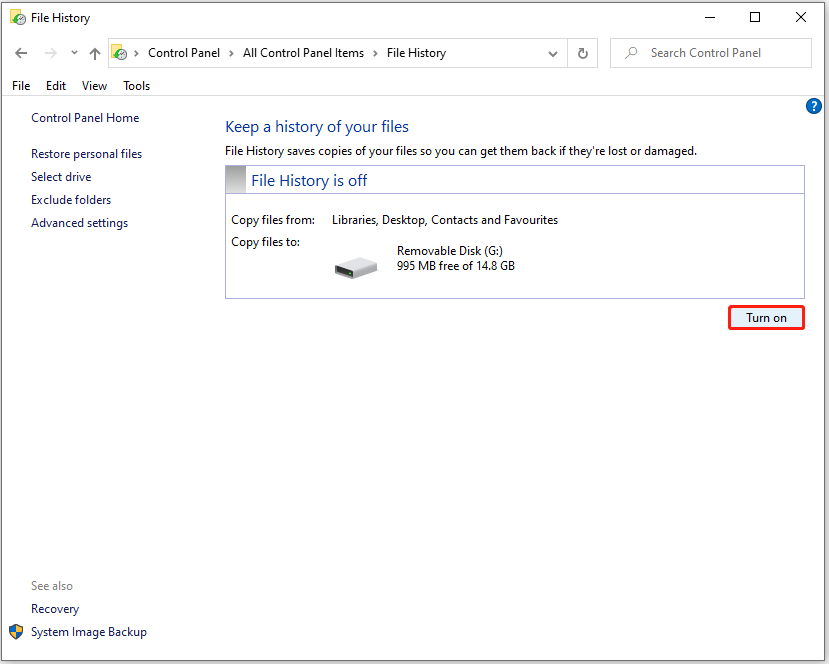
Step 4: After changing the backup location, click the Turn on button to launch the File History function.
Option 2: Via Settings
Now, we will introduce how to change Windows backup location Windows 10 via the Settings application.
Step 1: Press the Windows + I keys at the same time to open the Settings application. Then, click the Update & Security part.
Step 2: Change the backup location.
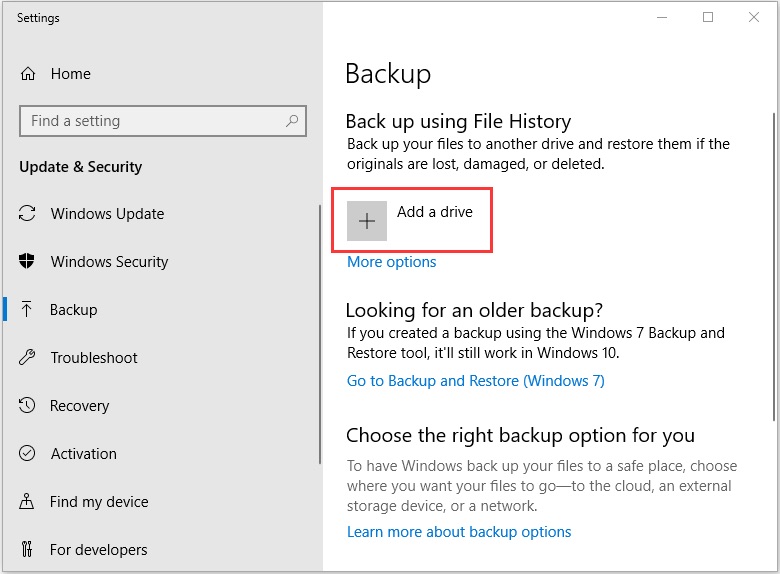
(1) Click the Backup tab from the left side and click the Add a drive option on the right. Then, select the desired drive in the list. Now, you have changed the location successfully.
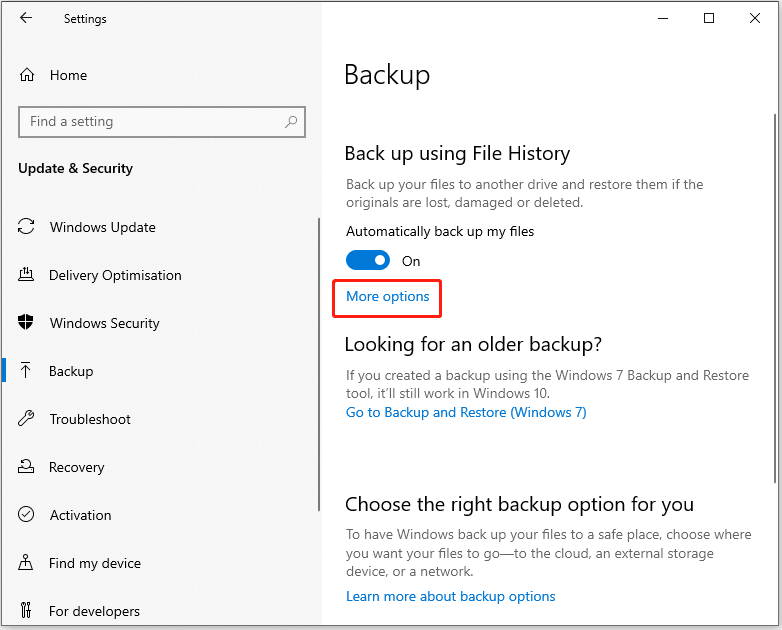
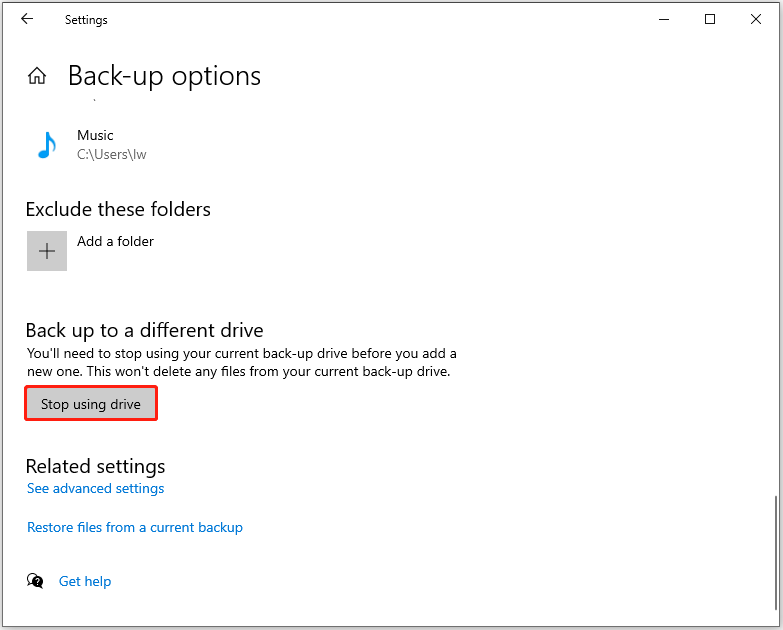
(2) If you have enabled File History, the page mentioned above will look as follows. Here, you need to click More options and scroll down to the Backup to a different drive option. Then, click the Stop using drive button to select another drive to use with File History.
Way 2: Use Backup and Restore (Windows 7)
Backup and Restore (Windows 7) allows you to back up files and folders to the internal or external hard drive and network drives. Here are the details:
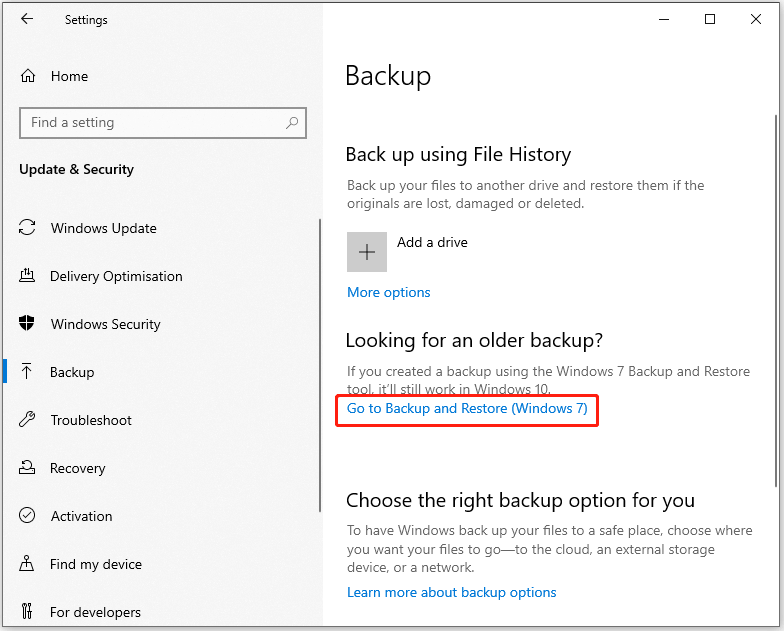
Step 1: Open the Settings application again and choose the Backup tab. Then, click Go to Backup and Restore (Windows 7).
Step 2: Next, click the Change settings option. Then, Windows Backup will start.
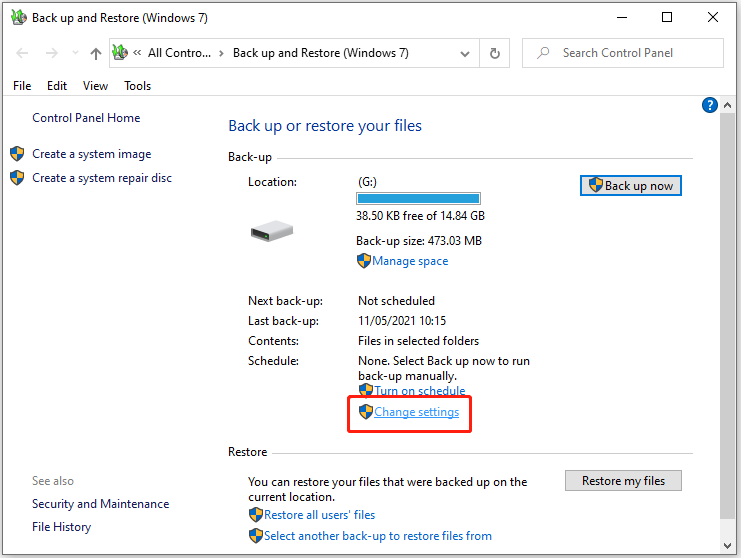
Step 3: Here, the backup destinations are listed.
(1) You can choose the location you want to save and click Next.

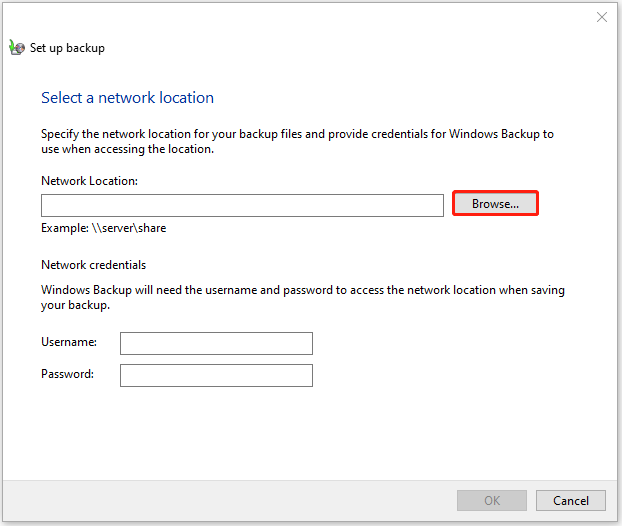
(2) If you want to save backups to the network location, you can click the Save on a network… button. Then, click Browse to select the network location and click OK. Alternatively, you can enter the network location path manually. Next, enter the username and password credentials for the network location and click the OK button.
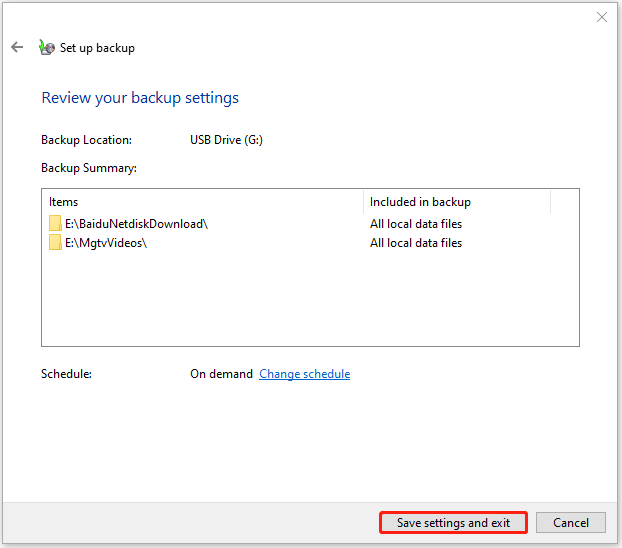
Step 4: After choosing the backup source in the next pages, you need to click the Save settings and exit button.
Way 3: Use Third-Party Program – MiniTool ShadowMaker
You can also try the professional backup software – MiniTool ShadowMaker, which can be used to back up files, folders, partitions, disks, and the operating system. MiniTool ShadowMaker allows you to back up your computer to multiple places: Administrator account folder, Libraries, Computer, Shared. You can change the location as your demand.
Step 1: Download MiniTool ShadowMaker and install it. Launch it and click Keep Trial to enter its main interface.
MiniTool ShadowMaker TrialClick to Download100%Clean & Safe
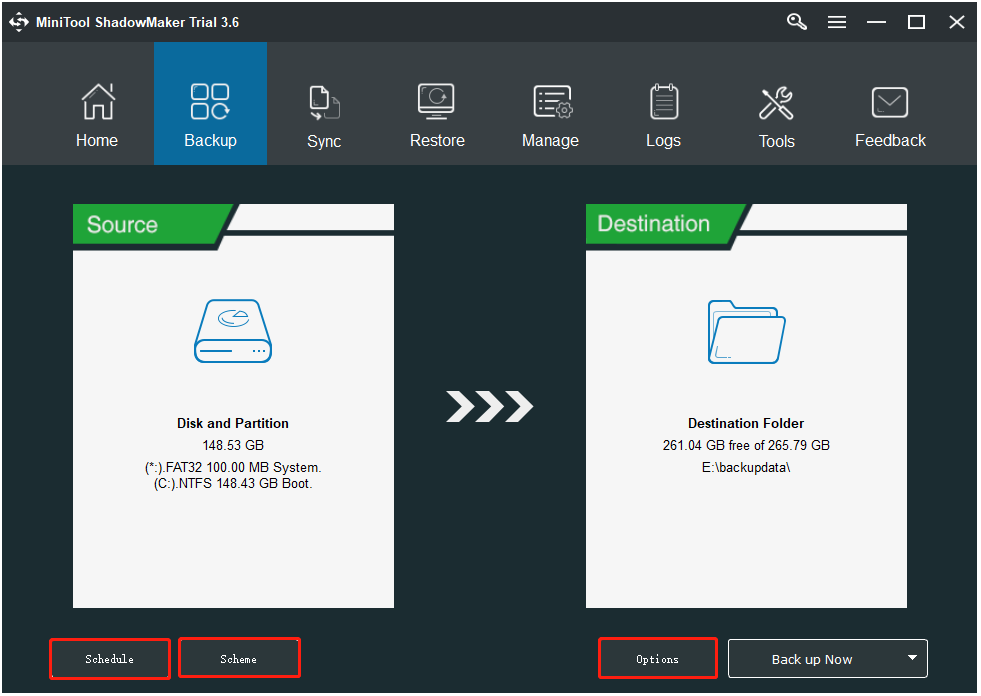
Step 2: Click Source to choose the data you want to back up.
Step 3: Click the Destination module to choose the destination. Here, you can change the backup location.
(1) Administrator account folder– Click Administrator (sometimes your account name), and then choose one folder as the destination location.
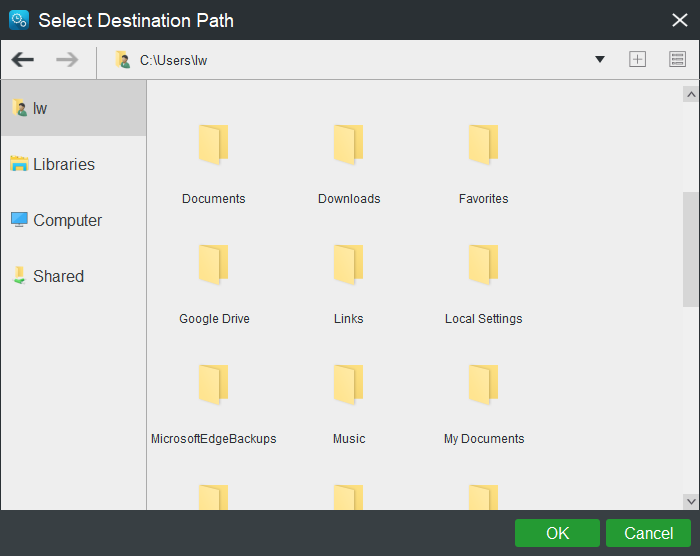
(2) Libraries – Click Libraries and choose one folder as the destination.
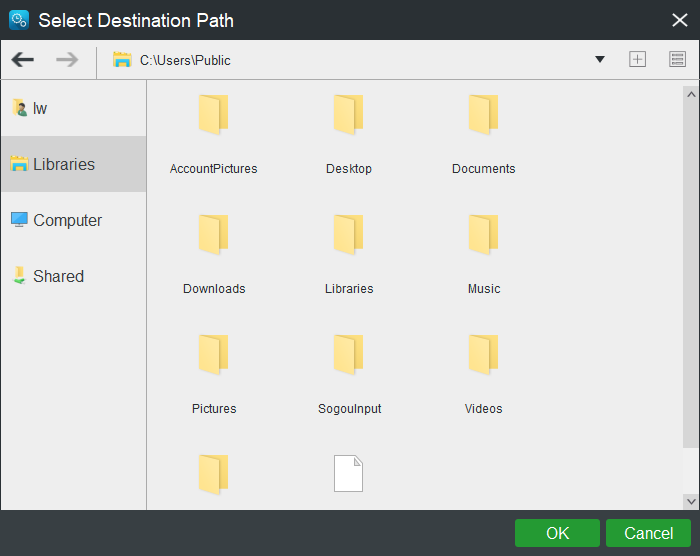
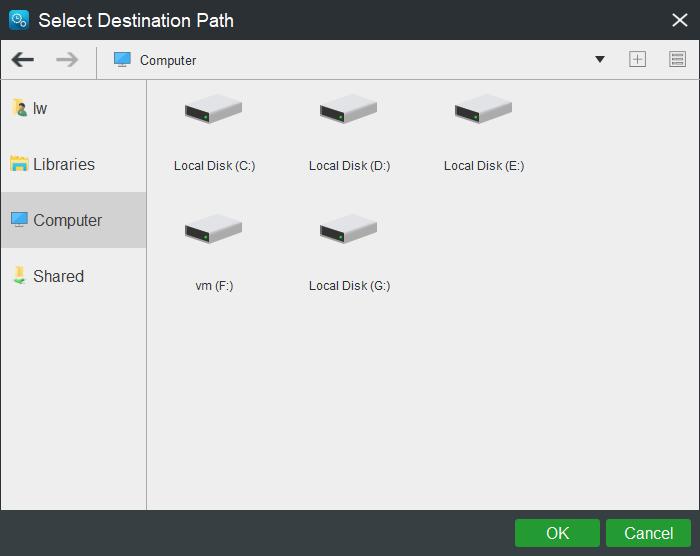
(3) Computer – The detected drives will be listed under this tab. Here, you can choose a partition on your internal hard drive, external hard drive, or removable USB flash drive as the target place to store the backup image file.
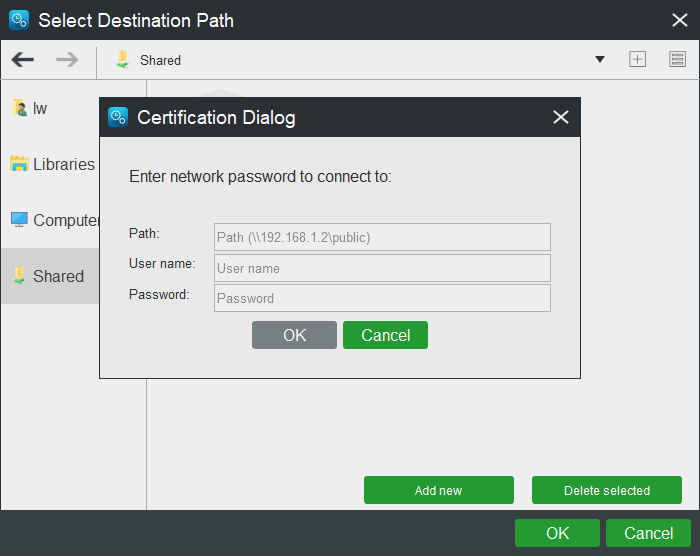
(4) Shared – Under this tab, the destination can be NAS or a computer in the same LAN. Click the Shared tab, click the Add new button, and type the path, user name, and password.
Step 3: After that, click Back up Now to start the backup task.
MiniTool ShadowMaker provides some advanced backup parameters to provide better protection for your data.
- The Schedule feature of MiniTool ShadowMaker enables you to back up files regularly. You can set it to back up on daily/weekly/monthly/on events.
- MiniTool ShadowMaker provides three backup schemes including Full backup, Incremental backup, and Differential backup. The program chooses the Incremental backup mode by default and you can click Scheme to change.
- The Options offers some advanced backup parameters, such as the backup compression level, image creation mode, etc.
File History VS Backup and Restore VS MiniTool ShadowMaker
Just now, you have known how to change backup location Windows 10 with three different tools. Now, this part is about the differences between File History, Backup and Restore, and MiniTool ShadowMaker.
Backup Content
File History will back up your documents, music, photos, videos, and other files in the user account folder. Backup and Restore allows you to back up the system, the entire drive, and files in user folders. MiniTool ShadowMaker can back up files, folders, partitions, disks as well as the entire system. MiniTool ShadowMaker and Backup and Restore have a larger extent.
Backup Destination
File History backs up files to an external hard drive internal hard drive or your network location. Backup and Restore support backing up to internal or external hard drives and network locations. MiniTool ShadowMaker allows the internal & external hard drive, NAS, Home File Server as the destination. MiniTool ShadowMaker provides more destinations.
Besides, you may often encounter problems with Windows 10 backup not working properly, such as the error that the backup did not complete successfully, the file history cannot run automatically or stop working, etc. Thus, MiniTool ShadowMaker is worth being used to change backup location.
How to Change iTunes/iPhone Backup Location on Windows 10
When you back up iPhone to the computer using iTunes, the iPhone backup is safely stored in a specific location on your computer. When restoring the iPhone from backup, iTunes will automatically find the iPhone backup stored on the computer. However, some users want to change the iPhone backup location to desktop or external drive on Windows 10.
Changing the iTunes backup location to any other location on the computer should work, but there is no guarantee. Besides, it is not recommended to change the iPhone backup location to an external storage drive since it may damage the backup file and cause problems when restoring the iPhone.
Now, here is the guide on how to change iPhone backup location on Windows 10.
Step 1: Right-click the Start menu to choose File Explorer. Navigate to a location where you want to save the iPhone backup.
Step 2: Right-click any empty area and click New > Folder to create a new folder. Name this new folder MobileSync and do not close the File Explorer window.
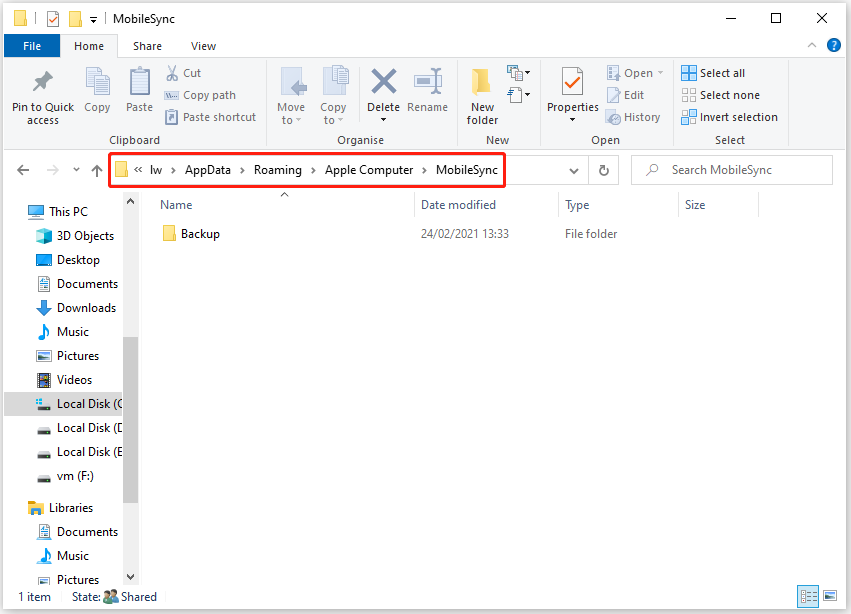
Step 3: Open another File Explorer window and navigate to C:\Users\UserName\Apple\MobileSync.
Step 4: Right-click the Backup folder and choose Copy. Go to the New MobileSync folder you created in step 2 and paste the iPhone backup folder here.
Step 5: Now, go back to the default MobileSync folder and rename the iPhone backup folder to Old Backup.
Step 6: Type cmd in the Search box. Then right-click Command Prompt to select Run as administrator.
Step 7: In the Command Prompt windows, type the following command:
MkLink /J “C:\Users\UserName\Apple\MobileSync\Backup” “C:\MobileSync\Backup”
Tips:
- This step is to redirect the original backup address to the new backup address. In the next backup, the commands executed by iTunes are still backed up to the original address, but the backup file is saved to the new address during the actual operation.
- C:\MobileSync\Backup is just an example and you can change it.
Step 8: Now, you should see the symbolic link created in the MobileSync folder. Once Symlink is created, it will force iTunes to back up the iPhone to the new location.
Bottom Line
How to change backup location Windows 10? How to change iTunes backup location? Just choose one suitable tool based on your needs. We strongly recommend using MiniTool ShadowMaker to change the Windows backup location.
If you have any suggestions of Windows automatic file backup or any questions regarding MiniTool ShadowMaker, leave a comment below or send an email to [email protected].
Change Backup Location Windows 10 FAQ
- Open the Settings application again and choose the Backup tab. Then, click Go to Backup and Restore (Windows 7).
- Next, click the Change settings option. Then, you can change settings here.
- Open Settings and go to Update & Security.
- Click Backup. Under the Looking for an older backup section, click the Go to Backup and Restore (Windows 7) option.
- Under the Back-up section, click the Manage space option. Under the Data file backup section, click the View backups button. Then, you find your backup files.
User Comments :