Sometimes your computer wakes up when it should stay asleep, and doesn't go into standby when it should. The outdated drivers and automatic updates can cause serious damage to your computer. Here are 7 solutions, click MiniTool to get more information.
Windows 10 Won’t Stay Asleep
Sleep mode is the basic part of the Windows system. Most of you don’t turn the PC off every time, but put it to sleep mode to reduce power consumption and cool it down while maintaining the speedy access to the system.
However, the sleep mode in Windows 10 seems to be problematic. In other words, even if you can make your PC sleep, the PC will wake up without any interaction. Basically, it’s doesn’t stay in sleep mode as expected before using it.
We will provide some basic troubleshooting steps for you. If your computer won’t stay asleep, you can try the solutions listed below.

How to Fix the “Windows 10 Won’t Stay Asleep” Issue
- Run the Troubleshooter
- Check the Drivers
- Check the Advanced Power Options
- Disable Specific Devices
- Use Sleep-Hibernation Hybrid
- Disable Fast Startup
- Reset Your PC
7 Solutions to Fix Computer Won’t Stay Asleep
Now, we will introduce 7 solutuions to fix computer won’t stay asleep one by one.
Solution 1: Run the Troubleshooter
First, you should make sure that you have enabled sleep mode correctly. Then you should confirm that the sleep mode is indeed properly configured. You can follow the steps we provided below to confirm that.
Step 1: Choose Hardware and Sound after you launching Control Panel, and click Power Options.
Step 2: Click Change plan settings in the Preferred plans section.

Step 3: Under the Put the computer to sleep section, you should set the time for PC to make it go to sleep.
Secondly, you can use the Windows built-in tool – Troubleshooter related to power to fix that computer wakes from sleep. All errors in the power configuration can be fixed by troubleshooter and it allows you to put your PC to sleep without having to wake up by yourself. You can run Troubleshooter by the following steps:
Step 1: Open Setting by pressing the Windows key and the I key at the same time.
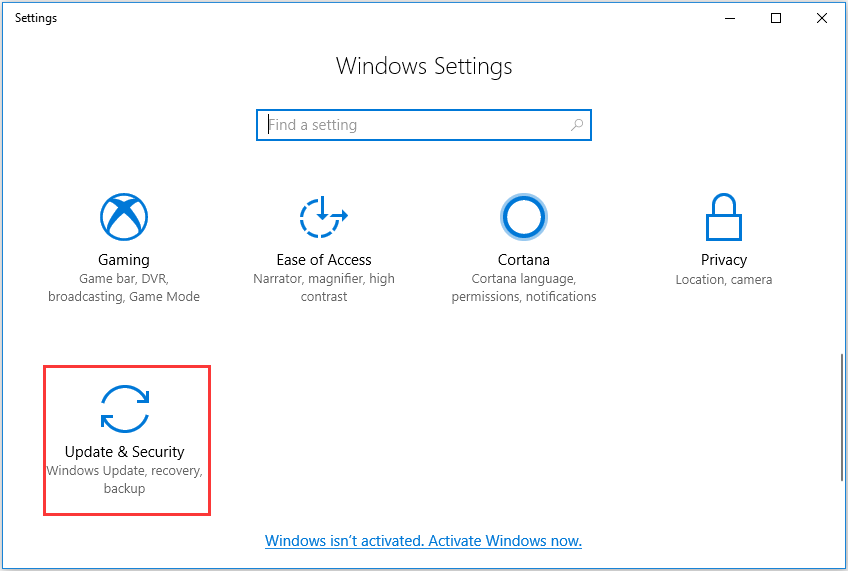
Step 2: In the setting page, please choose Update & Security.
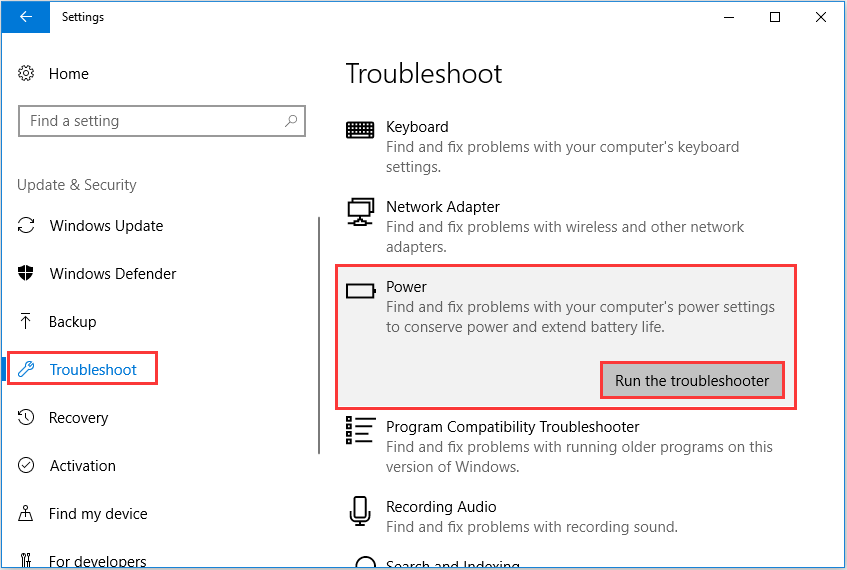
Step 3: Open Troubleshoot from the left panel.
Step 4: At lastlick Run the troubleshooter after clicking Power.
Solution 2: Check the Drivers
According to users, Realtek sound drivers can cause the system wake-up for no reason. Thus, you should check if all drivers are installed properly. Here are the steps.
Step 1: You should navigate to Device Manager and update all major drivers.
Step 2: You should pay more attention to Sound, Display, and Network devices.
Alternatively, you can go to the official manufacturer’s website and download the appropriate drivers, even if the driver seems to be up-to-date. This is especially true for older devices that are known to have Windows 10 issues. So, if your computer won’t stay in the Sleep mode on Windows 10, you can try it.
Solution 3: Check the Advanced Power Options
You can reset all advanced power options to their default values. This will solve some problems, for example, computer configures the wrong advanced options for your active power plan. After this step, don’t forget to set the sleep mode preferences.
Here are the steps of resetting advanced power options to their default values.
Step 1: Choose Hardware and Sound after you launching Control Panel, and click Power Options.
Step 2: Click Change plan settings on your active power plan.
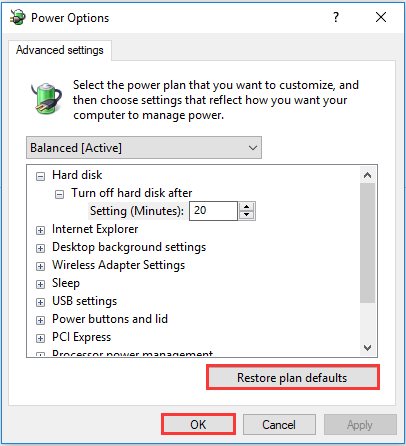
Step 3: Then click Change advanced power settings.
Step 4: Now, you just need to click Restore plan defaults and click OK to make the changes.
Solution 4: Disable Specific Devices from Waking Up Your PC
There is a solution for you to find out which device is waking up your device. Then you can adjust its settings or even unplug it. Some third-party applications can help, but we will use Command Prompt. You can access peripherals and determine all power usage on your system by these commands.
The following are the steps:
Step 1: Input CMD in the search box, right-click to select Run as administrator.
Step 2: Type the following command: Powercfg -devicequery wake_armed and press Enter.

Step 3: Then all the devices which can wake the PC from sleep will be listed. If you see the device you don’t use, type the command: Powercfg -devicedisablewake “devicename” and press Enter. Don’t forget to change the device name.
Step 4: At last, you need to close Command Prompt and restart your PC.
Solution 5: Use Sleep-Hibernation Hybrid Instead of Sleep
To fix the issue of computer won’t stay asleep, you can use Sleep-Hibernation. You can follow the steps:
Step 1: First launch Control Panel and choose Hardware and Sound, then click Power Options.
Step 2: Click Change plan settings on your active power plan.
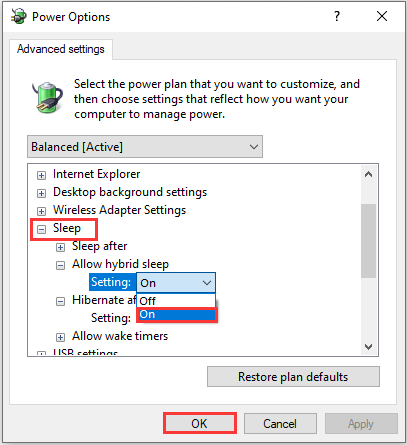
Step 3: Click Change advanced power settings. Then expand Sleep and click Allow hybrid sleep.
Step 4: Turn Hybrid sleep on for both Battery and AC and click OK to confirm the changes.
Solution 6: Disable Fast Startup and Prevent Programs Starting with the System
In addition, we recommend you to disable the Fast Startup feature. As we all know, this newly introduced (relatively newer) feature can cause that the system can’t wake up occasionally without any reason. Here are steps to disable the Fast Startup feature.
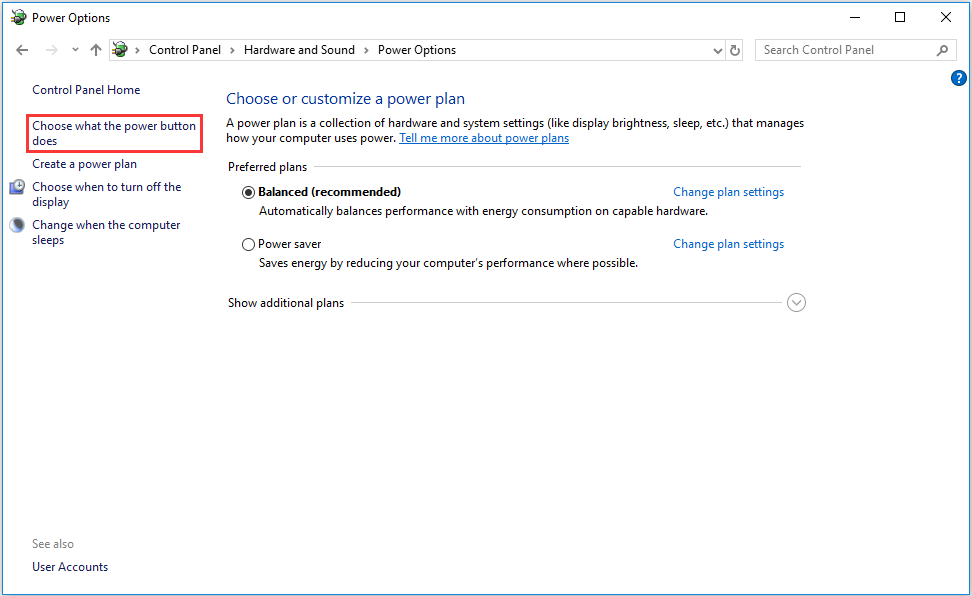
Step 1: Open Control Panel, click Hardware and Sound and choose Power Options.
Step 2: In the left pane, click Choose what the power button does.
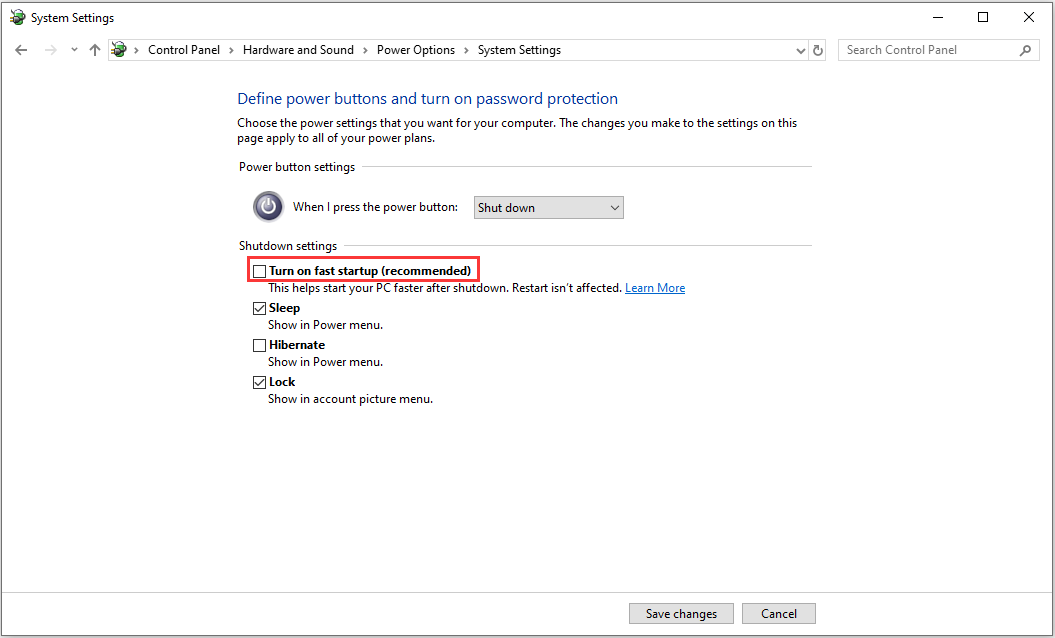
Step 3: Click Change settings that are currently unavailable and uncheck the Turn on fast startup (recommended) box and click Save changes.
Step 4: Shut down your PC and power it on again to confirm whether your computer won’t stay asleep.
In addition, we suggest that all startup third-party programs and their dedicated services should be disabled. This is known as Clean Boot. You can follow the instructions to disable the Clean Boot.
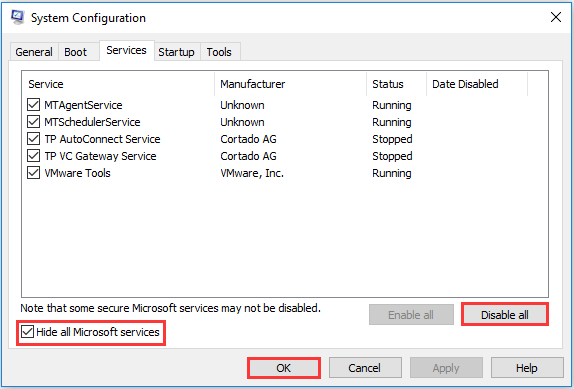
Step 1: Type msconfig in the Windows Search bar and open System Configuration.
Step 2: Check the Hide all Microsoft services box under the Services tab, and click Disable all to disable all active third-party services.
Step 3: Next, select the Startup tab and go to Task Manager. Prevent all programs from starting with the system and confirm the changes.
Step 4: At last, restart your PC.
If you are unable to disable your antivirus software, we recommend that you uninstall it temporarily. You can install it again after determining which application is causing the computer wakeup.
Solution 7: Reset Your PC to Factory Values
Finally, if none of the above solutions can fix that Windows 10 won’t stay asleep, there is only one solution left. Whether it is good or bad, reset the PC to the factory value. This is more like a refresh of the system than reinstalling. Moreover, since most reports problems after the update, you should use this recovery option to resolve this issue.
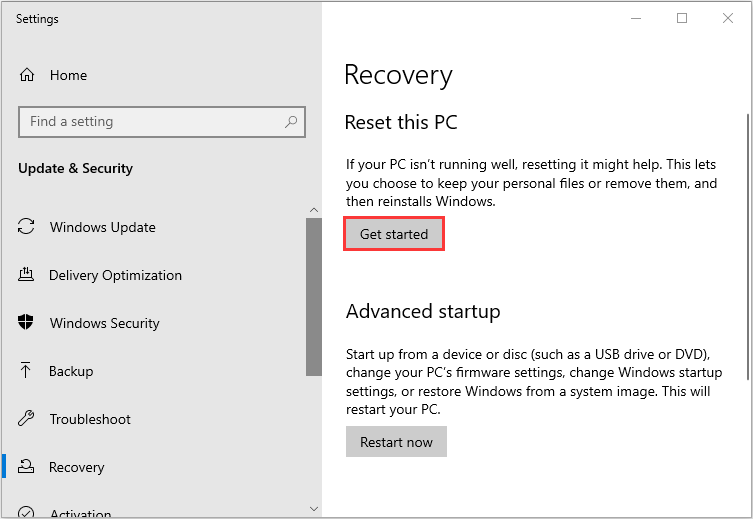
Step 1: Type reset in the Search bar and open Reset this PC.
Step 2: Click Get started under the Reset this PC option.
Step 3: Choose Keep my files and continue with the resetting process.
Use MiniTool ShadowMaker to Back Up Your System
After offering you the solutions to fix Windows 10 won’t stay asleep, we have a suggestion for you. In case of something on your system, we suggest you backing up your system in advance. Now, we will introduce a free backup software for you – MiniTool ShadowMaker.
MiniTool ShadowMaker provides a one-click system backup solution. It supports backing up your system drive completely, including system partition, system reserved partition and EFI system partition. And you can image all of your data including computer settings, applications, drivers, system files and boot files.
The system backup is bootable. When the system crashes, you can restore your computer to a normal state, read this post – How to Restore Computer to Earlier Date in Windows 10/8/7 (2 Ways).
MiniTool ShadowMaker provides a Trial Edition that gives you 30-day free trial for all backup features. You can purchase its Pro Edition to use it permanently.
Now you can download MiniTool ShadowMaker Trial Edition to back up your system.
MiniTool ShadowMaker TrialClick to Download100%Clean & Safe
Now, let’s see how to back up your Windows system.
Step 1: Decide a Backup Mode
- Launch MiniTool ShadowMaker and keep using the trial edition.
- Please choose the computer to manage and click Connect in the Local section to enter the main interface.

Step 2: Choose Backup Source
- Go to the Backup page.
- This software selects the system partition and system reserved partition by default.
Step 3: Choose a Destination Path to Store Your System.>
- You can back up your system to an external hard drive, USB flash drive, NAS and more.
- Then choose a destination path to store your system and click OK. Here we take the New Volume (E) as an example.

1. Please do not save a volume image file to the volume being backed up.
2. The destination that used to store system must have enough storage space.
Step 4: Start to Back Up
- Go back to the following interface.
- You have two options: click Back up Now to start the backup process immediately or click Back up Later to delay the backup process.
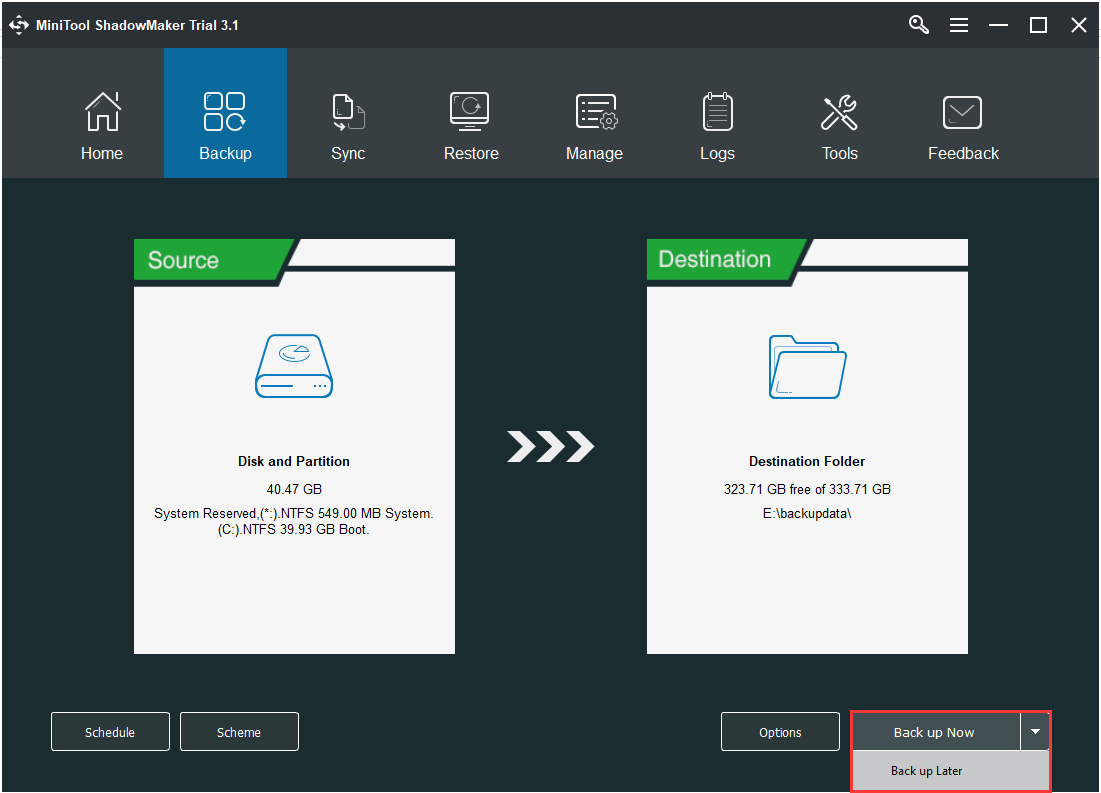
1. To set advanced parameters for the current backup task, go to Options.
2. To specify a backup task to run on a regular basis, go to Schedule.
3. To manage disk space occupied by backup files, go to Backup Scheme.
Here are all the steps of how to back up system by MiniTool ShadowMaker.
Bottom Line
That’s all about how to fix computer won’t stay asleep. You can try these solutions one by one until you fix this issue successfully and you can try MiniTool ShadowMaker to back up your system in advance to protect your data. If you have any questions and suggestions, please contact us via [email protected] or leave a comment.
Computer Won’t Stay Asleep FAQ
- Press the sleep keyboard shortcut.
- Press a standard key on the keyboard.
- Move the mouse.
- Quickly press the power button on the computer.
User Comments :