Samsung provides all its SSD users with a utility called Samsung Data Migration. It helps you copy data stored on your computer’s current storage device to your new Samsung SSD quickly and easily. However, some users encounter the “Samsung Data Migration Stuck at 0%, 99%, or 100%” error.
The following are the possible reasons for the “Samsung Data Migration stuck at 0%, 99%, or 100%” error:
- Hard drive failure.
- Transfer large files or partitions to Samsung SSD.
- There is a problem with the SATA port or the SATA-to-USB adapter.
- Samsung Data Migration version is not up to date.
- Target SSD has too much data.
Also see: Solutions to Samsung Data Migration Cloning Failed (100% WORKS)
Then, let’s see how to fix the “how to fix Samsung Data Migration stuck at 0%, 99%, or 100%” issue.
Samsung Data Migration Stuck at 0%, 99%, or 100%
Fix 1: Verify Your Cable Connection
Due to your SATA/USB cable connection, the transfer process may be interrupted during data migration. Thus, to fix the “Samsung Data Migration stuck at 0%, 99%, or 100%,” issue, you need to verify that the SATA/USB is properly connected.
If they are connected correctly and the problem persists, you can easily plug the HDD SATA cable into another motherboard port, or try another SATA cable. If it still doesn’t work then you have to move the USB drive to another port.
Fix 2: Check Your HDD and SSD
If your hard drive is damaged, data transfers from a failed hard drive are likely to get stuck and not complete. The chkdsk command checks the health of internal and external storage devices attached to your computer. Here is how to do that:
Step 1: Type cmd in the Search box and choose Run as administrator.
Step 2: Then, type chkdsk /f /x and press the Enter key.
Step 3: Follow the on-screen prompts to complete this operation. After that, you can restart your computer and see if the “Samsung Data Migration stuck at 0%, 99%, or 100%” has been fixed or not.
Fix 3: Check Your Target Disk Space
Another factor that can make your transfer appear to be stuck is that the destination drive may be too full to receive any more data. To be on the safe side, it’s recommended you transfer no more than 75% of the destination drive’s total free space.
Fix 4: Check the Data Capacity of the Files You’re Transferring
You have to pay attention to your data file size and partition. If your Samsung Data Migration is not responding during the transfer, make sure that you don’t move multiple large files or partitions at once. Large data transfers can cause bugs and glitches in the program. Try to transfer your files into smaller batches.
Fix 5: Update Samsung Data Migration
Samsung has rolled out a new update for its data migration tool, and you should always make sure you have the latest version. If you are using an older version of Samsung Data Migration, this may be the reason for the issue.
You can try to update Samsung Data Migration to the latest version to fix the “Samsung Data Migration stuck at 0%, 99%, or 100%” issue. The steps are as follows:
Step 1: Go to the Samsung official website.
Step 2: Under Data Migration, select Samsung Data Migration software for consumer SSD.
Step 3: Click the DOWNLOAD button on the right of the latest Data Migration Software package.

Alternatives to Samsung Data Migration
There is a better solution for the “Samsung Data Migration Software stuck at 0%, 99%, or 100%” issue – try Samsung Data Migration alternatives.
Tool 1: MiniTool ShadowMaker
You can use the professional backup software – MiniTool ShadowMaker to replace Samsung Data Migration. It supports data migration with several SSD brands, not limited to Samsung. As an alternative to Samsung Data Migration, this Samsung SSD software provides you with the Clone Disk feature to transfer all contents from the old hard drive to the new Samsung SSD in Windows 11/10/8/7 without losing data or messing up the cloning process.
This program can also be used to back up the operating system, disk, partition, file, and folder. It offers a Trial Edition that allows a 30-day free trial for all backup features. If you want to use it permanently, get its Pro Edition. Now you can download and try MiniTool ShadowMaker.
MiniTool ShadowMaker TrialClick to Download100%Clean & Safe
Now, let’s see how to migrate SSHD to SSD step by step.
Step 1: Connect the SSD to your computer. Launch MiniTool ShadowMaker, and click Keep Trial to continue to use the Trial edition.
Step 2: After entering the main interface, navigate to the Tools tab. And then choose the Clone Disk feature to continue.
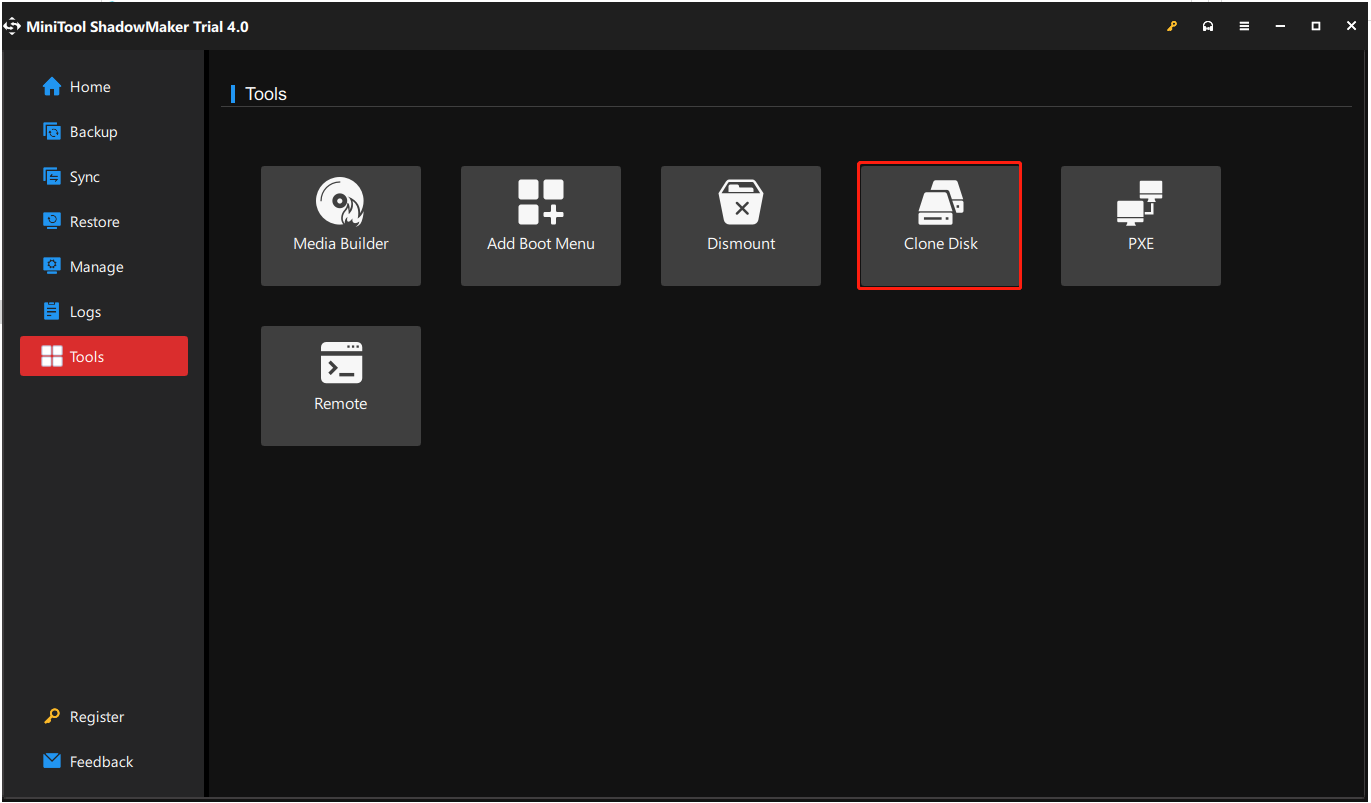
Tip: MiniTool ShadowMaker supports you to clone the dynamic disk, but it is just for the simple volume.
Step 3: Next, you are required to choose the source disk and the target disk for cloning. Here, you intend to clone HDD to Samsung SSD, thus, please set the HDD as the source disk and the Samsung SSD as the target disk.
Step 4: After you have successfully selected the disk clone source and destination, click OK to continue.
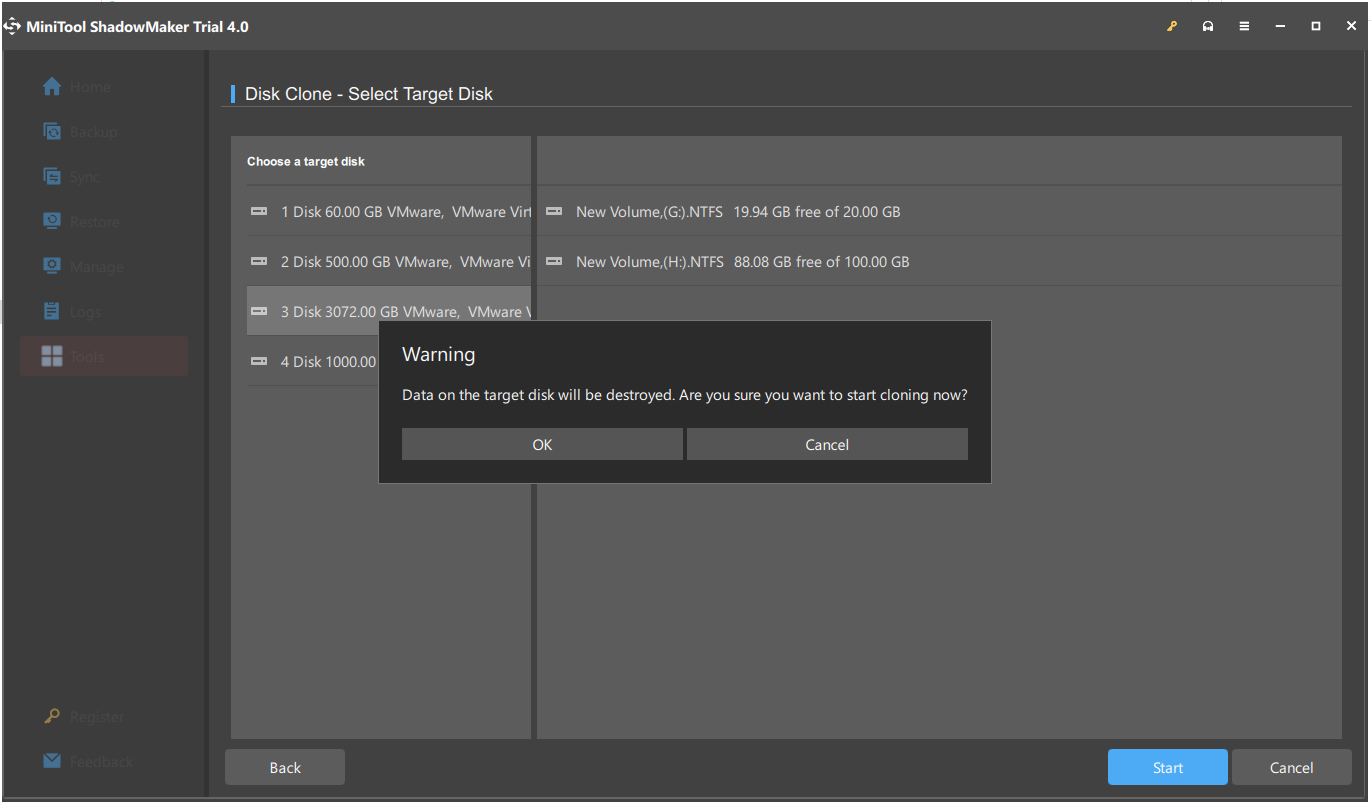
Step 5: Then you will receive a warning message that tells you all data on the target disk will be destroyed during the disk cloning process. Then click OK to continue.
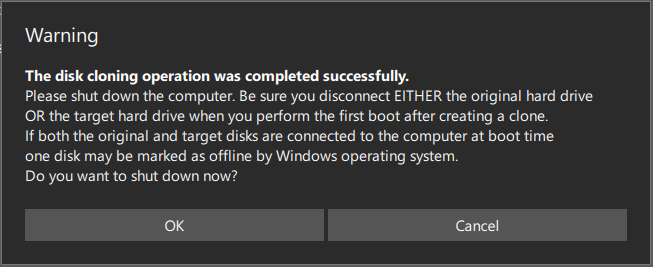
Note: If there are important data on the target Samsung SSD, you had better back them up in advance.
Step 6: Then it will begin to clone HDD to SSD and you need to wait several minutes until the process is finished.
Step 7: When the disk clone process is finished, you will receive a message which tells you that the source disk and the target disk have the same signature. Thus, you need to remove the HDD from your computer and insert the SSD into the Samsung PC.
Tool 2: MiniTool Partition Wizard
In the above part, we show you how to clone the system from HDD to SSD for free with MiniTool ShadowMaker. In addition to MiniTool ShadowMaker, MiniTool Partition Wizard is also a great tool to clone a hard drive. Here is how to clone the system with MiniTool Partition Wizard.
Step 1: Download and install MiniTool Partition Wizard. Then, launch it.
Step 2: Choose the Migrate OS to SSD/HD feature from the left side of the software’s user interface.
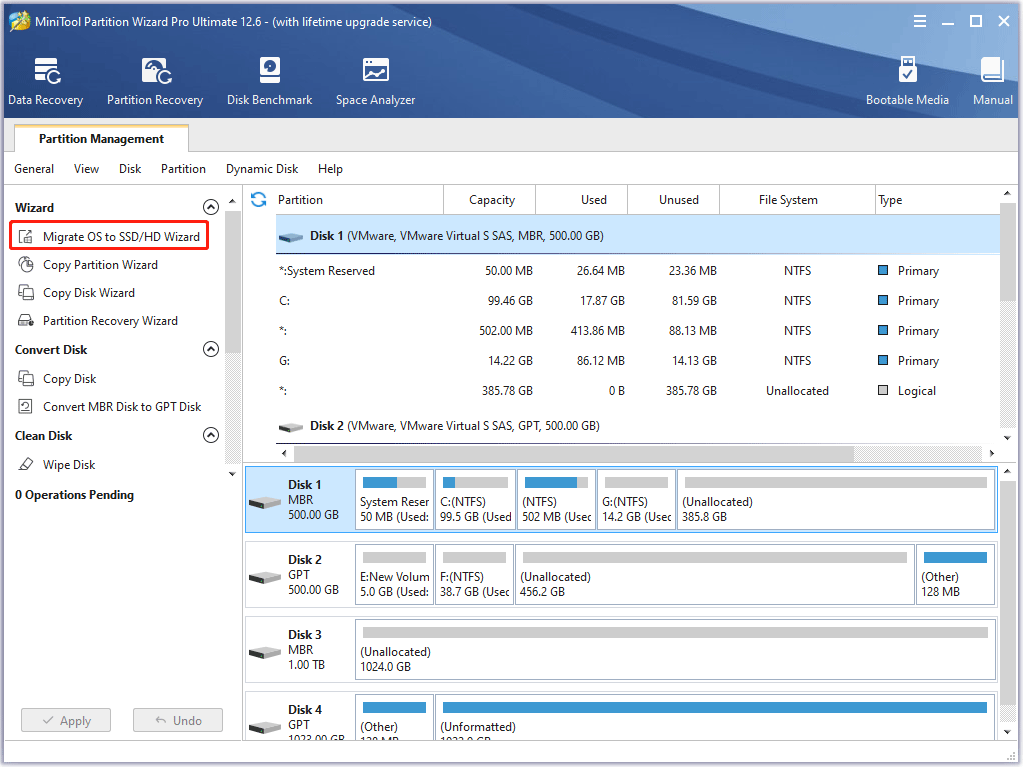
Step 3: Choose Option A or Option B based on your needs and then click the Next button to continue.
Step 4: Find and choose your SSD in the disk list on the Select Destination Disk window and click the Next button. Then, click the Yes button.
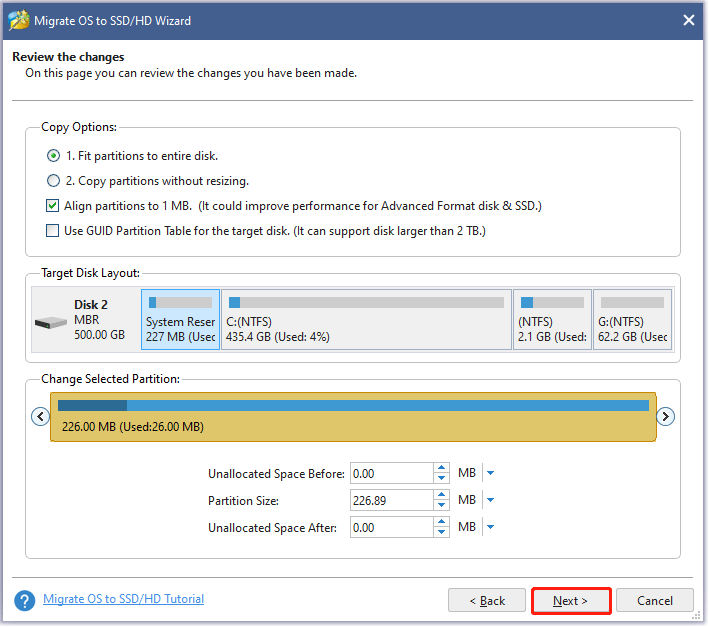
Step 5: On the Review the changes window, customize the following options and click the Next button.
- Choose the Fit partitions to entire disk option or the Copy partitions without resizing option.
- Keep the Align partitions to 1 MB checked option checked, which could improve the performance of the SSD.
- Check the Use GUID Partition Table for the target disk option if your computer support UEFI boot mode and the SSD is of more than 2TB capacity.
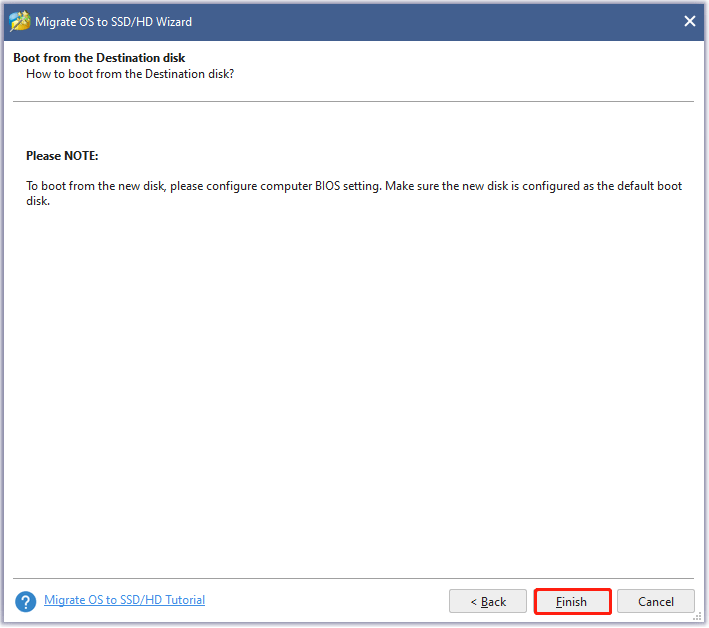
Step 6: Read the note on the current window and then click the Finish button.
Step 7: Preview the change on the user interface. Then, click the Apply button to start system migration.
Step 8: Wait for MiniTool Partition Wizard to finish the task.
Further Reading: Data Recovery Software
While SSDs do a lot better than HDDs, data stored on SSDs isn’t always safe. For example, you formatted a partition by mistake; you accidentally deleted some important data or partitions; your SSD got infected by a virus or malware, etc.
Therefore, if your SSD data is lost due to various reasons and there is no backup, please keep calm and seek help from MiniTool Power Data Recovery as soon as possible.
MiniTool Power Data Recovery TrialClick to Download100%Clean & Safe
Bottom Line
Are you worried about the “Samsung data migration cloning failed” problem? Take it easy now! MiniTool ShadowMaker and MiniTool Partition Wizard can easily and effectively clone an old/small hard drive to Samsung SSD. Just free download one of them for a try.
As to any question about using MiniTool software or any suggestion for our products, we appreciate it. So, tell us right now by writing an email and sending it to [email protected] or leaving your comment in the following comment zone. Thanks in advance.
Samsung Data Migration Stuck at 0%, 99%, or 100% FAQ
Depending on volumes of data and differences between source and target locations, migration can take from some 30 minutes to months and even years. The complexity of the project and the cost of downtime will define how exactly to unwrap the process.
One of the main reasons why the Samsung Smart Switch takes a long time to transfer your files is due to a total load of data. If possible, transfer files gradually or depending on their file sizes. You can start with the most important files first such as your contacts and messages. Then, work on your photos.
Check whether all the schema changes as per the new system are updated. Data migrated from the legacy to the new application should retain its value and format unless it is not specified to do so. To ensure this, compare data values between legacy and new application databases.
User Comments :