The Operating System Did Not Shutdown Cleanly HP/Dell/Lenovo
You start your workday by booting up your computer and end the day by shutting it down. An improper boot or shutdown can keep you from working or enjoying games. It is reported that some of you encounter a shutdown issue with the following error message:
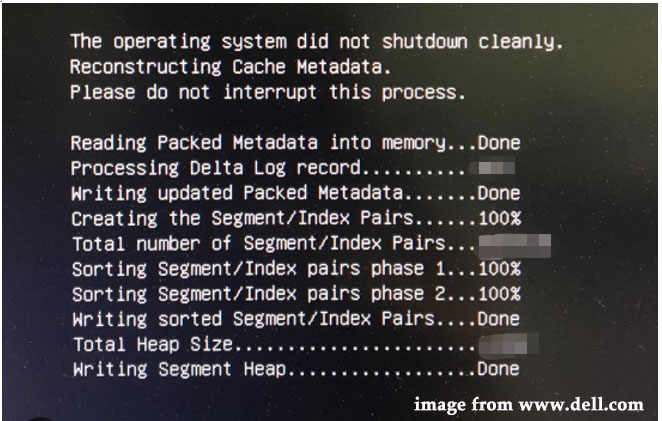
The operating system did not shutdown cleanly.
Reconstructing Cache Metadata.
Please do not interrupt this process.
Are you in the same boat when trying to shut down your computer? Even if you press the Esc key according to the tips on the screen, you will see another message saying that Abnormal Status Reported by Rapid Storage Technologies UTFI driver.
The second message indicates that the Rapid Storage Technology is incompatible with the hardware on your computer and this error is pretty common on computers with Intel Optane Memory.

Sometimes, when your computer fails to shut down properly, the computer will start to reconstruct the cache metadata. When the rebuilding process is done, your computer will shut down properly. If the operating system did not shutdown cleanly message still appears on the screen after waiting for quite a long time. It’s time to take some countermeasures.
How to Fix the Operating System Did Not Shutdown Cleanly Dell/HP/Lenovo?
Fix 1: Try Startup Repair
Windows Startup Repair is a handy tool when you encounter booting or shutdown issues on your PC. This tool can be run from the desktop but it can also be run from outside Windows 10/11. Even when you don’t have access to the desktop, you can still use this tool to help you solve some booting problems and system corruption.
Step 1. Press the Power icon to shut down your computer and then reboot it several times when you see the Windows icon. Then, you will see the Startup Repair (or Automatic Repair) screen.
Step 2. Tap on Advanced options and hit Troubleshoot under the Choose an option screen.
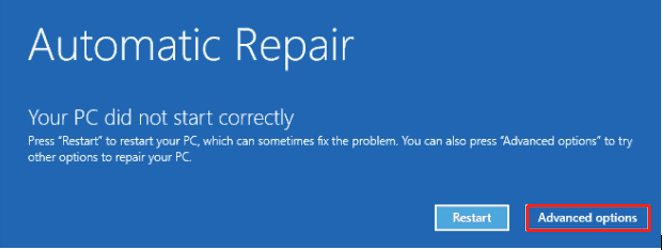
Step 3. Under Troubleshoot, press Advanced options and select Startup Repair/Automatic Repair in the list to launch this tool.
Step 4. Now, Windows will start to repair itself, please wait patiently. After the repairing process is complete, remember to shut down your device to see if the operating system shuts down cleanly.
Fix 2: Disable Intel Optane Memory
Intel Optane Memory provides you with some services including quickly launching the program, fast recovery of files without lagging, rapid file transferring process and so on. Like other tools, it also has some shortcomings, for example, some notebooks cannot support it and then you will meet the operating system did not shutdown cleanly issue. In this condition, disabling Intel Optane Memory may do the trick. There are two ways to disable it:
# Way 1: via Intel Rapid Storage Technology
Intel RST, also called Intel Rapid Storage Technology, is a Windows-based application that can improve the performance and reliability of systems. You can disable Intel Optane Memory via it.
Step 1. Boot your computer and log into the administrative account.
Step 2. Press Win + S to evoke the search bar, type Intel Rapid Storage Technology in the search box, and then hit Enter.
Step 3. Go to the Intel Optane Memory tab and disable this option.
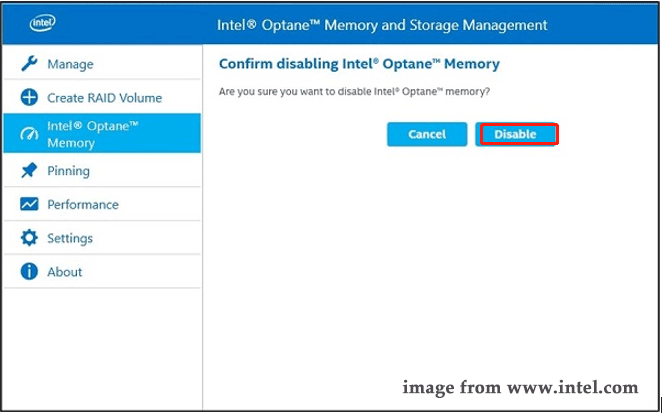
Step 4. Restart your computer to make the changes effective.
some of you may find that Intel Rapid Storage Technology is not running. If so, go to this guide to get corresponding fixes - 3 Methods to Fix the Intel RST Service Not Running Error.
# Way 2: via BIOS
The second method to disable Intel Optane Memory is via the BIOS page.
Step 1. Enter Windows Recovery Environment.
Step 2. Tap on Advanced options > Troubleshoot > Advanced options > UEFI Firmware Settings > Restart to open the BIOS settings.
Step 3. Go to the Devices tab > ATA Drive Setup > select Intel Rapid Storage Technology > hit Enter.
Step 4. In the Optane Volume Separation section, choose Start deconcatenation and hit Enter.
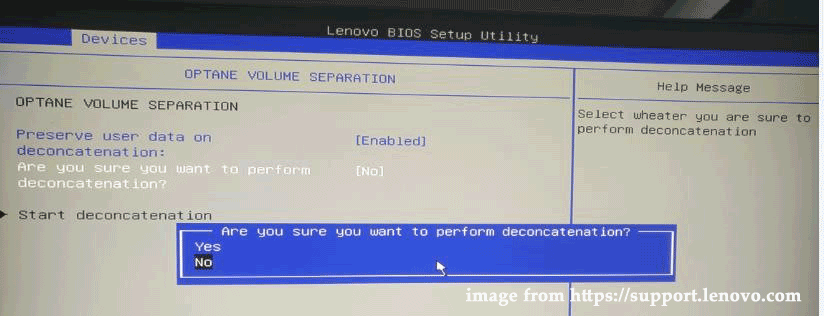
Step 5. Hit Yes & Enter to confirm this action.
Step 5. Wait for this process to complete, exit the BIOS page, and then your computer will reboot automatically. If the operating system did not shutdown cleanly issue appears again, please try the next solution.
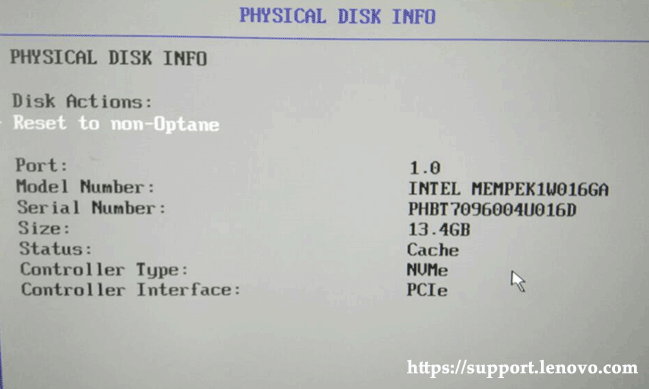
In the BIOS settings, you have another way to disable Intel Optane Memory: open BIOS > go to Settings > Advanced > choose Intel Rapid Storage Technology > hit Enter > Intel PCle > set it to Reset to non-Optane.
Fix 3: Run Hardware Diagnostic
Another potential cause of the operating system did not shutdown cleanly issue is hardware corruption. You can make use of Windows Memory Diagnostic to check if there is any hardware issue in your device. Here are the steps:
Step 1. Press Win + R altogether to launch the Run dialog.
Step 2. Type mdsched.exe and hit Enter to open Windows Memory Diagnostic.
Step 3. Click on Restart now and check for problems to start the diagnosing process.
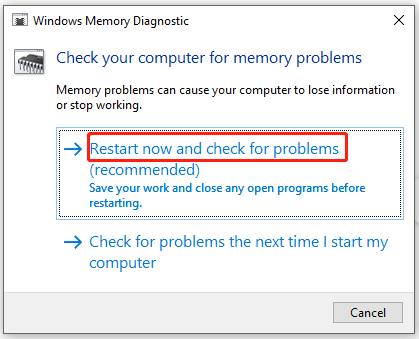
As soon as the scanning process is finished, you can replace the faulty hardware according to the results on the screen.
Fix 4: Restore UEFI Firmware to Default
There is a chance that you have changed the UEFI Firmware settings recently. That will also corrupt the cache metadata and then you will be informed that the operating system did not shutdown cleanly. Therefore, resetting the UEFI firmware settings and setting it to default may be a nice workaround. Try the steps below:
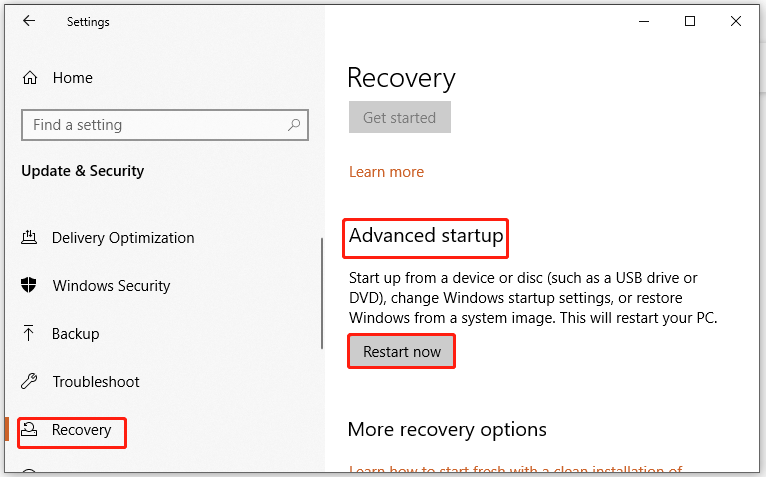
Step 1. Click the gear icon to open Settings and go to Update & Security.
Step 2. In the Recovery tab, click on Restart now under Advanced startup.
Step 3. Under the Choose an option page, hit Troubleshoot > Advanced options > Advanced options > UEFI Firmware Settings > Restart.
Step 4. After entering the BIOS page, press F9 (the corresponding key may vary from manufacturer to manufacturer) to load the default settings.
Step 5. Press Restore Settings to restore the settings to default. If a warning message pops up, choose Yes and hit Enter to confirm your action.
Step 6. Quit the BIOS page when the resetting finishes and wait for your system to restart itself.
Fix 5: Perform System Restore
If the operating system did not shutdown cleanly issue still exists, you can choose to perform a System Restore to restore your system to a previously healthy state. Here’s how to do it:
Step 1. Open Control Panel and set it to view by Small icons.
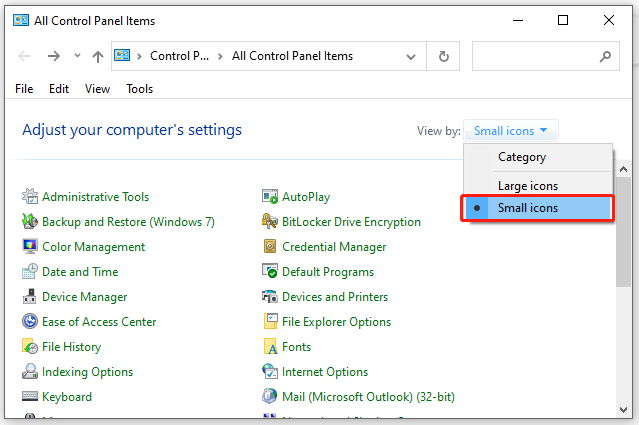
Step 2. In the program list, scroll down to locate the Recovery option and click on it.
Step 3. Press Open System Restore and then choose the restore point to restore your system to an earlier state.
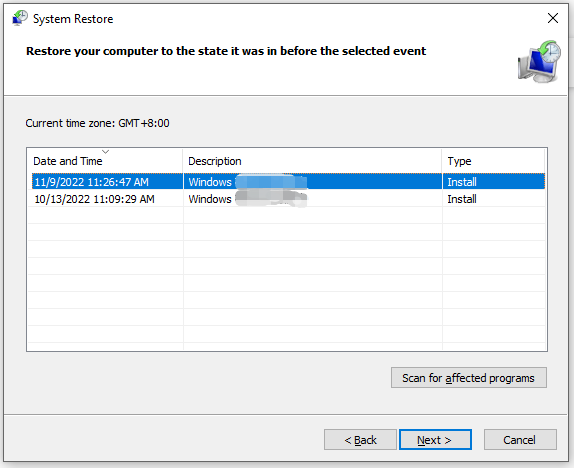
Step 4. The restoration process might take some time, please wait patiently. Finally, reboot your computer to inspect if the operating system did not shutdown cleanly issue disappears.
Fix 6: Reset this PC
If the operating system did not shutdown cleanly issue is still there after trying all the solutions we mentioned above, the last option is resetting the PC. This operation will delete all your data including apps, settings & files and reinstall the system from scratch.
As a result, it is necessary to back up your data with a reliable tool before proceeding. Here, we recommend you try MiniTool ShadowMaker.
MiniTool ShadowMaker TrialClick to Download100%Clean & Safe
Here’s how to reset your PC:
Step 1. Press Win + I at the same time to open Windows Settings.
Step 2. Scroll down to find Update & Security and click on it.
Step 3. In the Recovery tab, tap on Get started under Reset this PC.
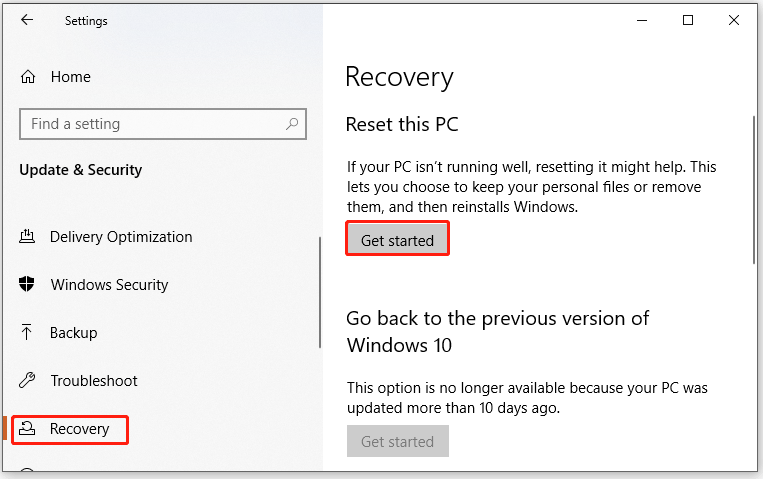
Step 4. There are two options for you: Keep my files and Remove everything. Choose either of them and then follow the on-screen guidelines to finish the resetting process.
Suggestion: Back up Your Data Before Resetting Your PC
As we mentioned in the last method, resetting your PC is a little risky because this operation will wipe your files, settings and third-party applications. If you don’t create a backup of your data, there might be some data loss and it will be hard to recover the lost files.
To avoid such misery, it is indispensable for you to back up precious files before performing a computer reset. When it comes to backup, a piece of Windows backup software – MiniTool ShadowMaker deserves a shot. This tool is so powerful that it can meet your backup demands on files, folders, partitions, systems and even the whole disk. Without wasting more time, let’s jump into the steps to back up files.
Step 1. Download, install and launch this program.
MiniTool ShadowMaker TrialClick to Download100%Clean & Safe
Step 2. Hit Keep Trial to get a 30-day free trial.
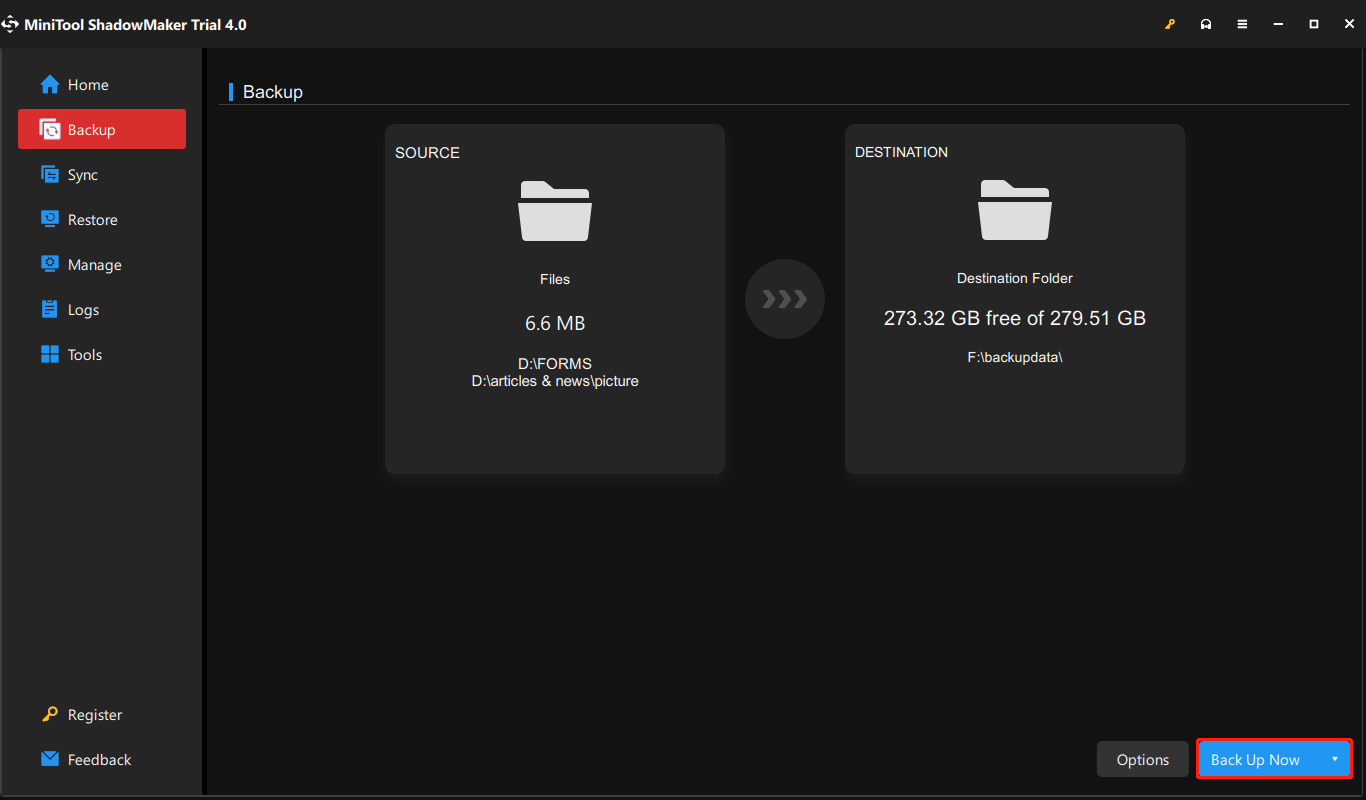
Step 3. Go to the Backup page. As for selecting the backup source, hit SOURCE > Folders and Files. Since MiniTool ShadowMaker has chosen a default storage path for you, you can start the backup task at once by hitting Back Up Now.
If you want to develop a habit of backing up files regularly, you can create an automatic backup by going to Options > Schedule Settings.
We Need Your Voice
In this guide, we show you 6 solutions to the operating system did not shutdown cleanly Lenovo/HP/Dell and a suggestion about how to back up your important files to prevent unexpected data loss. If you still have some queries about this issue or our backup software, MiniTool ShadowMaker, please pose your question in the comment zone below or contact us via [email protected]. We will reply to you as soon as possible.
The Operating System Did Not Shutdown Cleanly FAQ
When the operating system did not shutdown cleanly crops up, it means that your laptop doesn’t support Intel Optane Memory. Normally, your computer will start to reconstruct the cache metadata and it will shut down properly after the rebuilding process is done.
- Try Startup Repair
- Disable Intel Optane Memory
- Run Hardware Diagnostic
- Restore UEFI Firmware to Default
- Perform System Restore
- Reset this PC
To give the operating system a break, you just need to: click on the Start menu > hit the Power icon > tap on Shut down.
If you want to close an application and reboot your operating system, press Ctrl + Alt + Del altogether.
- Perform System Restore in Safe Mode
- Use Startup/Automatic Repair
- Run SFC
User Comments :