This article delivered by MiniTool Software intends to introduce the official backup software of Toshiba developed for its CANVIO series external hard drives. It explains its features and gives a step-by-step user guide. Also, this post provides a much more powerful alternative to Toshiba storage backup software called MiniTool ShadowMaker.
About Toshiba Backup Software
Toshiba Backup Software is a kind of data backup tool for the CANVIO series external hard drives. Both the software and portable hard drives are developed and produced by Toshiba.
Toshiba Storage Backup Software enables you to back up folders that are saved on the computer to the storage device relying on the selected backup plan. It is not guaranteed to operate run on all computers or homebuilt PCs. Also, the backup software isn’t guaranteed to back up or restore all files on the storage device.
Features of Toshiba Backup Software
In general, the main feature of the application is backup and restore. With it, you can configure 1 backup plan for each storage device and each backup plan will conduct an automatic backup at the specified time.
As for restoration, you can restore the backup data in the specified location. Generally, you can manage up to 5 storage devices.
- The backup won’t perform if the backup destination storage device isn’t connected at the time specified in the backup plan. So, you need to ensure the target storage device is connected before the specified time.
- The backup won’t carry out if the backup software is shut down at the time specified in the backup plan. So, make sure the app is opened ahead of the backup time.
- The backup won’t conduct if the computer is turned off, in sleep, standby, or hibernation mode at the time specified in the backup plan. If so, just click the Backup Now button to carry out the backup immediately.
Compatible Storage Devices
Toshiba Backup Software only supports backing up to storage devices formatted in the NTFS file system. So, before backing up with this program, make sure the destination device is of NTFS format. If not, you can use MiniTool Partition Wizard to reformat it to NTFS or convert it to NTFS with just a few clicks.
MiniTool Partition Wizard DemoClick to Download100%Clean & Safe
Toshiba Canvio Backup Software Download
Before downloading Toshiba backup software for external hard drive, you should download the Toshiba Canvio backup software manual and read it carefully.
Toshiba storage backup software applied models are listed below. An asterisk mark (*) in the model is an alphanumeric character.
- Canvio Advance (HDTCA******A)
- Canvio Advance (HDTC9******A)
- Canvio Alu / Alumy (HDTH3******B)
- Canvio Premium (HDTW2******A)
- Canvio Slim (HDTD3******A)
The following are the specifications of the Toshiba external hard drive backup software:
- Software version: 1.41.0508
- Release date: September 11, 2020
- Supported operating system (OS): Windows 10 (2004/20H2/21H1, 32/64 bit) & Windows 8.1 (32-bit/64-bit)
Toshiba Canvio backup software manual (14MB)>>
Toshiba external hard drive backup software download (9.5MB)>>
Toshiba hard drive backup software release notes (11KB)>>
- The supported OS excludes Windows 10 Education, Pro Education, Enterprise, Enterprise LTSB, S mode, and mobile version as well as Windows 8.1 Enterprise and Windows RT 8.1.
- Software support language: English, German, Spanish, French, Italian, Portuguese, Simplified Chinese, Japanese.
- Manual support language: English, German, Spanish, French, Italian, Portuguese.
Toshiba Backup Software Tutorial
How to make use of Toshiba Storage Backup Software? Let’s see the step-by-step guide below.
#1 Create a Backup Plan
You can back up your computer folders to the storage device by configuring a backup schedule. For a single storage device, only one backup plan can be assigned to it.
1. Connect the NTFS CANVIO storage device to your computer.
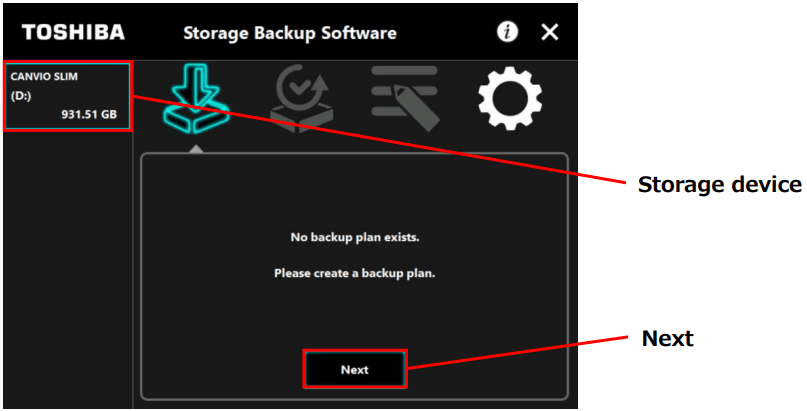
2. Launch backup software for Toshiba CANVIO.
3. In the main interface of the software, it will list the compatible storage devices. Select the one you’d like to create a backup plan and click Next.
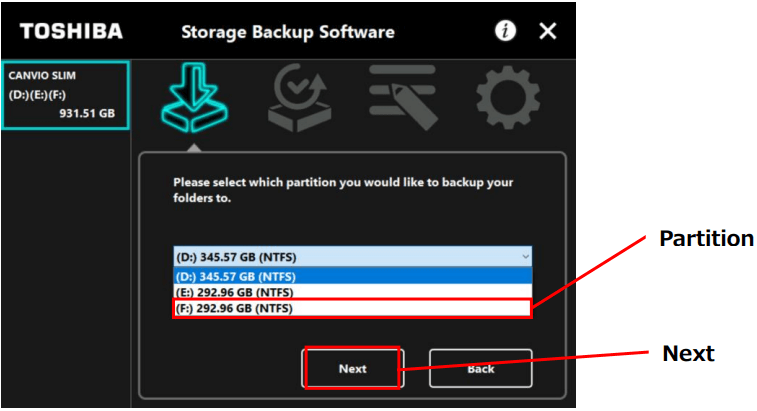
4. Select a specific partition on the target storage device to store the backup data.
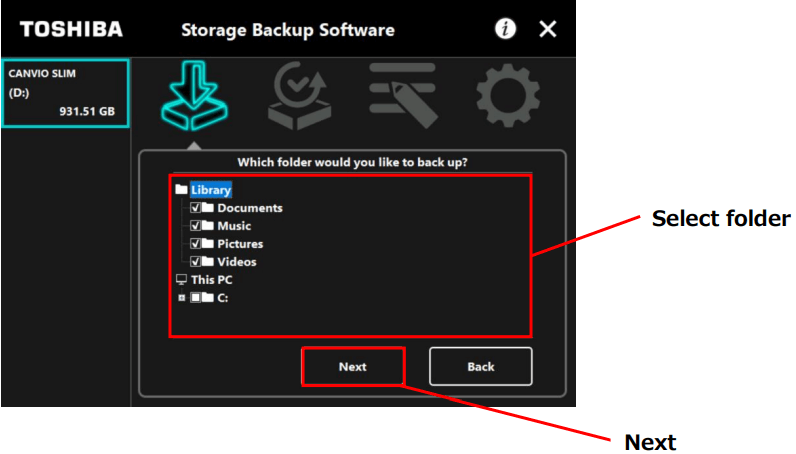
5. Then, choose the folders on your machine that you want to back up. Hidden files and folders won’t be displayed.
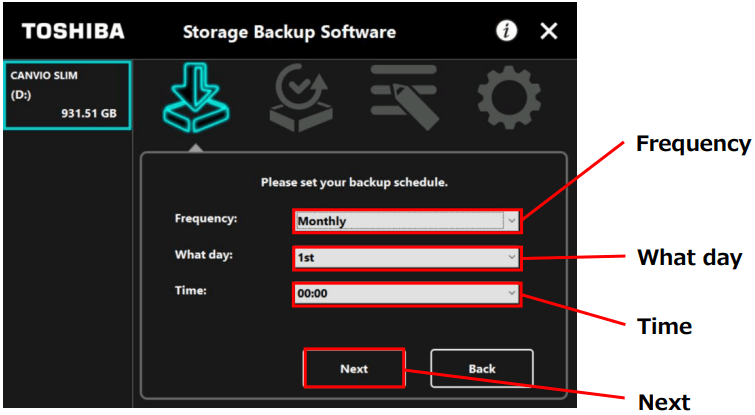
6. Next, set up the backup Frequency (Hourly, Daily, Weekly, or Monthly), backup Day (date or day of the week), as well as backup Time (24 hours/every hour) to go on.
The automatic backup won’t perform while the setup screen of the software is open. If the Toshiba Storage Backup Software is running under another user’s account, it won’t conduct the auto backup set up by you. Just shut down the software from the other user account and sign in to your account to let it perform your automatic backup process.
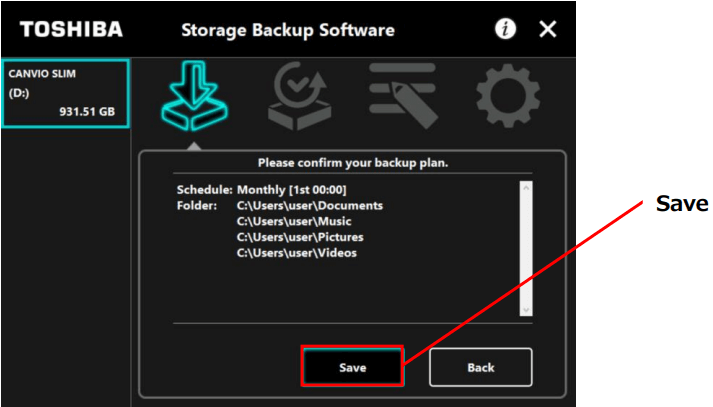
7. Preview the backup task and click Save > OK to confirm.
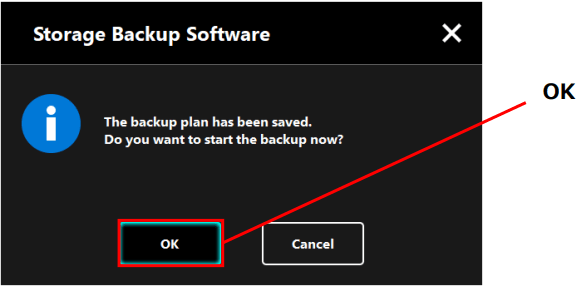
8. It will further ask whether you want to perform the backup process immediately or not. Choose OK or Cancel as you wish.
Once a backup plan is created, a flag-shape backup plan icon will appear on the related storage device in the device list. At the same time, you can see the progress bar if you choose to perform a backup immediately after you set up a backup plan.
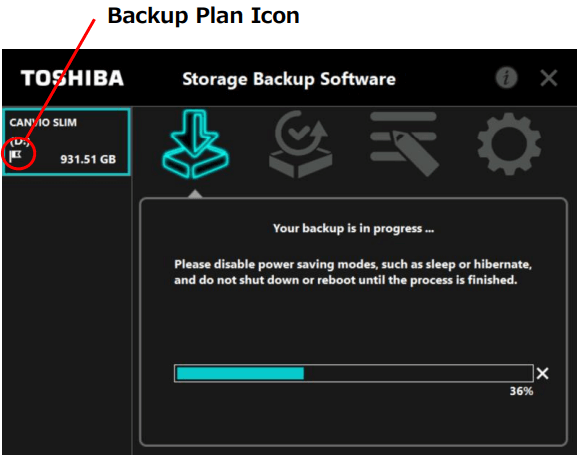
You are able to abort the backup process by clicking the cross icon next to the progress bar. Once aborted, all incomplete backup data will be discarded.
Please don’t disconnect the destination storage device during the backup process. Also, make sure the PC doesn’t go into sleep, standby, or hibernate mode while the backup is processing. Otherwise, the storage device may be damaged.
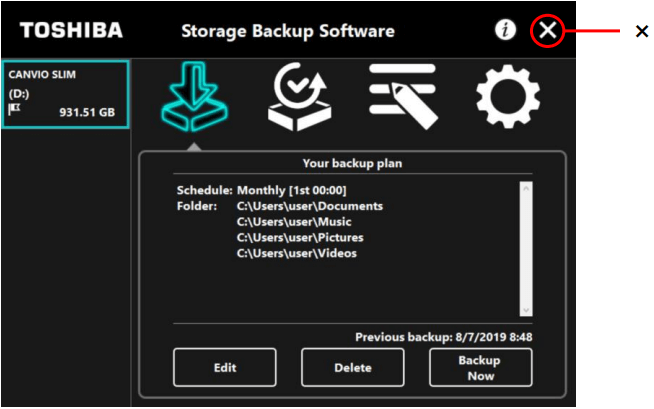
When the initial backup completes, you can see your backup plan and previous backup record in the main dialog. Just click the cross icon on the top right to close the window.
#2 Edit Backup Plan
You can change your previous backup plan as you like by following these steps.
- Connect the target storage device to your PC and open Toshiba storage backup software.
- You will see an interface similar to the right above picture. Just click on the Edit
- Then, you will be shown with the backup source folder selection dialog, just uncheck the folders you don’t want to back up and check the folders you want.
- It’s time to change your backup schedule.
- Check and save your changes.
All in all, the guide for editing an already existing backup plan is very similar to creating a new backup plan.
#3 Delete Backup Plan
Deleting a backup plan will also delete the existing data backed up by the plan. If you want to keep the backup data, you need to restore it before deleting the backup plan.
If there are multiple storage devices connected to the computer, it is recommended to remove all storages devices except for the one you plan to delete the backup data from. This will prevent you from deleting the backup data from a wrong storage device.
- Connect the target storage device to your PC and launch Toshiba Backup Software.
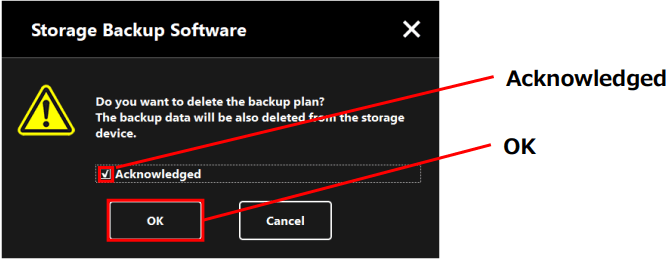
- Select the Delete option in the main UI (user interface).
- It will ask you whether you want to delete the backup plan. Just check the Acknowledged column and click OK to confirm.
When the backup plan is successfully deleted, the flag-shape icon will disappear from the target storage device.
#4 Backup Now
If you want to manually perform a backup, you can use the Backup Now button.
- Plug the storage device into your computer and open the Toshiba backup application.
- In its main interface, within the previous backup record section, click on the Backup Now
- Click OK to confirm the backup process.
- Wait until the backup process finishes.
#5 Restore Backup Data
The below guidance will teach you how to recover data from Toshiba backup.
1. Connect the related storage device to the machine and launch Toshiba Storage Backup Tool.
2. Select the second Restore icon on the main page.
3. Choose the date of the backup data you want to restore.
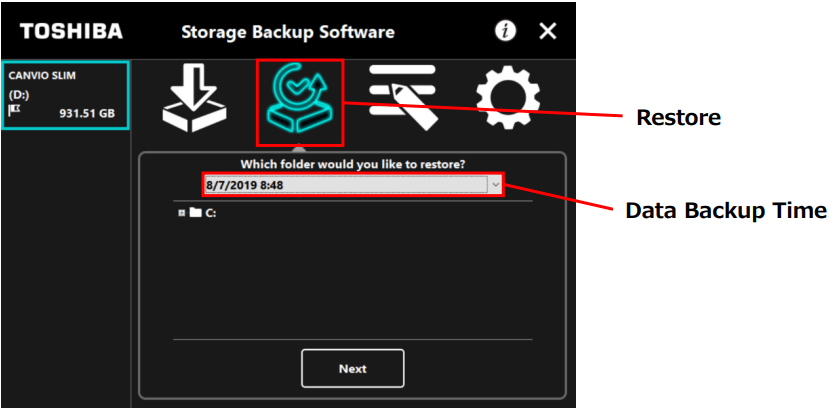
4. Under the date selection column, select the folders you plan to restore. By default, all backed-up folders are selected.
5. Then, select a destination location (the original location or a new location) to save the restored data and click Restore.
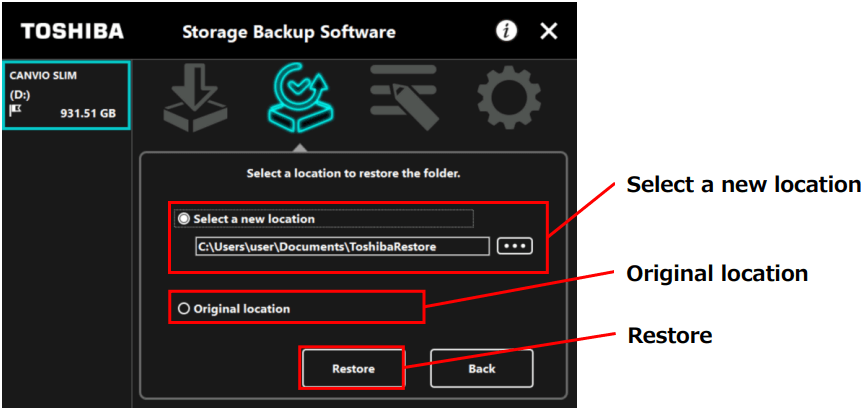
The backup data can’t be restored to a different computer. And, only when to sign in with the same user account as when the backup was performed, the “restore to original location” option is available.
Do not disconnect the storage device while it is restoring. Also, make sure the computer does not go into sleep, standby, or hibernate mode during the restoration. Otherwise, the storage device may be damaged.
You are allowed to about the restore process by clicking the cross icon next to the restoration bar. If you really do that, the restoration is incomplete and the restored data may not be displayed correctly.
#6 View Logs
Besides, you can view the logs of the tasks you have done within Toshiba storage backup software. Click the third Log icon and the Backup, Restore, Backup Detail, and File View options will appear. Just click the corresponding button to view the logs you intend to check.
Also read: Is Toshiba Canvio Advance 1TB USB 3.0 Portable HDD Worth Buying?
Toshiba Backup Software Alternative – MiniTool ShadowMaker
Why introduce the alternative of Toshiba Storage Backup Software? Because the Toshiba backup program has some limitations.
- Can only backup files/folders.
- Not guaranteed to back up or restore all files on the storage device.
- Not guaranteed to operate run on all computers or homebuilt PCs.
- Can only backup to NTFS-format CANVIO external hard drives.
- A single external disk can only be used for one backup plan.
- Manage up to 5 storage devices.
- Deleting a backup plan will also delete the existing data backed up by the plan.
- The backup data can’t be restored to a different computer.
Correspondingly, MiniTool ShadowMaker has the following advantages compared to Toshiba backup software.
- Besides files/folders, can also back up the system, partitions, and the entire disk.
- Support all Windows computers, workstations, virtual machines, etc.
- Support NTFS, exFAT, FAT32, FAT16, EXT4, EXT3, and EXT2 file systems.
- Support Windows 11/10/8.1/8/7/Vista/XP (all editions, 32/64 bit) and Windows Server 2019/2016/2012 (R2)/2008 (R2)/2003 (R2)
- Support nearly all storage devices recognized by Windows like HDD, SSD, USB external hard drives, hardware RAID, NAS, Home File Server, etc.
- A destination location can be used for multiple backup plans only if it has enough storage space.
- Can manage multiple storage devices.
- Can choose to keep the backup data while deleting a backup plan.
- The backup data can be restored to a different computer.
- More specific schedule backup.
So, let’s see how to use MiniTool ShadowMaker to create a scheduled file backup.
MiniTool ShadowMaker TrialClick to Download100%Clean & Safe
1. Download, install, and launch MiniTool ShadowMaker on your computer. If it asks for purchase, just click the Keep Trial
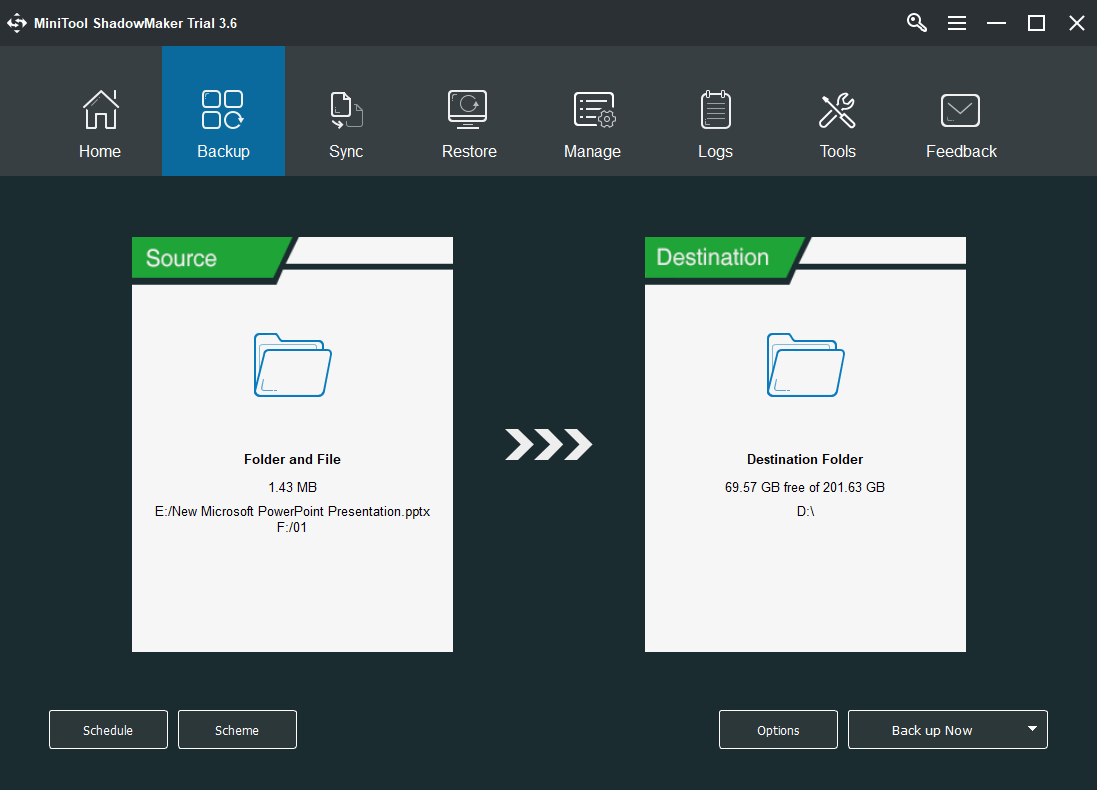
2. Choose the second Backup tab.
3. Click on the Source module to select whatever on your machine you want to back up. Here, we will select some files and folders.
4. Click on the Destination module to pick up a location to save the backup image. Internal disks, external hard drives, USB flash disks, network shared storage/NAS (on another computer) are available.
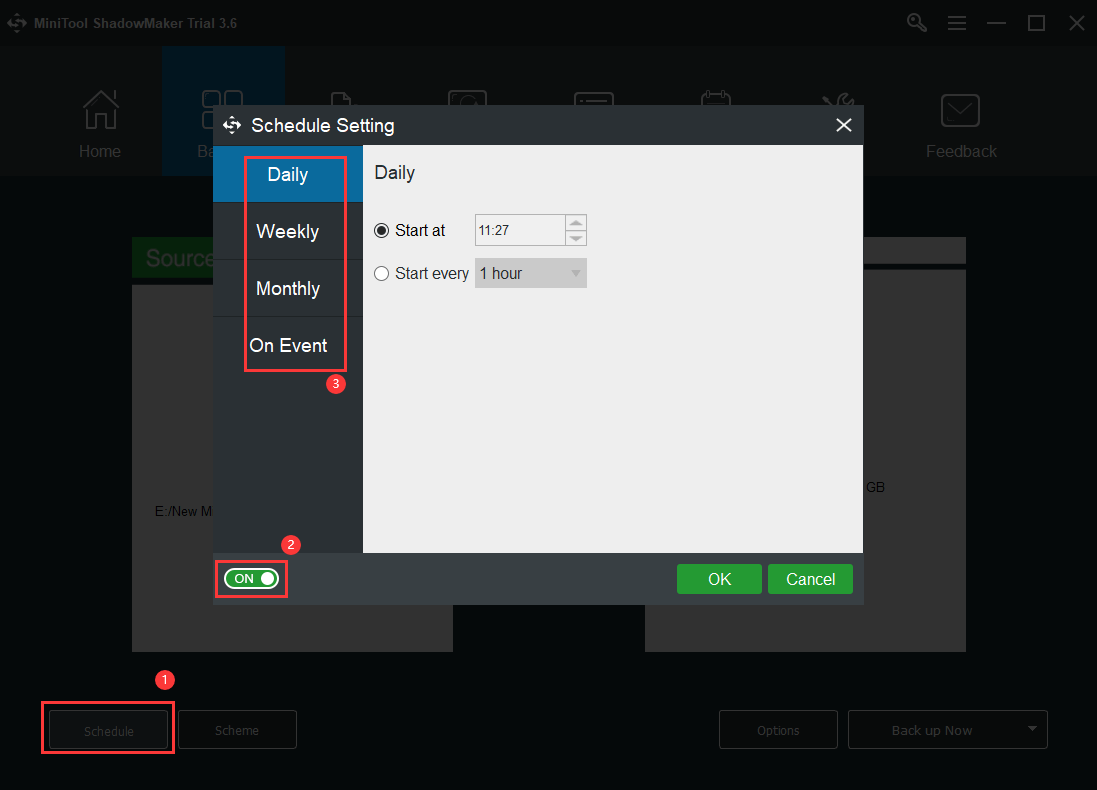
5. Click on the Schedule button, switch on the schedule settings in the popup, and select a proper schedule among the following ones.
- Daily backup: Once a day at a specific time or every x hour(s).
- Weekly backup: Specific days within a week at a specific time for each day.
- Monthly backup: Specific days within a month at a specific time for each day.
- On event backup: Back up when system logs on or logs off.
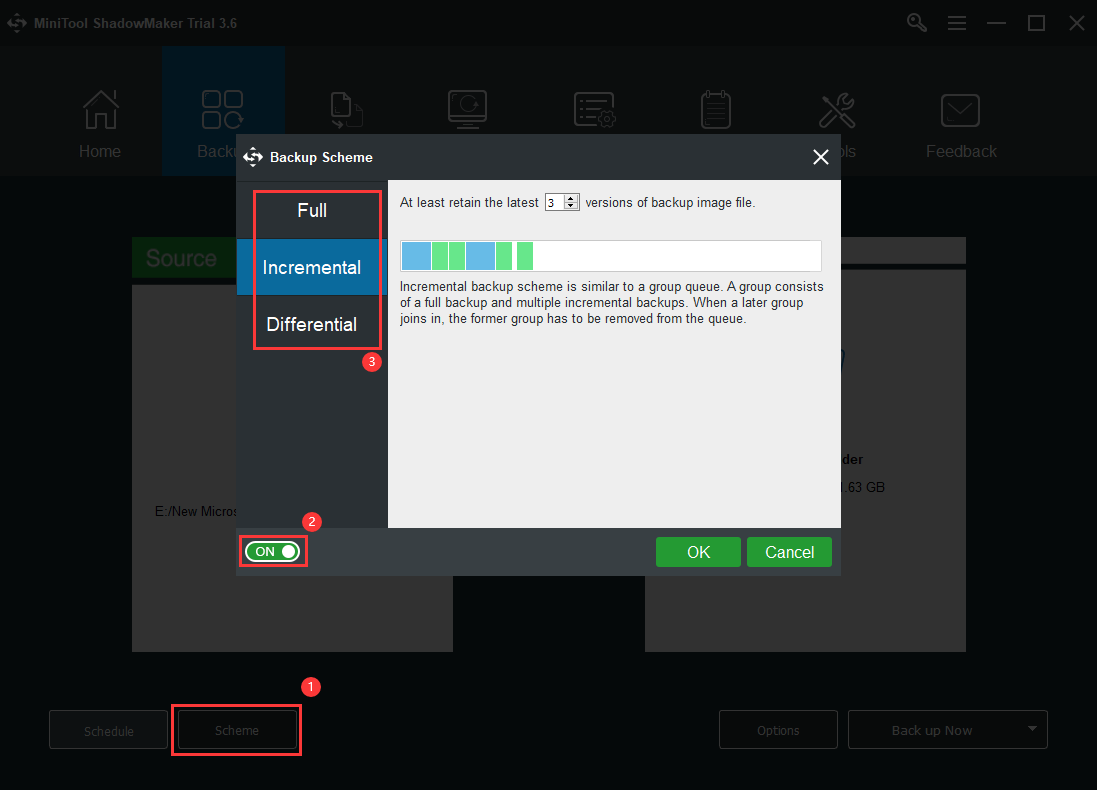
6. Click on the Scheme button, turn on the scheme settings, and choose a scheme that suits you. The backup scheme will specify how much backup image to maintain in the destination before deleting the old one.
- Full backup: Back up all the source files selected by you.
- Incremental backup: Only backs up changed (added or edited) files compared to the last backup.
- Differential backup: Only backs up changed (added or edited) files based on the last FULL backup.
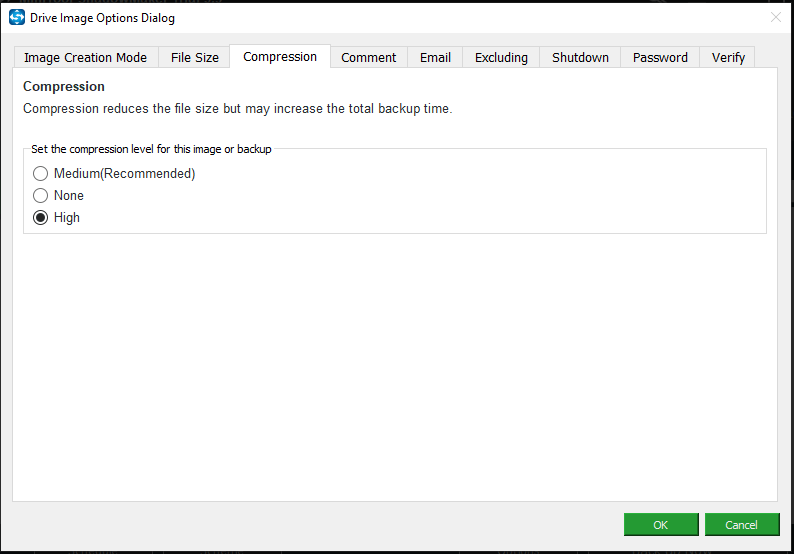
7. Click on the Options button to configure some settings for this backup task including split/compress/comment/encrypt/verify backup images, order email notification, exclude certain files from backing up, set up to only backup used sectors, and set up to shut down the computer when the backup completes.
8. Finally, you can choose to Back up Now or Back up Later.

Wait until the backup process finishes. You can also turn to your other business while the backup task is processing.
Ok, that is all we intend to introduce about Toshiba Backup Software. Hope you have a better understanding of it. If you have something to complement, a different opinion, or a question, feel free to leave a comment below. Or, if you encounter any problem while using MiniTool ShadowMaker, just contact [email protected].
About The Author

Position: Columnist
Helen is a tech writer with over 10 years of experience. She specializes in creating easy-to-follow guides for video editing, media file conversion, and computer performance. Helen doesn't just write—she tests every software herself and listens to feedback from users and experts. Her goal is to make complex programs simple so that everyone can solve their tech problems with confidence.
User Comments :