Whether you need to transfer plenty of files between two computers? Or have you recently got a new computer and need to migrate your old data into it? Perhaps you should learn about how to transfer files from PC to PC. Fortunately, this guide from MiniTool will give you the five easiest methods for transferring files between computers.
How to Transfer Files from One Computer to Another Computer
The process of file transfer to a PC involves the transmission and reception of data or documents between multiple computer systems or devices. This can include transferring data over a network, such as the Internet, or physically moving data from one computer to another.
Transferring files is not an extremely complicated process, which can be done in a variety of ways. When buying a shiny new laptop, you are excited, but at the same time, you also may come across a problem with most of your familiar and important data sitting on the old computer, unwilling to start all over again. Now, you may be curious about how to transfer files from one computer to another computer.
There are five easy and simple ways for the computer to computer transfer. Next, we will walk you through these methods in detail. Try out the following ways and pick one that fits you best based on your needs and budget.
Use PC to PC file transfer software – MiniTool ShadowMaker
If you want to move all your disk data, including Windows settings, important documents, personal sensitive files, applications, pictures, videos, etc., among all methods, third-party transfer software is an advisable option. It can let your new computer just keep the same as the old one.
Cloning a hard drive is your top choice at the moment, which enables you to create an identical replica of your previous drive onto a new drive. When the cloning process is done, the new disk is supposed to boot on your new laptop.
Therefore, MiniTool ShadowMaker is recommended for you to use, which is user-friendly and powerful functionality. It not only is a professional file backup software but also has the Clone Disk feature for cloning hard drives such as cloning HDD to SDD.
With this assistance, you can clone the entire disk to a new hard drive with simple clicks. Download and install the best program and enjoy a 30-day free trial by clicking the button below.
MiniTool ShadowMaker TrialClick to Download100%Clean & Safe
Here are detailed steps about how to transfer files from PC to PC.
Step 1: Launch MiniTool ShadowMaker to Configure Something.
1. Remove your hard drive from the new PC after shutdown, connect it to your old device, then open MiniTool ShadowMaker installed on your old PC and click the Keep Trial button.
2. Look for the Tools module and click it.
3. Choose the Clone Disk feature from the following page.
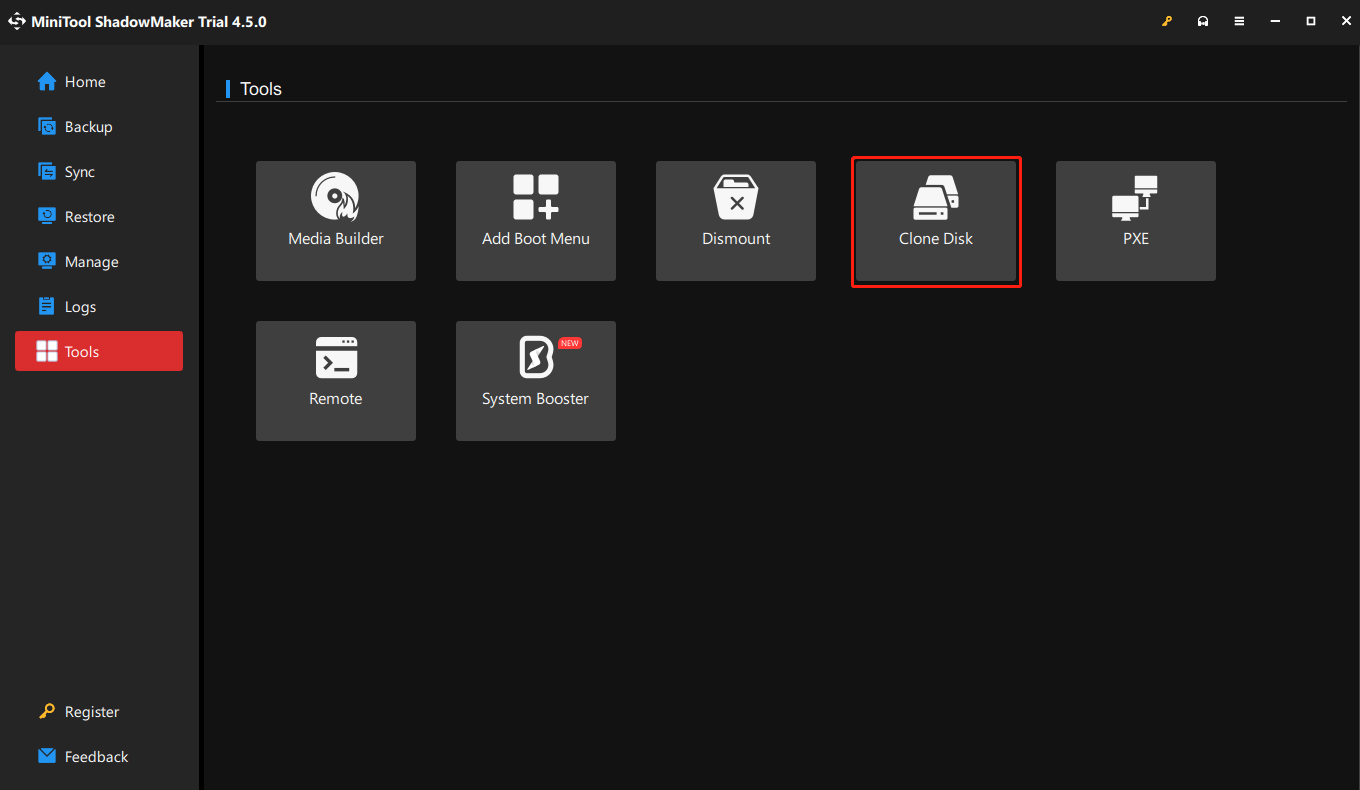
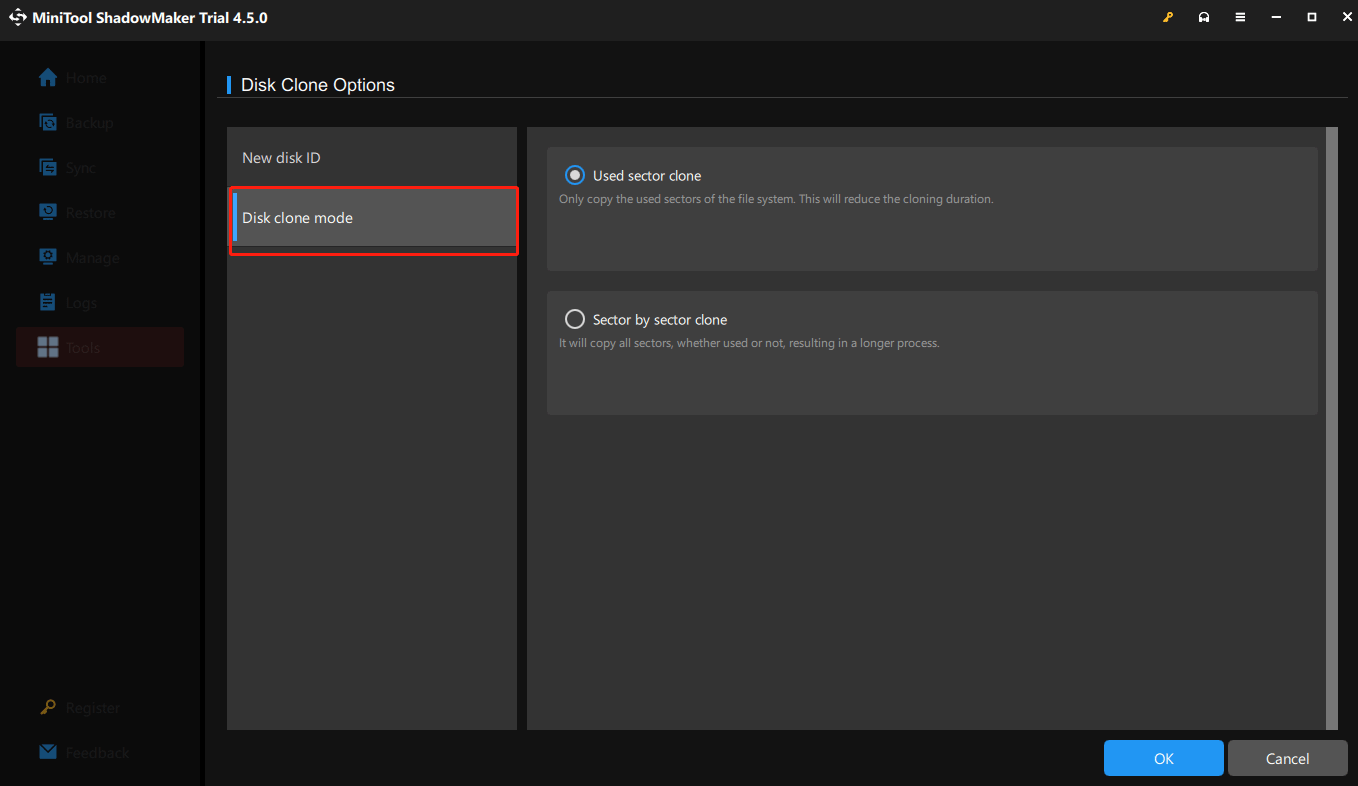
4. Click the Options button at the bottom and New disk ID is selected by default.
Switch to Disk clone mode, read the introduction, and choose one according to your requirements. It allows you to clone the used sectors or run sector by sector cloning. When done, click the OK button.
Step 2: Perform Clone Disk
1. When moving data from one computer to another, you’d better choose the system disk of the old computer as the source disk and select the drive of your new one as the target disk.
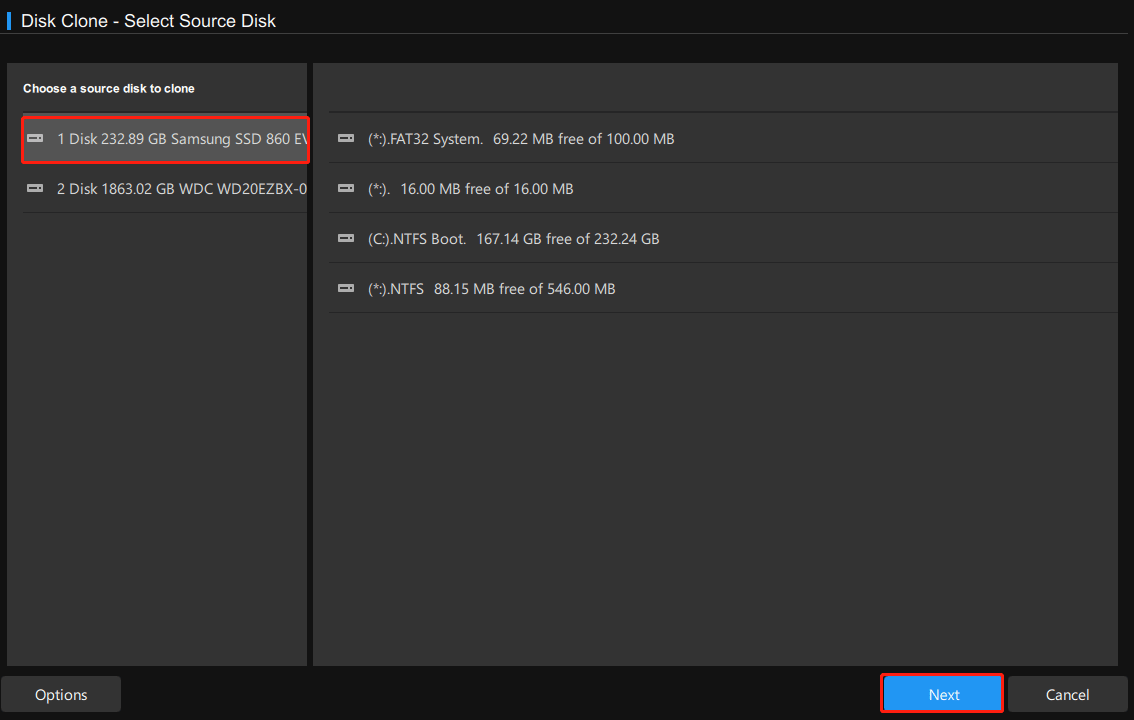
2. Click Start to begin the clone. Please patiently wait for the process to be finished.
After cloning, you need to unplug the target disk from the old PC and connect it to the new one. If the hardware on your two PCs is the same, it means you can directly run your new PC from the cloned disk.
If the two hardware are incompatible, the new PC won’t boot successfully. Then, return to the Tools page and click Media Builder to create a bootable disc or USB flash drive.
Connect the created media to the new PC and boot your PC from it to enter the MiniTool Recovery Environment. Then you can use Universal Restore to fix the issue. Finally, remove the media and try to boot your PC properly.
Use an External Storage Device
The second method to transfer files between computers is to use an external storage device. You could purchase a high-speed flash drive or external hard drive, on condition that both your computers have USB 3.0 or USB 4.0 ports. And speed is of the essence when you need to move tons of files between two computers. Take the following steps.
Step 1: Connect the external hard drive to the old PC with a cable and copy the files you need to transfer. And then paste them into your external drive.
Step 2: After finishing, remove the external drive from the old PC, plug it into the new one, and copy & paste the files. The pasting process may take some time if there is a lot of data.
Besides, this way can give you a backup of your data as well in case of data loss and you can get them back.
Use a Transfer Cable
A transfer cable is another way to transfer files from one computer to another computer. It saves time and does not require an external device to copy the data for transfer to another Windows PC. As a Windows 10/11 user, you can get a Windows transfer USB cable like Plugable. It connects both computers with two USB-A 3.0 ports.
Here’s how to transfer files from PC to PC with a transfer cable.
Step 1: Plug the USB cable into each PC. When the two PCs recognize it, they will install the driver automatically.
Step 2: Next, you need to install data transfer software on both PCs.
Step 3: Launch the software on the two computers and perform a file transfer to a PC.
File Transfer to a PC over LAN
As for moving data from one computer to another, you may consider using an Ethernet cable. But remember that this way only lets you transfer files between computers on the same local area network (LAN).
Here are the detailed steps for the computer to computer transfer.
Step 1: Connect your two computers with a LAN cable
1. Connect your both computers with a LAN cable like Ethernet crossover cable.
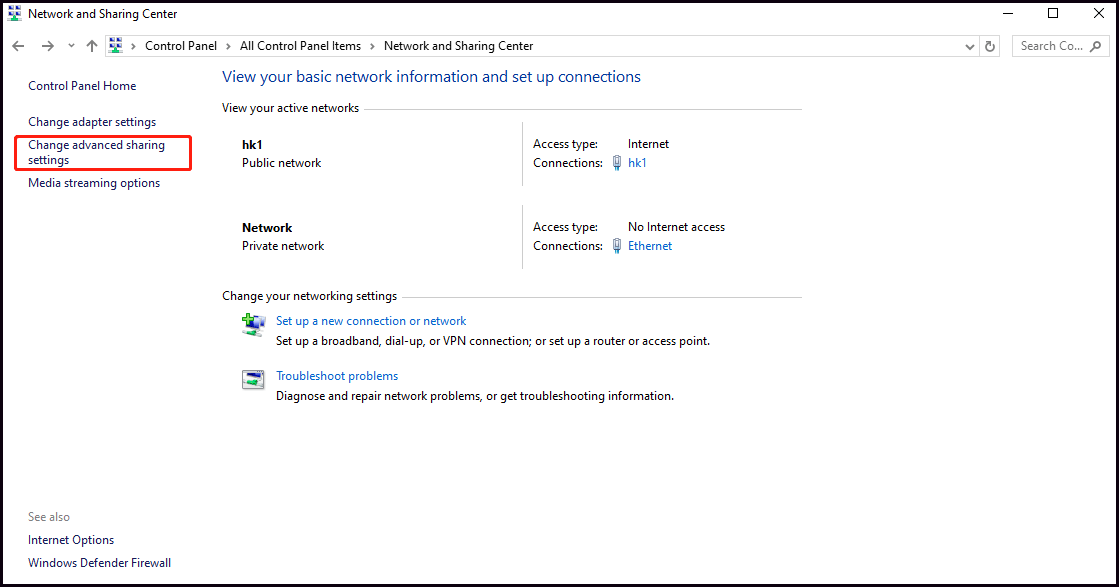
2. In order to transfer data, you need to turn on Network Sharing on both computers. First, type Control Panel intothe search box of Windows 10/11 and choose to enter it.
3. Locate the Network and Internet option from its main interface.
4. Select Network and Sharing Center from the following window.
5. Then find the Change advanced sharing settings option and click it.
Step 2: Set up settings
1. Scroll down to the File and printer sharing section, check Turn on file and printer sharing.Finally, click the Save changes button to save your settings. Now you have enabled Network Sharing.
2. Next, you should bring them onto the same LAN by setting a static IP address of the same class. Similarly, navigate to Ethernet under Network and Sharing Center and click on it.
Step 3: Make different IP addresses
1. Choose Properties from the pop-up window, click Internet Protocol Version 4 (TCP/IPv4), and then choose Properties.
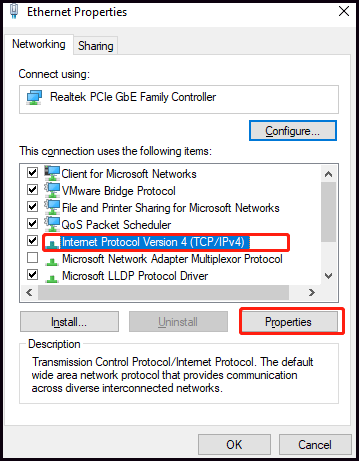
2. Make different IP settings for your two computers. For computer 1, the two IP addresses are 192.168.1.1 and 192.168.1.4 respectively, and the subnet mask for two PCs is 255.255.255.0. After that, you can go to File Explorer in Windows 10 and click Network. Both of your two computers will be listed here.
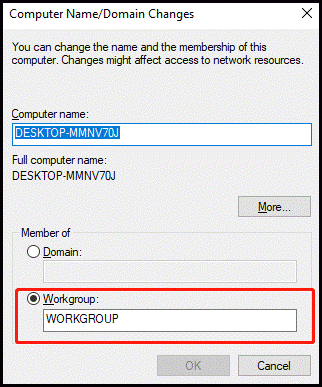
3. Go to This PC and right-click the blank to enter Properties > Change settings > Change. Just make sure that the workgroup name of each computer is WORKGROUP.
Step 4: Create a shared folder to transfer files from PC to PC.
Firstly, you need to create a new folder on the desktop, migrate all of the files you need into it, and then right-click on it to choose Give access to > Specific people.
Secondly, choose Everyone from the drop-down menu and click Add. Next set Permission Level to Read/Write.
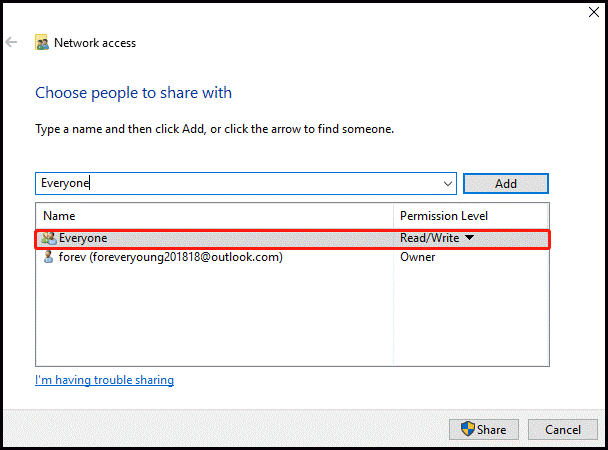
Finally, click the Share button. After finishing these operations, go to another PC from the Network and copy & paste the shared folder to it.
From the above introduction, you may find transferring files between computers using the ethernet cable is very complicated as there are so many steps you need to take. In order to transfer files from PC to PC successfully, it’s necessary to follow each step mentioned above.
Transfer Files to a New Computer via Cloud Storage
Last but not least, another convenient way available to users who want to transfer files to a new computer is to use cloud storage. There are some recommended cloud services, for example, OneDrive, Google Drive, Dropbox, etc. This way has become more and more popular among Windows users since it makes syncing files between computers easier.
Take the OneDrive as an example and we will show you how to transfer files from PC to PC. Follow the steps below.
Step 1: Go to File Explorer and open the OneDrive folder (OneDrive is pre-installed by default in Windows 10/11). If your computer is without OneDrive, you need to download and install it.
Step 2: Ensure that all the data that you want to transfer is displayed in the folder. Then sign in to OneDrive with your Microsoft account on the new Windows PC and you can see your files by accessing OneDrive.
The process is straightforward provided that an internet connection is on and your data is protected from potential hard drive failures. This is because when your old and new computers synchronize folders locally, both can enable file uploads and downloads at the same time.
Bottom Line
In summary, the above five methods are useful for you to transfer files from PC to PC. Just choose one of them that suits your needs best and try to take advantage of it. Wish you can succeed in moving your data between computers.
User Comments :