Windows backup has always been a core feature of Windows, enabling users to back up and restore their files. However, some Windows 11 users report that they encounter the backup error. Now, this post from MiniTool tells you how to fix the Windows 11 backup error.
Windows 11 Backup Error
As with any software, the backup feature built into Windows 11 is not perfect and you may encounter different types of issues on Windows 11 when backing up your Windows 11. This post focuses on the Windows 11 backup error.
What causes the Windows 11 backup error?
- Insufficient disk space
- Windows Update related errors
- Driver or device issues
- Corrupted system files
- Missing or corrupted registry keys or files
Next, let’s see how to get rid of the “Windows 11 backup error” with multiple solutions.
How to Fix Windows 11 Backup Error?
Fix 1: Run SFC (System File Checker)
If you encounter the Windows 11 backup error due to the corrupted system files, you can try to run SFC (System File Checker) to fix the issue. Here is how to do that:
Step 1: Press the Windows + R keys together to open the Run dialogue box and type cmd in it to open Command Prompt.
Step 2: Type sfc /scannow and press the Enter key. This process may take up to 20 minutes to scan or repair corrupt system files. You need to be patient and restart your computer for these changes to take effect.
Fix 2: Run DISM
If running SFC is not working, you can try to run DISM (Deployment Image Servicing and Management) to fix the Windows 11 backup failed error. Follow the guide below:
Step 1: Type cmd in the Search box and choose Run as administrator.
Step 2: Type the following commands and press the Enter key after each one.
- DISM /Online /Cleanup-Image /RestoreHealth
- DISM /Online /Cleanup-Image /ScanHealth
- DISM /Online /Cleanup-Image /CheckHealth
Fix 3: Check If Your Disk Has Bad Sectors with chkdsk
If corrupt system files or a defective Windows image are not the cause of the problem, you can check your disk for bad sectors. Follow the steps below.
Step 1: Type cmd in the Search box and choose Run as administrator.
Step 2: Then, type chkdsk /f /x and press the Enter key.
Step 3: Follow the on-screen prompts to complete this operation. After that, you can restart your computer and see if the Windows 11 backup error has been fixed or not.
Fix 4: Delete the WindowsImageBackup Folder
As likely as not you have created a system image of your drive that is not totally the same as the backed-up data. The result will be saved in an inaccessible folder named WindowsImageBackup. You cannot access it unless you operate under administrator privileges.
You can delete the WindowsImageBackup folder exactly the same way as you delete any other folder on your PC. To solve Windows 11 backup error, deleting the failed backup and creating a new image may be a good choice.
Step 1. Type cmd in the Search box and choose Run as administrator.
Step 2. Type the following command and press Enter. You can replace F with the correct drive letter for the backup external drive.
dir /s /a F:\WindowsImageBackup
Step 3. Copy the next command and press Enter to delete the folder.
rd /s /q F:\WindowsImageBackup
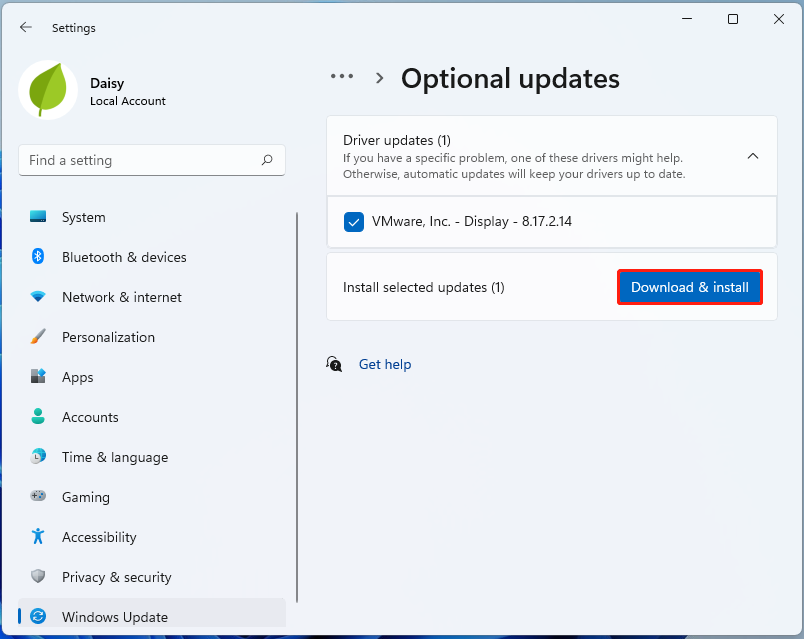
Fix 5: Update Outdated Drivers
Since the Windows 11 backup error can also be caused by the outdated driver. You can update the outdated drivers to remove the issue. Here are the steps:
Step 1: Press the Windows + I keys together to open the Settings application.
Step 2: Go to Windows Update and select Advanced options.
Step 3: Go to Optional updates. Select Driver updates and proceed to Download & install. After downloading and installing the update, restart your system.
Fix 6: Remove the Reparse Point
If the reparse point points to a volume with a FAT file system, delete it first, then use the built-in backup utility to back up your system. Here is how to remove the reparse point.
Step 1. Type cmd in the Search box and choose Run as administrator.
Step 2: Type dir /al /s in the command prompt window. Then, you will see the junction point and its location.
Step 3: Go to the location of the junction point. Right-click it and select Properties from the context menu, then go to the General tab and check if the folder type is Mounted Volume. If so, please delete this file.
Fix 7: Enable Sync on Windows 11 Backup
If the above solutions are not working, you can try to enable sync on Windows 11 backup. Follow the steps below:
Step 1: Press the Windows + I keys together to open the Settings application.
Step 2: Click the Accounts part in the left panel. Then, click Windows backup and click Manage sync settings.
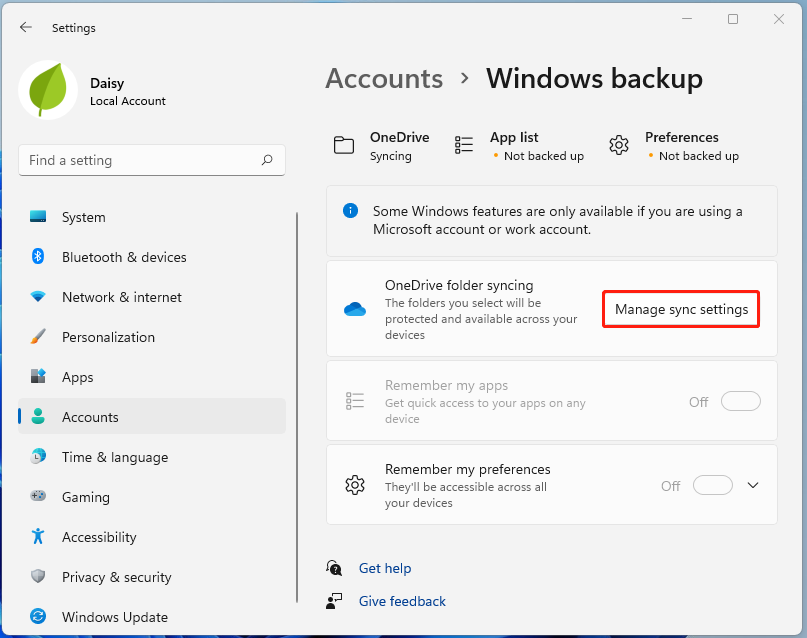
Step 3: The folders you select will be protected and available across your devices. A new window will pop up. Within it, you can manage folder backup in Windows 11 OneDrive and decide which folder(s) to be backed up. Selected folders will sync in OneDrive. New and existing files will be added to OneDrive, backed up, and available on your other devices even if you lose this PC.
How to Back up Windows 11 with Other Programs
After fixing the Windows 11 backup error issue, you may think the Windows 11 built-in backup tool is not great. You can also use a piece of third-party software to back up your Windows 11. MiniTool ShadowMaker is a good choice. It is a piece of reliable and professional backup software for Windows 11/10/8/7, which can easily back up your files, disks, partitions, and operating system.
This software allows you to perform an automatic backup, as well as incremental and differential backup. Besides, you can use it to make advanced settings to automatically delete previous backup files so that the backup disk will never run out of space.
MiniTool offers a Trial Edition of this software that allows you for 30 days for free. Just download it by clicking the button below to have a try.
MiniTool ShadowMaker TrialClick to Download100%Clean & Safe
Now, let’s see how to back up Windows 11 with MiniTool ShadowMaker:
Step 1: After downloading and installing MiniTool ShadowMaker, open it. Then, click Keep Trial to continue.
Step 2: Go to the Backup feature where you will see system partition(s), as well as the destination folder for image storage, are selected by this software.
You can enter the corresponding section to reselect the backup source and storage location. In addition to Windows OS, files, disks or partitions can be backed up, it is allowed to back up your PC to an external hard drive, USB flash drive, and NAS.
Step 3: After deciding the backup source and target, you can make an advanced setting to delete Windows image backups automatically with MiniTool ShadowMaker.
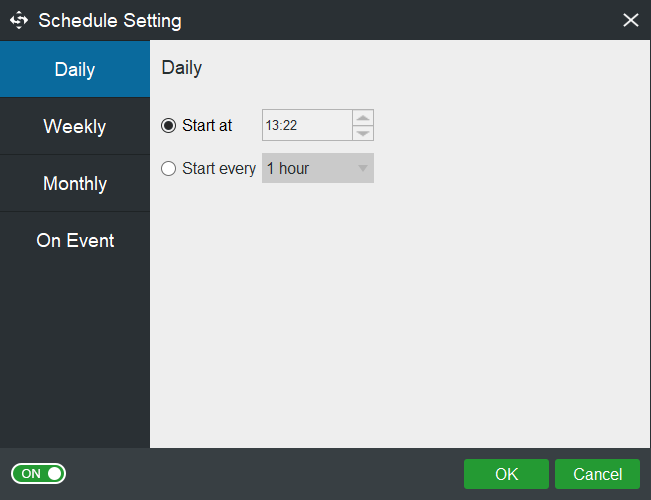
Besides, you had better make a scheduled plan for the backup. Thankfully, MiniTool ShadowMaker allows you to back up your computer daily, weekly, monthly, or on event. Just click the Schedule button before clicking Back up Now. Then, set the schedule and MiniTool ShadowMaker will start automatically backing up your data at a specific time.
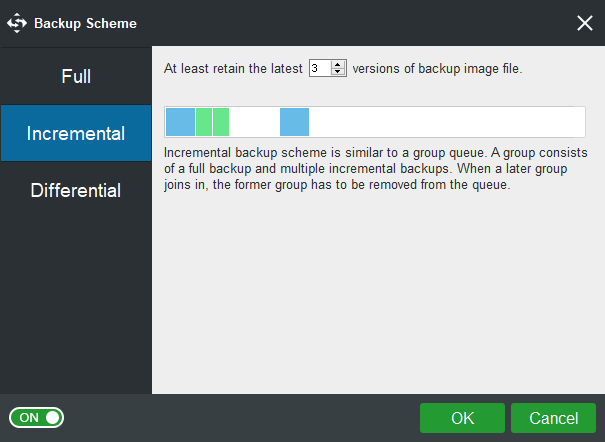
Minitool ShadoaMaker also allows you to create various backups, including full backups, incremental backups, and differential backups. If you want to do that, refer to this post – full backup, incremental backup, and differential backup. You can go to Scheme to set.
Step 4: Finally, go back to the Backup page and click Back up Now button to execute the backup.
Further reading: Sync Data with MiniToolShadowMaker
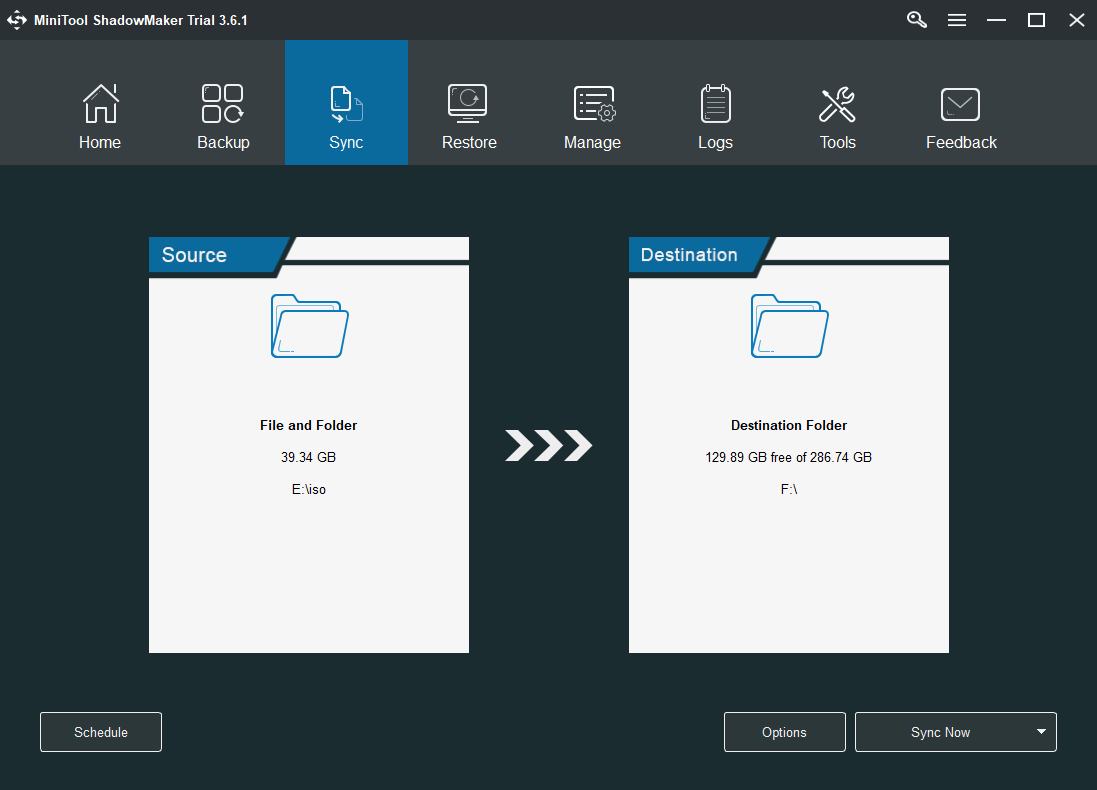
As for file sync data on local, MiniTool ShadowMaker can also satisfy your demands.
Step 1: After launching MiniTool ShadowMaker, go to the Sync page.
Step 2: Click the Source and Destination module to choose the files that you want to sync and the storage path.
Step 3: Click the Sync Now button to immediately perform the sync process. You need to notice that the sync feature of MiniTool ShadowMkaer is the one-way process
Also see: 5 Useful Solutions to Sync Files Among Multiple Computers
Final Words
Are you bothered by the annoyance: Windows 11 backup error? If you run into the error during the update processs, try the solutions above to easily get rid of that trouble. If you have any other ways to solve the backup issue, leave a comment below. Thanks in advance.


User Comments :