How to Fix Error 0x80071AC3? Do you Know the Answer?
When you want to back up your data on your computer to an external drive, you may receive an error message like Error 0x80071AC3: The operation could not be completed because the volume is dirty. Please run chkdsk and try again.
This issue always happens to external drives like USB flash drives, SD cards, memory cards, external hard drives, and more. Due to this issue, you will be unable to cut, copy, delete and edit files on the external drive. In other words, the drive is inaccessible.
Thus, the urgent thing you should do is to get rid of the error 0x80071AC3 the volume is dirty. In this post, we summarize some available solutions which can be used to resolve 0x80071AC3. You can try them one by one to help you out.
Solution 1: Run CHKDSK or Use the Error Checking Tool
When you receive error 0x80071AC3 the volume is dirty, you can see that there is a recommended way to solve this issue: running CHKDSK. Therefore, you can first run CHKDSK to have a try.
Additionally, the Windows Error Checking tool is the GUI (graphical) version of CHKDSK. Although it is not as powerful as CHKDSK since it doesn’t have some advanced options, you can still use it to identify and even correct a range of hard drive errors like file system issues & shield bad sectors.
If you think using CHKDSK is complex, you can directly use the Error Checking tool to resolve 0x80071AC3.
Option 1: Run CHKDSK
How to resolve 0x80071AC3 via CHKDSK? You can follow these steps:
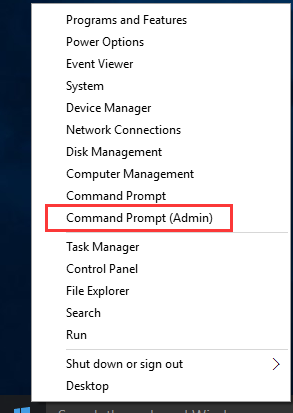
1. Press the Win + X keys at the same time to open the WinX menu.
2. Choose the Command Prompt (Admin) option to open the Command Prompt interface.
3. Type chkdsk g: /f /r into the interface and press Enter.
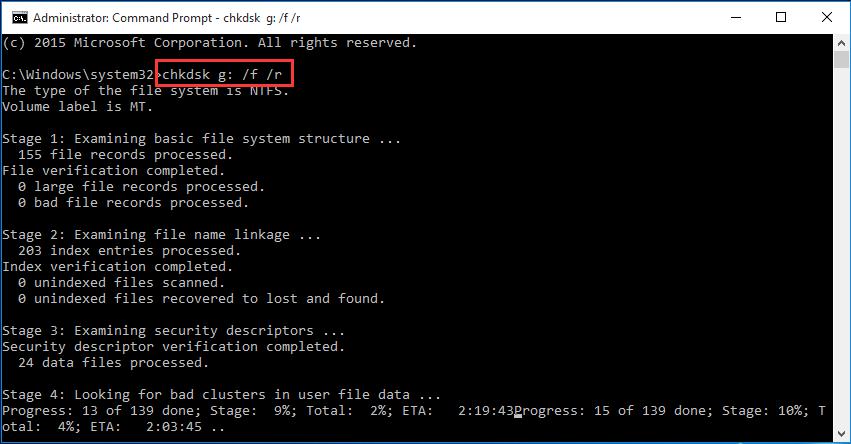
When the checking process finishes, you can go to see whether you can use the USB flash drive as normal.
Option 2: Use Error Checking Tool
The Error Checking tool is an alternative way for you to fix error 0x80071AC3.
How to fix error 0x80071AC3 with this tool? You can follow these steps:
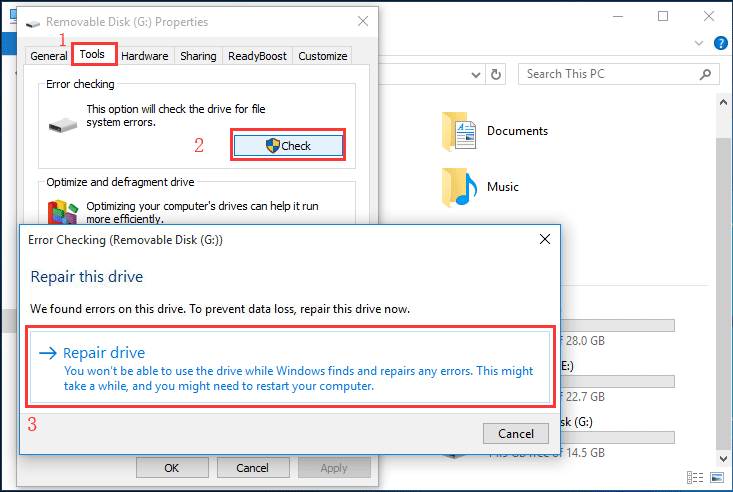
- Go to File Explorer > This PC.
- Right-click on the target USB flash drive and choose Properties from the popup menu.
- Switch to the Tools section and then press the Check button to start the checking process.
- If it finds errors on the drive, you need to press Repair drive to let Windows repair it. Perhaps, you still need to reboot your computer finally.
After these steps, you can go to see whether error 0x80071AC3 the operation could not be completed disappears.
If you still see this error, try the next solution.
Solution 2: Disable ReadyBoost
Some external USB drives are equipped with the ReadyBoost Disk Caching feature which is used to improve the performance of the drive. However, in some cases, it might lead to error 0x80071AC3 the volume is dirty when reading and writing to the drive.
So, you can go to see whether ReadyBoost is disabled. If not, disable it to have a try.
To do this job, you need to:
1. Repeat the first two steps mentioned in option 2 of solution 1 to enter Properties of Drive G:.
2. Tap ReadyBoost.
3. Check Do not use the device.
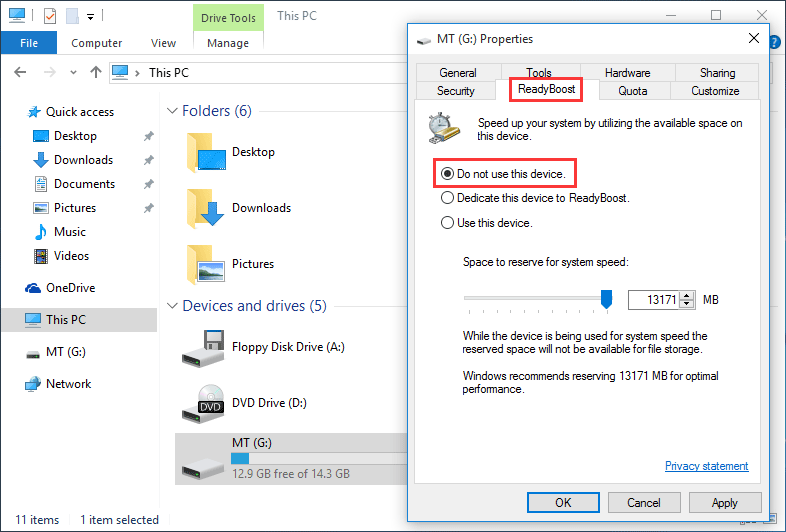
4. Click Apply and then press OK to keep the change.
If error 0x80071AC3 persists, perhaps you need to reinstall the driver for the drive.
Solution 3: Reinstall the Driver for the Faulty Disk Drive
How to get rid of error 0x80071AC3 the operation could not be completed through reinstalling the target driver? Please do these things:
1. Press Win + X to open the WinX
2. Choose Device Manager.
3. Double-click on Disk drives to expand it.
5. Find the drive that is influenced by error 0x80071AC3, right-click on it and then choose Uninstall.

6. Click OK on the confirm interface.
7. Unplug the drive from your computer and then reboot your machine.
8. Repeat step 1 and 2 to enter Device Manager.
9. Connect the USB flash drive to your computer.
10. Go to Action > Scan for hardware changes.
Wait until the reinstallation of the drive ends. After that, check whether the error code 0x80071AC3 disappears.
If this solution still doesn’t work, you can try another way: modify the registry. Go to see the next solution.
Solution 4: Modify the Registry to Allow Writing to the Drive
Another possible reason for error code 0x80071AC3 is that your computer’s Registry is configured to not allow your computer to write to drives in general or the drive that is bothered by this issue.
Thus, you need to modify the corresponding registry then.
1. Press Win + R keys at the same time to open Run.
2. Type regedit into the run dialog and press OK.
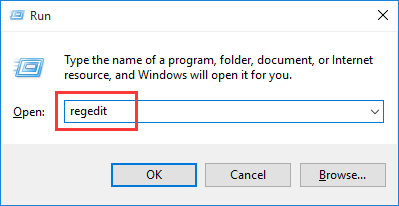
3. If you see the User Account Control interface, press Yes to continue.
After entering Registry Editor, Navigate to the following directory:
HKEY_LOCAL_MACHINE > SYSTEM > CurrentControlSet > Control
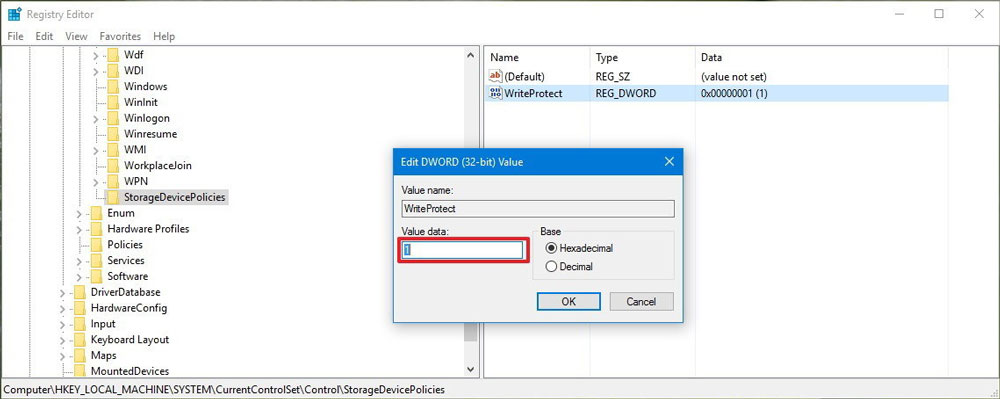
4. Locate StorageDevicePolicies and click it.
5. In the right pane, double-click WriteProtect to open it.
6. Check whether the value data is 1. If it is, replace it with 0 and press OK to save the change.
7. Close the Registry Editor and reboot your computer.
After the computer boots up successfully, you can go to check whether error 0x80071AC3 the volume is dirty is resolved.
If this issue still exists, perhaps, it’s time to format the drive to its normal state.
Solution 5: Format the Inaccessible Drive to Normal
Rescue Data before Formatting the Drive If Necessary
You know that formatting a drive will delete all data on the device. If there are some important files on it, you’d better rescue them first and then format it.
How to restore data from an inaccessible external drive? Indeed, you need to rely on a piece of third-party data recovery software – MiniTool Power Data Recovery.
This software is specially designed to retrieve your lost and deleted data from various types of storage devices. However, it can also scan the existing files on the selected drive. No matter you want to rescue data from a RAW partition, formatted partition, damaged partition, or a lost partition, you can just use this tool to have a try.
Firstly, you can try the Trial Edition of this software to see whether it can find the files you need to restore. Press the following button to get it.
MiniTool Power Data Recovery TrialClick to Download100%Clean & Safe
Then, in the following guide, we will walk you through the detailed steps to restore data from the inaccessible USB flash drive with this software.
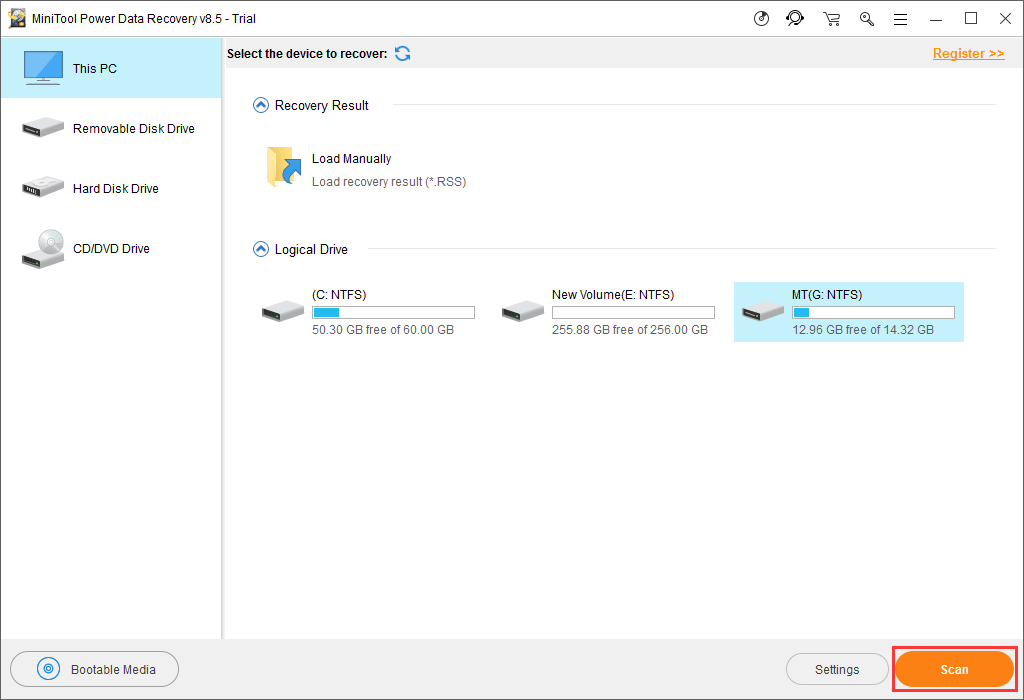
Step 1: Choose the USB Flash Drive to Scan
- Connect the USB flash drive to your computer and open the software.
- This PC module is displayed by default and the target drive is shown there automatically. Choose it and press the Scan button to start the scanning process.
Step 2: Find the Files You Need to Rescue
When the scanning process ends, you will see the scan results including existing and deleted items. Then, it’s time to find your needed files.
- Open each path to find the files you want to restore. However, you can also use the Type, Find and Filter features to locate your needed files quickly.
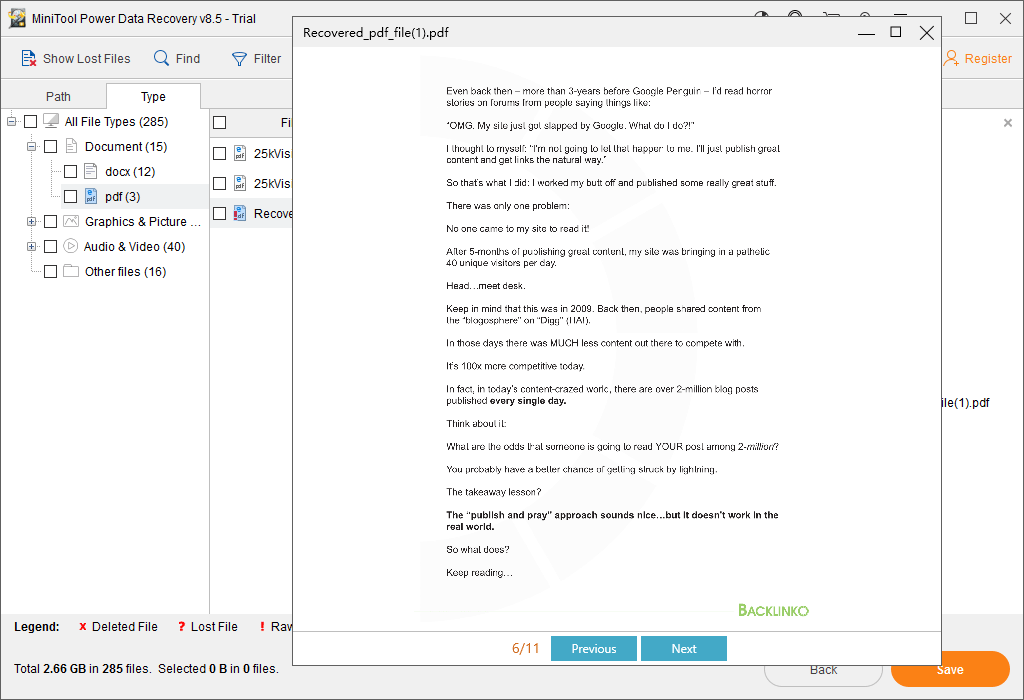
- Till now, this software supports previewing 70 types of files, and these files should be no larger than 100MB. Click on a file and press Preview to see whether it is your needed file.
Step 3: Update This Freeware to a Full Edition
With this free data recovery software, you are not allowed to save your needed files finally. However, you can update it to a full edition to do the job.
- Enter the MiniTool official site to get a proper edition according to your actual need. For example, if you are a personal user, the Personal Deluxe Edition can fully meet your need.
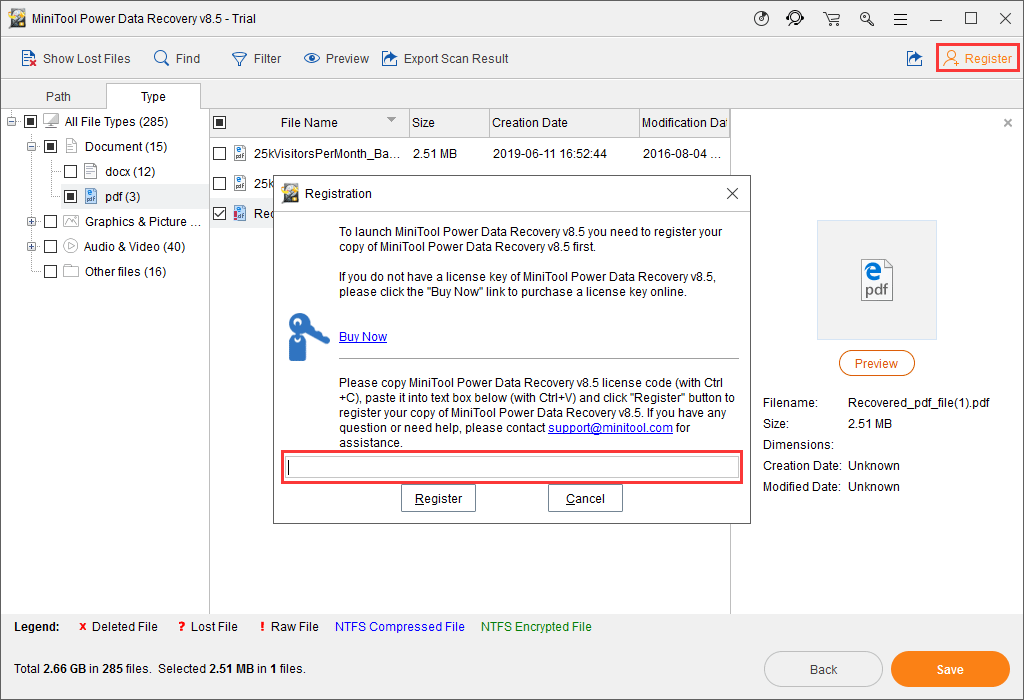
- Press the Register button on the software and copy & paste the license key you receive to the input box. Then, press the Register button to update the software directly.
Step 4: Check the Needed Data to Recover
- Check the files you want to restore and then press the Scan
- The software will inform you to choose a path to save the selected data. Remember that don’t choose the original path.
- Click OK to save the files.
Now, your wanted files are saved to a safe path. Then, you can feel free to format the drive to normal.
Format the Inaccessible Drive to Normal
There is more than one way to format an inaccessible drive and all of them are free:
- Format Partition feature of MiniTool Partition Wizard
- Windows built-in Disk Management
- Windows built-in Diskpart
There three ways are introduced in our previous article: How to Format USB Drive with Three Free USB Formatters Windows 10. We will not repeat them here.
After formatting the drive, the error 0x80071AC3 should be fixed and you can use it as usual then.
Suggestion: Back up Data Regularly
Day after day, year after year, you use different kinds of data storage devices to save your important data. But these files may get lost or corrupted suddenly. To keep them safe, you’d better back up your data regularly.
This professional backup software, MiniTool ShadowMaker, can be a good option. It can be used to back up the operating system, disks, partitions, files, and folders easily and quickly. In addition, you can create automatic backups with this software which can avoid a lot of trouble.
Likewise, you can first use the Trial Edition to experience this software free for 30 days.
MiniTool ShadowMaker TrialClick to Download100%Clean & Safe
Here is a related article which tells you how to use this program: 3 Ways to Create Automatic File Backup in Windows 10 Easily.
Bottom Line
Error 0x80071AC3 will not be a difficult issue if you master these 5 solutions mentioned in this post. When you are bothered by this problem, just try these solutions to help you out.
Should you have any questions when fixing this issue, you can contact us via [email protected], or let us know in the comment. You can also share your ideas and suggestions here.
Error 0x80071AC3 FAQ
- Use CHKDSK or the Error Checking Tool
- Disable ReadyBoost
- Reinstall the device driver
- Modify the registry to allow writing to the drive
- Format the Inaccessible drive to its normal state
- Press Win + R to open Run.
- Type cmd and press Enter.
- Input the command line of chkdsk and press Enter.
You can also use more parameters like chkdsk c: /r /f.
About The Author

Position: Columnist
Stella has been working in MiniTool Software as an English Editor for more than 8 years. Her articles mainly cover the fields of data recovery including storage media data recovery, phone data recovery, and photo recovery, videos download, partition management, and video & audio format conversions.
User Comments :