Mac Boots into a Flashing Folder with a Question Mark
If your Mac boots into a flashing folder with a question mark, it usually means that your Mac can’t find the start-up disk or the start-up doesn’t contain a working Mac operating system so it can’t boot into your Mac OS. When this issue happens, you will see the following interface.

Reasons for Mac Folder with Question Mark
If you want to solve this issue, you should figure out the cause of this problem first. Here are some possible reasons:
- Some faulty peripheral devices corrupt your Mac
- The cable connecting the driver and the motherboard is loose or damaged.
- The system files for Mac start-up and boot are corrupt.
- The startup disk fails.
In response to these reasons, we will provide some corresponding solutions and show them in this article.

Preparation: Back up Your Mac Data
If the files on your Mac are valuable, you should back them up before fixing the Mac question mark folder on startup issue to ensure data security. You can use Stellar Data Recovery for Mac, a special Mac data recovery software, to rescue your files.
You can use this software to create a USB recovery drive, then start your Mac from this bootable USB for data recovery.
Step 1: Preparations
- You need to have a normal working Mac device at hand to create a recovery drive.
- You need to prepare a USB drive that has at least 8GB of space. There should not be important data in it because the creation process will erase the USB drive.
- Prepare an external hard drive that has enough free space to save your needed files.
- Get a full edition of Stellar Data Recovery for Mac from the MiniTool official site and register it on the normal working Mac.
Step 2: Create a USB Recovery Drive
1. Connect the USB drive to the normal working computer via a USB port.
2. Open the software on the normal running Mac computer.
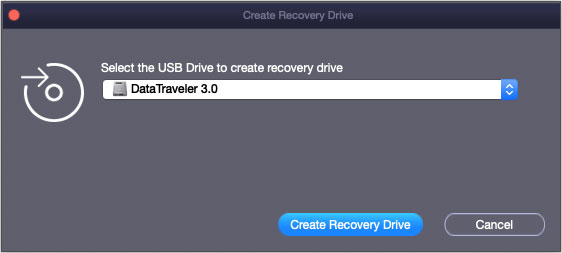
3. Click the Click here link next to Create Recovery Drive on the bottom of the software interface.
4. On the pop-up interface, select the target USB drive.
5. Click Create Recovery Drive to continue.
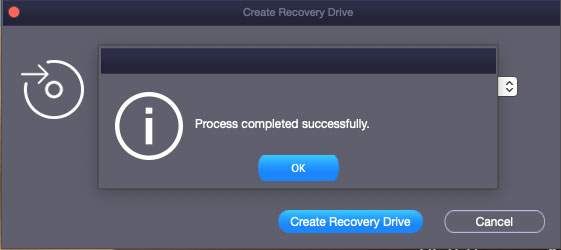
6. When the creation process ends, click OK to exit.
7. Unplug the USB drive.
Step 3: Rescue Your Mac Data
1. Connect the USB drive and the prepared external hard drive to your Mac that is bothered by folder with question mark on startup.
2. Press the Power button and immediately press & hold the Option key.
3. Release the key when you see the startup manager screen.
4. You can see all the drives that are connected. Select the USB Recovery Drive and press the Return key. Then, your Mac will boot from the selected USB recovery drive
5. Select StellarDataRecovery and click Continue.
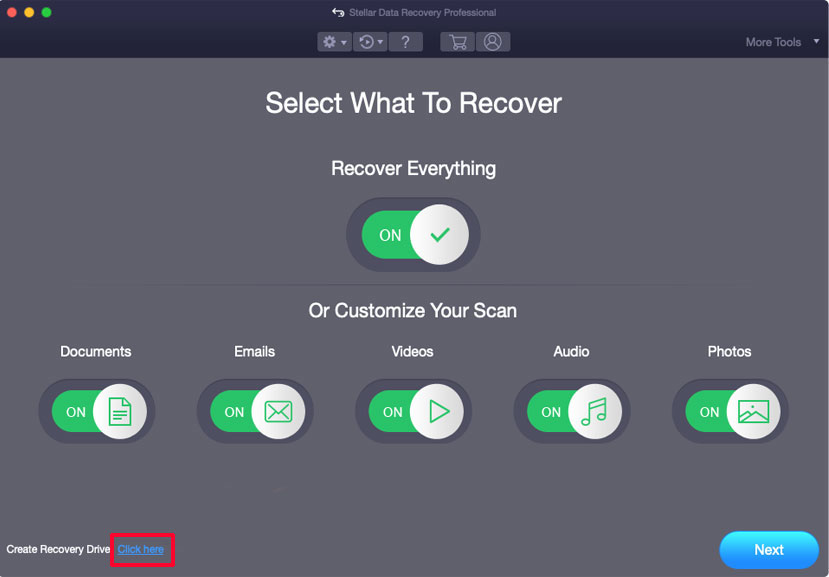
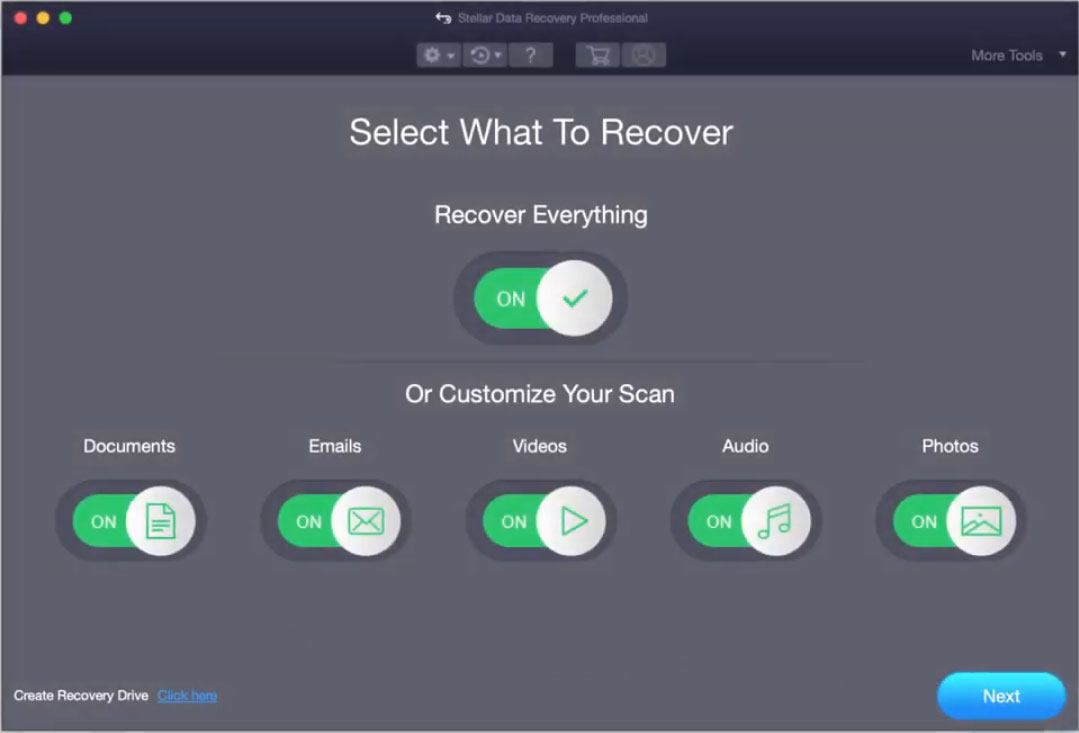
6. When you see the software interface, you need to select the data types you want to rescue.
7. Click Next.
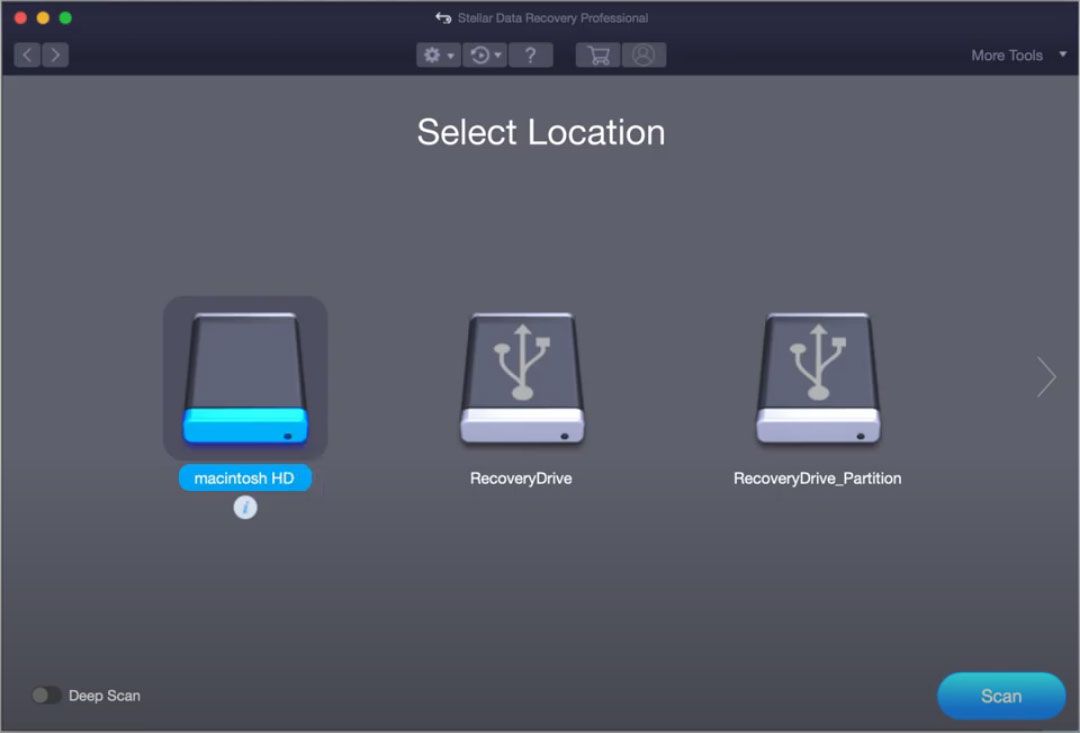
8. Select the drive you want to recover data from. If you want to perform a deep scan, you need to turn on the button next to Deep Scan on the bottom.
9. Click Scan.
10. The software begins to scan the selected drive. This process will last for a while. You should wait until the whole process ends.
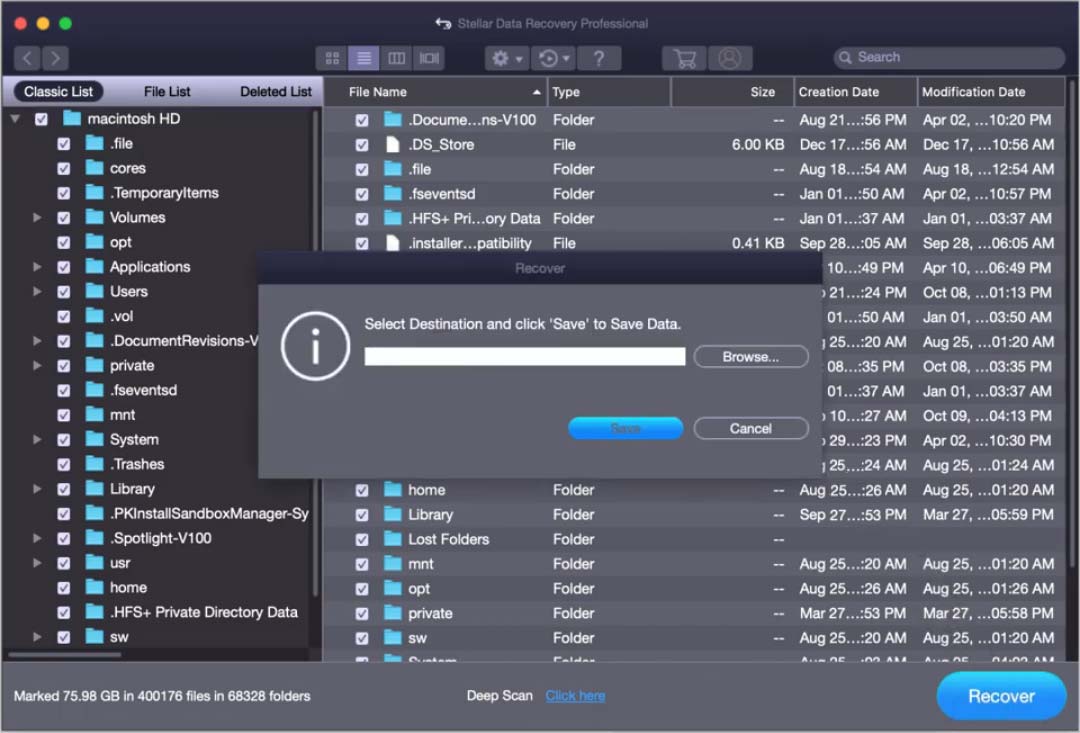
11. After scanning, you can see the scan results including both the existing and deleted files on your Mac. You can select your needed files to recover. If you are not sure, you can double-click the file to preview it and make a confirmation.
12. After selecting your needed files, you can click the Recover button and select the connected external hard drive as the destination storage drive. Then, click Save to store the files to the selected drive.
After backing up your Mac, you can repair your Mac issue without data loss.
Solution 1: Restart Your Mac
Sometimes, a simple restart will solve this problem. It won’t cost you a lot of time. You can just have a try.
- Press and hold the Power button for seconds until your Mac completely shuts down.
- Press the Power button again to restart your Mac.
Check whether your Mac can normally boot up this time.
Solution 2: Disconnect All the Peripheral Devices
Perhaps, there should be something wrong with the connected peripheral devices, causing your Mac to boot into a flashing folder with a question mark. To rule out this possibility, you should remove all the third-party devices from your Mac.
- Shut down your Mac. If you can’t power off the device using a normal way, you can force shut it down by pressing and holding the Power button for seconds until it shuts down.
- Unplug all your peripheral devices including external hard drives, SD cards, memory cards, printers, and the Ethernet cables that are connected to your MC.
- Restart your Mac and see whether it can boot normally.
If you still can see the question mark folder on Mac, the peripheral devices should not be the cause. Then, you can try the next method.
Solution 3: Reset NVRAM/PRAM
NVRAM/PRAM saves the settings like sound volume, display resolution, start-up disk selection, time zone, and the recent kernel panic information. Since the folder with question mark Mac issue can be a startup disk issue, you can reset NVRAM/PRAM to have a try.
It’s quite easy to do this:
- (Force) Shut down your Mac.
- Turn on your computer and immediately press Option-Command-P-R together.
- Release the key after about 20 seconds. You can also decide whether to release these buttons based on the following conditions:
- If your Mac can play a startup sound, you can release these keys after you head the second startup sound.
- If your Mac has an Apple T2 Security Chip, you can release the keys after the Apple logo appears and disappears for the second time.
After these steps, you can check whether your Mac can boot normally. If the issue persists, you can try the next solution.
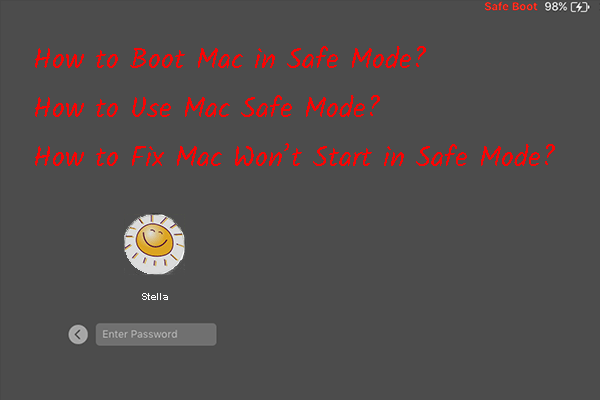
Solution 4: Start Your Mac into Safe Mode
Start your Mac into Safe Mode can help you check whether the issue is caused by software that loads along with your Mac start-up.
The ways to start up an Intel-based Mac and a Mac with Apple silicon in safe mode are different.
If you are using an Intel-based Mac, you can follow these steps to boot your Mac into Safe Mode:
- Shut down your Mac and wait about 10 seconds.
- Restart your Mac and immediately press & hold the Shift key.
- When you see the login screen, you can release the key. Then, you will see your Mac Safe Mode.
If you are using a Mac with Apple silicon, you can follow these steps to boot your Mac into Safe Mode:
- Shut down your Mac and wait about 10 seconds.
- Press and hold the Power button until you see the startup options window with available startup disks and Options.
- Select a startup disk.
- Press and hold the Shift key, click Continue in Safe Mode, and release the Shift key.
Here are two results:
- If the issue disappears in Safe Mode, you can exit Safe Mode and restart your computer. The issue should be solved.
- However, if the issue persists in Mac Safe Mode, you should reinstall your macOS and guarantee that your Apple software & third-party apps are up-to-date. If you want to reinstall macOS, you can skip to solution 7.
Solution 5: Make Sure the Preferred Start-up Disk Is Selected
If your Mac computer is not selected to boot from the start-up disk, it will not boot successfully. So, you need to make sure that your preferred start-up disk is selected.
- Boot your Mac into Safe Mode.
- Log in to your Mac.
- Click the Apple menu on the top and go to System Preferences.
- Click Startup Disk.
- Click the icon of the disk you want to use as the start-up disk.
- Click Restart.
After these steps, the issue should be solved and your Mac should be able to boot normally.
However, if you still see the folder with question mark Mac on startup, there should be something wrong with the start-up disk. You can use Disk Utility to fix it.
Solution 6: Use Disk Utility to Repair the Start-up Disk
Since your Mac won’t boot up normally, you need to first boot your Mac into Recovery and then access Disk Utility to fix the start-up disk.
- Shut down your Mac completely.
- Press the Power button and press Command-R at the same time.
- When you see the Apple logo, you can release the keys.
- Enter your password if prompt.
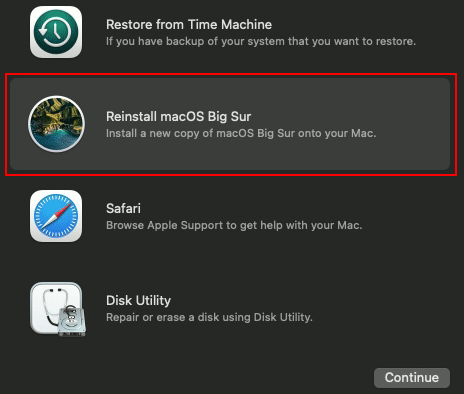
- You can see the macOS Utilities interface and this means that you enter Mac Recovery Mode.
- Disk Utility is the final option on the screen. Select it and click Continue to open Disk Utility.
- In Disk Utility, choose View > Show All Devices from the menu bar or toolbar. Then, you can see all the available disks from the sidebar. The first disk is your start-up disk.
- Select the first disk from the sidebar and click the First Aid button.
- A small window pops up. Click Run to start repairing the disk. If you can’t see Run, there should be a Repair Disk button instead. You should click it to continue.
- First Aid will begin to check your start-up disk for errors. It can automatically fix the found errors.
After that, you can restart your Mac as usual and see whether the issue is solved. If the result is positive, everything is OK now. If not, you will need to reinstall macOS.

Keep reading.
Solution 7: Reinstall Your MacOS
If all of the above methods can’t solve question mark folder on Mac, your macOS should be damaged and you need to reinstall it. You can still do this job in Mac Recovery Mode.
- Force shut down your Mac.
- Restart your Mac into Recovery Mode.
- Select Reinstall macOS in the macOS Utilities interface and click Continue.
- Follow the on-screen instructions to reinstall macOS on your computer.
After the reinstallation, the issues should disappear and you can normally boot your Mac.
Solution 8: Replace the Damaged Start-up Disk
If your Mac still boots into a flashing folder with a question mark or it can’t boot normally, the start-up disk should be corrupt. You can contact Apple Support for help. If necessary, you may need to replace the damaged start-up disk.
Bottom Line
When your Mac starts into a flashing folder with a question mark, you can just try the solutions mentioned in this article to help you out. There should be a suitable method for you. Should you have other suggestions or related issues, you can let us know in the comments or contact us by sending an email to [email protected].
About The Author

Position: Columnist
Stella has been working in MiniTool Software as an English Editor for more than 8 years. Her articles mainly cover the fields of data recovery including storage media data recovery, phone data recovery, and photo recovery, videos download, partition management, and video & audio format conversions.
User Comments :