How to format a USB drive without losing data? This MiniTool post tells you everything. First of all, back up files or recover important data to another location. After that, learn how to format a normal or problematic USB flash drive through Settings, Disk Management, or CMD.
What Does Formatting a USB Do
USB format is an operation to reinitialize the USB drive. It’s not only a way to clean up data, but also a crucial step to ensure device compatibility and performance. Here’s what formatting a USB drive does:
1. Erase data (It depends on which format you choose.)
- If you choose full format, all files and folders on the USB drive will be deleted. They’re not hidden, and completely gone.
- If you choose quick format, this quickly clears the file directory so that the data appears to be deleted, but the contents may still be recoverable.
2. Set the file system
This determines how data is stored and accessed. Common file systems include:
- FAT32: Compatible with most devices, but limited to 4GB file size.
- exFAT: Supports files larger than 4GB and ultra-large partitions, is compatible with multiple platforms, and is more efficient than FAT32.
- NTFS: Works with Windows, supports large files and permissions, but isn’t always compatible with Macs or gaming consoles.
3. Repair errors or corruption
If your USB drive malfunctions, formatting can fix problems caused by file system corruption.
4. Prepare for a specific use
You can format a USB drive to make it bootable, for use with a specific operating system, or to erase it before giving it to someone else.
Format Type: Quick Format & Full Format
There are two ways to format. Understand their differences and choose a more suitable formatting method.
1. Quick Format
A quick format is a very fast formatting method. It primarily clears the file system index information, but the actual file contents remain on the storage device. They are simply invisible.
Since it doesn’t erase the data or check the disk for bad sectors, it’s very fast, typically taking only seconds to minutes.
This method is suitable for situations where your device is functioning normally and you simply want to quickly clear data for reuse, such as cleaning a USB drive.
However, please note that data can still be retrieved by recovery tools, making it unsuitable for handling sensitive information or for giving the device away.
2. Full Format
A full format is a more thorough process. It not only deletes all files but also scans the entire drive sector by sector. It can check for bad sectors and mark these damaged areas to prevent future problems.
Furthermore, it erases the data, making recovery very difficult or even impossible. Since this process is more complex, it is much slower than a quick format and can take tens of minutes, especially on large hard drives.
A full format is suitable for the following situations:
- The device has experienced read/write errors or file corruption.
- You are planning to give the device away or sell it.
- You need to ensure that data is completely erased to protect privacy.
- You want to start using the device in a healthy state again.
Can You Format a USB Drive Without Losing Data
Not really. Formatting a USB drive always erases the existing file system. It means the data will be inaccessible and usually deleted. However, you can back up important data or restore it to a safe place before formatting to avoid data loss.
Here are two situations.
- If it’s a working drive, copy all the contents to another drive or back up files.
- If it’s a faulty USB drive, perform data recovery first, and then format it.
How to Format a Problematic USB Drive on Windows
When your USB drive is corrupted and inaccessible, you should use data recovery software to recover data first.
Step 1: Recover Files Using MiniTool Power Data Recovery
Here, I would like to introduce MiniTool Power Data Recovery to recover files. Its advantages are as follows.
- Supports various data loss scenarios. Whether it’s accidental file deletion, formatting errors, virus attacks, system crashes, or even a USB drive that requires formatting, MiniTool can handle it.
- Provides deep scan technology. It performs sector-level scans on USB drives to recover files that have been deleted, lost, or are even on logically damaged partitions.
- Supports a variety of file types. This tool recovers nearly all file formats, including photos, videos, documents, and audio, meeting various recovery needs.
- Owns strong compatibility. It supports Windows 11/10/8/7, and works with various devices, including USB drives, SD cards, HDDs, and SSDs.
The free edition of this software can recover up to 1 GB of data, making it ideal for lightweight recovery tasks. Download and install MiniTool Power Data Recovery Free to do a USB data recovery.
MiniTool Power Data Recovery FreeClick to Download100%Clean & Safe
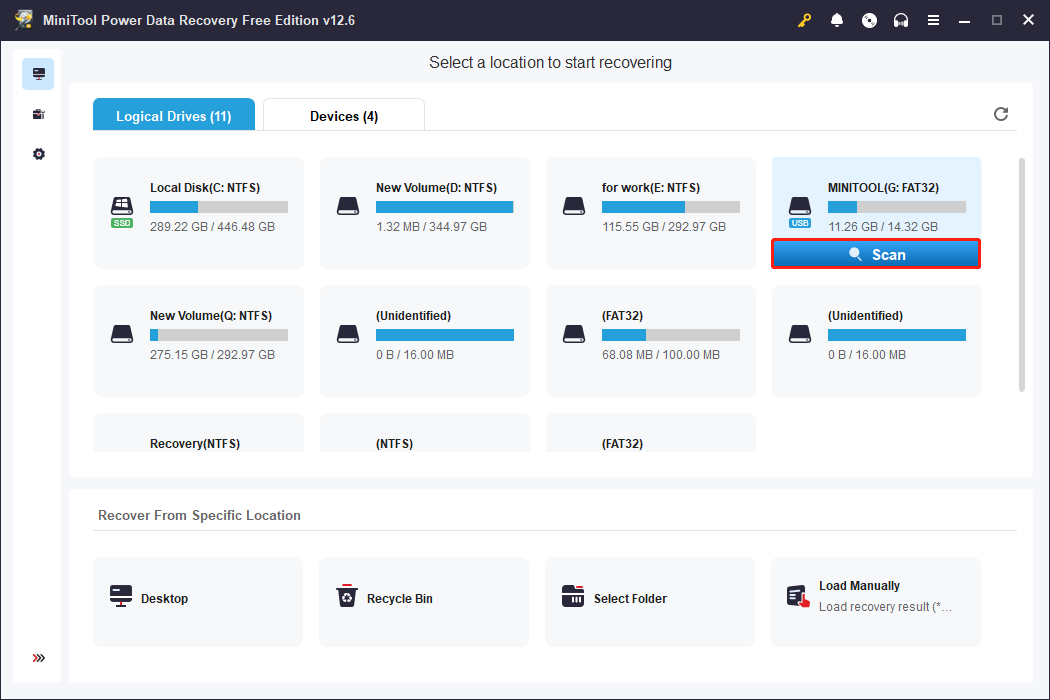
Step 1: Open the software and scan your USB drive
Launch MiniTool Power Data Recovery. When in the Logical Drives section, find the USB drive, move your cursor to the section, and click Scan to scan for data.
Alternatively, in the Devices tab, locate your device and click Scan to scan the whole disk.
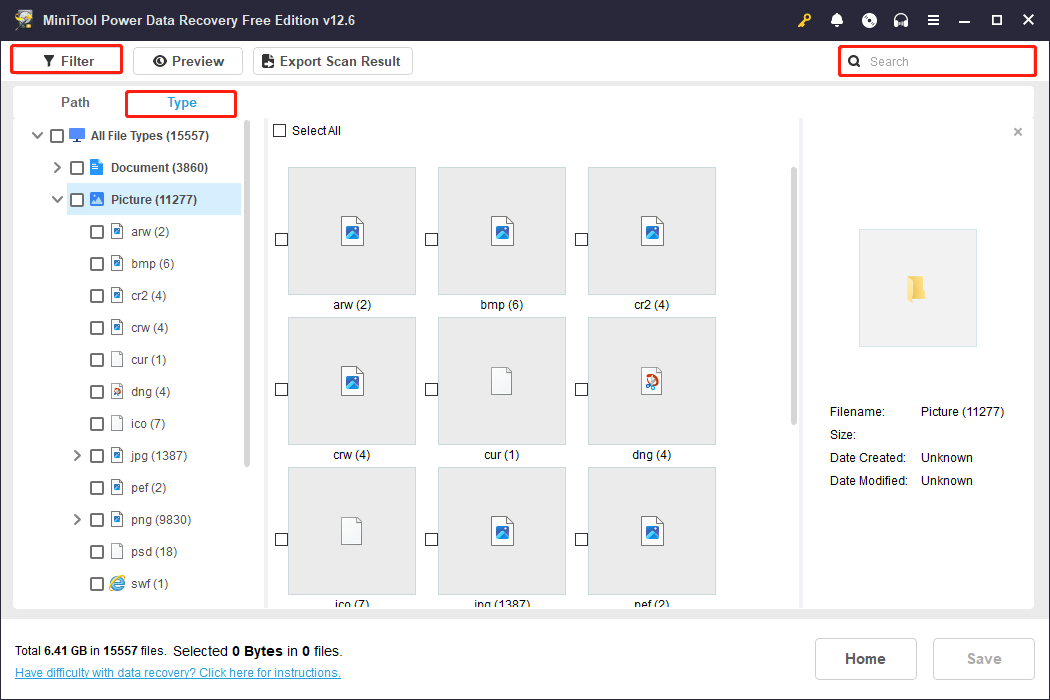
Step 2: Try Type, Filter, and Search to locate the files you want
Wait patiently for the scanning process to complete. The length of time depends on the size of your disk and the amount of data stored.
When it ends, all the files on your drive will be listed under the Path tab. You can expand the Deleted Files, Lost Files, or Existing Files to find files based on the file structure.
Besides this, these three features, Type, Filter, and Search, can also help you find the target files.
- The Type feature will automatically classify the scanned files by file type, such as documents, videos, audio, etc. If you want to find a certain type of file, switch to the Type tab and expand All File Types.
- The Filter feature allows you to set the filter conditions at once. It includes file type, modification date, file size, and file category.
- The Search feature supports precise search and fuzzy search. As long as you remember the keywords of the file name, you can quickly locate the file you want.
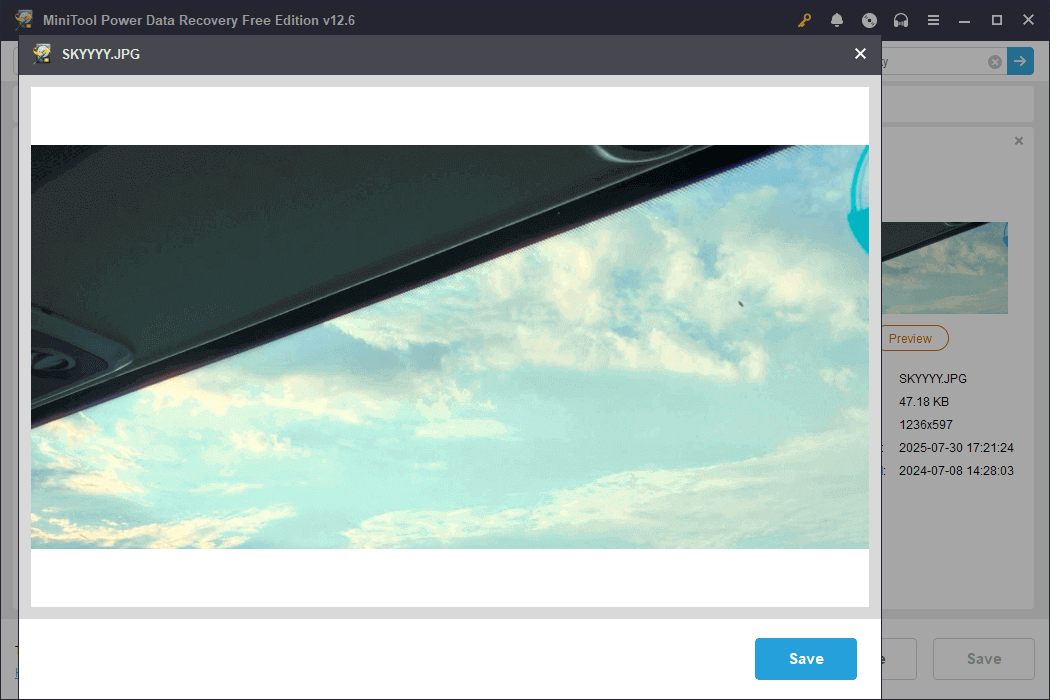
Step 3: Check the file content using the Preview feature
After finding the file, do not restore it immediately. If you restore the wrong file, you will waste the free recovery capacity.
You need to preview the files you want to restore in advance. Double-click them one by one and proceed to the last step after confirming them.
Step 4: Save all the files to a new location
Tick all the files and hit the Save button. A window will pop up where you need to choose a safe location. It is used to store the recovered files. After selecting, click OK to start the recovery process.
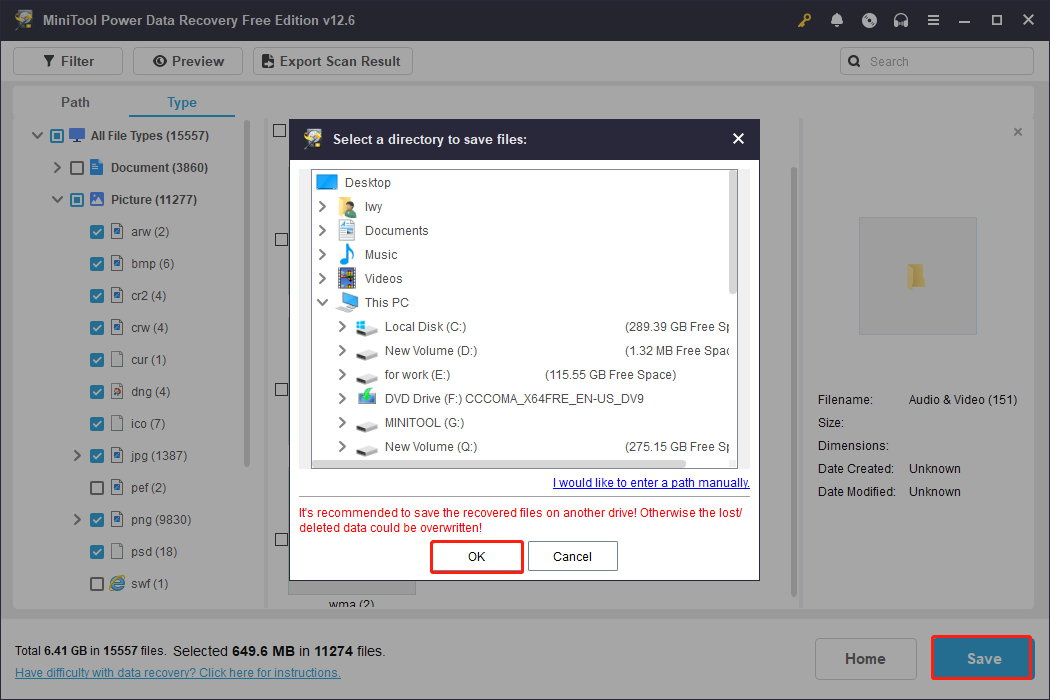
When the Recovery Completed window shows, close the software and check your files.
Step 2: Format Your USB Drive
After recovering important files, you can perform a formatting. Now learn how to format a USB drive.
Way 1: With File Explorer
Step 1: Press Win + E to open File Explorer.
Step 2: In the left pane, find and right-click your drive to choose Format.
Step 3: Select the file system according to your needs and set the volume label.
Step 4: Check the box for Quick Format or not, and then click Start.
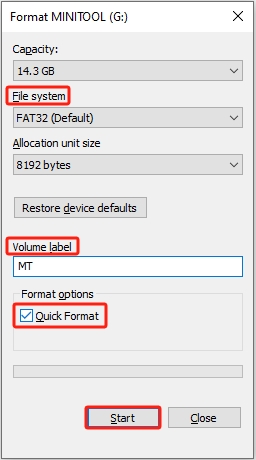
Step 5: Finally, click OK in the new box to confirm the change.
Way 2: Through Disk Management
Step 1: Right-click Windows and choose Disk Management.
Step 2: Locate and right-click your drive, and choose Format.
Step 3: Set the volume label and choose a suitable file system.
Step 4: Tick the box for Perform a quick format and click OK.
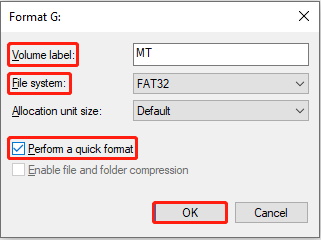
Step 5: Click OK again to start the formatting.
Way 3: Use Diskpart
Using Diskpart is also a way to format the USB drive.
Step 1: Type Command Prompt in the Windows search bar, right-click the best match, and select Run as administrator.
Step 2: Enter the following commands one by one and press Enter after each:
- Diskpart (Launch Diskpart)
- list disk (List all disks)
- select disk G (Select the USB drive)
- clean (Clean the drive)
- create partition primary (Create a new primary partition)
- format fs=exfat quick (Format the partition with the specified file system using quick format. You can replace exfat with fat32 or ntfs depending on your needs.)
- assign (Assign a drive letter automatically)
- exit (Exit Diskpart)
Now, your USB drive is now freshly formatted and ready to use.
Way 4: Try MiniTool Partition Wizard
MiniTool Partition Wizard is a powerful disk partition management tool. With its Format feature, you can easily format a USB drive to FAT32, NTFS, exFAT, or other file systems to ensure compatibility with different devices.
Steps to format a USB drive:
Step 1: Download and launch MiniTool Partition Wizard.
MiniTool Partition Wizard FreeClick to Download100%Clean & Safe
Step 2: Select your USB and click Format Partition under Partition Management.
Step 3: Set the partition label, choose the file system, and click OK.
Step 4: In the main interface, click Apply to perform this operation.
What if the USB Drive Is Still Not Working
Way 1: Use Windows Built-in Tools
Disk Check Tool for Windows can fix various USB problems, including USB unrecognition, file system errors, drive corruption, RAW format, “Please insert a disk” prompt, etc.
Step 1: Open File Explorer, right-click your USB drive, and choose Properties.
Step 2: Switch to the Tools tab and click Check.
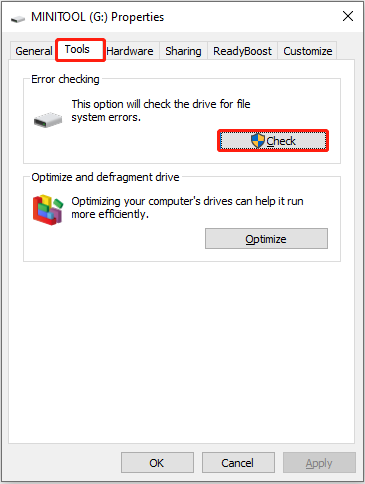
Step 3: In the new window, click Scan drive. Windows scans for and attempts to repair file system errors without deleting your data.
Way 2: Run CHKDSK
Using chkdsk to fix USB issues is an efficient and powerful method, especially for situations such as file system corruption, USB not being recognized, or USB in RAW format.
Step 1: Type cmd in the Windows search box, right-click Command Prompt, and choose Run as administrator.
Step 2: Enter chkdsk G: /f /r in the window and press Enter to execute this command. Replace G with your USB drive letter.
Wait for the scan and repair to complete. The command window will prompt whether errors were found and fixed.
Way 3: Run Hardware and Device Troubleshooter
You can run Hardware and Device Troubleshooter. This tool will scan your system and automatically identify USB-related hardware failures.
Step 1: Press Win + I to open Settings and choose Update & Security.
Step 2: Go to the Troubleshoot section and click Additional troubleshooters.
Step 3: Find and click the target hardware, and click Run the troubleshooter to fix related issues.
Way 4: Reinstall the USB Driver
Windows may not correctly recognize the USB device. Reinstalling the driver can force the system to re-recognize and load the correct driver.
Step 1: Press Win + X and choose Device Manager.
Step 2: Double-click Disk drives, right-click your driver card, and choose Uninstall device.
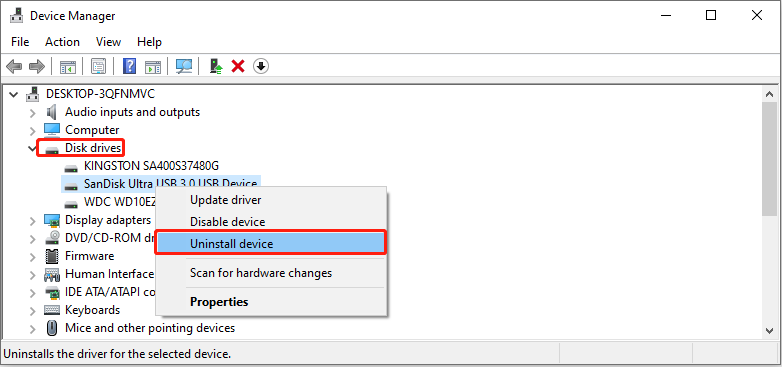
Step 3: Click Uninstall in the new prompt box.
After the process is completed, restart your computer, and Windows will automatically install the new driver for you.
How to Format a Working USB Drive on Windows
Step 1: Back up Files Using MiniTool ShadowMaker
Using MiniTool ShadowMaker to back up your USB drive is a very reliable and efficient option. It can create an image file of the entire drive, including all files, partition structure, and even system configuration.
It can set the compression level to make the backup file smaller and save hard disk space. If your USB drive becomes corrupted or data is lost, you can quickly restore it from the backup image.
Step 1: Download and install MiniTool ShadowMaker on your computer.
MiniTool ShadowMaker TrialClick to Download100%Clean & Safe
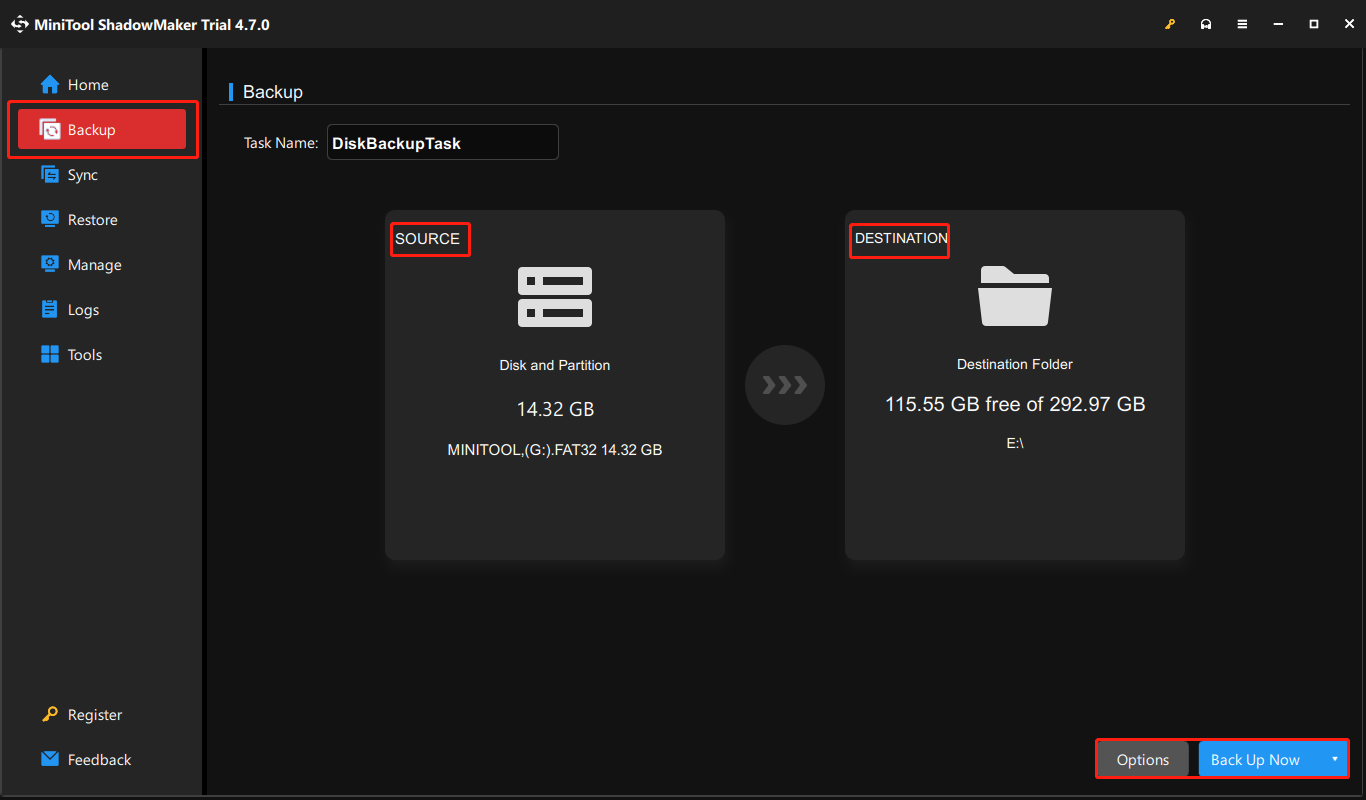
Step 2: Open the software, click Keep Trial, and go to the Backup tab.
Step 3: Click the SOURCE section to choose Disk and Partitions. In the window that pops up, select your USB device and its partitions. Once you’ve made your selection, click OK to go back to the main interface.
Step 4: Hit the DESTINATION section to choose a location to save the backup file. Then, click OK.
Step 5: Click Options to set high, medium, or low compression to save space, choose between full, incremental, or differential backups, and set automatic daily, weekly, or monthly backups.
Step 6: Finally, click Back Up Now to start the backup process. The system will start creating the backup image file.
Step 2: Format the USB Drive
Now, it’s time to format your USB drive. Format it according to the method mentioned above, such as using Disk Management, Diskpart, or MiniTool Partition Wizard.
Wrapping Things Up
I believe you have a deeper understanding of USB drive formatting. If you want to format a USB drive that works well without losing files, remember to back it up first.
If you want to format a USB drive with problems, first use MiniTool Power Data Recovery to scan and recover inaccessible disks. After that, format your USB drive with confidence.
When you use MiniTool products for the first time, you may have some questions. Contact us via [email protected], and we will do our best to answer them for you.
About The Author

Position: Columnist
Chelsea graduated from university with a major in English. She has a strong interest in English writing. It is this passion for writing that led her to become an English editor. Her articles mainly focus on data recovery and other computer industry news. As an energetic and outgoing girl, Chelsea enjoys listening to music, singing, riding bikes, and eating in her spare time.
User Comments :