
BitLocker Manager is a feature in MiniTool Partition Wizard that helps users manage BitLocker encryption more conveniently. It allows users to turn BitLocker on or off, and lock or unlock encrypted drives directly from the disk management interface, improving efficiency and usability when handling encrypted disks.
About BitLocker Manager
BitLocker is a Windows built-in encryption feature. It is designed to protect data by encrypting entire drives. However, managing BitLocker through Windows settings can be time-consuming for some users.
BitLocker Manager is an integrated feature in MiniTool Partition Wizard that works with the built-in Windows BitLocker encryption system. It is designed for users who need to manage encrypted drives without switching between Windows Settings and disk management tools. It is particularly useful when working with BitLocker-protected partitions during disk operations.
This feature allows users to easily manage BitLocker encryption on their drives, including turning BitLocker on or off and locking or unlocking the drive. It also allows users to manage BitLocker-protected drives alongside partition and disk operations, making encrypted drive management more convenient and flexible.
MiniTool Partition Wizard FreeClick to Download100%Clean & Safe
How to Use BitLocker Manager
How to Turn on BitLocker for a Drive
Step 1. Launch MiniTool Partition Wizard.
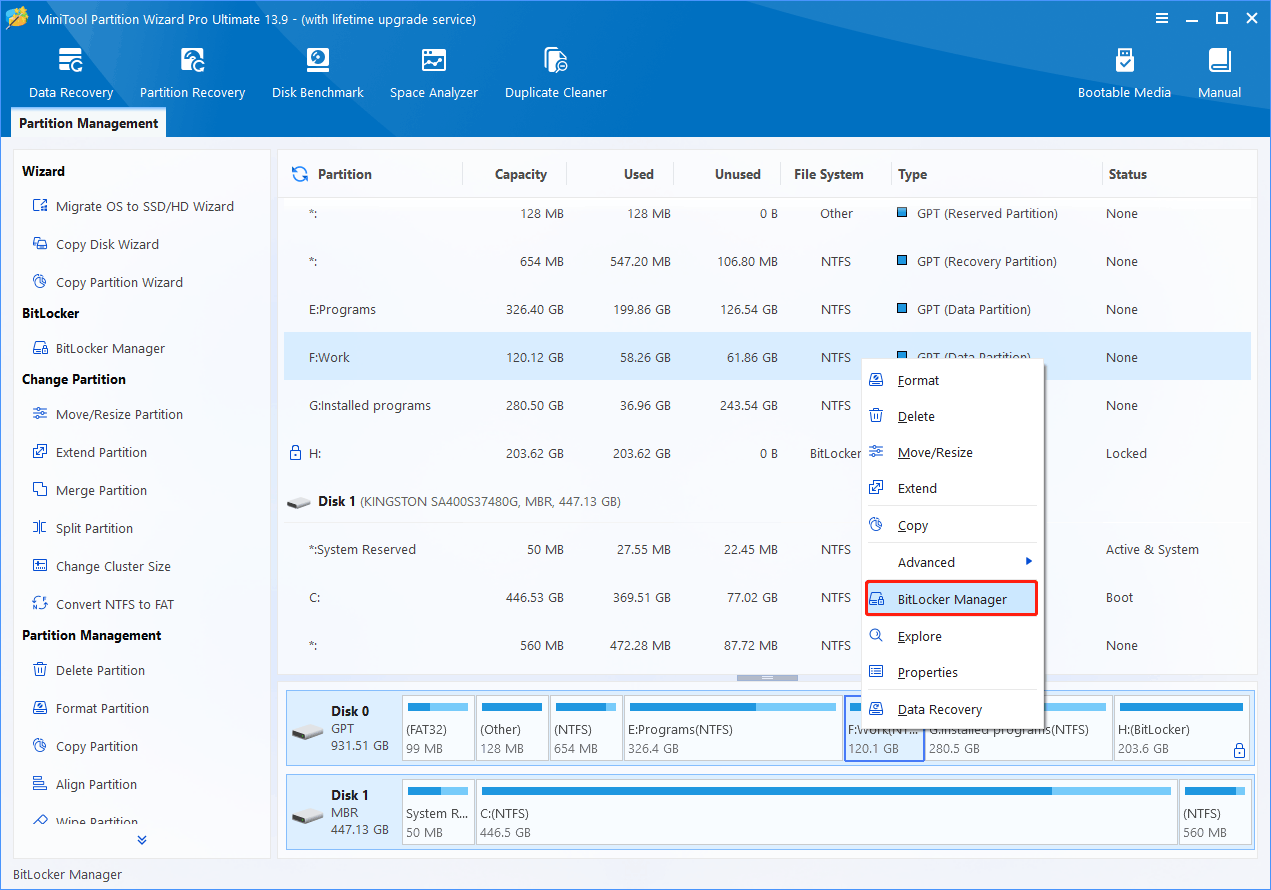
Step 2. Right-click the target drive and click BitLocker Manager from the menu.
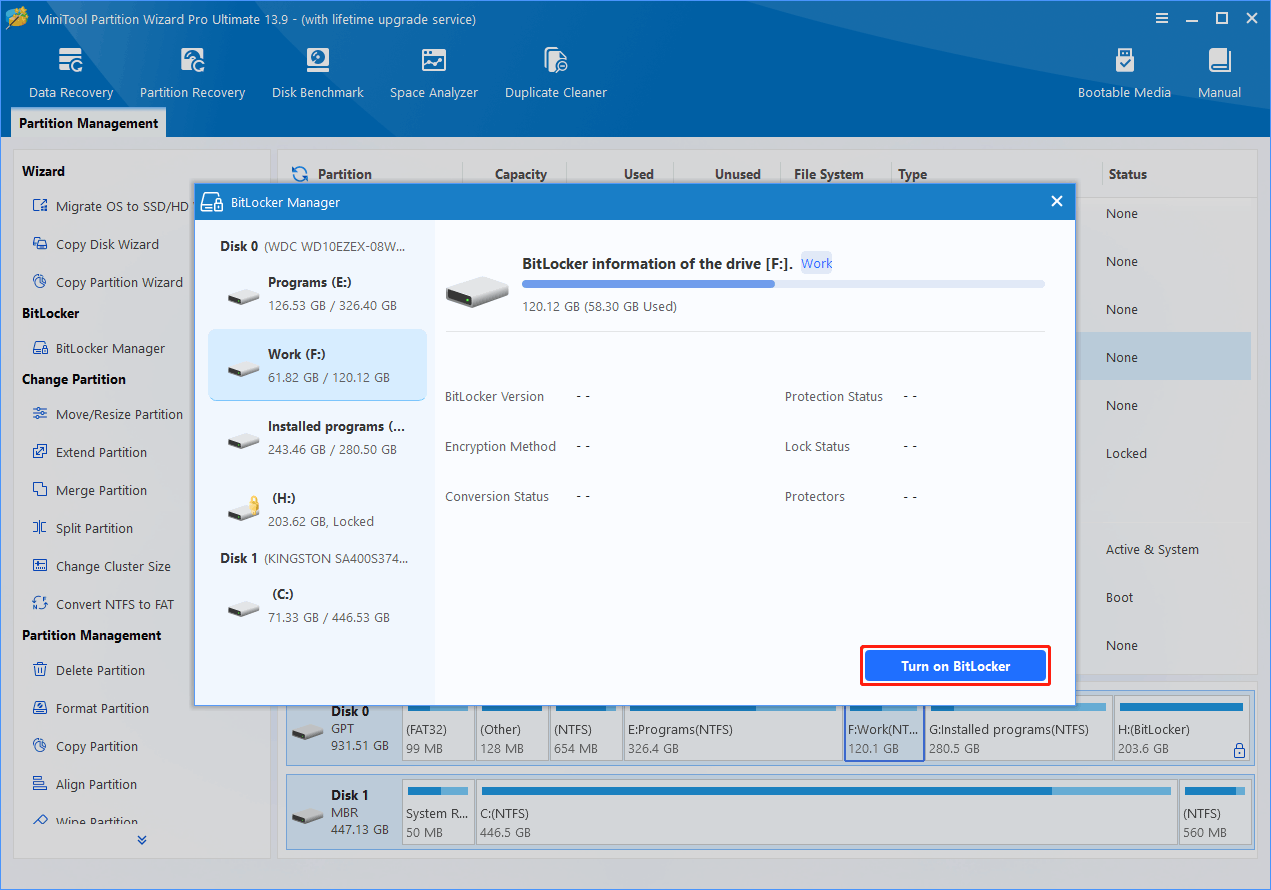
Step 3. Click the Turn on BitLocker button in the pop-up window to continue.
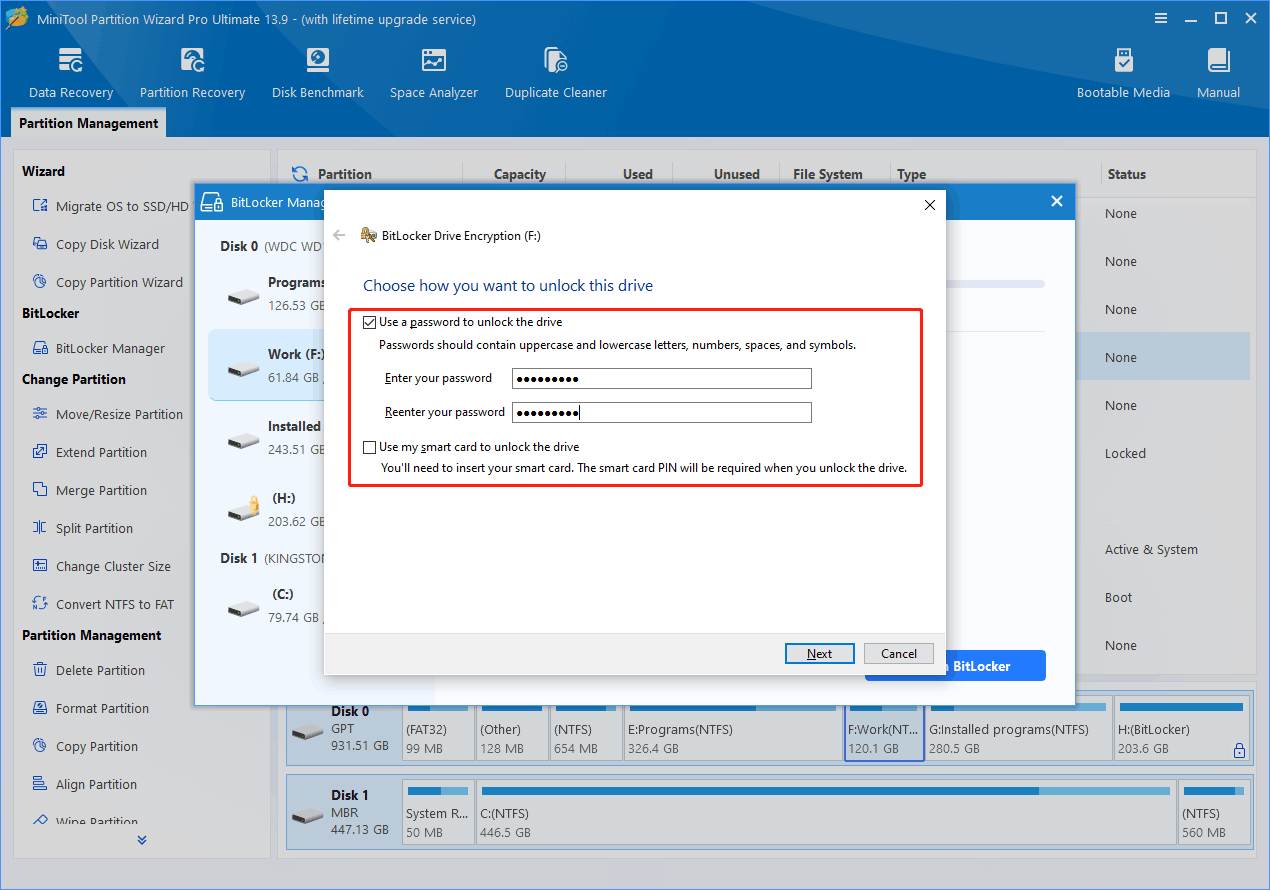
Step 4. Choose a method to unlock the drive.
A new window appears with two options:
① Use a password to unlock the drive
This option allows users to set a password. Enter it each time when users need to unlock the drive. It is suitable for most personal users.
② Use my smart card to unlock the drive
This option uses a physical smart card for authentication. It is typically used in enterprise environments with higher security requirements.
After selecting an option, enter the required password or insert a smart card, then click Next.
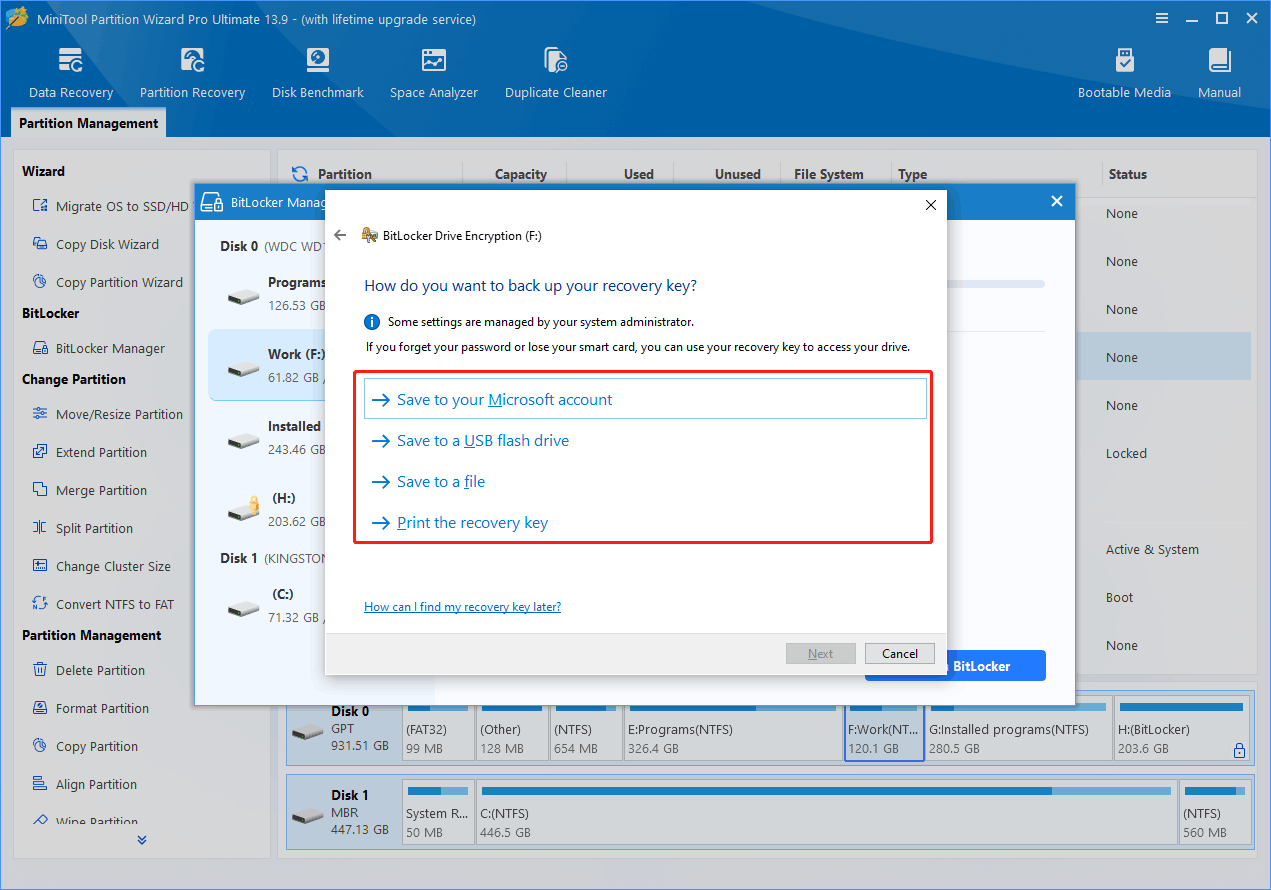
Step 5. Choose where to save the recovery key.
Users will see four options:
① Save to your Microsoft account:
Saves the recovery key online to the user’s Microsoft account, making it easy to access when needed.
② Save to a USB flash drive:
Saves the recovery key to a removable USB drive. Recommended if users prefer offline storage.
③ Save to a file:
Saves the recovery key as a .TXT file on the computer or another location. Make sure the file is stored safely.
④ Print the recovery key:
Prints a hard copy of the recovery key for physical backup.
Select one option based on users’ preference. Here we take Save to a file for example.
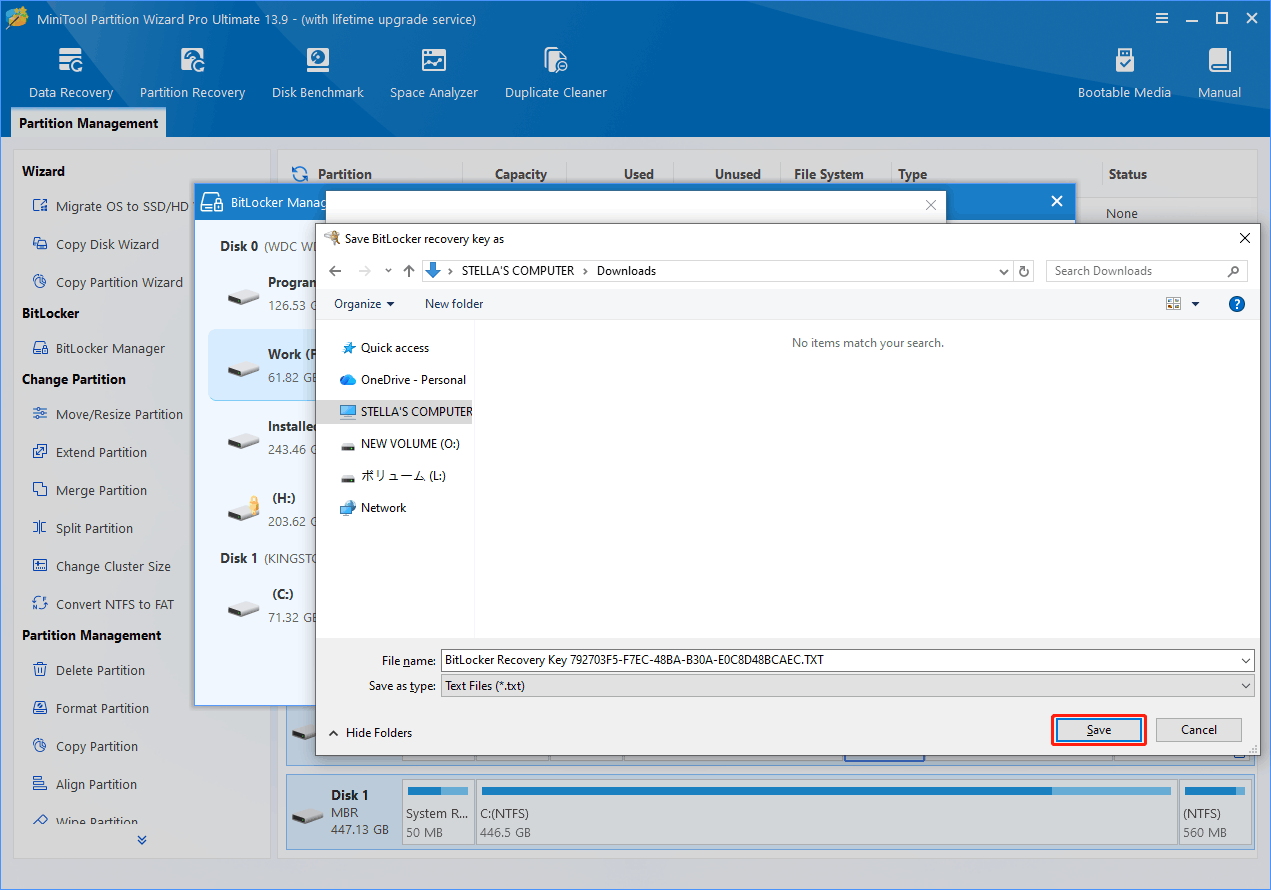
Step 6. Select a path to save the recovery key and click Save. This will go back to the previous window. Then, click Next to continue.
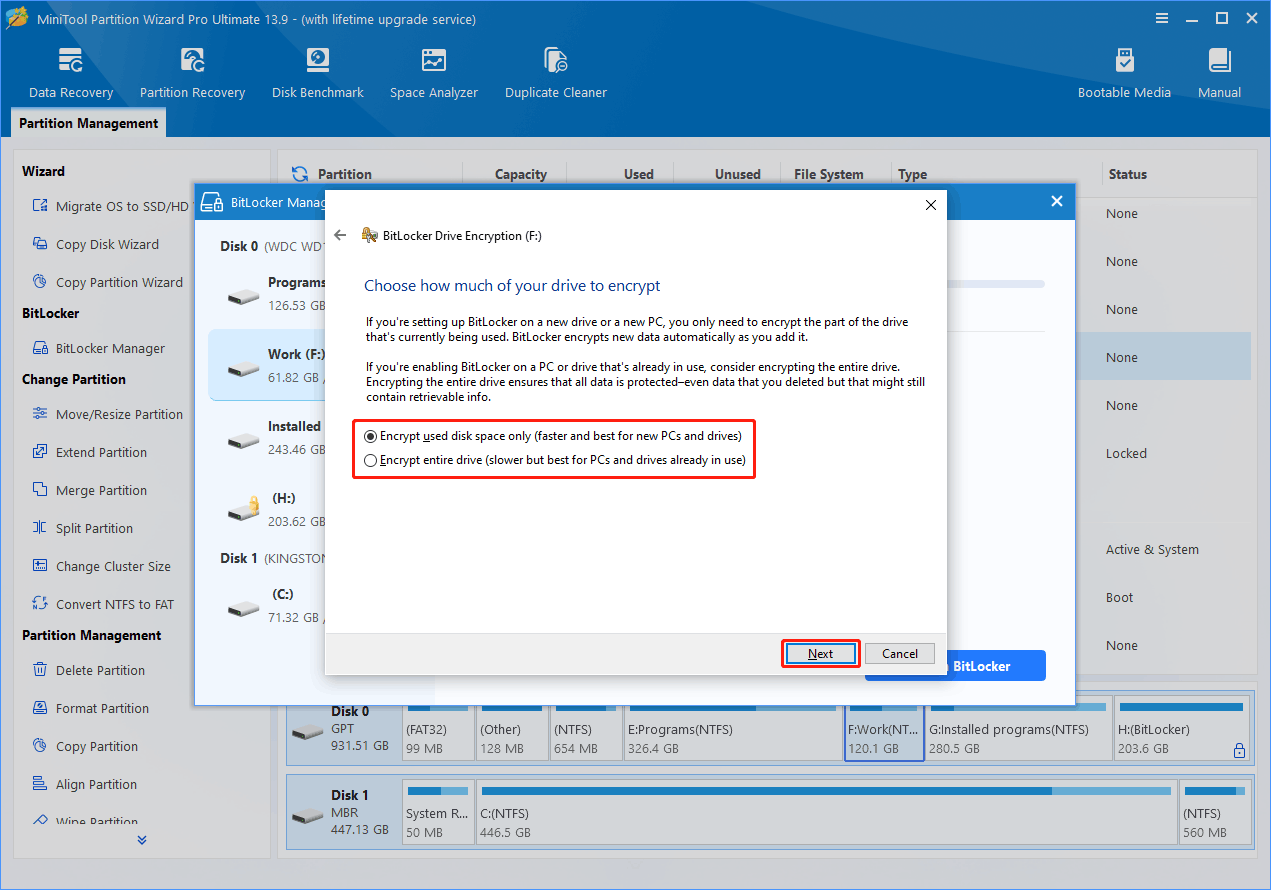
Step 7. Choose how much of the drive to encrypt.
①Encrypt used disk space only (faster and best for new PCs and drives):
Encrypts only the space currently in use. Recommended for new or empty drives.
②Encrypt entire drive (slower but best for PCs and drives already in use):
Encrypts all data on the drive, including deleted but recoverable data. Recommended for drives already in use.
Select one option according to users’ situation and click Next.
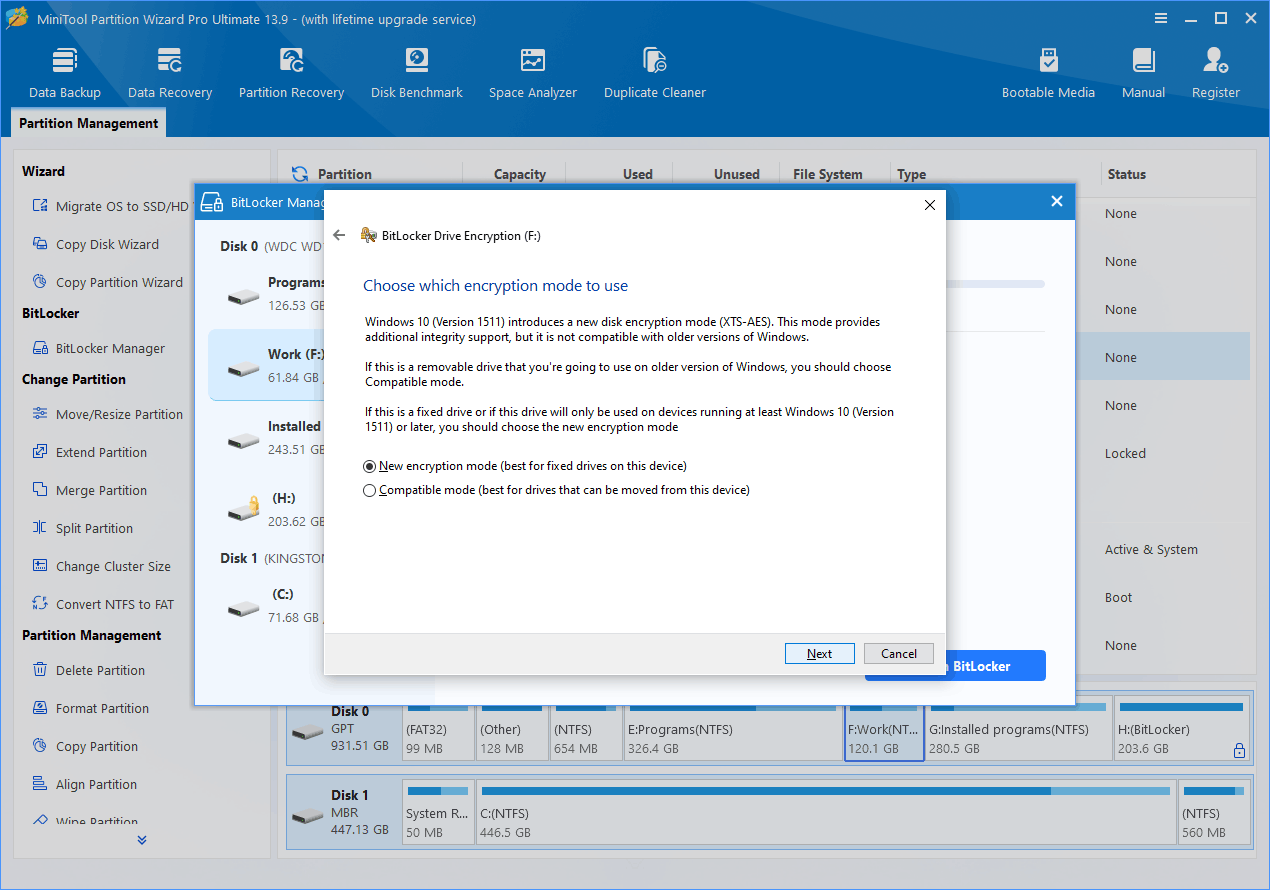
Step 8. Select the encryption mode.
① New encryption mode (best for fixed drives on this device):
Provides stronger and more modern encryption. Recommended for internal drives that stay on this device.
② Compatible mode (best for drives that can be moved from this device):
Designed for removable drives and better compatibility with older Windows versions.
Choose one mode based on the usage scenario and click Next.
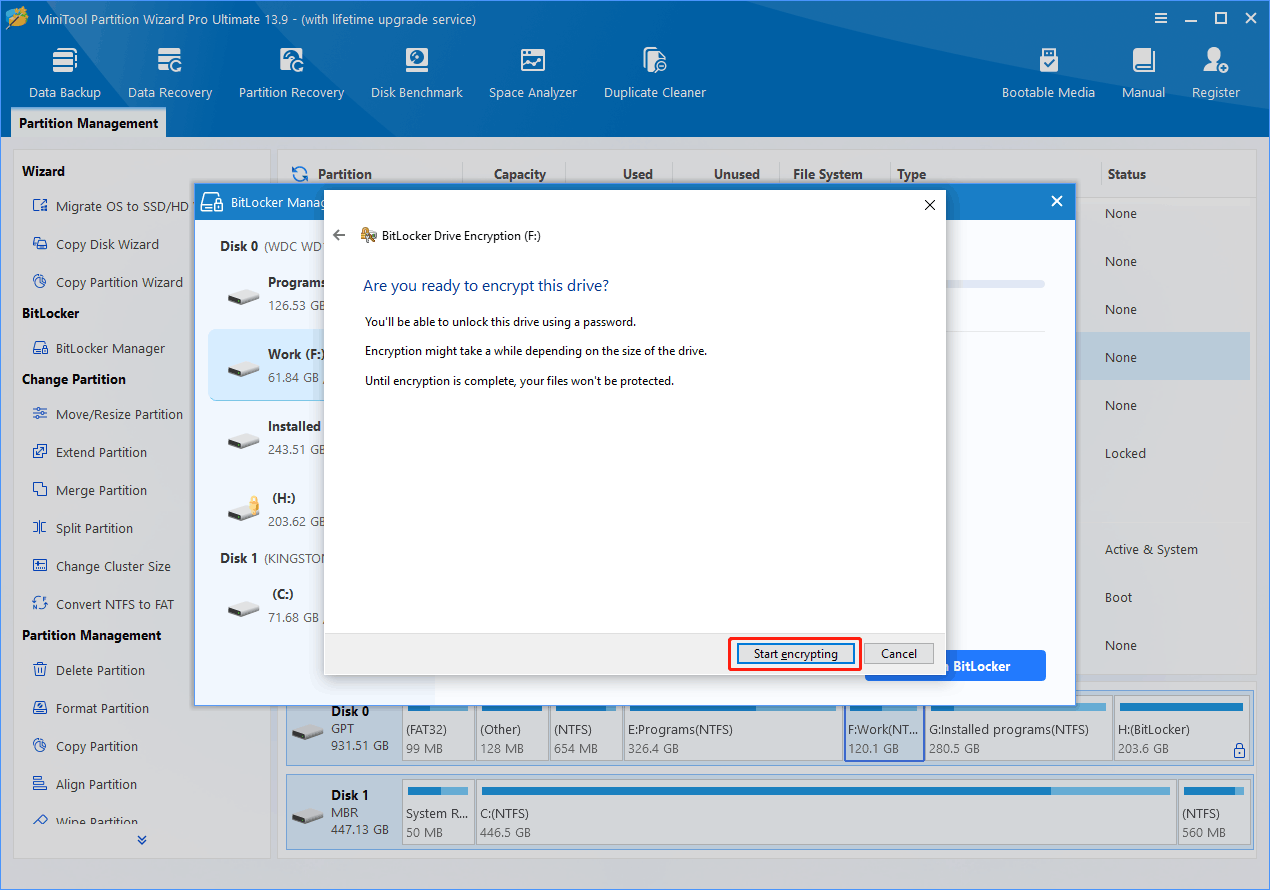
Step 9. Click Start encrypting to begin the encrypting process.
Step 10. When the process completes, click Close to go back to the software main interface.
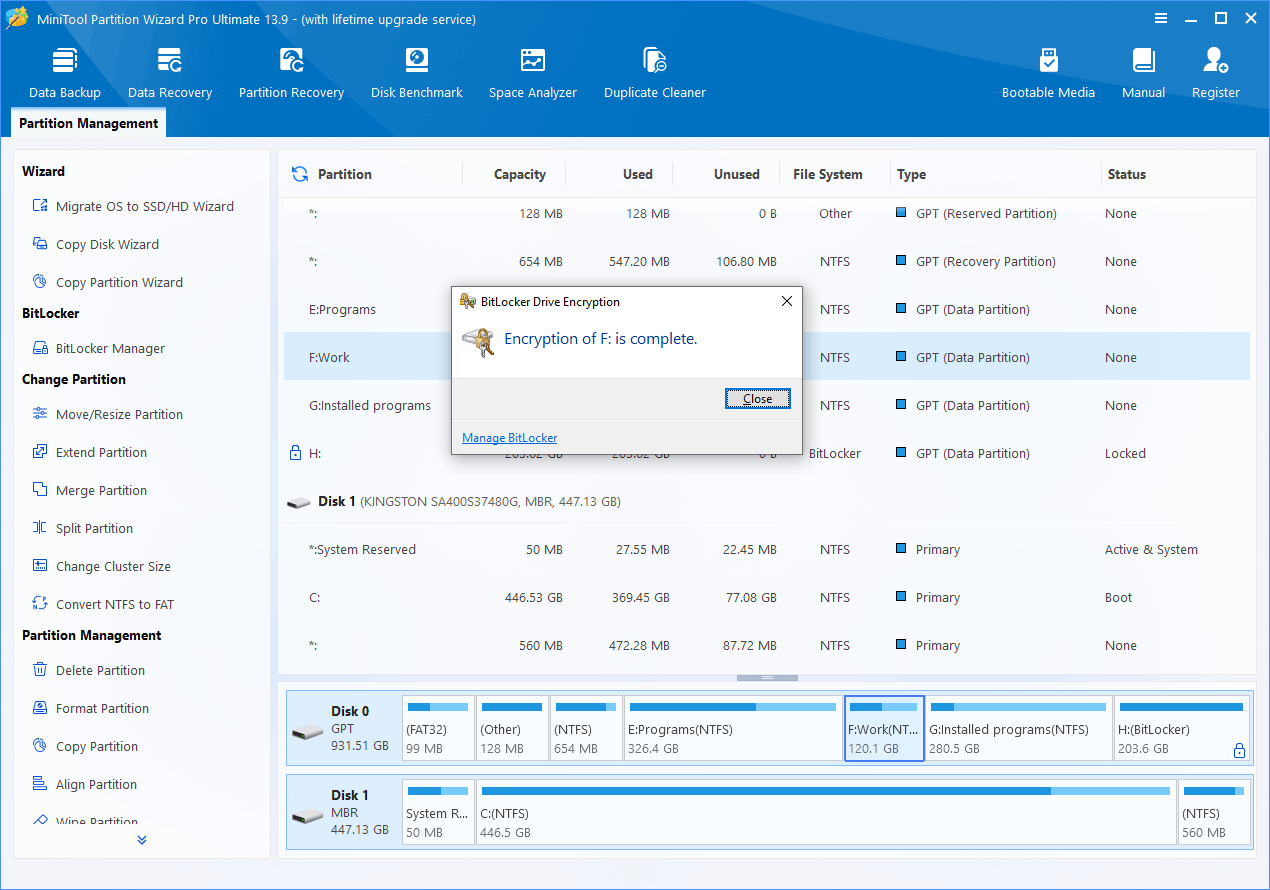
The software will automatically refresh the drive status. The target drive will now display a lock icon in an unlocked state, indicating that BitLocker has been enabled successfully.
How to Lock BitLocker Drive
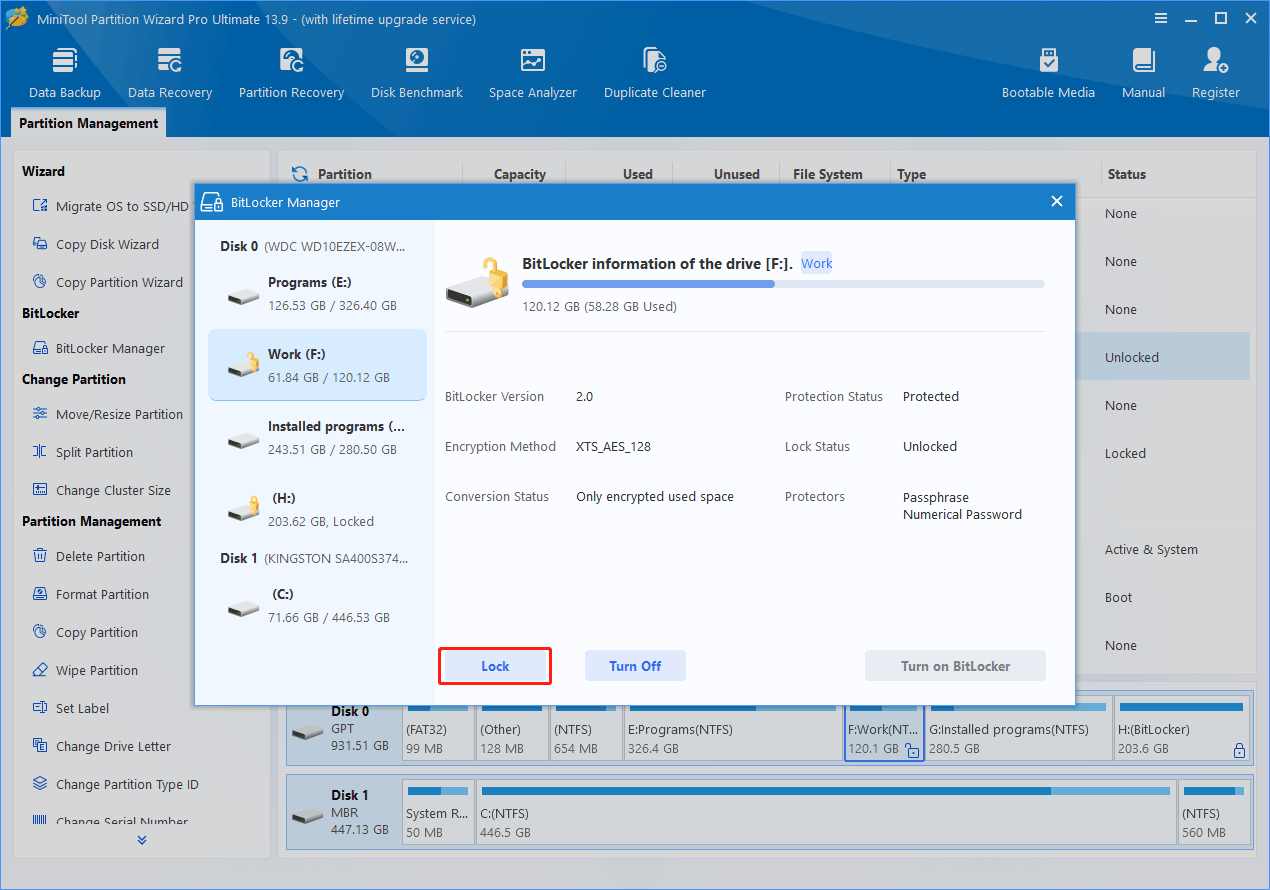
Step 1. Right-click the target drive and select BitLocker Manager.
Step 2. Click Lock in the pop-up window, then close the BitLocker Manager interface to return to the software’s main interface. The software will automatically refresh the drive status. The target drive will now display a locked icon, indicating that the drive has been successfully locked.
How to Unlock BitLocker Drive
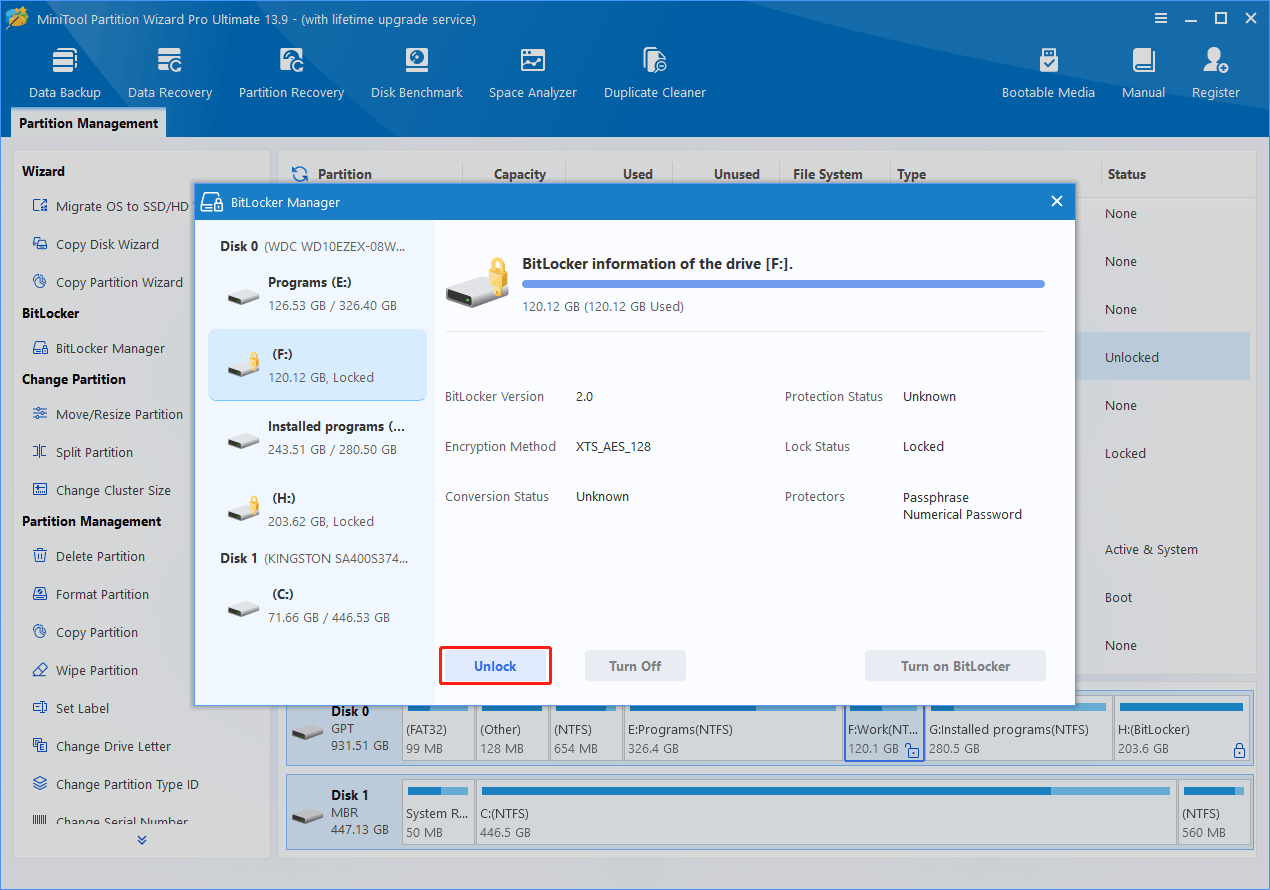
Step 1. Right-click the target drive and select BitLocker Manager.
Step 2. Click Unlock in the pop-up window.
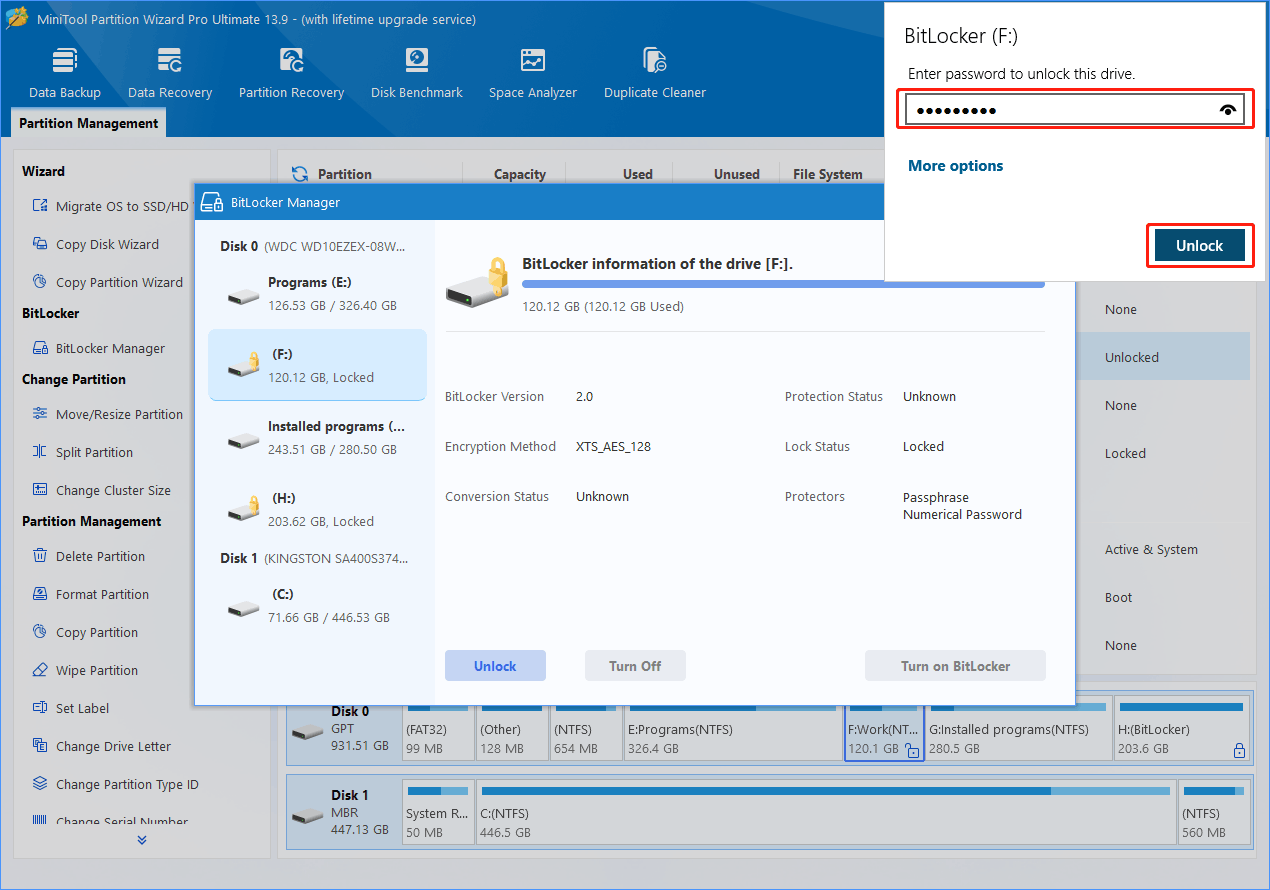
Step 3. In the small pop-up window, enter the password and click Unlock. Then, close the BitLocker Manager interface to return to the software’s main interface. The software will automatically refresh the drive status, and the lock icon will change to an unlocked state.
How to Turn off BitLocker for a BitLocker Drive
Step 1. Right-click the target drive and select BitLocker Manager.
Step 2. In the pop-up interface, click Turn Off.
Step 3. Click Yes to confirm the operation.
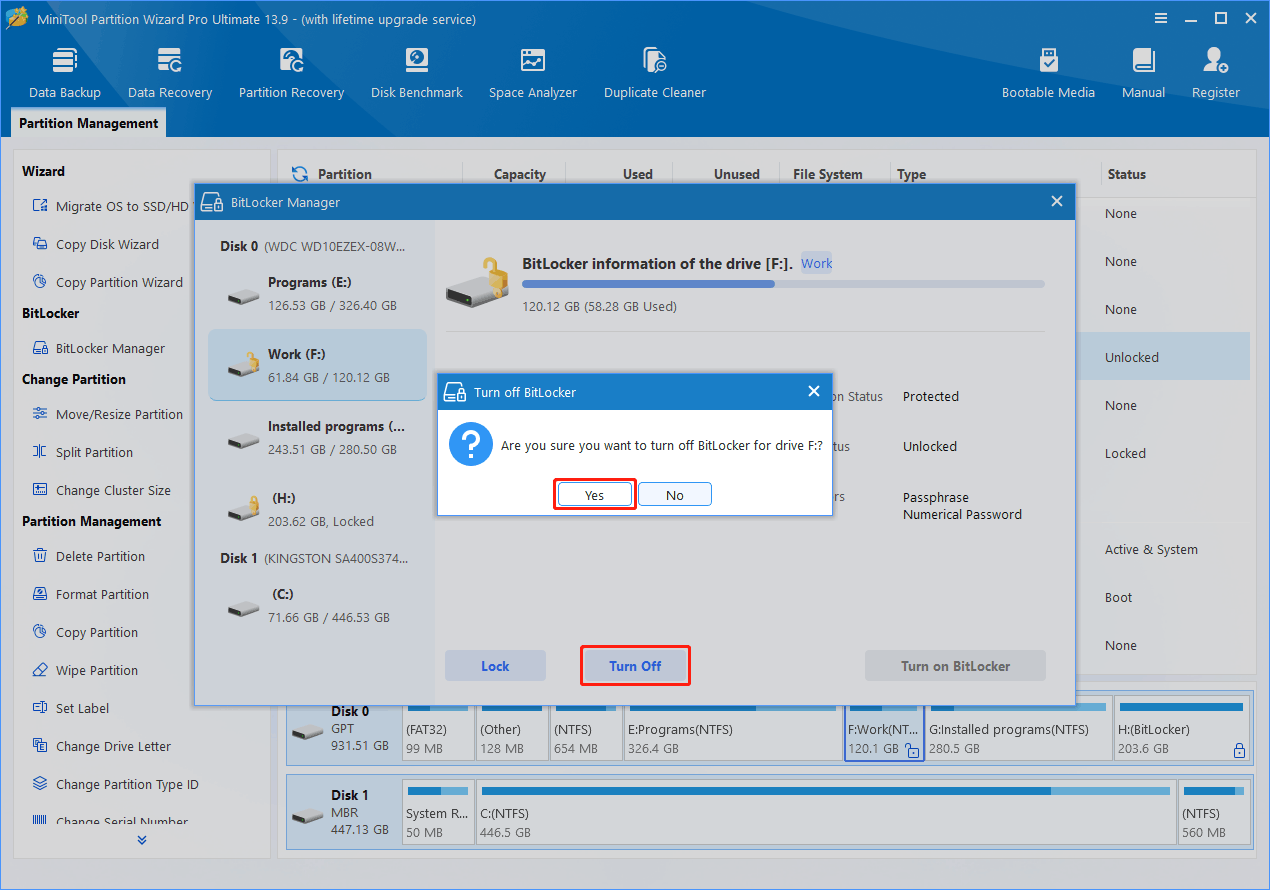
The decryption process will start automatically. Please wait until it completes. After decryption is complete, close the BitLocker Manager interface. The software will automatically refresh the drive status, and the lock icon will disappear from the drive..
BitLocker Manager Compatibility with Partition Operations
The availability of partitioning operations depends on the BitLocker status of the selected partition.
Refer to the following information before performing disk or partition management tasks.
Unlocked BitLocker Data Disk/Partition
| Disk/Partition Operations | Status |
| Resize Partition | Supported |
| Format Partition | Supported |
| Delete Partition | Supported |
| Delete All Partitions | Supported |
| Copy Disk/Partition | Supported |
| Wipe Disk/Partition | Supported |
| Split Partition | Supported |
| Partition Recovery | Supported |
| Change Drive Letter | Supported |
| Change Partition Label | Supported |
| Change Partition Type ID | Supported |
| Change Serial Number | Supported |
| Change Cluster Size | Supported |
| Set Partition as Logical | Supported |
| Set Partition as Primary | Supported |
| Explore | Supported |
| Convert FAT to NTFS | Supported |
| Check File System | Supported |
| Surface Test | Supported |
| Data Recovery | Supported |
| Set Active | Supported |
| Set Inactive | Supported |
| Clone Partition | Supported |
| Convert GPT Disk to MBR Disk | Supported |
| Convert MBR Disk to GPT Disk | Supported |
| Properties | Supported |
| Move Partition | Not Supported |
| Merge Partition | Not Supported |
| Extend Partition | Not Supported |
| Hide Partition | Not Supported |
| Align Partition | Not Supported |
| Align All Partitions | Not Supported |
| Convert NTFS to FAT | Not Supported |
2. Splitting a BitLocker partition creates two partitions. The first partition remains BitLocker-protected and unlocked, while the second partition is created without BitLocker protection.
3. After copying a BitLocker partition, BitLocker protection is removed from the destination partition.
4. Formatting a BitLocker partition removes BitLocker protection.
5. Converting a GPT disk to MBR (or vice versa) changes an unlocked BitLocker partition to a locked state.
Locked BitLocker Data Disk/Partition
| Disk/Partition Operations | Status |
| Delete Partition | Supported |
| Delete All Partitions | Supported |
| Format Partition | Supported |
| Copy Disk/Partition | Supported |
| Wipe Disk/Partition | Supported |
| Properties | Supported |
| Change Drive Letter | Supported |
| Change Partition Type ID | Supported |
| Set Partition as Logical | Supported |
| Set Partition as Primary | Supported |
| Surface Test | Supported |
| Partition Recovery | Supported |
| Set Active | Supported |
| Set Inactive | Supported |
| Copy Disk | Supported |
| Convert GPT Disk to MBR Disk | Supported |
| Convert MBR Disk to GPT Disk | Supported |
| Resize Partition | Supported (BitLocker must be unlocked first) |
| Split Partition | Supported (BitLocker must be unlocked first) |
| Change Cluster Size | Supported (BitLocker must be unlocked first) |
| Data Recovery | Supported (BitLocker must be unlocked first) |
| Move Partition | Not Supported |
| Merge Partition | Not Supported |
| Extend Partition | Not Supported |
| Hide Partition | Not Supported |
| Align Partition | Not Supported |
| Align All Partitions | Not Supported |
| Explore Partition | Not Supported |
| Check File System | Not Supported |
| Convert NTFS to FAT | Not Supported |
| Convert FAT to NTFS | Not Supported |
| Change Partition Label | Not Supported |
| Change Serial Number | Not Supported |
2. Disk usage information in Properties may not be displayed correctly for a locked BitLocker partition.
3. File system information is unavailable until the partition is unlocked.
Unlocked BitLocker System Partition (C:)
| Disk/Partition Operations | Status |
| Resize Partition | Supported |
| Format Partition | Supported |
| Delete Partition | Supported |
| Delete All Partitions | Supported |
| Wipe Disk/Partition | Supported |
| Copy Disk/Partition | Supported |
| Split Partition | Supported |
| Change Partition Type ID | Supported |
| Explore | Supported |
| Check File System | Supported |
| Surface Test | Supported |
| Data Recovery | Supported |
| Disk Surface Test | Supported |
| Partition Recovery | Supported |
| Disk/Partition Properties | Supported |
| Move Partition | Not Supported |
| Merge Partition | Not Supported |
| Extend Partition | Not Supported |
| Change Drive Letter | Not Supported |
| Change Partition Label | Not Supported |
| Change Serial Number | Not Supported |
| Change Cluster Size | Not Supported |
| Hide Partition | Not Supported |
| Align Partition | Not Supported |
| Align All Partitions | Not Supported |
| Convert NTFS to FAT | Not Supported |
| Set Active | Not Supported |
| Set Inactive | Not Supported |
2. After copying the system partition, the destination partition will not have BitLocker enabled.
3. Converting GPT to MBR (or vice versa) is unavailable when the disk contains the current system partition.
4. Wipe Disk and Delete All Partitions are unavailable on a disk containing the current system partition.
About The Author

Position: Columnist
Stella has been working in MiniTool Software as an English Editor for more than 8 years. Her articles mainly cover the fields of data recovery including storage media data recovery, phone data recovery, and photo recovery, videos download, partition management, and video & audio format conversions.
User Comments :