If you are wondering what is Windows PE, and you are curious about how to create a bootable Windows PE media, you can read this article to find the relative answers and master more information about Windows PE.
Windows PE is also known as Windows Preinstallation Environment and WinPE. It is a lightweight operating system with limited features. Mostly, it is used to install, deploy, and repair Windows for desktop editions, including Windows 10, Windows Server, and other Windows operating systems.
Windows PE cannot be used as the primary operating system. It was originally developed to replace MS-DOS boot disks with a bootable environment that can be loaded from CDs, DVDs, USB flash drives, and so on.
So, what is Windows PE used for? With Windows PE, you can: set up your hard drives before installing Windows, install Windows using applications or scripts from a network or a local drive, capture and apply Windows images, modify the Windows operating system when it is not running, set up the automatic recovery tool, recover data from devices that cannot be started, add your own custom shell or GUI to automatically perform these types of tasks.
Where Can You Download Windows PE?
For Windows PE download issue, you should first have Windows Assessment and Deployment Kit (Windows ADK), for they include the CopyPE and MakeWinPEMedia command line utilities.
You can download it from the Microsoft official site. Then you need to select the features like Deployment Tools which includes the Deployment and Imaging Tools Environment & Windows Preinstallation Environment which include the files used to install Windows PE during the installation process.
When running from the Deployment and Imaging Tools environment, CopyPE creates a set of available WinPE files that MakeWinPEMedia can use to create WinPE USB drives, virtual hard disks, or ISOs.
Then you can create a bootable WinPE media.
How to Create a Bootable Windows PE Media?
Now that you have the conditions to create a bootable Windows PE media, then you can see the following steps to create one.
Step 1: Create working files
No matter which kind of media you’re going to create, first you need to create a working set of WinPE files.
- Launch the Deployment and Imaging Tools Environment as an administrator.
- Run CopyPE to create a working copy of the Windows PE files. Type copype amd64 C:\WinPE_amd64 and hit Enter.

Step 2: Create a bootable Windows PE media
Now that you have a set of working files, you are able to use MakeWinPEMedia to build a bootable WinPE media.
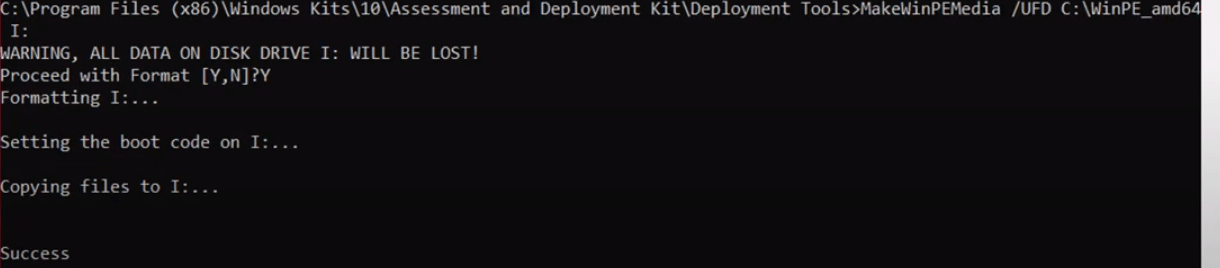
Choice 1: Create a bootable WinPE USB drive
- Attach a USB flash drive to your PC, and then launch the Deployment and Imaging Tools Environment as an administrator.
- Format the USB using MakeWinPEMedia with the / UFD option and install Windows PE to the USB flash drive by typing MakeWinPEMedia /UFD C:\WinPE_amd64 E: (E: should be the USB drive letter).
Choice 2: Create a WinPE ISO, or burn it DVD, or CD
- Start MakeWinPEMedia with the /ISO option to create an ISO file containing the Windows PE files by typing MakeWinPEMedia /ISO C:\WinPE_amd64 C:\WinPE_amd64\WinPE_amd64.iso.
- Then you can choose to burn it to a DVD or CD via Windows Disc Image Burnner or other burnning tools.
Limitations of Windows PE
Windows PE might not be used for any purpose other than deployment and recovery, as it is not a general-purpose operating system.
To prevent it from being used as a production operating system, Windows PE has a feature that it will automatically stop running the shell and restart after 72 hours of continuous use. Not configurable during this period.
When Windows PE restarts, all changes are lost, including changes to the drivers, drive letters, and the Windows PE registry.
The default Windows PE installation uses the FAT32 file format, which has its own limitations, such as a maximum 4GB file size and a maximum 32GB drive size.
Notes on Running Windows Setup in Windows PE:
When running Windows Setup in Windows PE, you need to pay attention to:
You can install the 64-bit version of Windows using the 32-bit version of Windows PE and the Windows Setup.
Windows PE supports dynamic disks while Windows Setup does not. If you install Windows to a dynamic disk created in Windows PE, this dynamic disk cannot work in Windows.
For UEFI-based PCs that support both UEFI and legacy BIOS modes, you need to boot Windows PE in the correct mode to properly install Windows. See MBR vs. GPT Guide: What’s The Difference and Which One Is Better to know more.
About The Author

Position: Columnist
Linda has been an editor at MiniTool for seven years. She continuously learns about computers and puts her knowledge into practice. Moreover, she is particularly knowledgeable in disk management, data recovery, system installation, and PDF editing. Her articles typically reference multiple examples or are based on her own experience, providing users with the most suitable solutions.
User Comments :