This post introduces 2 ways to allow you easily check Nvidia driver version on Windows 10. You can check driver version through Device Manager or Nvidia Control Panel. Check the step-by-step guide below. MiniTool software also provides free data recovery software, hard drive partition manager, system backup and restore software if you need.
If you want to check if your Nvidia driver is in up-to-date and find out the current Nvidia driver version of your Windows computer, you can check the 2 ways below. Each way is attached with a step-by-step guide.
#1. How to Check Nvidia Driver Version Windows 10 in Device Manager
You can access Windows Device Manager that allows you to manage computer hardware devices and drivers, and check driver version on Windows 10. Below is the guide for how to check drivers Windows 10.
Step 1. Press Windows + R, type devmgmt.msc in Run dialog, and click OK to open Device Manager in Windows 10.
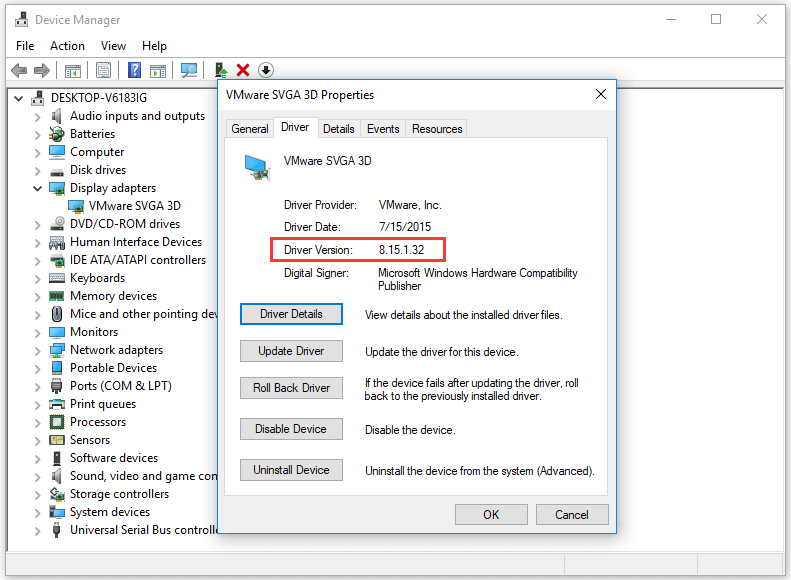
Step 2. In Device Manager window, you can see all computer hardware devices are listed. You can expand the device category which you want to check the driver version. Here we click Display adapters since we want to check Nvidia driver version.
Next you can right-click the Nvidia graphics card, and choose Properties.
Step 3. Then you can click Driver tab in Properties window, and you can see the current version of the Nvidia driver.

In the driver properties window, you can also check the driver details, update driver, roll back Nvidia drivers, disable the device, uninstall the driver, etc.
#2. Check Nvidia Driver Version in Windows 10 from Nvidia Control Panel
If your computer uses Nvidia graphic cards, then an Nvidia Control Panel application is installed on your computer. You can check Nvidia driver version through Nvidia Control Panel.
Step 1. Right-click the empty area on computer desktop screen, and choose Nvidia Control Panel to open it.
Step 2. Next click System Information link at the bottom-left. And you can check the Nvidia driver version under Details.
How to Recover Lost Data on Windows 10 Computer
Data loss frequently occurs when your computer has problems like system crash, blue/black screen error. You can easily restore lost data from Windows 10 computer only if you have the professional data recovery software at hand.
MiniTool Power Data Recovery, best data recovery software for Windows, helps you easily recover any deleted/lost files from Windows 10 computer, external hard drive, SSD, USB flash drive, SD card, etc. Novice users can use this data recovery software with ease due to its extremely intuitive interface and simple operation. The easy user guide is attached below.
- You can download and install MiniTool Power Data Recovery on your Windows computer. Then launch it.
- Next choose the device you’d like to recover data from in the left pane. If you want to recover data from external storage device like external hard drive or USB, you should connect it to your computer beforehand.
- In the right window, you can select the target partition or storage device, and click Scan MiniTool Power Data Recovery will start scanning the chosen device.
- After it finishes the scan, you can check the scan result to find wanted files, and click Save button to choose a new destination to store the recovered files.


User Comments :