Windows 11/10 Defender has Controlled Folder Access protection. This post from MiniTool introduces 3 ways for you to enable/disable Controlled Folder Access in Windows 11/10. Now, keep on your reading.
Controlled Folder Access
Controlled Folder Access is a feature of the Windows Security application on Windows 11/10. This feature blocks ransomware by preventing the modification of files in protected folders. Enabling controlled folder access prevents untrusted applications, malware, or other means from altering files in protected directories.
This feature is disabled by default on Windows 11/10. The following part provides 3 ways for you to enable Controlled Folder Access in Windows 11/10.
How to Enable Controlled Folder Access
Way 1: Via Windows Security
To enable Controlled Folder Access in Windows 11, you can use the Windows Security application:
Step 1: Open the Windows + I keys together to open the Settings application.
Step 2: Go to Privacy & Security > Windows Security > Open Windows Security.
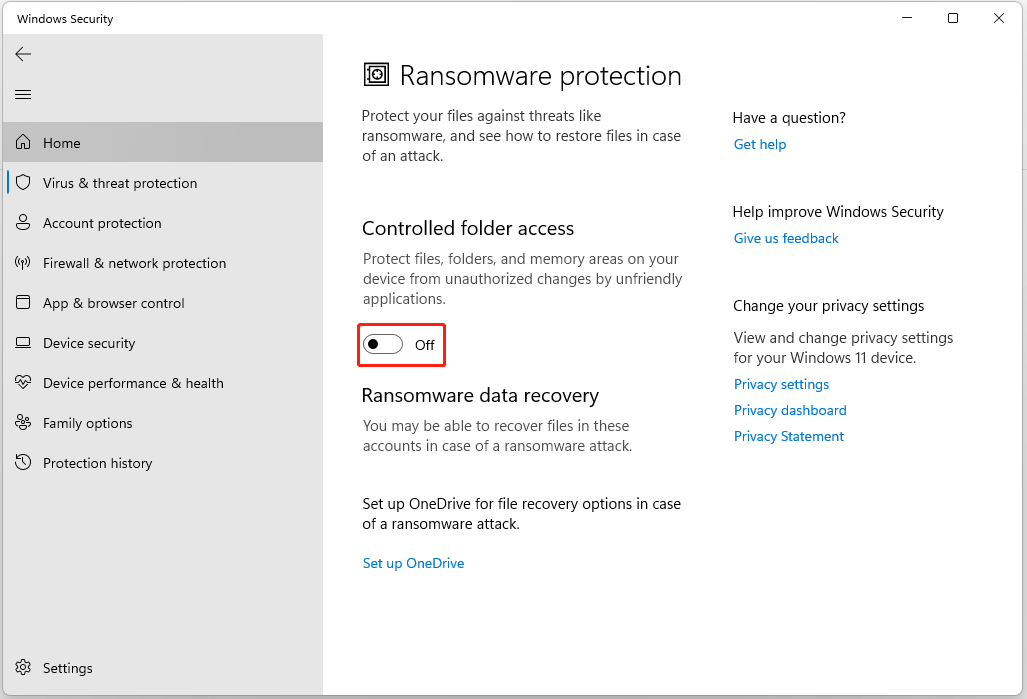
Step 3: Under Virus & threat protection settings, click the Manage settings link.
Step 4: Under Controlled folder access, click the Manage Controlled folder access button.
Step 5: Then, turn on the toggle under Controlled folder access.
Way 2: Via Local Group Policy Editor
If you have Windows 11 Pro or Enterprise, you can use Local Group Policy Editor to enable Controlled Folder Access. Here is how to do that:
Step 1: Press the Windows + R keys at the same time to open the Run dialogue box.
Step 2: Type gpedit.msc in it and click OK to open Local Group Policy Editor.
Step 3: Go to the following path:
Computer Configuration > Administrative Templates > Windows Components > Microsoft Defender Antivirus > Microsoft Defender Exploit Guard > Controlled Folder Access
Step 3: In the right panel, double-click Configure Controlled folder access.
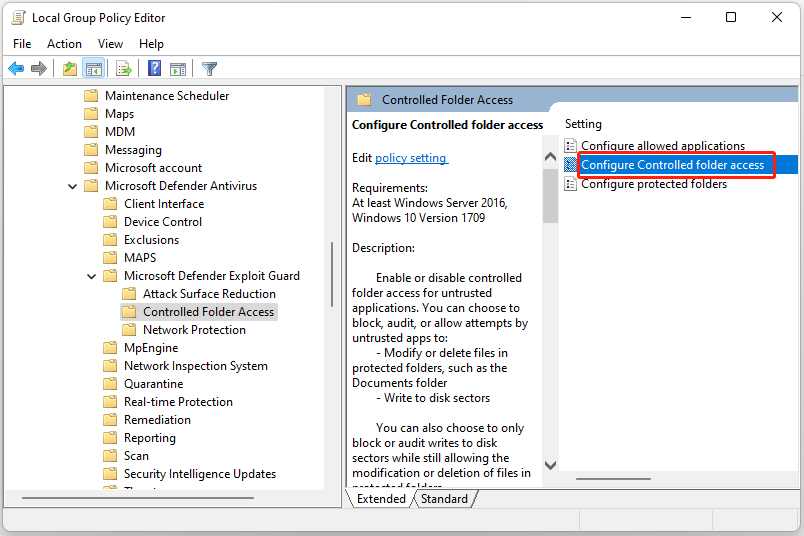
Step 4: Then, click the Enabled button. Click the drop-down menu to choose Block. Then, click Apply and OK.
Tip: If you want to disable Controlled Folder Access, you just need to click the Disabled button.
Way 3: Via Windows Powershell
The third method for you to enable Controlled Folder Access in Windows 10/11 is via Windows Powershell.
Step 1: Type Windows PowerShell in the Search box and choose Run as administrator.
Step 2: In the elevated PowerShell window, type the following command and press Enter.
Set-MpPreference -EnableControlledFolderAccess Enabled
Tip: If you want to disable Controlled folder access, you can type the following command and press Enter.
Set-MpPreference -EnableControlledFolderAccess Disabled
Protect Your Folders and Files
With the increase in ransomware attacks in recent years, it’s important to have the ability to protect your files and folders. Controlled Folder Access is a Windows feature that protects your data from unauthorized access. However, it’s not enough just to rely on this feature.
There is a better way for you to protect your important files and folders, that is, backing up them to the external hard drive. After backing up them, you can restore them if they get lost due to a virus attack or ransomware attack. To do this task, you can try MiniTool ShdowMaker. It’s a great backup and sync program.
MiniTool ShadowMaker TrialClick to Download100%Clean & Safe
Final Words
This post has offered 3 ways for you to enable Controlled Folder Access in Windows 11/10. Besides, there is a piece of backup software for you to provide better protection for your files and folder.
User Comments :