If you want to put your computer in a lower-power state, you can enable the PC’s Hibernate Mode. Well then, how can you enable Hibernate Mode in Windows 11? MiniTool gives you three ways to do this work and just choose one to have a try.
What Is Hibernate on a Windows PC?
Hibernate mode is a fairly useful feature in saving power battery and effectively managing the current power consumption. In Hibernate mode, your PC suspends all the background and running activities. When you turn on the machine, you can resume your work right where you left off.
This mode can put your computer in a lower-power state and allows it to shut down without losing any work. When the PC is in Hibernate mode, all the apps, documents, files, and other contents are saved to the hard drive instead of RAM.
By default, there is no Hibernate option in the start menu of Windows 11. To enable it, you can try some effective ways mentioned below. Hibernate is mainly designed for laptops.
How to Enable Hibernate in Windows 11
Enable Windows 11 Hibernate via Control Panel
Control Panel is a useful app that allows you to tweak many settings for Windows. To enable Hibernate, you can also use this tool.
Here is what you should do:
Step 1: Type control panel to the search box of Windows 11 and then click the result to open this tool.
Step 2: Display items by large icons and then click Power Options.
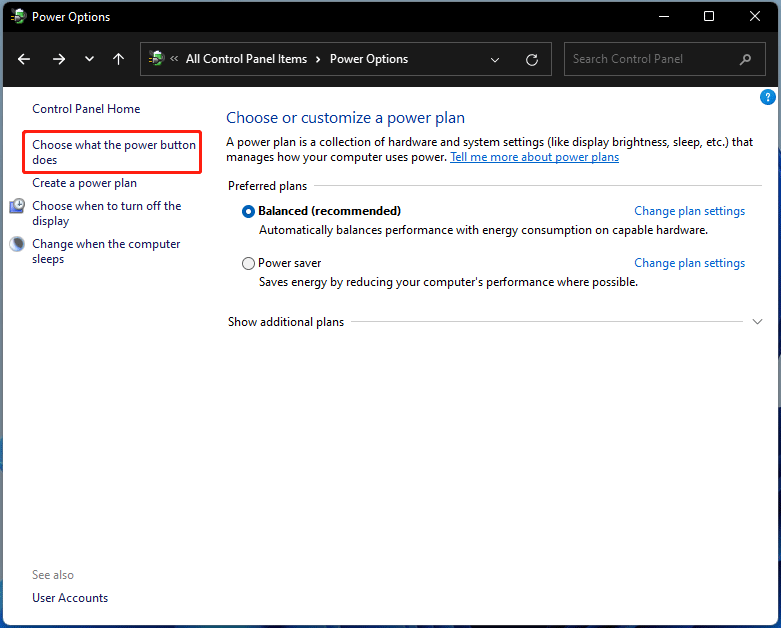
Step 3: Click Choose what the power button does from the left side.

Step 4: Click the Change settings that are currently unavailable link.
Step 5: Tick the box of Hibernate under the Shutdown settings section. (To disable Hibernate, uncheck the box of Hibernate.)
Step 6: Finally, click the Save changes button.
Now, you can click Start > Power and the Hibernate option is displayed.
Enable Hibernate Windows 11 in Command Prompt
Step 1: Press Win + S keys on your keyboard to open the search box, type cmd, and right-click Command Prompt to choose Run as administrator.
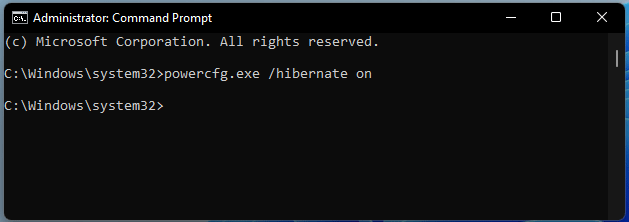
Step 2: Type powercfg.exe /hibernate on and press Enter to enable Hibernate mode. To disable Hibernate, run this command – powercfg.exe /hibernate off.

Enable Hibernate Windows 11 via Registry Editor
In addition, there is another way for you to enable Hibernate and it is changing Windows Registry.
Step 1: Open Registry Editor by searching for regedit in the search box.
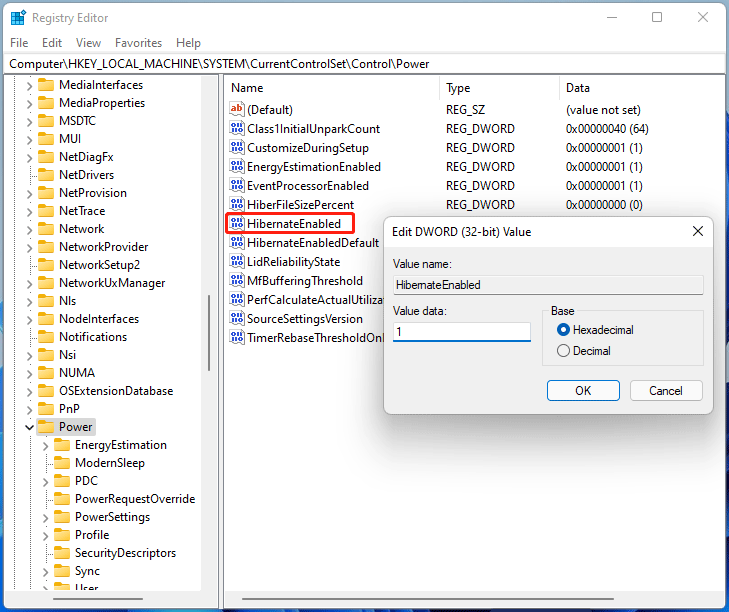
Step 2: Navigate to this path: HKEY_LOCAL_MACHINE\SYSTEM\CurrentControlSet\Control\Power.
Step 3: Go to the right side, double-click the HibernateEnabled key and change its value data to 1.

Step 4: Restart your PC and you can see the Hibernate option from the power menu.
To disable Hibernate Windows 11, change the value data of HibernateEnabled back to 0 and restart the PC to let the change be efficient.
Related article: How to Disable or Re-enable Hibernation on Windows 10
Final Words
That’s all the information about Windows 11 hibernate mode and how to enable it in this new operating system. If you are using a laptop, performing a lot of tasks, and want to leave serval hours, you can enable this mode to let the laptop be in a lower-power state without exiting all the work.

User Comments :