External hard drive showing as local disk and is inaccessible? What should you do if Windows recognizes your external hard drive or USB drive as local disk and prevents you from accessing your files? Now, you can find possible reasons why this issue occurs and potential solutions from this MiniTool guide.
Windows Recognizes My External Hard Drive as Local Disk
“Greetings, I'm in desperate need of help. I bought a WD My Passport HDD about 4 months ago, and it seemed to work fine until today. When I connect it to the laptop it shows up as Local Disk (F:) and the Storage bar is not shown. I tried right-clicking in order to change the sharing options but explorer.exe just crashes on me. Any help is appreciated.”answers.microsoft.com
External disks are widely used for data storage, file backup, and file sharing due to their high capacity and portability. However, sometimes you may find that your external hard drive shows as local disk D (or other drive letters) in File Explorer and you are unable to access the files on the drive.
This issue is usually associated with hardware issues, corrupted file systems, virus infection, drive failure, and so on. In the next part, we explore several feasible solutions to this problem.

Solutions to External Hard Drive Showing as Local Disk
Before implementing advanced solutions, you can remove the external hard drive, connect it to another PC, and check whether it becomes accessible. Also, you can change a USB port or a USB cable to rule out connection issues. If the issue of “external hard drive showing as local disk” happens in every computer, you can try the following approaches.
Solution 1. Check the Disk for File System Errors
It is mostly likely there are problems with the disk file system if the external hard drive shows as local disk and is inaccessible. To scan for and repair damaged file system, you can run the CHKDSK command line.
Step 1. Connect the external hard drive to your computer.
Step 2. On your taskbar, right-click the Start button and select Run.
Step 3. Type cmd in the open box and hit the Enter key, then you’ll get the Command Prompt window.
In the new window, type chkdsk drive letter: /f /r /x (replace the drive letter with the actual one of the external hard drive, e.g., chkdsk G: /f /r /x) and press Enter.
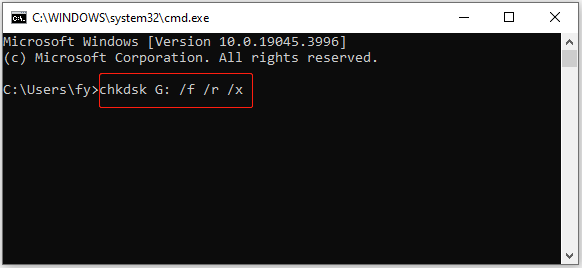
Step 4. Once the command line is executed, you can go to File Explorer and check if the external hard drive appears normal and whether you can access its data.
Solution 2. Format the External Hard Drive
If the CHKDSK command line does not fix the external hard drive, you may need to format the drive. Formatting a disk will delete all files on it, so you need to recover the needed files on the external hard disk first of all.
To perform external hard drive data recovery, you can use MiniTool Power Data Recovery. It is a secure and green data recovery software that helps recover files from external hard drives, internal hard drives, USB drives, SD cards, and so on.
It not only supports the recovery of deleted files from functioning disks but is also good at recovering inaccessible files when the disk is in various error states. For example, it helps recover data when the external hard drive shows 0 bytes, the hard disk shows RAW, the hard drive shows unallocated, etc. The free edition of this software supports free file scan, file preview, and 1 GB of free file recovery.
MiniTool Power Data Recovery FreeClick to Download100%Clean & Safe
Once you get your files back, you can format the external hard drive without losing data. If you are unable to format the disk in File Explorer or Disk Management, you can use a professional third-party partition manager, MiniTool Partition Wizard.
The Format Partition feature is free to use.
Step 1. Make sure the external hard drive is connected to your PC. Then, download, install, and launch MiniTool Partition Wizard Free.
MiniTool Partition Wizard FreeClick to Download100%Clean & Safe
Step 2. On the home of this partition magic, select the partition of the external disk, then click the Format Partition option from the left panel.
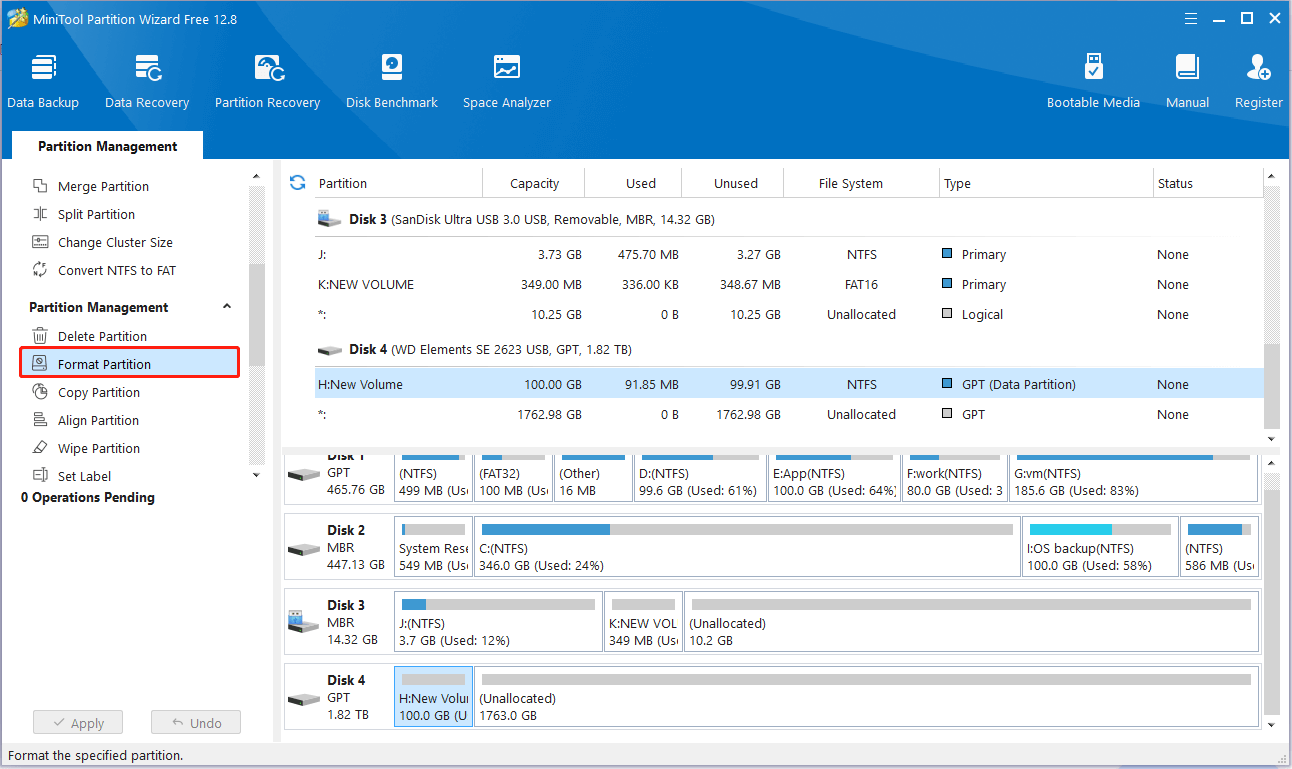
Step 3. Next, specify the partition label and file system, then hit OK.
Step 4. Finally, click the Apply button to complete the disk formatting process.
Solution 3. Update the Disk Driver
Updating disk drivers may also be effective in resolving the “external hard drive showing as local disk” issue.
Step 1. Right-click the Windows logo button and select Device Manager.
Step 2. Expand the Disk drives tab, then right-click the target external hard drive and choose Update driver.
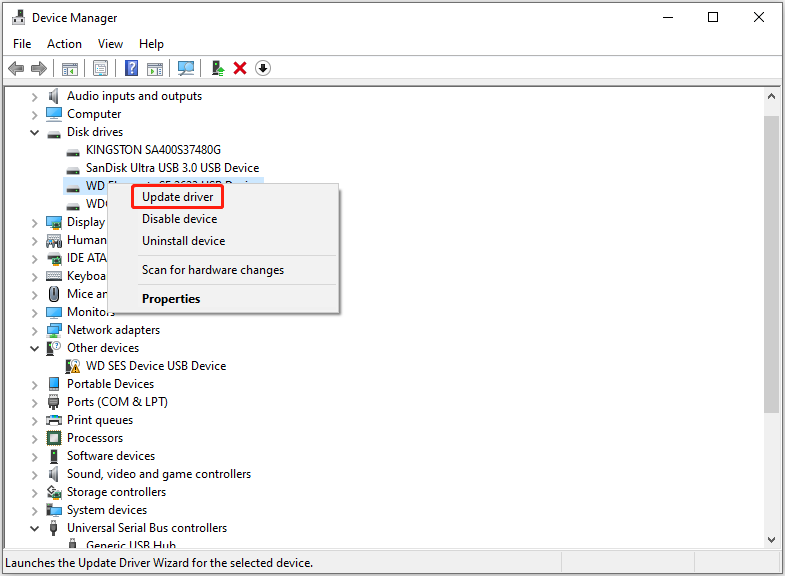
Step 3. Follow the on-screen instructions to complete the process.
Conclusion
To sum up, if the external hard drive shows as local disk D/E/F…, you can try the approaches above to make the drive normal. To prevent permanent data loss, you are suggested to recover files by using MiniTool Power Data Recovery.
MiniTool Power Data Recovery FreeClick to Download100%Clean & Safe
If you encounter any issues while using MiniTool software, please let us know via [email protected].
About The Author

Position: Columnist
Shirley holds a bachelor’s degree in English and has been an editor at the MiniTool Team for many years. She specializes in IT-related content, with a focus on data recovery, file backup, disk management, and other technical topics. She is committed to delivering clear, accurate, and practical solutions to help users resolve common computer issues.
User Comments :