If your internet connection is not working after installing a new Windows 10/11 update, do you know how to fix the issue? In this post, MiniTool Software lists some useful solutions that are worth trying.
Windows Update Breaks Internet Connection
When a Windows 10/11 update is released, many users will choose to install the latest update immediately to experience the new features and improvements. A new Windows update always contain new features, improvements, and bug fixes. However, there may be some bugs in a new Windows update.
For example, you may find that there is no internet after a Windows update. Many users have reported this issue. If you are also bothered by this problem, you can try the methods mentioned in this post to help you out.
Universal Fixes for Internet Not Working After Windows Update
Fix 1: Restart Your PC
In most cases, the internet not working after Windows update is just a temporary issue. You can restart your computer and the issue should disappear.
Fix 2: Manually Enable Wi-Fi
After a Windows update, your Wi-Fi network connection may be disabled. You can manually enable it on your device.
Manually enable Wi-Fi on Windows 10
Step 1: Go to Start > Settings > Network & Internet.
Step 2: Click Wi-Fi from the left menu.
Step 3: Turn on the button under Wi-Fi on the right panel.
Manually enable Wi-Fi on Windows 11
Step 1: Press Windows + I to open the Settings app.
Step 2: Click Network & Internet from the left panel.
Step 3: On the right panel, turn on the button next to Wi-Fi.
Fix 3: Re-Enable Network Adapter
You can also re-enable the network adapter to solve the internet not working after Windows update.
Re-enable network adapter on Windows 10
Step 1: Go to Settings > Network & Internet.
Step 2: Click Status from the left menu.
Step 3: Click Change adapter options under Advanced network settings.
Step 4: Right-click the target adapter and select Enable.
Re-enable network adapter on Windows 11
Step 1: Go to Settings > Network & Internet > Advanced network settings.
Step 2: On the next page, click More network adapter options under Related settings.
Step 3: The Network Connections interface will pop up, on which you need to right-click the target adapter and select Enable.
Fix 4: Turn off Airplane Mode
The airplane mode may be turned on but you don’t know. So, you can go to check if airplane mode is the cause and turn it off if it is on.
>> See how to turn off airplane mode on Windows 10/11
Fix 5: Forget and Reconnect Wi-Fi
If the Wi-Fi network connection is not working after a Windows update and the above methods don’t work for you, you can forget and then reconnect your Wi-Fi to have a try.
Fix 6: Reboot Router
It is simple to reboot the router. You can just power it off and then power it on 60 seconds later. After rebooting the router, you’d better wait for 3-5 minutes and then check the internet connection to see if it can work normally.
Fix 7: Ping the Connection
Step 1: Use Windows Search to search for Command Prompt and select Command Prompt from the search result to open Command Prompt.
Step 2: Type ping google.com into Command Prompt and press Enter. Here, you can change the Google service to another online service like Bing.com.
If you see successful replies, it means your internet connection is working.
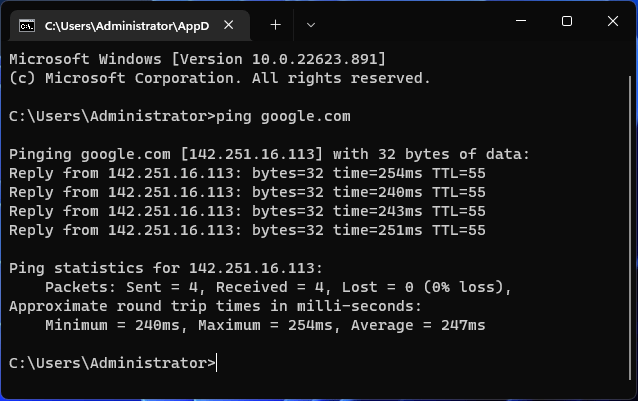
If the replies are wired, you will need to fix the connection. You can continue trying the next solution.
Fix 8: Run the Internet Connection Troubleshooter
Run the internet connection troubleshooter on Windows 10
Step 1: Go to Start > Settings > Update & Security > Troubleshoot.
Step 2: Click the Additional troubleshooters link from the right panel.
Step 3: Under Get up and running, click Internet Connections and then click Run the troubleshooter. This tool will begin to detect and fix the found issues.
Run the internet connection troubleshooter on Windows 11
Step 1: Press Windows + I to open the Settings app.
Step 2: Go to System > Troubleshoot.
Step 3: Click Other troubleshooters on the next page.
Step 4: Click the Run button next to Internet Connections to run the troubleshooter.
Advanced Fixes for Internet Not Working After Windows Update
Windows update breaks internet connection? If the above basic fixes can’t help you solve the problem, you can try the next advanced solutions.
Fix 1: Reset the TCP/IP Stack and Clear the DNS Cache on PC
Step 1: Run Command Prompt as administrator.
Step 2: Type netsh winsock reset into Command Prompt and press Enter. This command can reset the components that handle network requests.
Step 3: Type netsh int ip reset into Command Prompt and press Enter. This command can reset the internet protocol (IP) stack.
Step 4: Type ipconfig /release into Command Prompt and press Enter. This command can clear the current networking configuration.
Step 5: Type ipconfig /renew into Command Prompt and press Enter. This command can automatically reconfigure the network settings.
Step 6: Type ipconfig /flushdns into Command Prompt and press Enter. This command can clear the Domain Name System (DNS) cache.
Step 7: Restart your computer.
Fix 2: Reset Network
Reset Network on Windows 10
Step 1: Go to Settings > Network & Internet > Status.
Step 2: Click Network reset under Advanced network settings.
Step 3: Click the Reset now button to reset your network.
Step 5: Click Yes to confirm the operation.
Reset Network on Windows 11
Step 1: Press Windows + I to open the Settings app.
Step 2: Go to Network & internet > Advanced network settings.
Step 3: Click Network reset under More settings.
Step 4: On the next page, click the Reset now button to reset your network.
Step 5: Click Yes to confirm the operation.
Fix 3: Update or Reinstall or Roll back Network Adapter
You can go to Device Manage to update, uninstall, or roll back the network adapter.
Update network adapter
Step 1: Right-click Start and select Device Manager to open it.
Step 2: In Device Manager, expand Network adapters.
Step 3: Right-click your network adapter and select Update driver.
Step 4: Follow the on-screen guides to update the network adapter to the latest version.
Reinstall network adapter
Step 1: Right-click Start and select Device Manager to open it.
Step 2: In Device Manager, expand Network adapters.
Step 3: Right-click your network adapter and select Uninstall device.
Step 4: Click Uninstall to confirm.
Step 5: Restart your computer. Then, Windows will automatically install the latest network driver on your machine.
Roll back network adapter
The new network adapter may not be compatible with your system, this it doesn’t work. You can roll back the network adapter to have a try.
Step 1: Right-click Start and select Device Manager to open it.
Step 2: In Device Manager, expand Network adapters.
Step 3: Right-click your network adapter and select Properties.
Step 4: On the pop-up interface, click the Roll back button and follow the on-screen guides to roll back the network adapter to the previous version.
Fix 4: Turn off Windows Firewall or Third-Party Antivirus Software
Windows Firewall or your installed third-party antivirus software may block your internet connection. To rule out this possibility, you can turn off the firewall or third-party antivirus software, and then check if you can use the network connection normally.
Fix 5: Uninstall Windows Update
If you think the new Windows update brings you a lot of trouble, you can choose to uninstall it. You can uninstall cumulative updates using the following methods:
Uninstall cumulative updates on Windows 10
Step 1: Go to Start > Settings > Update & Security > Windows Update.
Step 2: Click View update history from the right panel.
Step 3: Click Uninstall updates on the next page.
Step 4: On the pop-up page, right-click the update you want to uninstall and click Uninstall.
Step 5: Click Uninstall to confirm the operation.
Uninstall cumulative updates on Windows 11
Step 1: Press Windows + I to open Settings.
Step 2: Click Windows Update from the left panel.
Step 3: Click Update history from the right panel and then Uninstall updates under Related settings.
Step 4: Find your recently installed update and click the Uninstall button next to it.
Step 5: Click Uninstall to confirm the operation. This will remove it from your device.
Fix 6: Go back to the Previous Version of Windows
You can also go back to the previous Windows 10/11 version which your network connection still works normally.
Go back to the previous version of Windows on Windows 10
Step 1: Go to Start > Settings > Update & security > Recovery.
Step 2: Click the Get started button under Go back to the previous version of Windows 10.
Step 3: Follow the on-screen instructions to make your system go back to the previous version on which the network connection can work normally.
Go back to the previous version of Windows on Windows 11
Step 1: Click Windows + I to open the Settings app.
Step 2: Go to System > Recovery.
Step 3: Click the Go back button under Recovery options.
Step 4: Follow the on-screen guides to go back to the previous Windows 11 version.
Bottom Line
Internet not working after installing a Windows update? Here are 14 easy fixes for you. Should you have other related issues, you can let us know in the comments.
