If you suspect your hard drive encounters issues, you can check the drive for errors on Windows 7. This MiniTool post talks about fixdisk Windows 7. You can follow the guide to check the hard drive for errors on Windows 7.
Symptoms when Running Windows 7
Although Windows 7 is an old enough Windows version, many users are still running it in their daily life. You could be one of such users. You might find that the system crashes or programs get freezing when you want to make some operations or open certain files.
If so, your hard disk might have errors. You need to perform Windows 7 disk check to solve the problem. To help you do this, we will show you a full guide about fixdisk Windows 7 here.
Tip: Rescue Your Fils if Necessary
If your hard drive is damaged or inaccessible, you’d better use MiniTool Power Data Recovery (a professional data recovery software) to rescue your files on it and then run Windows 7 disk check to fix the drive.
This software can recover your files in different situations. If your files are deleted or formatted by mistake, you can use this MiniTool data restore tool to get them back. If your storage becomes RAW or you cannot open it for other reasons, you can also use this utility to rescue your files on it. This software has a trial edition, allowing you to scan the drive and recover data up to 1 GB. So, just try it to perform data recovery.
MiniTool Power Data Recovery FreeClick to Download100%Clean & Safe
How to Check Hard Disk for Errors on Windows 7?
On Windows 7, you can use the Disk Check tool to check hard disk for errors. This tool is designed to identify and automatically correct file system errors. This can make you continue to load and write data from the hard disk.
Here is how to check your hard disk for errors using the Disk Check tool on Windows 7:
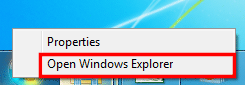
Step 1: Right-click the Start icon from the left-bottom corner, then select Open Windows Explorer.
Step 2: Click Computer from the left navigation pane to make all your drives to be displayed in the right pane.
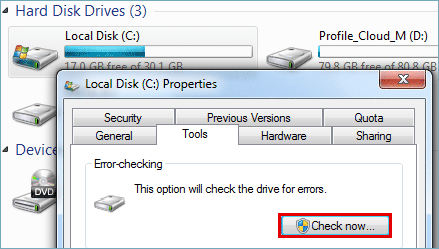
Step 3: Right-click the problematic drive, then select Properties.
Step 4: Switch to the Tools tab.
Step 5: Click the Check now button under Error-checking.
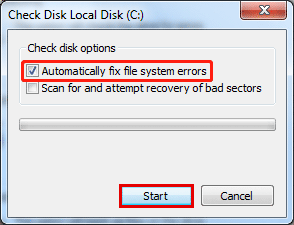
Step 6: On the next pop-up window, you need to select Automatically fix file system errors, then click the Start button to start the scanning process.
Step 7: If you receive a window saying the disk is in use, you can click Schedule disk check to continue. This window always appears when you are checking a system drive. If you are checking a non-system, you can skip to Step 9 to continue.
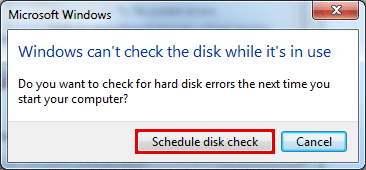
Step 8: Close all open programs, then restart your PC. The disk-checking tool will start to scan and fix errors on your hard drive before the computer startup.
Step 9: If you are not scanning a system drive but you receive the following message, you need to save all open files and close all open programs, then click Force a dismount to continue.

Step 10: The Windows 7 disk check process will start. When it ends, you can see the scan results.

Bottom Line
Want to check your hard disk for errors on your Windows 7 computer? You can find a full guide in this post. Additionally, if you need to recover data from your damaged hard drive, you can try MiniTool Power Data Recovery.
MiniTool Power Data Recovery FreeClick to Download100%Clean & Safe
If some issues happen when using MiniTool Software, you can contact us via [email protected].
About The Author

Position: Columnist
Stella has been working in MiniTool Software as an English Editor for more than 8 years. Her articles mainly cover the fields of data recovery including storage media data recovery, phone data recovery, and photo recovery, videos download, partition management, and video & audio format conversions.
User Comments :