If your SD card suddenly becomes inaccessible, prompts you to format, or displays as RAW, don’t rush to format or give up. This could be due to a file system issue rather than physical damage.
Windows’ built-in CHKDSK command can be helpful. Let’s take a closer look at what this command does.
What Is CHKDSK
CHKDSK (Check Disk) is a powerful command-line tool in Windows. It is used to detect and repair file system errors on disks. Read the following contents to understand this tool better.
1. Its main features include:
- Scanning the integrity of the disk file system
- Repairing logical errors (such as file system corruption)
- Detecting and marking bad sectors
- Providing disk usage reports
2. This is a detailed introduction to some common parameters:
- /f: Repairs errors on the disk (the disk must be locked)
- /r: Finds bad sectors and recovers readable information (includes /f functionality)
- /x: Forces unmounting the volume (includes /f functionality)
- /b: Clears bad cluster list and rescan (NTFS only)
If your SD card has the following problems, you can try running CHKDSK to restore it to a normal state:
- The system prompts: “You need to format the disk before you can use it.”.
- The file or directory is corrupted and unreadable.
- The SD card is in RAW format.
- The SD card appears empty, but contains files.
- The camera or phone freezes or displays a black screen when using an SD card.
- The SD card does not display a drive letter when inserted.
- …
Recover Data from a Corrupt SD Card in Advance
Before running CHKDSK on a corrupted SD card, you need to ensure your data is secure. That’s because the repair process may delete existing data, especially if the damage is severe or there are bad sectors.
If your corrupted SD card cannot be accessed, try MiniTool Power Data Recovery to recover the data from your inaccessible card.
This powerful recovery tool scans damaged and inaccessible SD cards and recovers nearly all file formats. The recovery process is read-only and doesn’t write to the SD card, preventing secondary damage.
Its user-friendly interface allows recovery in just a few steps, making it easy even for beginners. This free file recovery software gives you free recovery capacity for 1 GB of files. Now, let’s start recovering data from your SD card.
Step 1: Connect your SD card to your computer
Step 2: Download and launch the software
Click the green button to download and install MiniTool Power Data Recovery on your PC. After the installation completes, double-click the icon to open it.
MiniTool Power Data Recovery FreeClick to Download100%Clean & Safe
Step 3: Find and scan the SD card
In the main interface, find the SD card under the Logical Drives tab. Move your cursor to it and click Scan.
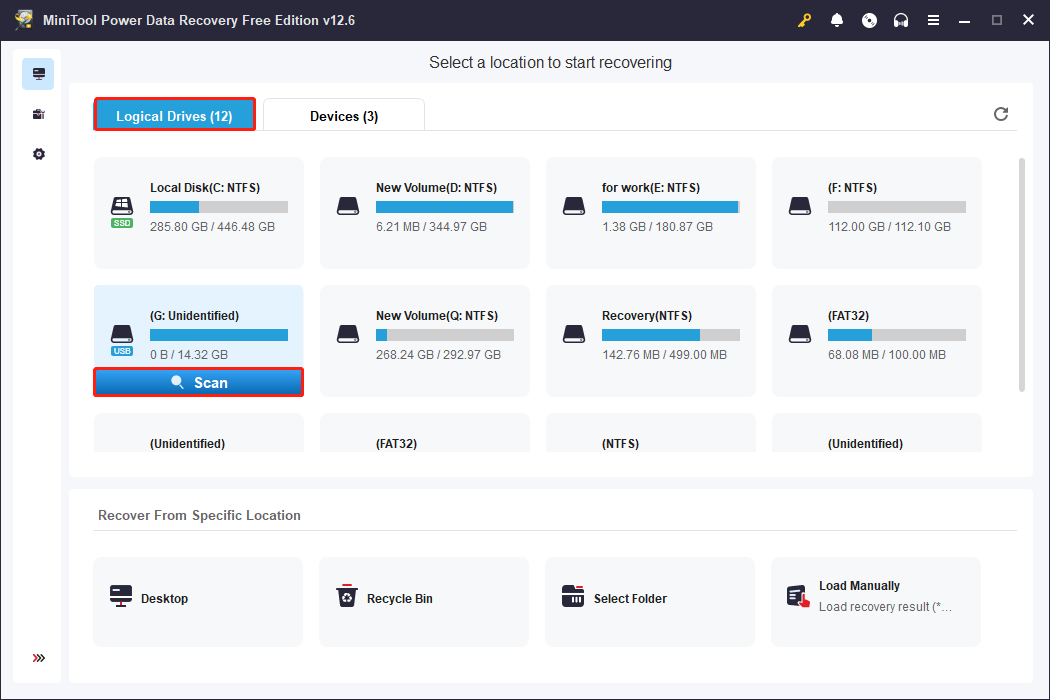
The scan will take some time. For a more complete scan result, please wait patiently.
Step 4: Locate the target files using Path, Type, Filter, or Search
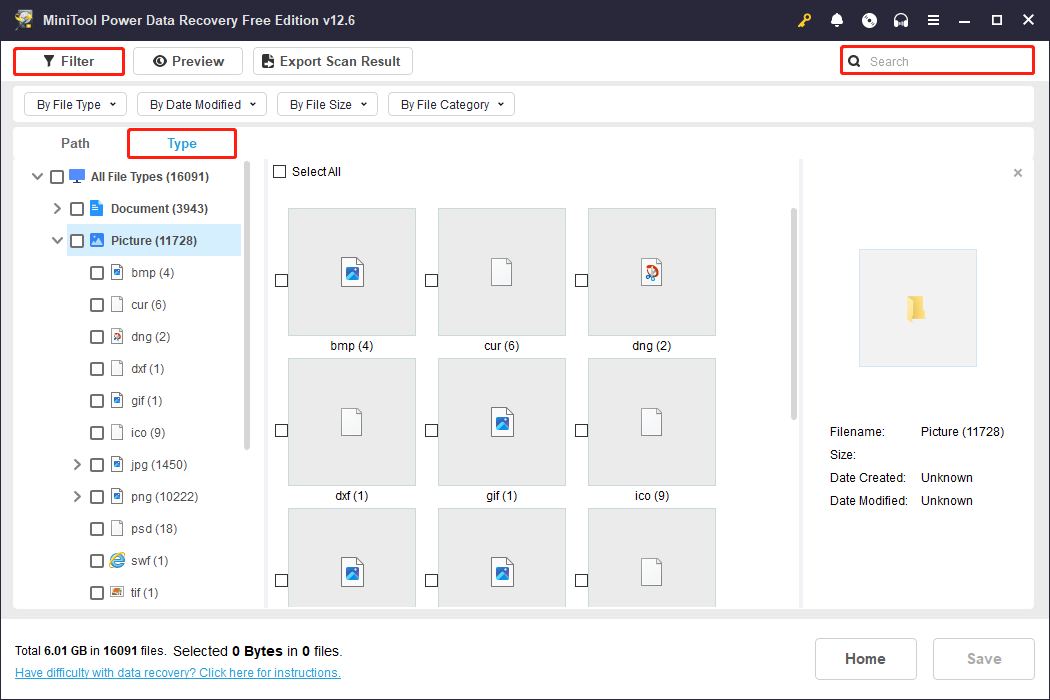
After the scan is completed, the files will be listed under the Path tab.
If you want to find the files according to the file structure, expand Deleted Files, Lost Files, or Existing Files to locate them. Besides this, here are some other filter features.
- The Type feature allows you to quickly locate target files by file type, such as documents, pictures, audio, or videos. Switch to the Type tab and expand the file type to find the target files.
- The Filter feature can quickly narrow your search scope. Click the Filter button, and you can set the filter criteria by file type, modification date, file size, and file category at once.
- The Search feature allows you to quickly locate target files by keywords, such as file names or extensions. On the scan results page, input the file name keywords in the search bar and press Enter. The software will instantly filter matching items.
Step 5: Check the file contents before recovery
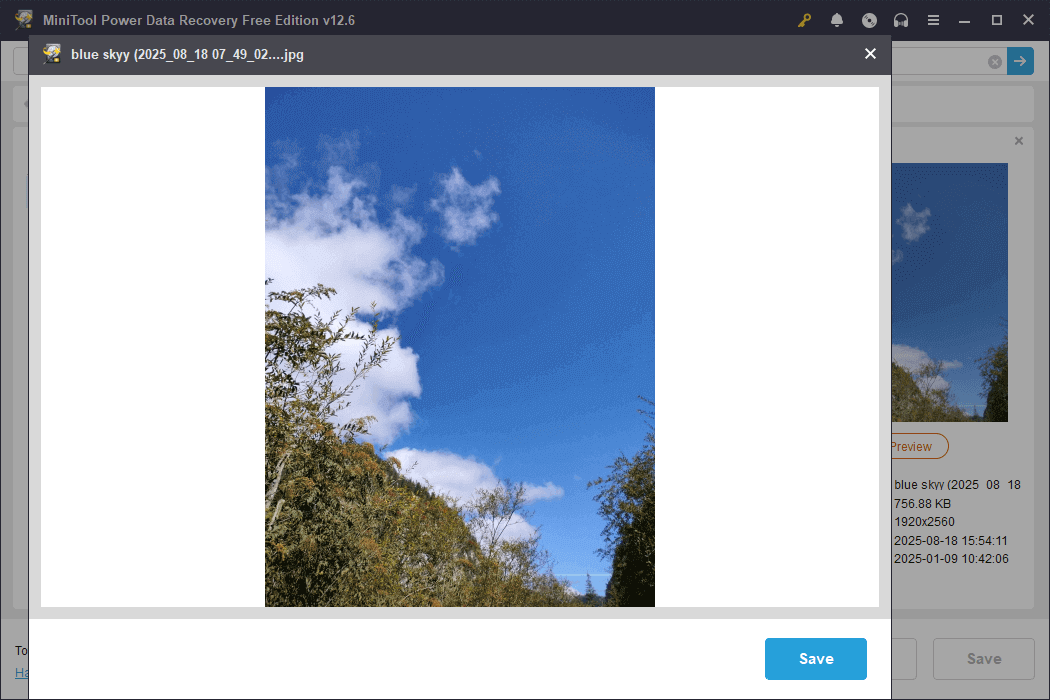
The Preview feature allows you to view file contents before recovery. This confirms they are the intended files and effectively prevents unrelated files from being restored.
To preview a file, double-click it in the file list. A preview window will appear, displaying the file’s contents.
Step 6: Restore the selected files to a specified location
After confirming the target files, check them, click Save, and then select a save path. Finally, hit OK to start the recovery.

After successfully recovering important files, you can start using CHKDSK to repair the damaged SD card.
How to Run CHKDSK on an SD Card
Here is how to use CHKDSK to scan and repair logical errors and file system corruption on your SD card. This will restore it to normal working condition. Two options are here.
Option 1: Use the CHKDSK Command
The CHKDSK command allows you to deeply scan and check your SD card.
Step 1: Open an administrative Command Prompt
Type cmd in the Windows search bar, right-click Command Prompt, and choose Run as administrator.
Step 2: Execute the CHKDSK command for SD card
Input chkdsk /f /r /x *: or other parameter combinations and press Enter to fix errors. Replace * with your actual drive letter.
For example, to repair the G: drive, input chkdsk /f /r /x G: and hit Enter.
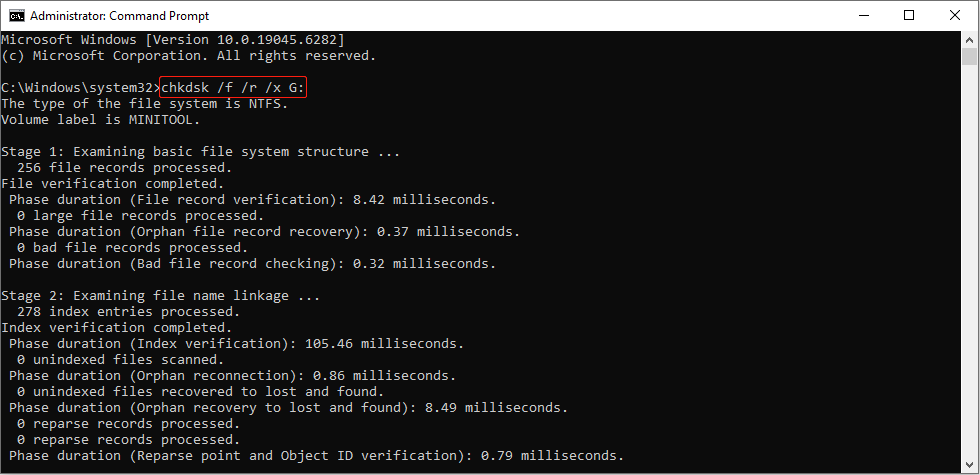
The system will begin checking and repairing errors on the SD card. This process may take several minutes, depending on the card size and the severity of the error.
After the repair is complete, restart this computer and check if the SD card is back to normal.
Option 2: Try the Error Checking Tool
Windows includes an error-checking tool that performs the same function as chkdsk /f. It can also CHKDSK for SD card and is suitable for users who are not familiar with CMD.
Step 1: Press Win + E to open File Explorer, and click This PC.
Step 2: Right-click your SD card and choose Properties.
Step 3: Go to the Tools tab and click Check.

Step 4: Choose Scan and repair drive to start the repair process.
After the repair is complete, re-insert the SD card or restart the computer to confirm whether your card returns to normal.
Other Ways to Troubleshoot Your Corrupted SD Card
If you’re still unable to access your SD card, try the following solutions.
Way 1: Assign a New Drive Letter
Assigning a new drive letter allows the system to re-identify the device and restore access rights. This is especially useful when the card is recognized but cannot be opened or prompts “Please insert a disk”.
Step 1: Open Disk Management
Press Win + X and select Disk Management.
Step 2: Locate and right-click the target drive
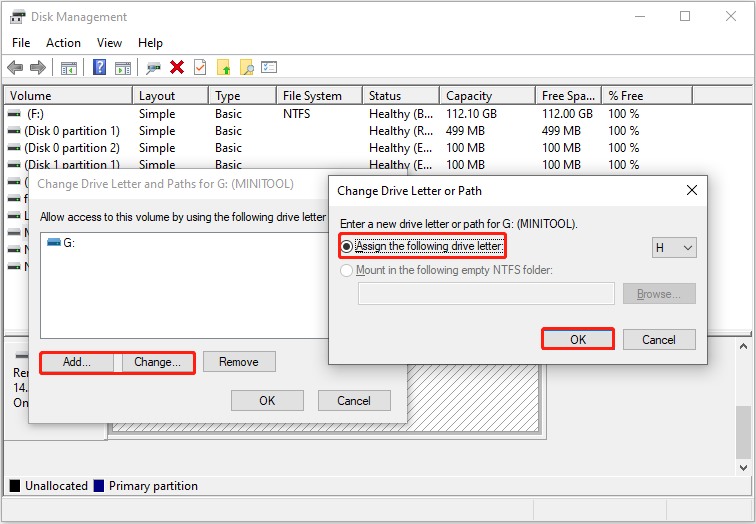
In the Disk Management window, find the volume whose drive letter you want to assign or change. Right-click the volume and select Change Drive Letter and Paths.
Step 3: Add or change a drive letter
If the drive doesn’t have a drive letter assigned, click Add; if it already has one, click Change. Select an unused letter from the drop-down menu, click OK, and then click Yes in the confirmation window.
If there is no problem with the drive letter, continue with the next method.
Way 2: Reinstall SD Card Drivers
Reinstalling the SD card driver can fix the “inaccessible” status caused by recognition anomalies or compatibility issues.
Step 1: Open the Device Manager
Right-click the Windows icon and click Device Manager.
Step 2: Find the SD card driver
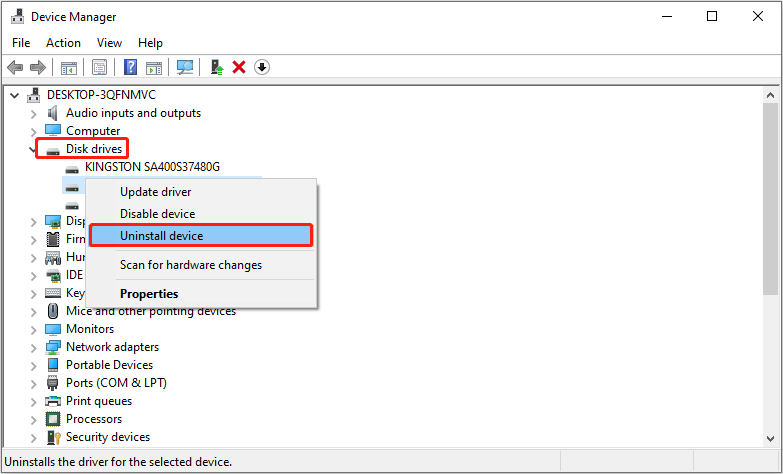
Expand Disk drives or Universal Serial Bus controllers to find the device associated with your SD card or card reader.
Step 3: Uninstall the driver
Right-click the device, select Uninstall device, and click Uninstall in the pop-up window.
Step 4: Restart your computer
After uninstallation is complete, restart your computer. Windows will automatically reinstall the driver upon restart.
If this method fails, the fix below may help.
Way 3: Create a Partition on Unallocated Space
When the SD card is displayed as “unallocated space” due to a damaged partition table, creating a new partition can help. This can re-establish the file system structure and allow the system to recognize and use this storage area again.
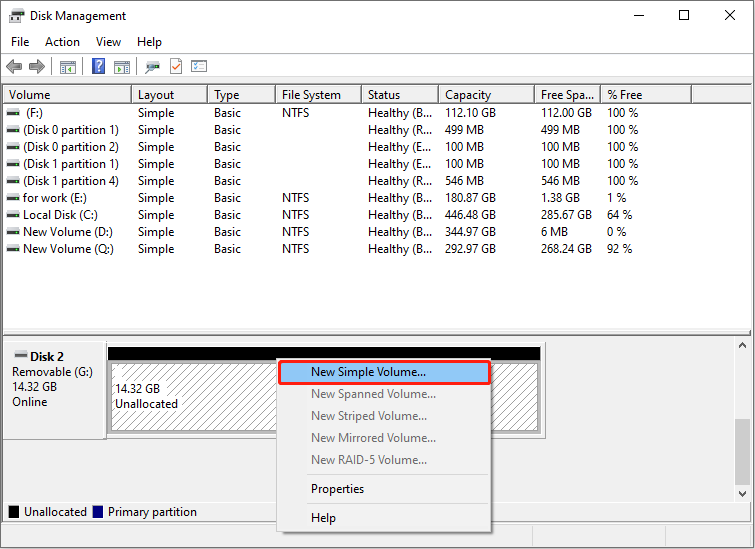
Step 1: Open Disk Management and locate the unallocated space
Open Disk Management. Once inside, select the unallocated space, typically indicated by a black bar.
Step 2: Create a new partition
Right-click the unallocated space and select New Simple Volume. The New Simple Volume Wizard will launch, and you’ll need to click Next.
Step 3: Set the partition size and assign a drive letter
Enter the desired amount of space (in MB) or use the default to allocate the entire space, and click Next. Select a drive letter and click Next.
Step 4: Format the partition
Select a file system and enter a volume label. Check Perform a quick format and click Next.
Step 5: Complete partition creation
Click Finish. The system will automatically format the drive and assign a drive letter. After a few seconds, your new partition will appear in This PC.
When these methods don’t work, it is best to format your SD card.
Way 4: Format Your SD Card to Normal
If all the above methods fail, the SD card’s file system may be severely damaged, and you may need to format it. This operation will clear the corrupted structure and re-establish a fresh file system, allowing the device to recognize and use the card again.
Formatting using File Explorer:
Step 1: Press Win + E to open File Explorer, and click This PC.
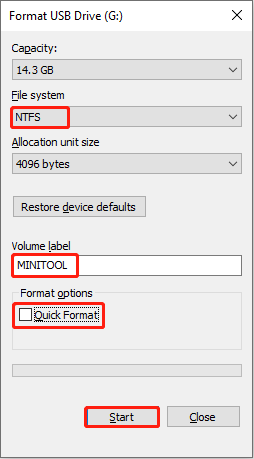
Step 2: Find and right-click the SD card and select Format.
Step 3: In the pop-up window, set the file system and volume label. Uncheck Quick Format (this may take a long time and will make data almost impossible to recover).
Step 4: Click Start > OK, wait for the process to complete, and then click OK once more.
Formatting using Disk Management:
Step 1: Open Disk Management.
Step 2: Find and right-click the target drive and select Format.
Step 3: Set the file system and volume label, uncheck Perform a quick format, and click OK.
Besides these, you can also format your SD card using MiniTool Partition Wizard. This is a powerful partitioning tool. It supports multiple file systems and can format various types of SD cards quickly and safely.
MiniTool Partition Wizard FreeClick to Download100%Clean & Safe
Tips for Protecting Your SD Card
After successfully repairing your SD card, please remember to keep it properly. You can adopt the following suggestions to protect your SD card:
- Safely remove the device. After each use of the SD card, use the system’s “Safely Remove Hardware” feature to remove it instead of unplugging it directly.
- Avoid transferring or writing data on an unstable power supply. When transferring files, ensure the device has a stable power supply and avoid sudden shutdowns or unplugging.
- Scan with antivirus software. Regularly check your SD card with antivirus software to prevent viruses from tampering with file attributes or setting hidden write protections.
- Use a branded card reader. Choose a reliable card reader and avoid cheap or outdated devices.
- Back up your data regularly. Regardless of whether your card is functioning properly, it’s recommended that you regularly back up important files. This will help you quickly restore files if they are lost.
Wrapping Things Up
When an SD card experiences some issues, data security is paramount. After using MiniTool Power Data Recovery to recover data from an inaccessible SD card, you can confidently repair your corrupted card.
First, CHKDSK SD card. If that doesn’t work, proceed with the following steps: assign a new drive letter, reinstall the driver, create a new partition in the unallocated space, or format it. Hope your SD card will be back to normal use.
Got questions about MiniTool products? We’re here to help. Just let us know your confusion through [email protected].
About The Author

Position: Columnist
Chelsea graduated from university with a major in English. She has a strong interest in English writing. It is this passion for writing that led her to become an English editor. Her articles mainly focus on data recovery and other computer industry news. As an energetic and outgoing girl, Chelsea enjoys listening to music, singing, riding bikes, and eating in her spare time.
User Comments :