Benefits of Adding Unallocated Space to D Drive
As the computer usage time increases, the number of files stored in the computer will generally increase, occupying a large amount of disk space on C drive, D drive, etc. Insufficient disk space may cause a series of problems such as slowing down of the computer, inability to use software normally, inability to download files, etc.
Adding unallocated space to D drive (or other memory-starved partitions) is an effective way to increase D drive space. Thereby, you will have more disk space to store and organize files. In addition, you can move large files or folders stored in the C drive to the D drive to free up C drive space and ensure the normal operation of the computer.
Now, you can keep reading to learn how to add unallocated space to D drive.
How to Add Unallocated Space to D Drive
Way 1. Increase D Drive Space via Disk Management
Windows offers you a built-in partition management tool, Disk Management, to organize disk partitions. You can use this utility to add unallocated space to a partition.
How to add unallocated space to D drive with Disk Management? See detailed steps below.
Step 1. Right-click the Windows logo button to select Disk Management.
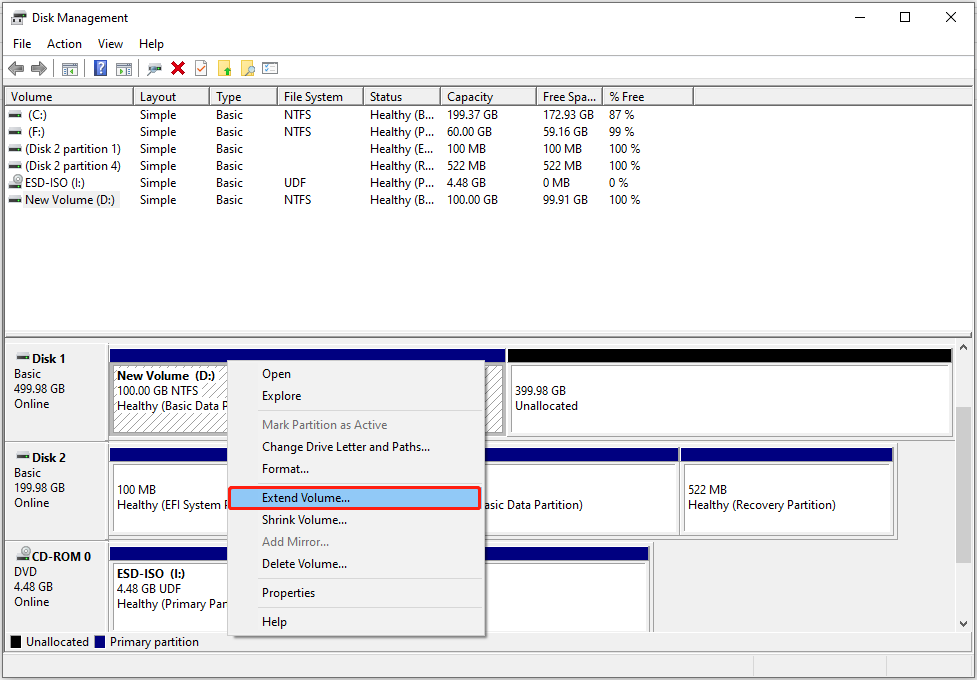
Step 2. Right-click the D partiiton located to the left of the unallocated space and select Extend Volume.
Step 3. Click Next to continue.
Step 4. Adjust the amount of space you want to add to the D drive from unallocated space and click Next.
Step 5. Finally, click Finish.
Way 2. Merge Unallocated Space to D Drive With MiniTool Partition Wizard
Although it is easy to increase D drive space with Disk Management, you may encounter the Extend Volume grayed-out issue. Here is a true example:
I see a 13 MB unallocated disk space in Disk management. But when I try to merge the space with D drive, I see the Extend Volume option is greyed out. I have seen some third-party applications which can be used to merge the unallocated space but is it safe to use them?learn.microsoft.com
In such a situation, MiniTool Partition Wizard is highly recommended. It is a professional and green partition management tool that can help extend/shrink volumes, create/delete partitions, move/resize partitions, etc.
Now, you can download and use this 100% secure and free partition manager to extend the D drive.
MiniTool Partition Wizard FreeClick to Download100%Clean & Safe
Step 1. Launch MiniTool Partition Wizard Free.
Step 2. Select the D drive, then scroll down to choose Extend Partition from the left panel.
Step 3. In the new window, open the drop-down list of Take Free Space from and choose the target unallocated space. After that, drag the handle to adjust the new size of the D drive. Then click OK.
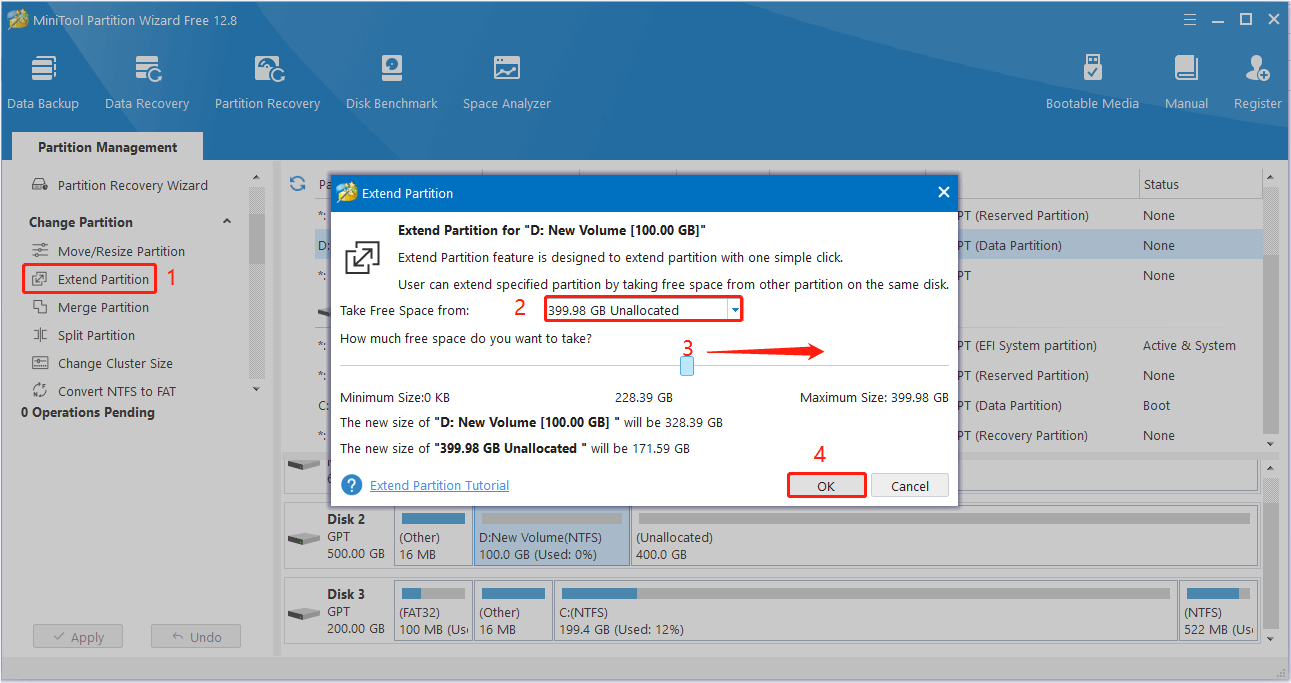
Step 4. Preview the disk expansion effect. If it meets your requirements, click the Apply button located in the lower left corner to apply this change.
Alternatively, you can use the Move/Resize Partition feature to move adjacent unallocated space to the D drive.
Way 3. Extend D Drive Using CMD
Next, we will show you how to add unallocated space to D drive using CMD. If you prefer to increase D drive space by using command lines, you can choose this way.
Step 1. In the Windows search box, type cmd. Then right-click Command Prompt from the best match result to select Run as administrator.
Step 2. In the new window, type the following command lines. Remember to press Enter after each command line.
- diskpart
- list volume
- select volume * (* represents the volume number of the D drive)
- extend size=XXXX (XXXX stands for the free space size you want to add to the D drive)
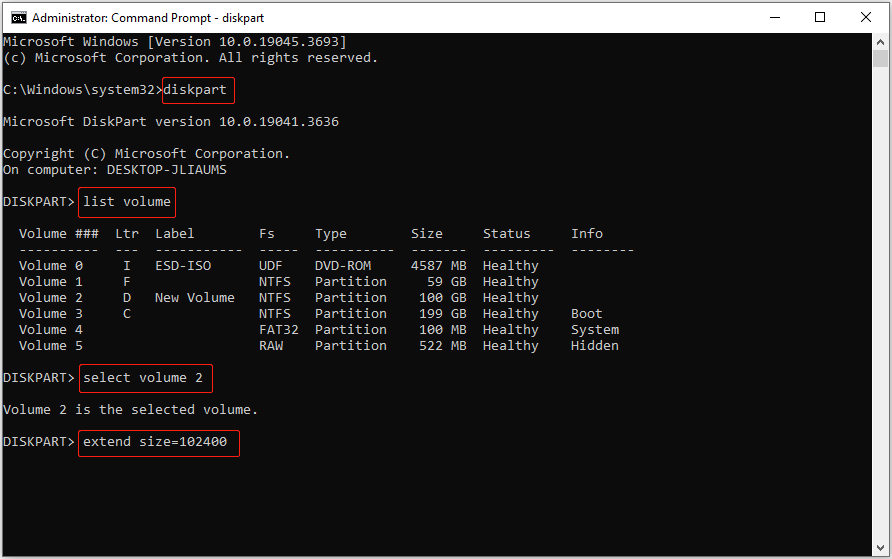
Step 3. Finally, type exit and press Enter to close the Command Prompt window.
MiniTool Power Data Recovery FreeClick to Download100%Clean & Safe
Bottom Line
This post introduces how to add unallocated space to D drive via Disk Management, MiniTool Partition Wizard, and CMD. Hope you can extend the D drive successfully after implementing the approaches above.
Should you have any concerns about MiniTool software, please do not hesitate to let us know by sending an email to [email protected].
About The Author

Position: Columnist
Shirley holds a bachelor’s degree in English and has been an editor at the MiniTool Team for many years. She specializes in IT-related content, with a focus on data recovery, file backup, disk management, and other technical topics. She is committed to delivering clear, accurate, and practical solutions to help users resolve common computer issues.
User Comments :