To move unallocated space to C drive, you can use Windows built-in Disk Management or DiskPart tools. However, these tools may not work if the unallocated space is not immediately adjacent to the C drive. To increase the C drive space without this restriction, use MiniTool Partition Wizard.
Keeping unallocated space on the system disk can result in wasted capacity, especially if the C drive runs out of space.
Adding the unallocated space to the C drive can make full use of the disk and prevent system performance degradation due to low free space.
This MiniTool guide explores how to add unallocated space to C drive in Windows 10 or 11 in detail.
How to Move Unallocated Space to C Drive in Windows 10/11
To increase the C drive space, you can use the professional partition manager, MiniTool Partition Wizard.
If you prefer not to use third-party software, Windows’ built-in Disk Management or the DiskPart command-line tool can also extend the C drive.
However, both of the built-in tools require the unallocated space to be directly adjacent to the C drive on the right side.
Continue reading to decide which method applies to your situation.
Method 1. Use MiniTool Partition Wizard
MiniTool Partition Wizard is a free disk management software compatible with Windows 11/10/8/7.
It has an Extend Partition feature that allows you to take free space from unallocated space (or even existing partitions) to enlarge the C drive.
The unallocated space can be adjacent to the C drive or non-contiguous, whether on the left or right side.
The Extend Partition tool is completely free to use. Download MiniTool Partition Wizard and follow the steps below to extend the C drive using unallocated space.
MiniTool Partition Wizard FreeClick to Download100%Clean & Safe
Step 1. On the main interface of this partition magic, select the C drive and click Extend Partition from the left sidebar.
Step 2. In the new window, expand the drop-down list of Take Free Space from and choose the target unallocated space.
Step 3. Drag the slider left or right to specify how much free space to allocate, then click OK.
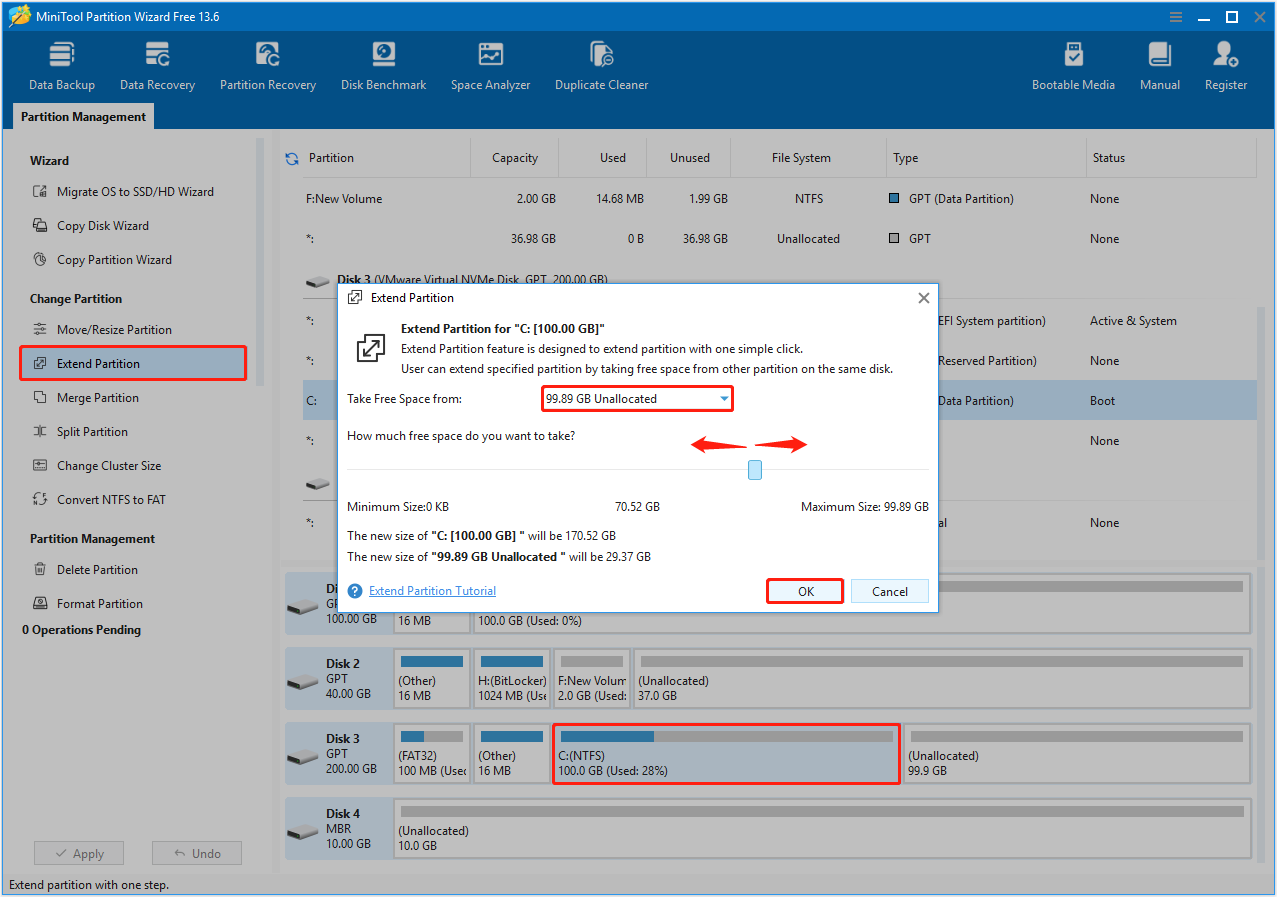
Step 4. Preview the result after extending the C drive. Once you confirm it meets your needs, click Apply to confirm this change.

Method 2. Use Disk Management
Disk Management has an Extend Volume feature that helps you increase the C drive size using contiguous unallocated space directly to its right.
Follow the steps below to move unallocated space to C drive using Disk Management.
Step 1. In Disk Management, right-click the C drive and choose Extend Volume.
Step 2. Click Next.
Step 3. Specify the amount of space and click Next.

Step 4. Click Finish to increase the C drive capacity.
Problem: Extend Volume Is Grayed Out
In many cases, the Extend Volume option is grayed out. This is usually because the unallocated space is not adjacent to the C drive.
In such cases, you may need to delete the partition located to the right of the C drive to enable the Extend Volume feature.
- For a data partition, simply right-click it and select Delete Volume.
- If it is a recovery partition, you will need to delete it using the DiskPart tool.
Follow the instructions below to delete the recovery partition:
Step 1. Type cmd in the Windows search box. When the Command Prompt option appears, right-click it and choose Run as administrator.
Step 2. Type the following commands one by one and press Enter after each:
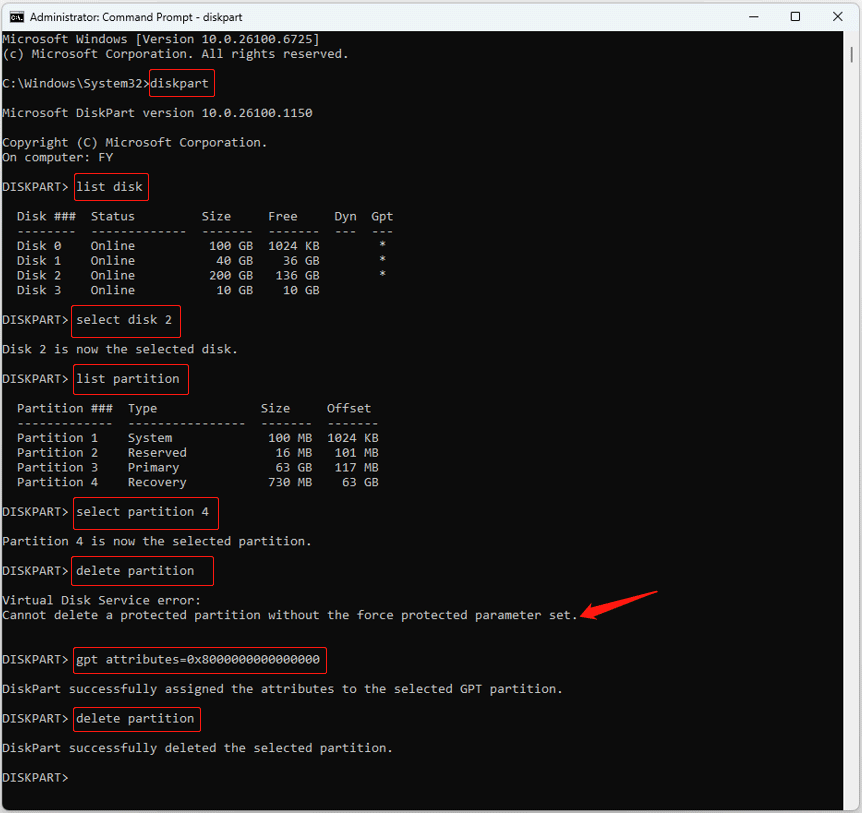
- diskpart
- list disk
- select disk 2 (replace 2 with the actual number of the system disk)
- list partition
- select partition 4 (replace 4 with the actual number of the partition you want to delete)
- delete partition
If you are deleting a recovery partition on a GPT disk, you may encounter the “Cannot delete a protected partition without the force protected parameter set” error.
This occurs because recovery partitions are often protected by the system to prevent accidental deletion.
In this case, execute the gpt attributes=0x8000000000000000 command to remove the protection attribute from the recovery partition. After that, run the delete partition command again.
Step 3. Now, you can open Disk Management and try to extend the C drive using the unallocated space again.
Method 3. Use Command Prompt
For users who prefer command-line operations, DiskPart provides a method to extend the C drive. Follow the steps below to add unallocated space to the C drive:
Step 1. Run Command Prompt as an administrator.
Step 2. Type the following commands one by one and press Enter after each:
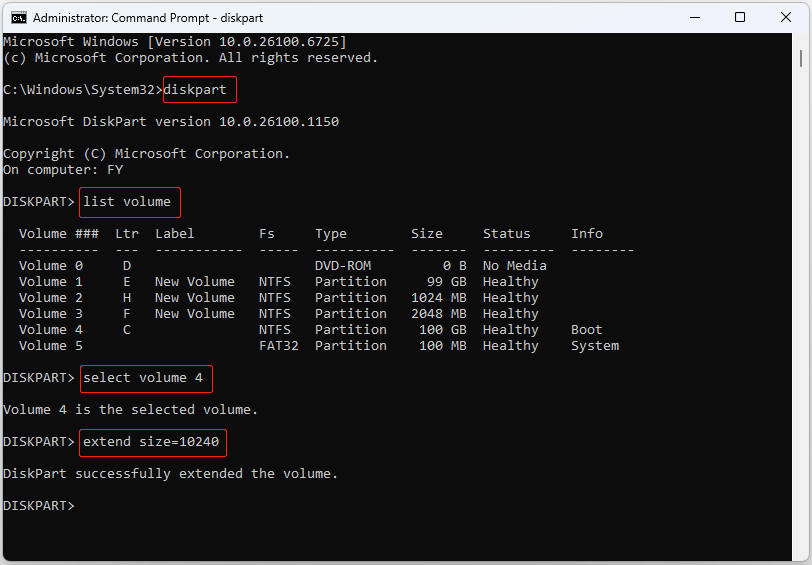
- diskpart
- list volume
- select volume 4 (replace 4 with the actual number of the C drive)
- extend size=10240 (replace 10240 with the amount of space you want to extend, in MB. For example, 10240 equals 10 GB).
The following table clearly compares the three tools for moving unallocated space to the C drive.
| Type | Ease-of-use | Unallocated space location | Suitable use cases | |
| MiniTool Partition Wizard | Graphical | Yes | No specific location required | Works with unallocated space, whether adjacent or non-adjacent, and on either side of the C drive. |
| Disk Management | Graphical | Yes | Must be contiguous with the C drive | Works only when unallocated space is directly adjacent to the right of the C drive. |
| DiskPart | Command line | No | Must be contiguous with the C drive | Works only when unallocated space is directly adjacent to the right of the C drive. |

Bottom Line
In conclusion, three tools are available for adding unallocated space to the C drive on the same disk in Windows 10/11.
MiniTool Partition Wizard does not require the unallocated space to be adjacent to the C drive. In contrast, Disk Management and DiskPart only work when the unallocated space is immediately to the right of the C drive.
Choose the appropriate tool to increase the system drive space based on your actual situation. If you have any issues when using MiniTool Partition Wizard, please do not hesitate to contact the technical support team at [email protected].
About The Author

Position: Columnist
Shirley holds a bachelor’s degree in English and has been an editor at the MiniTool Team for many years. She specializes in IT-related content, with a focus on data recovery, file backup, disk management, and other technical topics. She is committed to delivering clear, accurate, and practical solutions to help users resolve common computer issues.
User Comments :