A hidden disk refers to a disk partition that exists but is not visible in the computer system. These partitions usually don’t show up in File Explorer or other file-browsing tools, so you can’t access them directly. Hiding a disk partition is mainly to ensure the confidentiality of sensitive data and improve system security.
If you want to regain access to a hidden partition, you can take some methods to unhide it. In the next part, we will describe detailed information about “unhide hidden partition diskpart”.
How to Show Hidden Partition Using CMD
Diskpart is a command-line disk partitioning utility that is designed to manage computer hard drives. You can use it to unhide a partition. Here are the major steps on diskpart unhide partition:
Step 1. Press the Windows + R keyboard shortcut to open the Run window.
Step 2. Type diskpart in the text box and click OK.
Step 3. If a User Account Control window pops up, click the Yes option to continue.
Step 4. Next, type the following command lines and press Enter after each one.
- list volume
- select volume * (replace * with the target volume number of the hidden partition)
- assign letter # (replace # with an available drive letter)
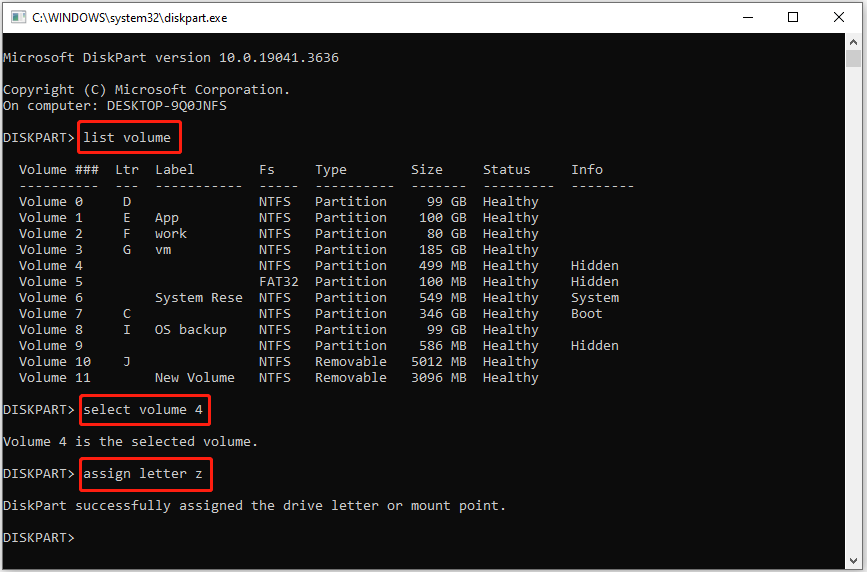
Step 5. Once the command lines are executed, the hidden partition should be displayed in Windows Explorer.
This is all about how to show hidden partition using CMD.
CMD Alternatives to Unhide a Hidden Partition
Alternative 1: Disk Management
A disk partition that lacks a drive letter will be prevented from showing up and accessing. In addition to the diskpart tool, you can unhide a hidden volume by adding a drive letter from Disk Management.
Step 1. Right-click the Start button to select Disk Management.
Step 2. Find and right-click the hidden partition and choose Change Drive Letter and Paths.
Step 3. Click Add to choose an available drive letter from the drop-down list, then click OK.
Alternative 2: MiniTool Partition Wizard Free
Sometimes, if the volume is hidden by a third-party partition manager, the hidden partition won’t show up in both File Explorer and diskpart. In such a situation, you won’t be able to unhide it with CMD. To complete the partition unhide task, you can take advantage of MiniTool Partition Wizard, a free partition management tool for Windows.
If you need to unhide a partition on a removable drive, you have to connect the drive to your computer first of all.
Step 1. Download, install, and launch MiniTool Partition Wizard Free.
MiniTool Partition Wizard FreeClick to Download100%Clean & Safe
Step 2. On the main interface of this partition magic, find and right-click the hidden partition and choose Unhide Partition from the context menu.
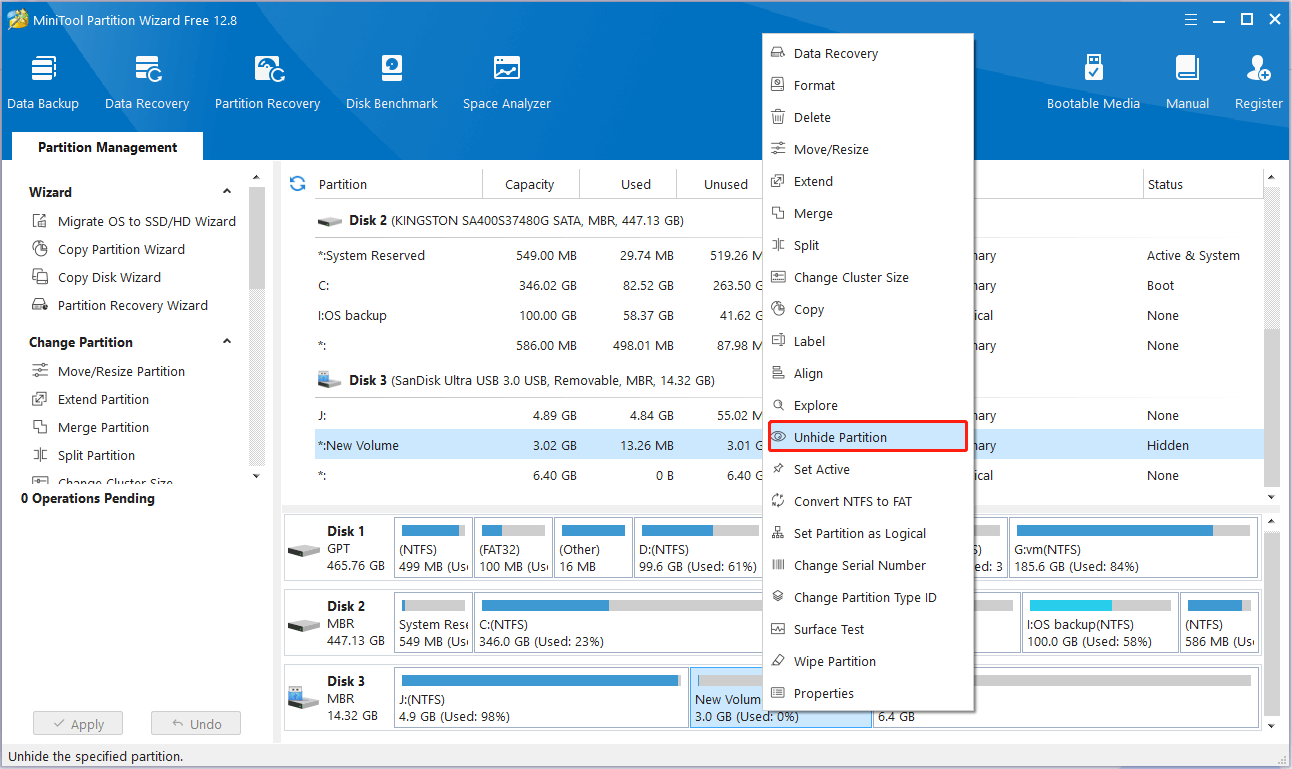
Step 3. Finally, click the Apply button from the bottom left corner to make this change take effect.
Further Reading: How to Hide a Partition on Windows
If you have no idea how to hide a partition to prevent others from accessing confidential files without permission, you can refer to the steps below.
Step 1. Right-click the Start button to select Run. Then type diskpart in the new window and press Enter.
Step 2. Input the following commands sequentially. Remember to press Enter after each command.
- list volume
- select volume * (replace * with the target number of the partition you want to hide)
- remove letter # (replace # with the drive letter of the partition you want to hide)
Alternatively, you can choose to hide a partition by using MiniTool Partition Wizard.
MiniTool Power Data Recovery FreeClick to Download100%Clean & Safe
Bottom Line
Reading here, you should know how to unhide partition in Windows 10 CMD. If this way does not work for you, you can use MiniTool Partition Wizard.
If you encounter any issues while using MiniTool software, please contact us via [email protected].
About The Author

Position: Columnist
Shirley holds a bachelor’s degree in English and has been an editor at the MiniTool Team for many years. She specializes in IT-related content, with a focus on data recovery, file backup, disk management, and other technical topics. She is committed to delivering clear, accurate, and practical solutions to help users resolve common computer issues.
User Comments :