Why You Need to Securely Wipe an External Hard Drive
Wiping a disk is a process that completely removes all data on a disk, rendering it unrecoverable through traditional or professional data recovery techniques, usually for data security and privacy reasons. For example, when you plan to throw away or sell a used external hard drive, erasing the disk can ensure that the files on it are permanently deleted to prevent personal files or work information from being leaked. In addition, wiping the disk may be to free up disk space. Although most users generally choose to delete files or format partitions to clear disk space, some users prefer to wipe the disk directly.
In conclusion, wiping your hard drive is an important security measure to ensure that your data is not at risk of being compromised. In the next part, we will describe how to wipe a hard drive Windows 11/10/8/7.
How to Wipe an External Hard Drive for Reuse
Method 1. Clean an External Hard Drive Using CMD
The easiest way to clean an external disk is to use the Windows built-in diskpart tool. The steps are as follows.
Before you do, connect your external hard drive to your PC with a USB cable.
Step 1. Type cmd in the Windows search box and select the Run as administrator option from the right panel.
Step 2. Type the following command lines, and press Enter after each command.
- diskpart
- list disk
- select disk # (# represents the external hard drive number)
- clean all

Method 2. Wipe an External Hard Drive With MiniTool Partition Wizard
If the diskpart “clean all” command line is not working or you receive an error message saying “DiskPart has encountered an error”, you can choose to wipe the external hard disk with the help of MiniTool Partition Wizard. It is a powerful partition management software that can help erase disks and perform other disk management operations such as disk formatting, disk cloning, disk conversion, disk error checking, etc.
Now, connect the external hard drive to your computer and start disk erasure.
Step 1. Download, install, and launch MiniTool Partition Wizard Free.
MiniTool Partition Wizard FreeClick to Download100%Clean & Safe
Step 2. Select the external hard drive and then click the Wipe Disk option from the left menu bar.
Step 3. In the new window, select a wiping method and click OK.
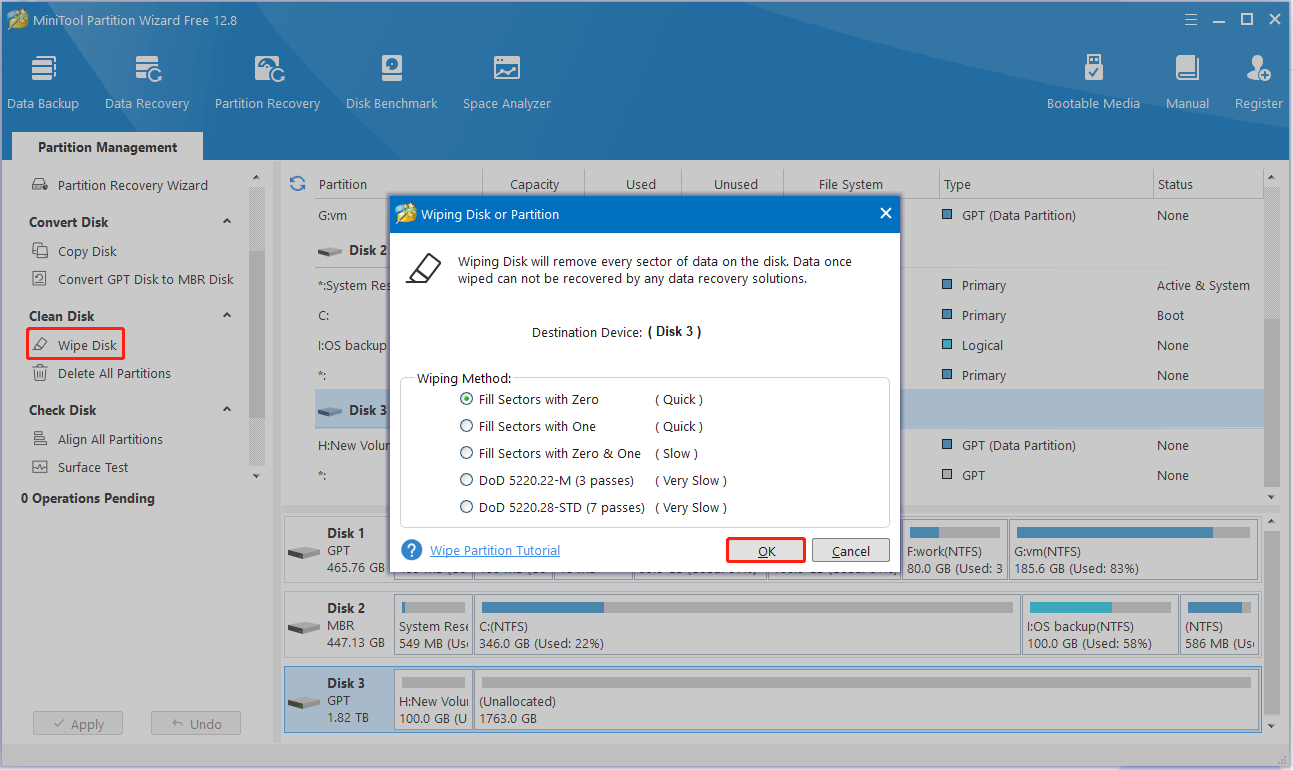
Step 4. Click the Apply button located in the lower left corner to start wiping the disk.
Method 3. Erase an External Disk via MiniTool System Booster
Alternatively, you can opt to wipe an external hard drive with MiniTool System Booster. It is the best PC tune-up software to help you wipe hard drives, speed up the CPU/RAM, repair system issues, clean junk files, and so on.
MiniTool System Booster provides you with a trial edition that allows you to enjoy its features within 15 days for free.
MiniTool System Booster TrialClick to Download100%Clean & Safe
How to wipe an external hard drive with this software? Keep reading.
Step 1. Make sure the external hard drive is connected to your computer.
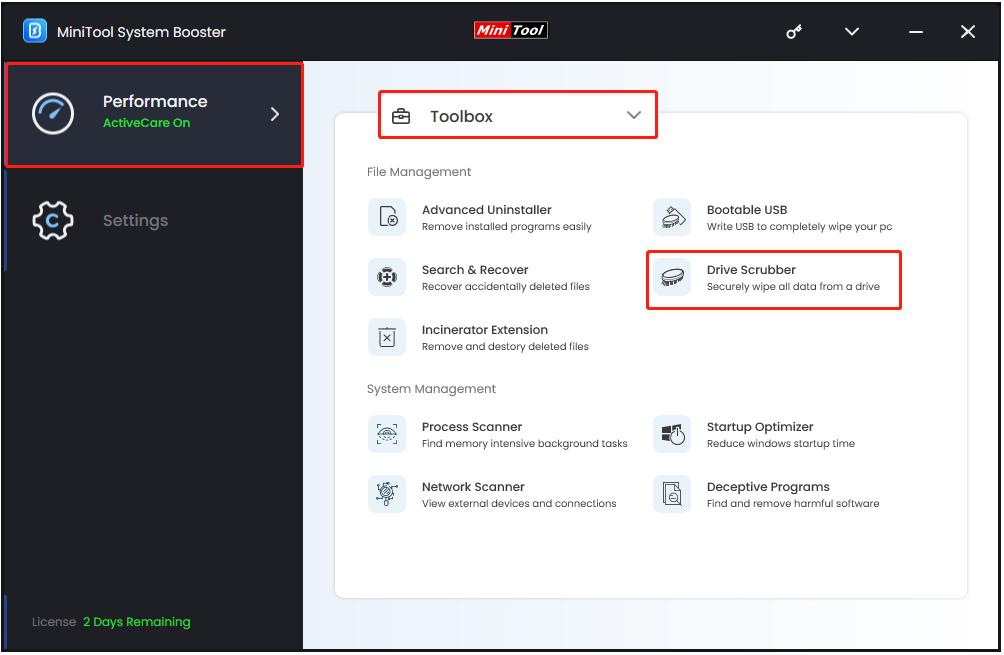
Step 2. Launch MiniTool System Booster to enter its main interface. In the Performance section, select the Toolbox option from the drop-down menu. After that, click the Drive Scrubber option to continue.
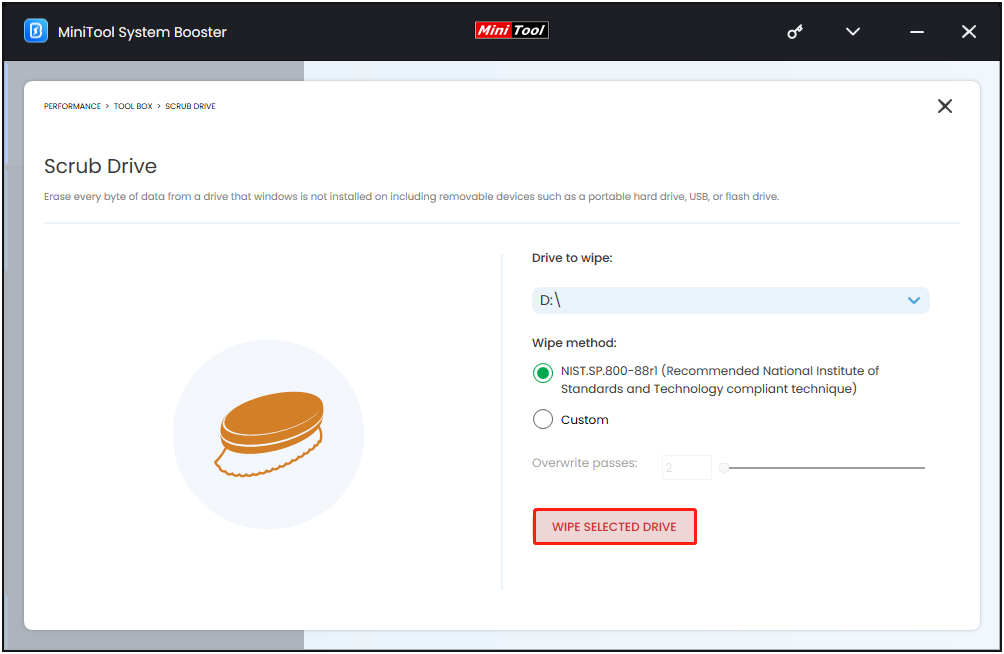
Step 3. Select the drive you’d like to wipe and select a wiping method. After that, click the WIPE SELECTED DRIVE button.
MiniTool Power Data Recovery FreeClick to Download100%Clean & Safe
Wrapping Things Up
All in all, this article introduces multiple approaches to assist you in wiping an external hard disk.
Please feel free to contact [email protected] if you encounter any issues while using MiniTool software.
About The Author

Position: Columnist
Shirley holds a bachelor’s degree in English and has been an editor at the MiniTool Team for many years. She specializes in IT-related content, with a focus on data recovery, file backup, disk management, and other technical topics. She is committed to delivering clear, accurate, and practical solutions to help users resolve common computer issues.
User Comments :