The best free data recovery software for Windows:
MiniTool Power Data Recovery is designed to recover data from different drives including both internal hard drives and external hard drives, SD cards, memory cards, USB flash drives, etc.
MiniTool Power Data Recovery FreeClick to Download100%Clean & Safe
What Is Real-Time Protection in Windows?
Windows Security (previously known as Microsoft Defender Antivirus) is a Windows snap-in antivirus tool that can help you prevent your computer and data from being attacked by unwanted viruses, ransomware, spyware, rootkits, and other forms of malware and hackers.
When the real-time protection is turned on, Windows Security will keep monitoring your computer and blocking what it considers a threat. This is good, but there are also conflicts: some safe tasks are considered unsafe elements and the tasks are blocked.
For example, real-time protection may prevent you from opening a file or downloading a file, or installing an app. In such a situation, you can choose to temporarily turn off real-time protection in Virus & threat protection in Windows Security. After finishing your task, you can turn this feature back on.
Now, we will introduce how to disable or enable real-time protection on your Windows computer.
How to Turn off Real-Time Protection on Windows 10/11?
Way 1: Disable real-time protection in Windows Security
You can use these steps to turn off or turn on real-time protection in Windows Security:
Step 1: Click the search icon and search for Windows Security. Then select Windows Security to open it.
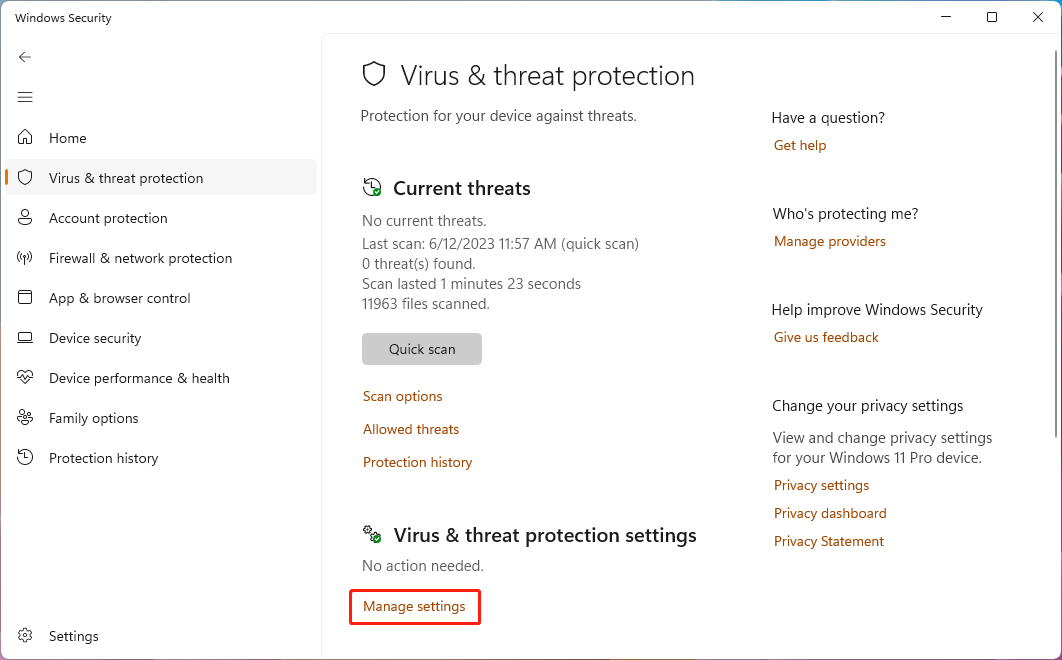
Step 2: Select Virus & threat protection from the left menu.
Step 3: Click Manage settings under Virus & threat protection settings.
Step 4: Turn off the button for Real-time protection. If you see the User Account Control interface, click the Yes button to continue.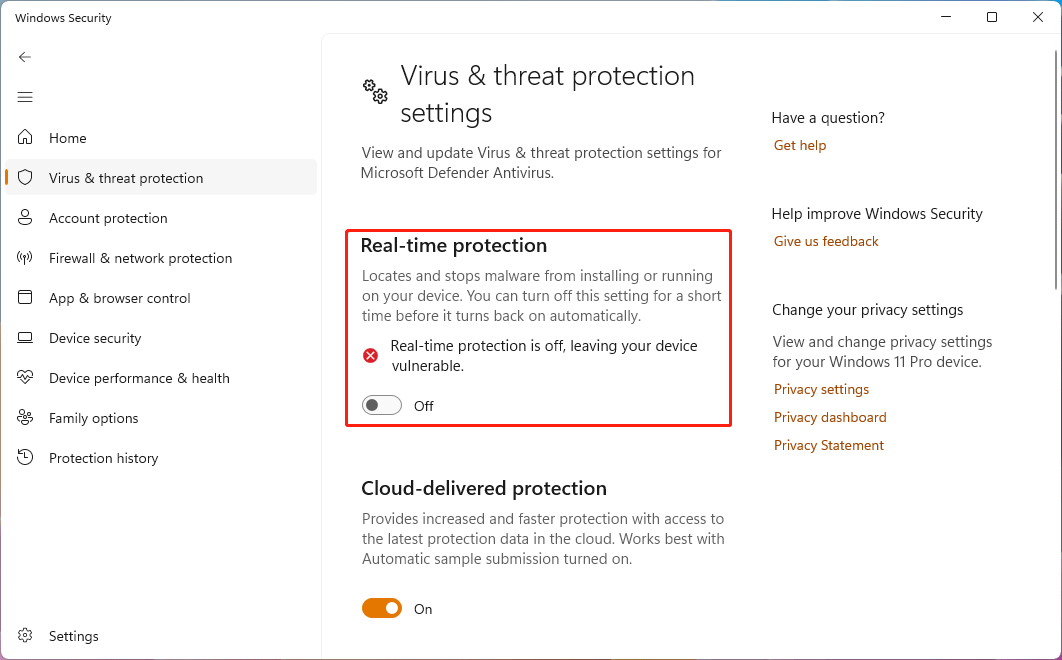
Now, real-time protection is disabled in Windows Security. You can continue your task. After that, you can turn on the button for real-time protection in step 4 to enable real-time protection.
Way 2: Disable real-time protection using PowerShell
You can also use PowerShell to enable or disable real-time protection. But there is one more thing you should note:
Tamper Protection in Windows Security can shield any operation from outside of Windows Security to modify the inner settings. But you can temporarily disable Tamper Protection by going to Windows Security > Virus & threat protection > Manage settings> turn off the button for Tamper Protection.
Then, you can use these steps to turn off real-time protection with PowerShell:
Step 1: Search for PowerShell using Windows Search, then right-click Windows PowerShell (this is under the best match) and click Run as administrator.
Step 2: Type the following command into PowerShell and press Enter:
Set-MpPreference -DisableRealtimeMonitoring $true
After these steps, real-time protection will be disabled until the next time you restart the device or run the following command in PowerShell to enable real-time protection:
Set-MpPreference -DisableRealtimeMonitoring $false
Bottom Line
You see it is very easy to disable or enable real-time protection on your Windows 10 or Windows 11 computer. You can select one of these two ways to help you complete the tasks blocked by real-time protection.
Besides, if you want to recover deleted files on a PC, don’t hesitate to try MiniTool Power Data Recovery.
MiniTool Power Data Recovery FreeClick to Download100%Clean & Safe
Should you have any questions related to MiniTool software, you can contact us via [email protected].
About The Author

Position: Columnist
Stella has been working in MiniTool Software as an English Editor for more than 8 years. Her articles mainly cover the fields of data recovery including storage media data recovery, phone data recovery, and photo recovery, videos download, partition management, and video & audio format conversions.
User Comments :